NotificationX cung cấp cho bạn khả năng tương thích hoàn toàn với Plugin dịch đa ngôn ngữ WordPress phổ biến nhất WPML. Nó cho phép bạn dịch NotificationX nội dung giao diện người dùng sang bất kỳ ngôn ngữ nào và áp dụng nó cho trang web đa ngôn ngữ của bạn. Làm theo hướng dẫn từng bước dưới đây để dịch chuỗi và giao diện người dùng NotificationX bằng WPML.
Làm thế nào để định cấu hình cài đặt plugin WPML? #
Để dịch NotificationX bằng WPML, trước tiên, hãy cài đặt và kích hoạt các plugin sau trên trang WordPress của bạn; WPML CMS đa ngôn ngữ và Bản dịch chuỗi WPML. You can check out this Tài liệu WPML to configure it on your WordPress site for more information.

After installing these plugins on your WordPress website, go to ‘WPML’→ ‘Setup’ from your dashboard and select the current language and the language you want to translate to. For instance, we are selecting the ‘German’ language to translate our website.

Follow the on-screen instructions in the WPML Setup wizard and add your site key. Select the site URL format from the three options to choose from. Click on the ‘Continue’ button for the next step

Enter the site key from your WPML account. After that, click on the ‘Continue’ button to proceed to the next step.

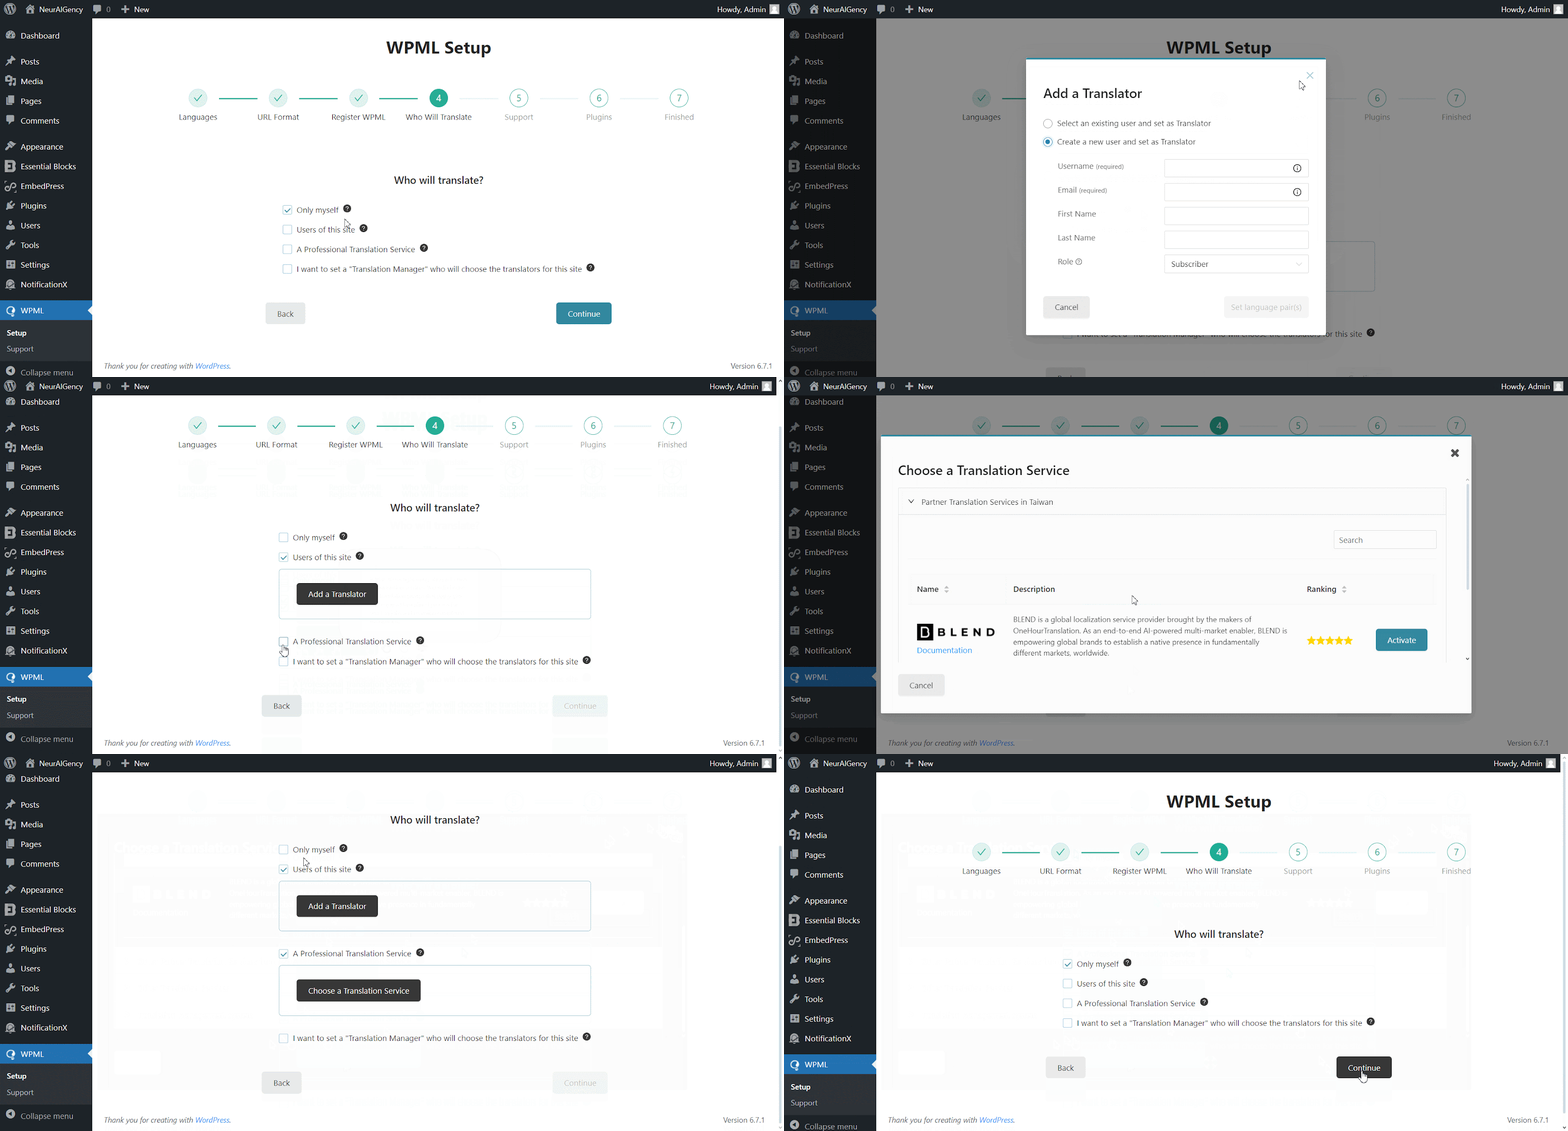
You will be asked how you want to translate your website. You have Four options: ‘Only myself’ to translate solely by yourself, ‘Users of this site’ to set up a team of translators from your WordPress site, ‘A Professional Translation Service’ to select one service from over 70 translation services options integrated with WPML, to assign a user of your site as ‘Translation Manager’ preferred when building site for a client. Choose your preferred one and click on ‘Continue'.

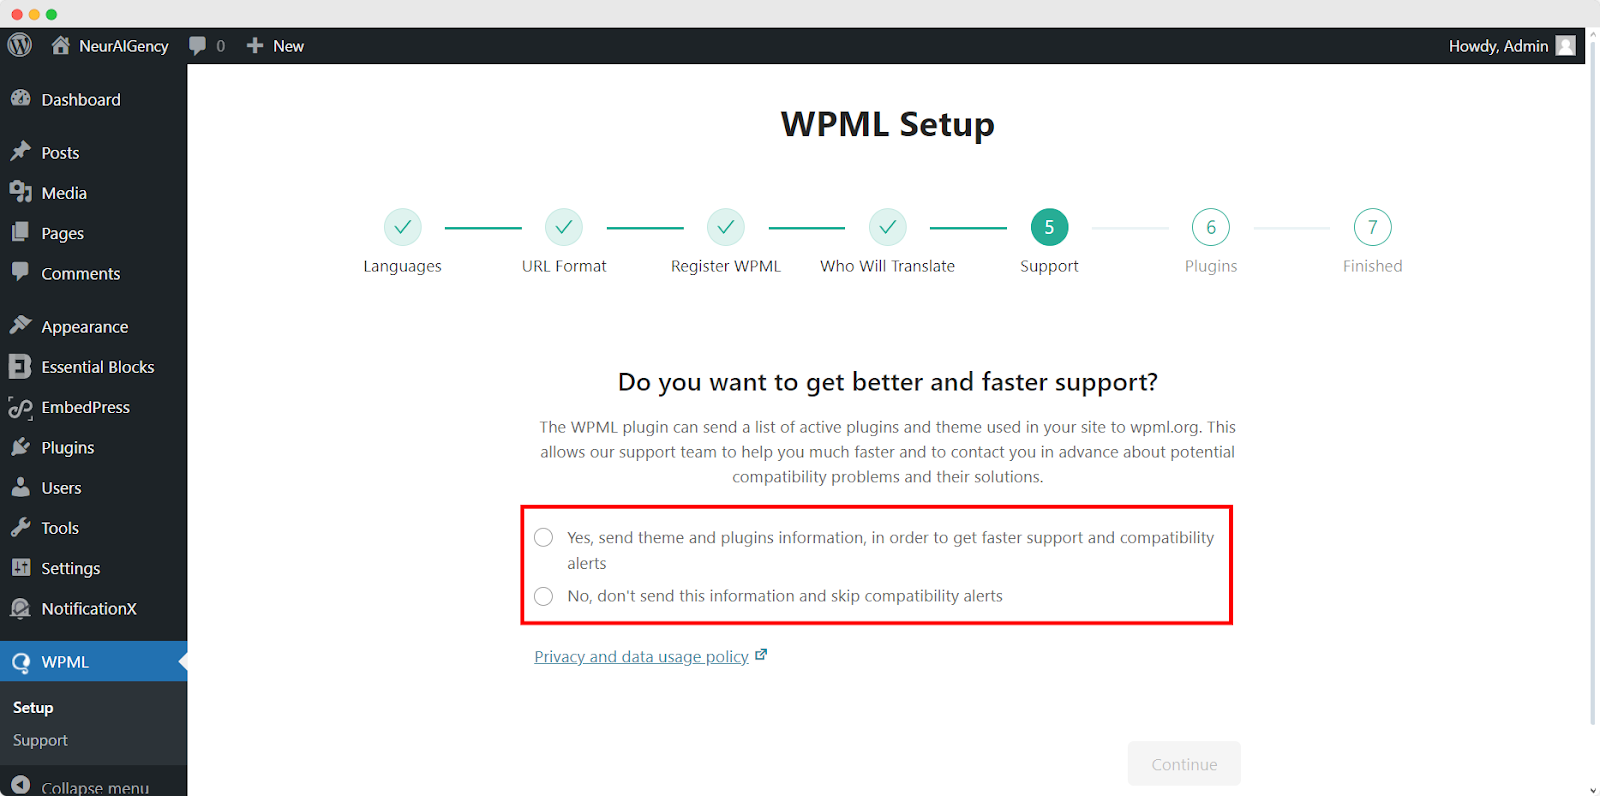
Continuing to the Support section, Choose ‘Vâng’ option to send your site theme & plugin information to WPML.org in order to get faster support and compatibility alerts or ‘No’ option skip sending the information. After choosing one option click ‘Continue'.

For the Plugin sections, follow the prompted instructions according to your needs. After configuring the WPML with selected options, it will automatically complete the setup.
This is how your plugin can be configured the way you want to translate your website.

How To Use The WPML Automatic Translation Option? #
NotificationX và CHUYÊN NGHIỆP NotificationX các plugin tương thích với WPML’s automatic translation feature. In the Translation Management section of the WPML plugin dashboard, you can access this advanced feature. With this, you can automatically translate your website’s content, including NotificationX alerts. Simply toggle the “Translate Everything Automatically’ button to enable it. You can also select a review option for each translation. You will have the option to change it later from the WPML Settings option.
Ghi chú: You can enable Translate Everything Automatically after sending some content for translation.

After that, go to ‘WPML’ ⮕ ‘Languages’ to change the default language, add or remove the translation language for the NotificationX plugin.

Làm thế nào để dịch chuỗi giao diện quản trị của bạn bằng WPML? #
Bản dịch chuỗi WPML goes beyond regular WPML translation. It lets you translate all alerts, including the plugin elements of NotificationX, for a multilingual WordPress site.
Navigate to ‘WPML’→’Theme and plugin localization’ from your WordPress dashboard. Select the ‘NotificationX’ and ‘NotificationX PRO’ plugins and hit the ‘Scan selected components for strings' cái nút.

After you have scanned all the strings on your plugin, now you can navigate to ‘WPML’ → ‘String Translation’ để dịch bất kỳ chuỗi nào bạn muốn. Bạn có thể tìm kiếm chuỗi bạn muốn dịch. Đây có thể là bất kỳ chuỗi nào từ giao diện người dùng.

Bằng cách nhấp vào '+' icon, you can choose the language you want to translate the string to. After that, you can manually add the translation to the text.
For example, for this doc, we are translating NotificationX strings to the German language. Hit the '+' và viết phiên bản đã dịch của chuỗi vào trường nhập. Bạn có thể lưu bản dịch bằng cách nhấn nút enter.

Finally, you can go to the NotificationX interface and check the translated string from the dashboard.

Nếu bạn muốn dịch các trường đầu vào NotificationX, chỉ cần đảm bảo chọn ‘admin_texts_notificationx’ domain from ‘WPML’ → ‘String Translation’ và chỉ cần làm theo quy trình tương tự được đề cập ở trên.

Làm thế nào để dịch các cảnh báo thông báo bằng NotificationX? #
Chỉ cần điều hướng đến Tất cả NotificationX from your NotificationX Dashboard and select the three-dot action option on a Notification type you want to translate. Here, you will find the translate option. Clicking on this icon will take you to the WPML String settings so you can translate the string as you want.

Một cửa sổ mới sẽ được hiển thị, được gọi là ‘String Translation,’ where you will find the string you want to translate. Click on the ‘+’ button to add a translation for the string.

Now, to translate NotificationX, you can click on the ‘+’ icon to translate the string and paste your translated text in the box. Click 'Đi vào' để áp dụng bản dịch. Bản dịch của bạn đã được lưu thành công.

Bây giờ hãy truy cập trang web trực tiếp và cuộn xuống để xem tất cả các ngôn ngữ bạn đã thiết lập để dịch. Đối với tài liệu này, chúng tôi đã dịch 'Nhận xét' cảnh báo sang tiếng Đức. Bấm vào biểu tượng ngôn ngữ và cảnh báo bình luận của bạn sẽ được dịch tự động.

How To Translate The Notification Bar Built With Elementor? #
If you have made a notification bar with Elementor, you can translate it too. Go to ‘All NotificationX’ from the dashboard and click the three dots on the one you want to translate. Then, click the ‘Translate’ icon to open WPML’s String Management settings.

From the new window, select the notification bar and click on the “Add Note for translator” button to add information for your alerts translation.

Now navigate to String Translation again and add translation of the each section of the notification bar build with Elementor. click on the ‘+’ icon to translate the string and paste your translated text in the box. Click 'Đi vào' để áp dụng bản dịch. Bản dịch của bạn đã được lưu thành công.

Go to your live website and change the language. Your Thanh NotificationX được xây dựng với Elementor sẽ được dịch thành công.

Bây giờ, nếu bạn truy cập trang web trực tiếp của mình, bạn có thể xem bản dịch của thanh thông báo một cách dễ dàng bằng cách chuyển đổi ngôn ngữ bằng plugin dịch đa ngôn ngữ WPML với NotificationX.
This is how easily you can translate NotificationX interface, comments and notification bar using the WPML plugin.Getting Stuck? Feel free to contact our đội hỗ trợ tận tâm để được hỗ trợ và truy vấn thêm.


