
Google Analytics là một trong những nền tảng phân tích khách truy cập web phổ biến nhất hiện có. NotificationX cho phép bạn kết nối tài khoản Google Analytics của mình và cho phép bạn hiển thị tổng số khách truy cập trang web hoặc khách truy cập trang web theo thời gian thực được tính là một cảnh báo thông báo hấp dẫn trên trang web của bạn.
Cách định cấu hình cài đặt API Google Analytics với NotificationX #
Trước khi bạn bắt đầu, hãy đảm bảo rằng bạn có Tài sản Google Analytics và đã chèn Thẻ trang web Google trên trang web WordPress của bạn.
Cách chèn thẻ trang web Google trên trang web WordPress của bạn #
Bạn có thể bỏ qua bước này nếu bạn đã chèn Thẻ trang web của Google trên trang web WordPress của mình. Để làm như vậy, trước hết, bạn cần phải đăng nhập vào tài khoản Google Analytics của bạn. Sau đó, đi đến cài đặt Quản trị viên bạn sẽ tìm thấy ở phía dưới bên trái bảng điều khiển của mình.

Từ Bảng điều khiển quản trị viên, bạn cần đảm bảo rằng bạn đã tạo 'Bất động sản'. Nếu bạn chưa có Tài sản, bạn có thể làm theo tài liệu này để kiểm tra cách bạn có thể thiết lập Tài sản trong Google Analytics.

Sau đó, đi đến 'Cài đặt tài sản' và đảm bảo rằng bạn đã chèn 'Tiêu đề tài sản' và 'URL mặc định' mà bạn muốn theo dõi cùng với thông tin khác.

Từ 'Thông tin theo dõi' phần, bạn có thể thu thập Thẻ trang web của Google và sao chép nó.

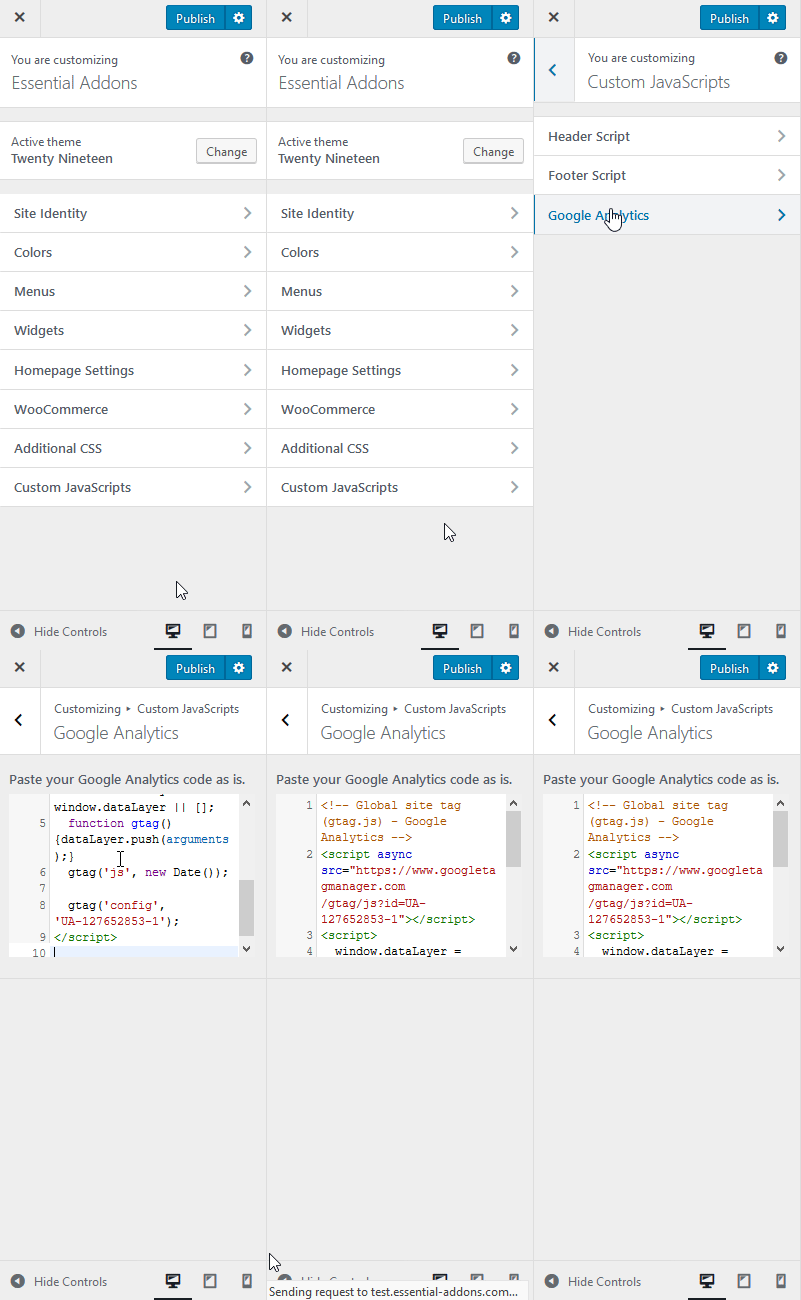
Sau đó, truy cập trang web WordPress của bạn và điều hướng đến wp-admin -> Ngoại hình -> Tùy biến. Tìm 'JavaScript tùy chỉnh' phần. Từ đó, bạn sẽ tìm thấy 'Google Analytics' Lựa chọn. Chỉ cần dán Mã theo dõi bạn đã sao chép ở bước trước và nhấp vào 'Công bố'. Trang web của bạn bây giờ sẽ được kết nối với Google Analytics.
#
Cách kết nối NotificationX với Google Analytics #
Có hai cách bạn có thể kết nối NotificationX với Google Analytics. Bạn có thể sử dụng Ứng dụng Google của riêng mình hoặc dùng thử Ứng dụng do NotificaitonX xác định.
Cách định cấu hình bằng ứng dụng Google được xác định trước #
Chuyển đến Bảng điều khiển WordPress của bạn và điều hướng đến wp-admin -> NotificationX -> Cài đặt -> Tích hợp API. Sau đó, mở 'Cài đặt Google Analytics' chuyển hướng. Tại đây, bạn có thể kết nối tài khoản Google Analytics của mình với ứng dụng Google được xác định trước của chúng tôi bằng cách chỉ cần nhấp vào 'Kết nối tài khoản của bạn' cái nút.

Sau đó, bạn sẽ được chuyển hướng đến một trang nơi bạn phải chọn tài khoản Google Analytics của mình. Chọn tài khoản của bạn từ đây.

Sau đó, bạn sẽ được chuyển hướng đến một trang như dưới đây. Lưu ý rằng, ứng dụng này đang được Google xác minh và đó là lý do tại sao bạn sẽ có thông báo này. Sau khi hoàn tất xác minh, bạn sẽ không nhận được thông báo này nữa. Nhấn vào 'Nâng cao'và sau đó nhấp vào'Truy cập notifyx.com‘

Sau đó, bạn sẽ được chuyển hướng đến một trang và một cửa sổ bật lên như bên dưới sẽ xuất hiện. Chỉ cần nhấp vào 'Cho phép' cái nút.

Sau đó, bạn sẽ được chuyển hướng đến trang sau. Ở đây, bạn phải đánh dấu tùy chọn 'Xem dữ liệu Google Analytics của bạn'(mặc dù được cho là được đánh dấu theo mặc định) và sau đó nhấp vào nút' Cho phép '

Sau đó, bạn sẽ được chuyển hướng đến bảng điều khiển WordPress của bạn về cài đặt NotificationX và sau đó chọn dự án bạn muốn từ tùy chọn thả xuống và bạn cũng có thể xác định khoảng thời gian sau khi NotificationX sẽ đi và kiểm tra số lượng khách truy cập mới nhất của bạn từ 'Thời lượng bộ nhớ cache' cài đặt. Sau khi thực hiện thành công, bạn sẽ hoàn tất cài đặt và sau đó nhấp vào nút 'Lưu'.

Cách định cấu hình bằng cách tạo ứng dụng Google của riêng bạn #
Bạn cũng có thể tạo ứng dụng Google của riêng mình và kết nối tài khoản Analytics của mình với điều đó và để làm điều này, chỉ cần nhấp vào 'Cài đặt ngay' cái nút.

Sau khi nhấp vào nút 'Cài đặt ngay', bạn sẽ có một biểu mẫu như bên dưới:

Trong mẫu này, bạn phải đặt ID khách hàng và Bí mật khách hàng. Để có được những thông tin đăng nhập này, bạn phải truy cập Tài khoản Google Cloud Console và tạo dự án trước tiên. Bấm vào đây và bạn sẽ được chuyển hướng đến trang sau.

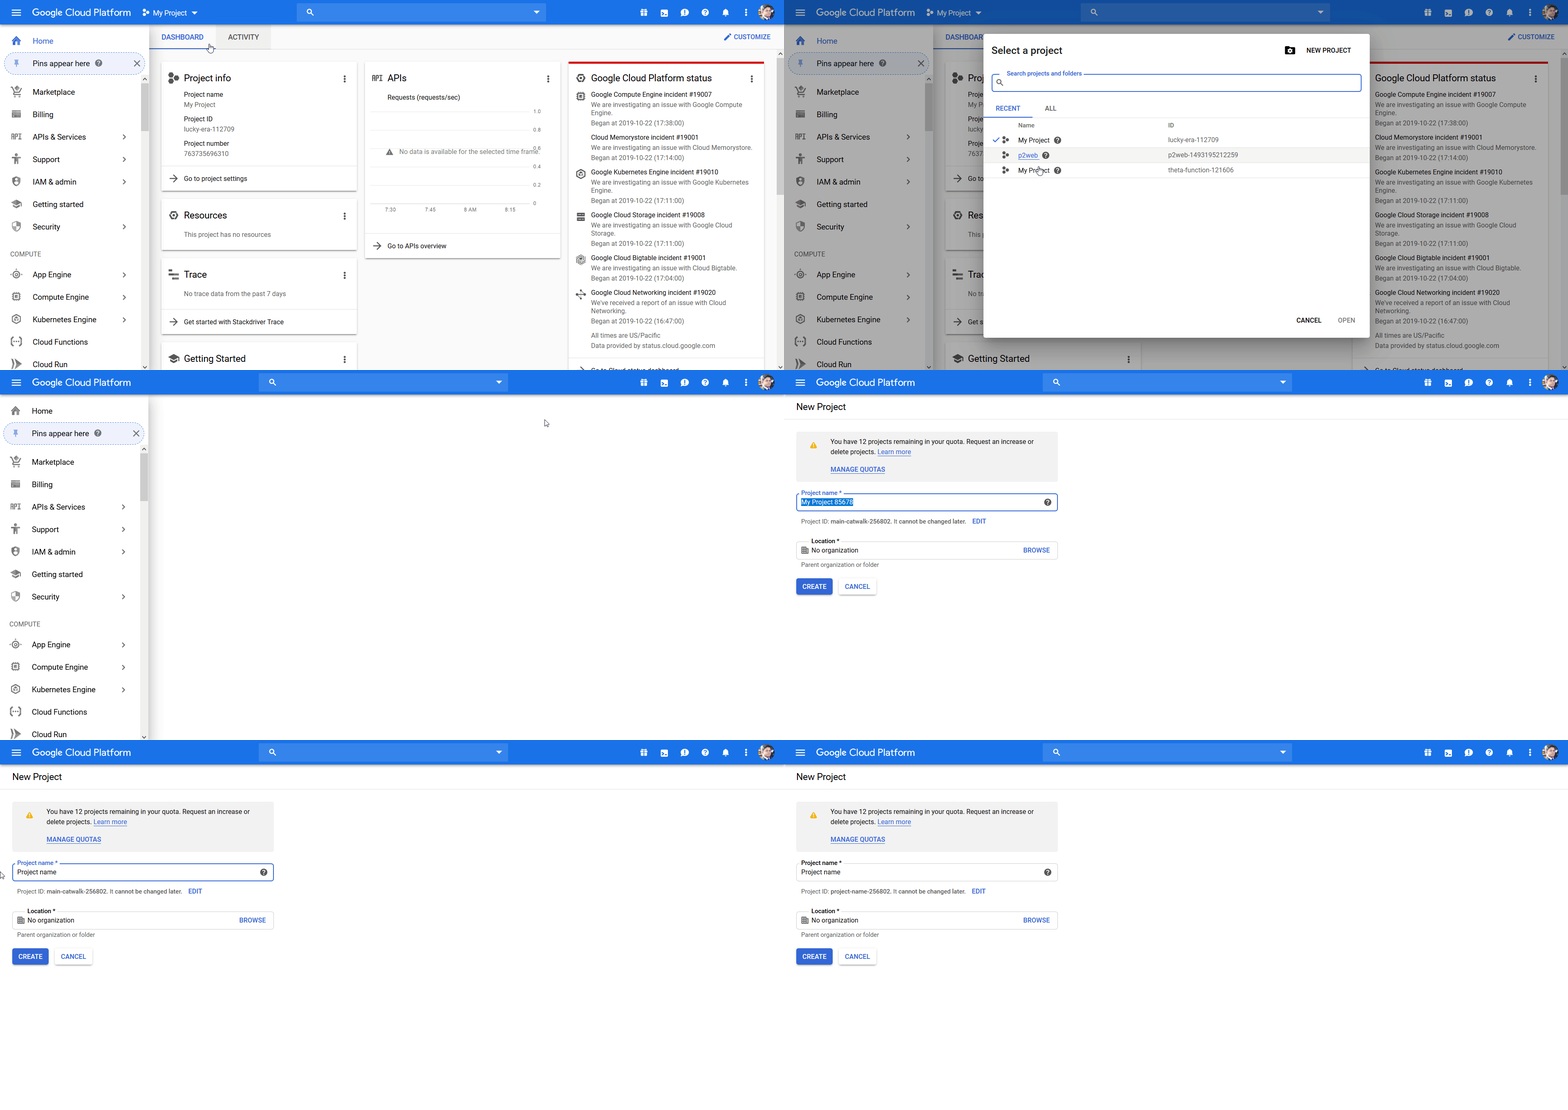
Bây giờ bạn phải chọn dự án của bạn. Nếu bạn không có thì bạn phải tạo một cái mới bằng cách làm theo các bước dưới đây:
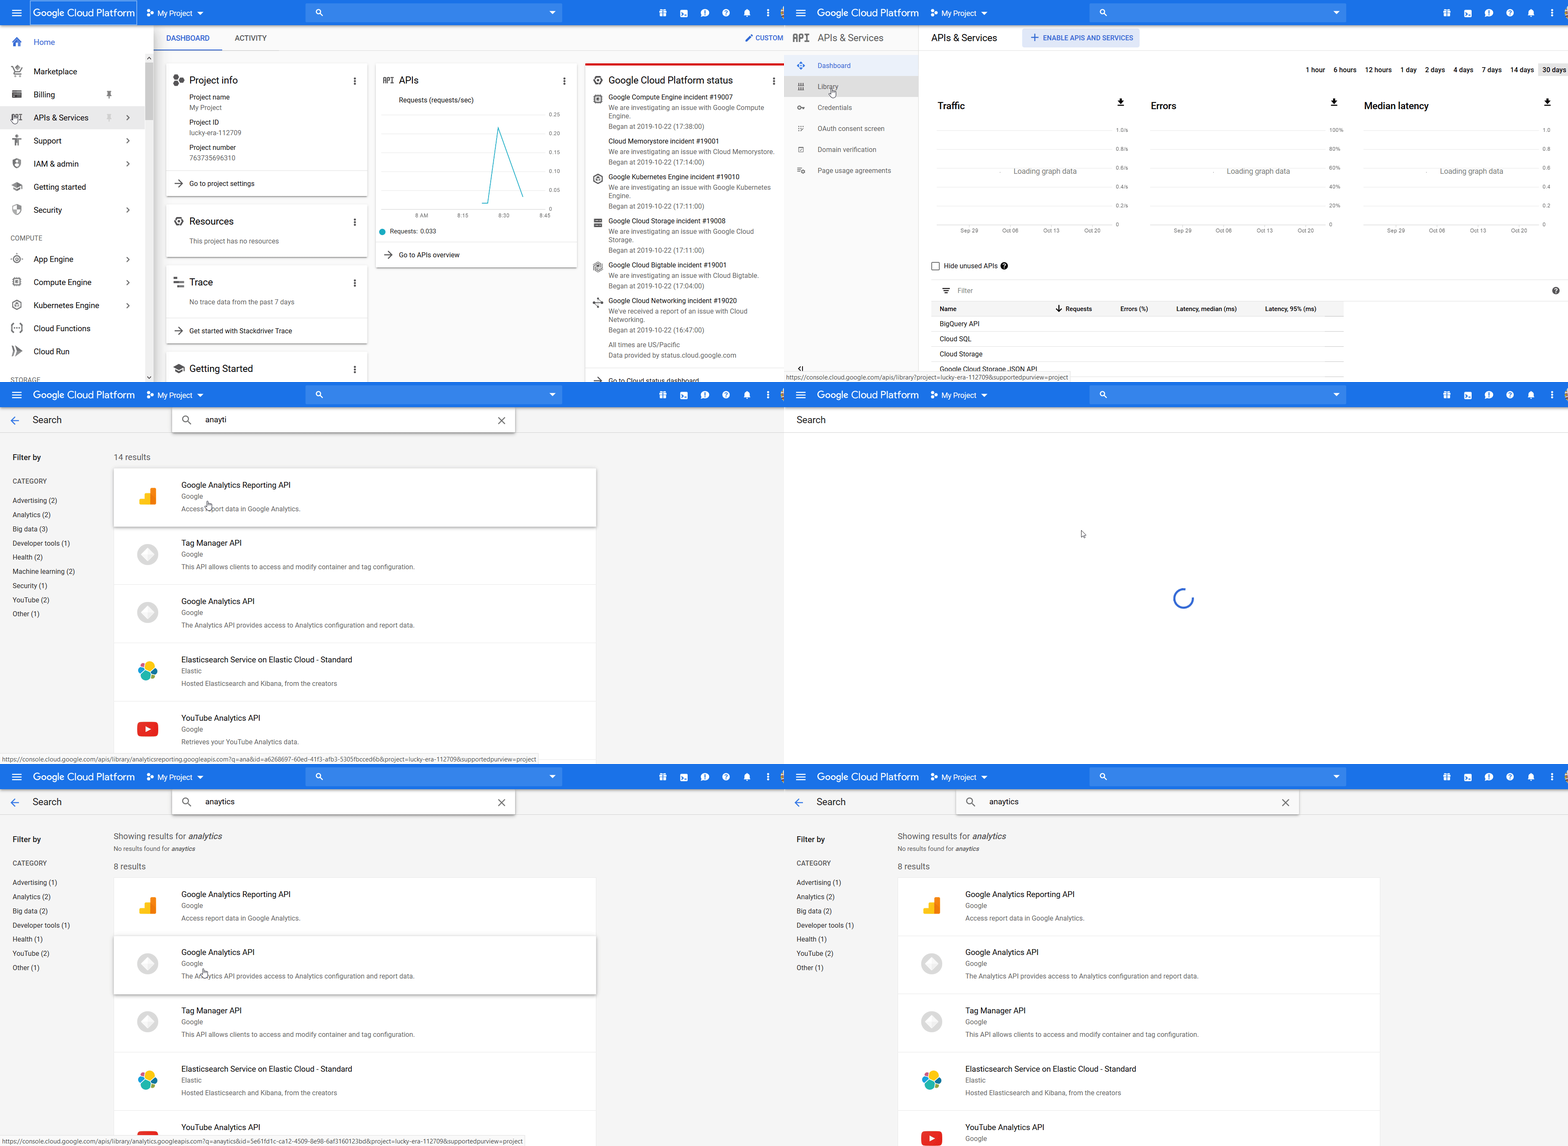
Sau đó, bạn phải Bật API báo cáo Google Analytics, thư viện API Google Analytics, API quản trị Google Analytics và API dữ liệu Google Analytics. Từ trang tổng quan của Google Cloud Platform, hãy chuyển đến API và dịch vụ >> Thư viện. Bây giờ tại trang thư viện API, hãy nhập 'phân tích' vào trường tìm kiếm và sau đó bạn sẽ tìm thấy các thư viện API yêu cầu của mình (API báo cáo Google Analytics, API Google Analytics, API quản trị Google Analytics và API dữ liệu Google Analytics) ở đầu tìm kiếm kết quả. Sau đó, nhập các trang thư viện này và nhấn nút Bật. Theo dõi phần trình bày trực quan dưới đây:
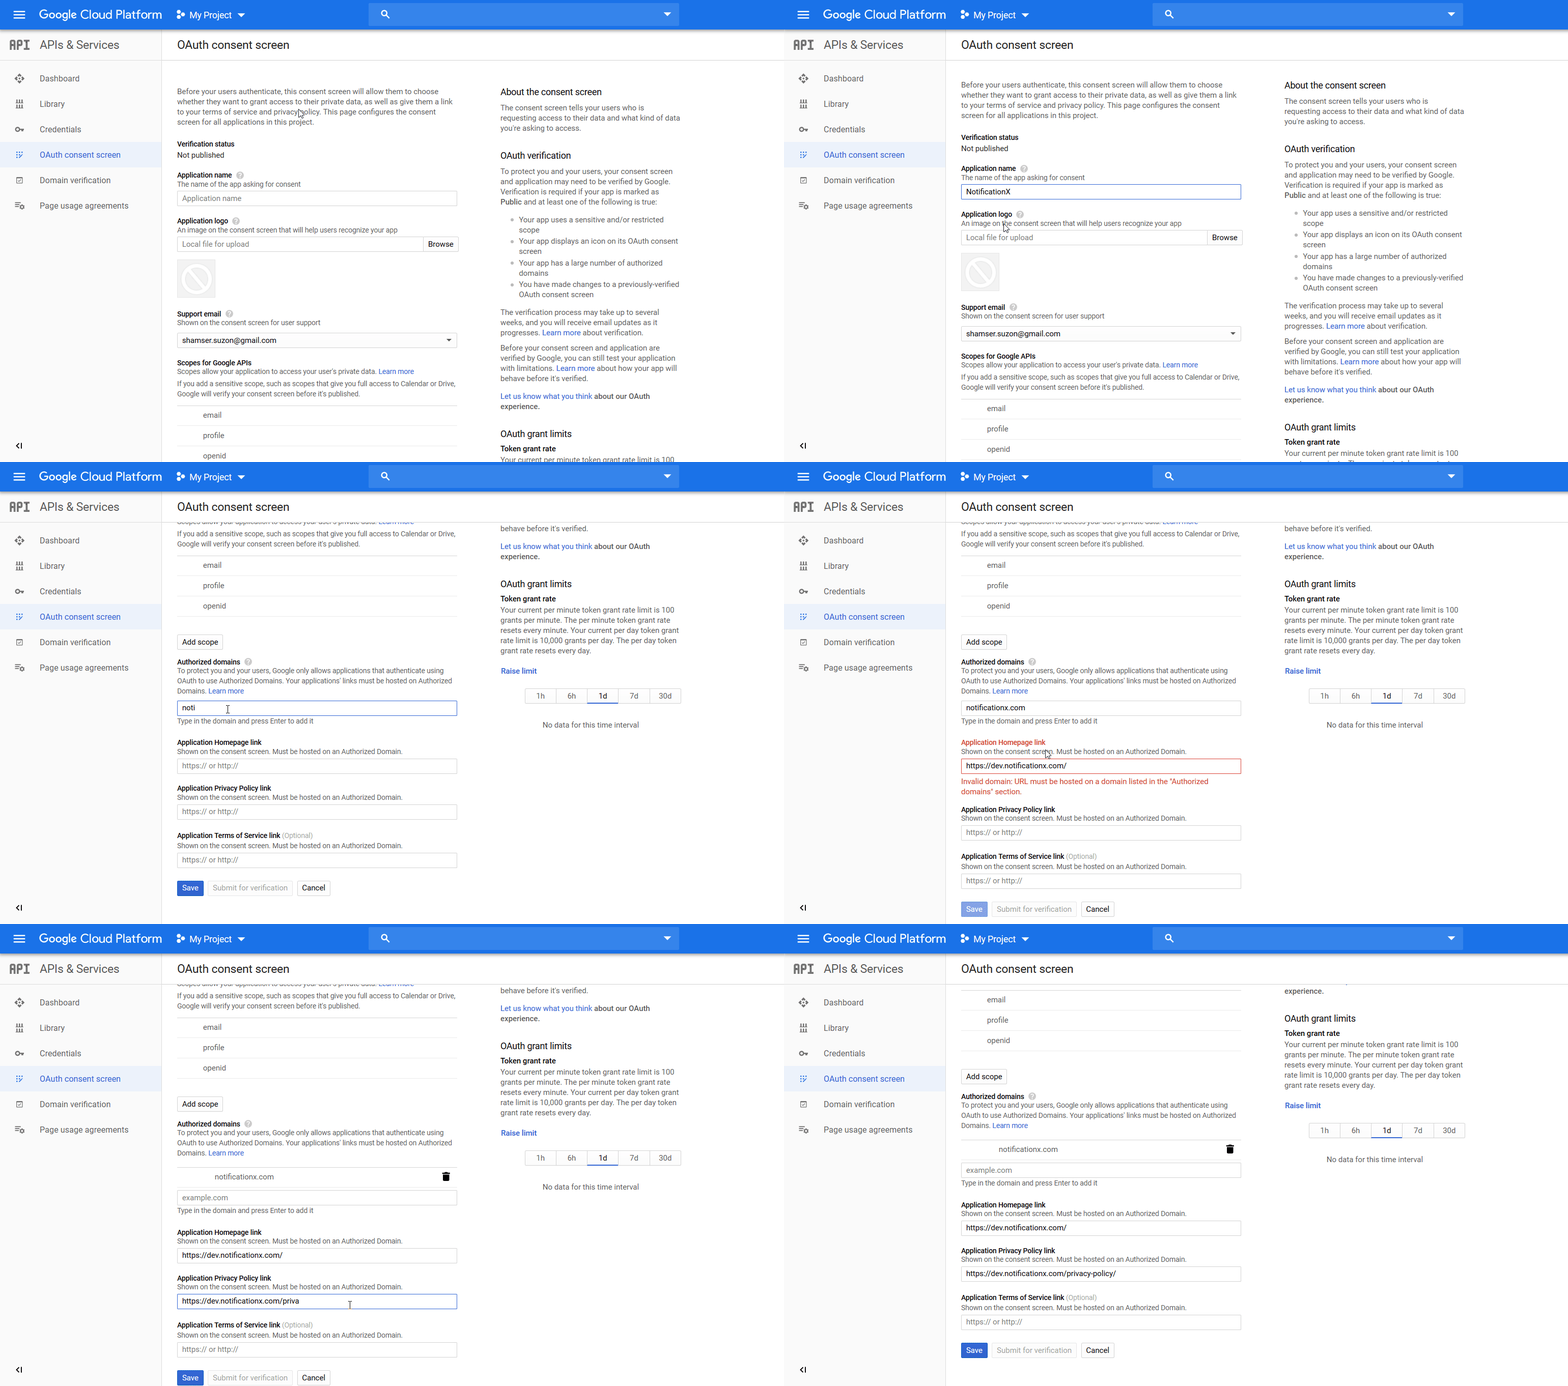
Bây giờ, bạn phải thiết lập 'Màn hình đồng ý của OAuth'. Để thực hiện việc này, từ bảng điều khiển Google Cloud của bạn, hãy đi đến API và dịch vụ >> Màn hình đồng ý của OAuth. Tại trang 'Màn hình đồng ý OAuth', bạn phải điền vào một số trường như 'Tên ứng dụng'- Đặt tên cho ứng dụng google của bạn ở đây theo mong muốn của bạn. Sau đó 'Hỗ trợ email'- Theo mặc định, địa chỉ email của bạn sẽ được chọn ở đây. Sau đó 'Miền ủy quyền'- Tại đây, cung cấp URL của trang web của bạn nơi bạn đang thiết lập NotificationX. Sau đó 'Liên kết trang chủ ứng dụng'- Cung cấp URL trang chủ của trang web của bạn nơi bạn đang thiết lập NotificationX. Sau đó 'Liên kết chính sách bảo mật ứng dụng'- Cung cấp URL trang chính sách bảo mật của trang web của bạn ở đây. Nếu bạn không có thì hãy tạo trước. Sau khi điền vào tất cả các trường này, sau đó nhấp vào 'Tiết kiệmNút 'và bạn đã hoàn tất! Xin vui lòng, kiểm tra trình bày trực quan dưới đây:
Sau khi nhấp vào nút 'Lưu' tại trang 'Màn hình đồng ý OAuth', bạn sẽ được chuyển hướng đến 'Thông tin xác thực' trang. Tại đây, bạn sẽ tìm thấy một tùy chọn thả xuống là 'Tạo thông tin đăng nhập'. Nhấp vào trường thả xuống này và chọn 'ID khách hàng OAuth'từ các tùy chọn và sau đó bạn sẽ được chuyển hướng đến trang' Tạo ID khách OAuth '. Tại đây, bạn sẽ tìm thấy một số tùy chọn trong nút radio bên dưới 'Loại ứng dụng' phần. Chỉ cần nhấp vào 'Ứng dụng web'. Sau đó, một số lĩnh vực sẽ xuất hiện. Bạn chỉ phải điền 2 trường vào đây 'Tên' và 'URI chuyển hướng được ủy quyền'. Trong trường 'Tên', bạn có thể cung cấp mọi thứ theo mong muốn của bạn và trong 'Trường URI chuyển hướng được ủy quyền, bạn phải sao chép URI từ trang cài đặt API NotificationX của bạn. Sau đó chỉ cần nhấp vào 'Tạo nên' cái nút. Xin vui lòng, kiểm tra trình bày trực quan dưới đây để hiểu rõ hơn:
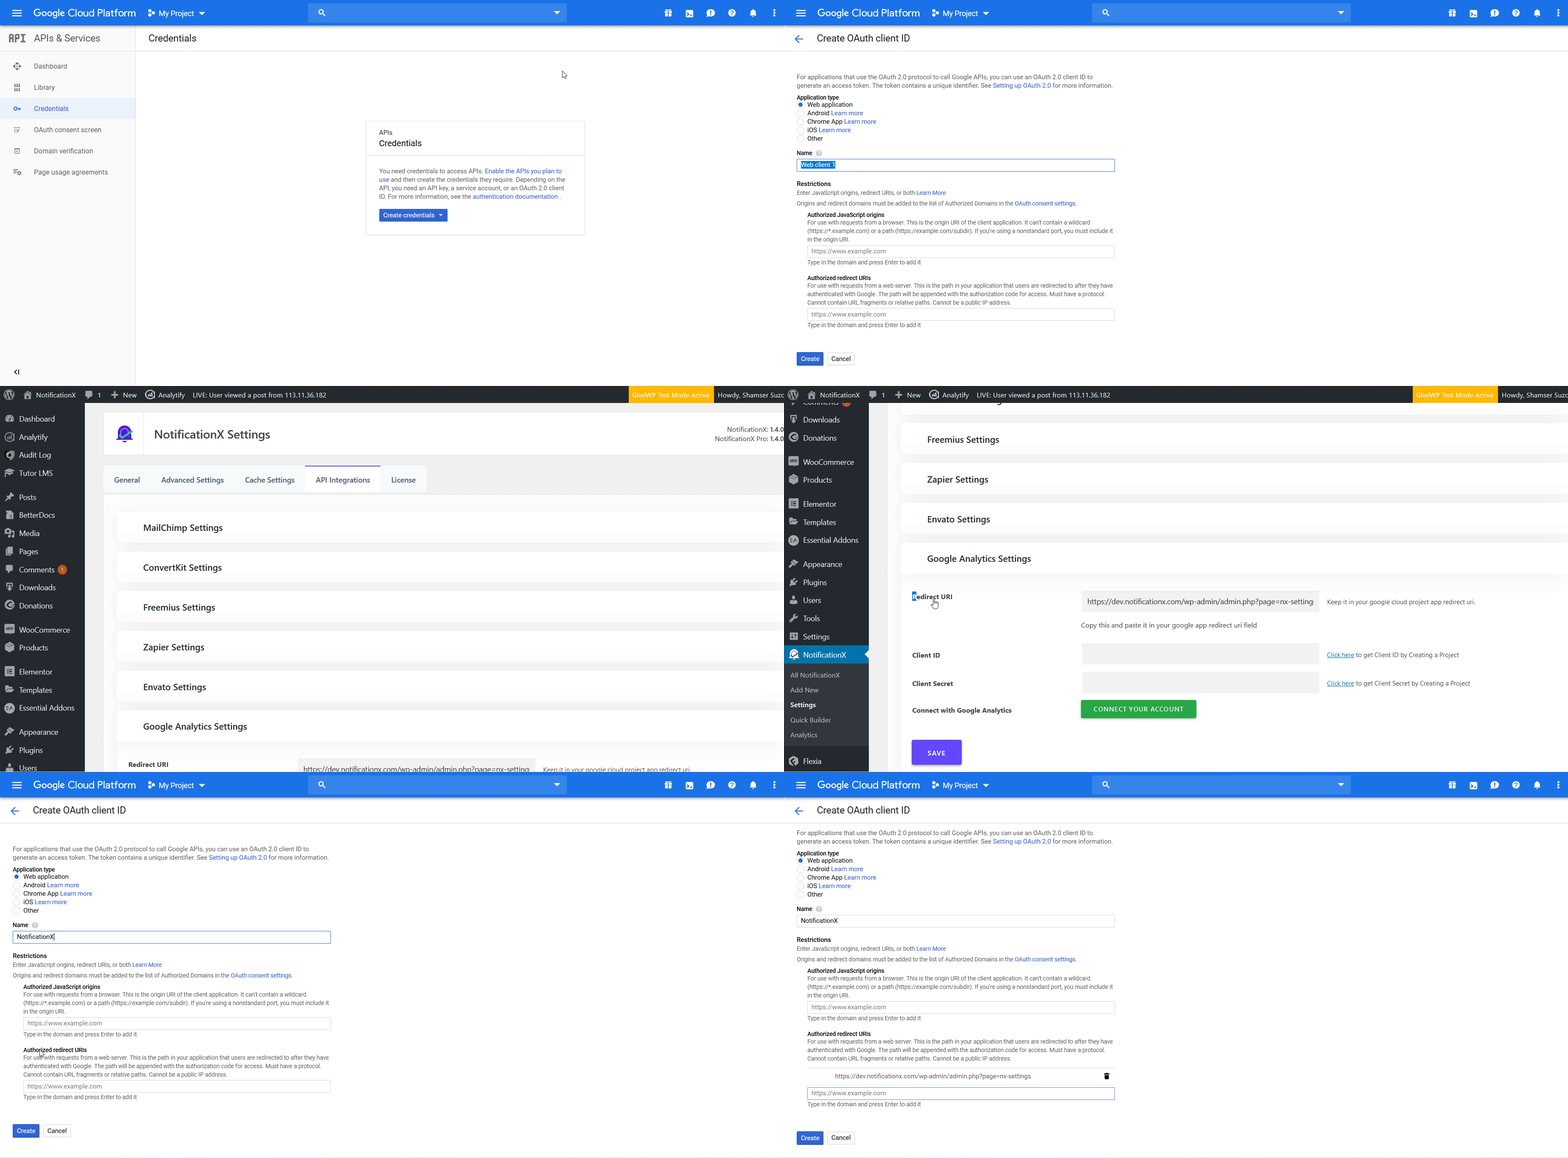
Sau đó, bạn sẽ được chuyển hướng đến trang 'Thông tin xác thực' một lần nữa và một cửa sổ bật lên sẽ xuất hiện trước mặt bạn, nơi bạn sẽ nhận được 'ID khách hàng'và'Bí mật khách hàng' dữ liệu. Chỉ cần sao chép cả hai thứ này và dán chúng vào các trường tương ứng của chúng trong các trường cài đặt API NotificationX của bạn và nhấn 'Kết nối tài khoản của bạn' cái nút. Sau đó, chỉ cần nhấp vào 'Tiết kiệmNút 'để hoàn thành quá trình.

Sau khi nhấp vào nút 'Kết nối tài khoản của bạn', bạn sẽ được chuyển hướng đến một trang nơi bạn phải chọn tài khoản Google Analytics của mình. Chọn tài khoản của bạn từ đây.
Sau đó, bạn sẽ được chuyển hướng đến một trang như dưới đây. Lưu ý rằng, ứng dụng này đang được Google xác minh và đó là lý do tại sao bạn sẽ có thông báo này. Sau khi hoàn tất xác minh, bạn sẽ không nhận được thông báo này nữa. Nhấn vào 'Nâng cao'và sau đó nhấp vào'Truy cập notifyx.com‘
Sau đó, bạn sẽ được chuyển hướng đến một trang và một cửa sổ bật lên như bên dưới sẽ xuất hiện. Chỉ cần nhấp vào 'Cho phép' cái nút.
Sau đó, bạn sẽ được chuyển hướng đến trang sau. Ở đây, bạn phải đánh dấu tùy chọn 'Xem dữ liệu Google Analytics của bạn'(mặc dù được cho là được đánh dấu theo mặc định) và sau đó nhấp vào nút' Cho phép '
Sau đó, bạn sẽ được chuyển hướng đến bảng điều khiển WordPress của bạn về cài đặt NotificationX và sau đó chọn dự án bạn muốn từ tùy chọn thả xuống và bạn cũng có thể xác định khoảng thời gian sau khi NotificationX sẽ đi và kiểm tra số lượng khách truy cập mới nhất của bạn từ 'Thời lượng bộ nhớ cache' cài đặt. Sau khi thực hiện thành công, bạn sẽ hoàn tất cài đặt và sau đó nhấp vào nút 'Lưu'.
Sau khi bạn hoàn thành các bước trước đó, chỉ cần thực hiện theo hướng dẫn bên dưới để hiển thị Số lượng khách truy cập Google Analytics cảnh báo bằng NotificationX.
Cách định cấu hình cảnh báo số lượng khách truy cập Google Analytics với NotificationX #
Bước 1 - Tạo Chiến dịch thông báo Google Analytics #
Chuyển đến Bảng điều khiển WordPress của bạn và điều hướng đến quản trị viên -> NotificationX -> NotificationX. Sau đó, ở trên cùng, nhấp vào 'Thêm mới‘.

Bước 2 - Chọn 'Google Analytics' làm Nguồn #
Sau khi hoàn thành bước 1, bạn sẽ được chuyển hướng đến 'Nguồn' Trang tab của NotificationX của bạn. Đơn giản chỉ cần đặt một Tiêu đề và chọn 'Phân tích trang' như loại Thông báo của bạn. Sau đó, chỉ cần chọn 'Google Analytics' làm Nguồn của bạn. Sau đó, nhấp vào nút 'Tiếp theo'.

Bước 3 - Chọn một chủ đề thiết kế #
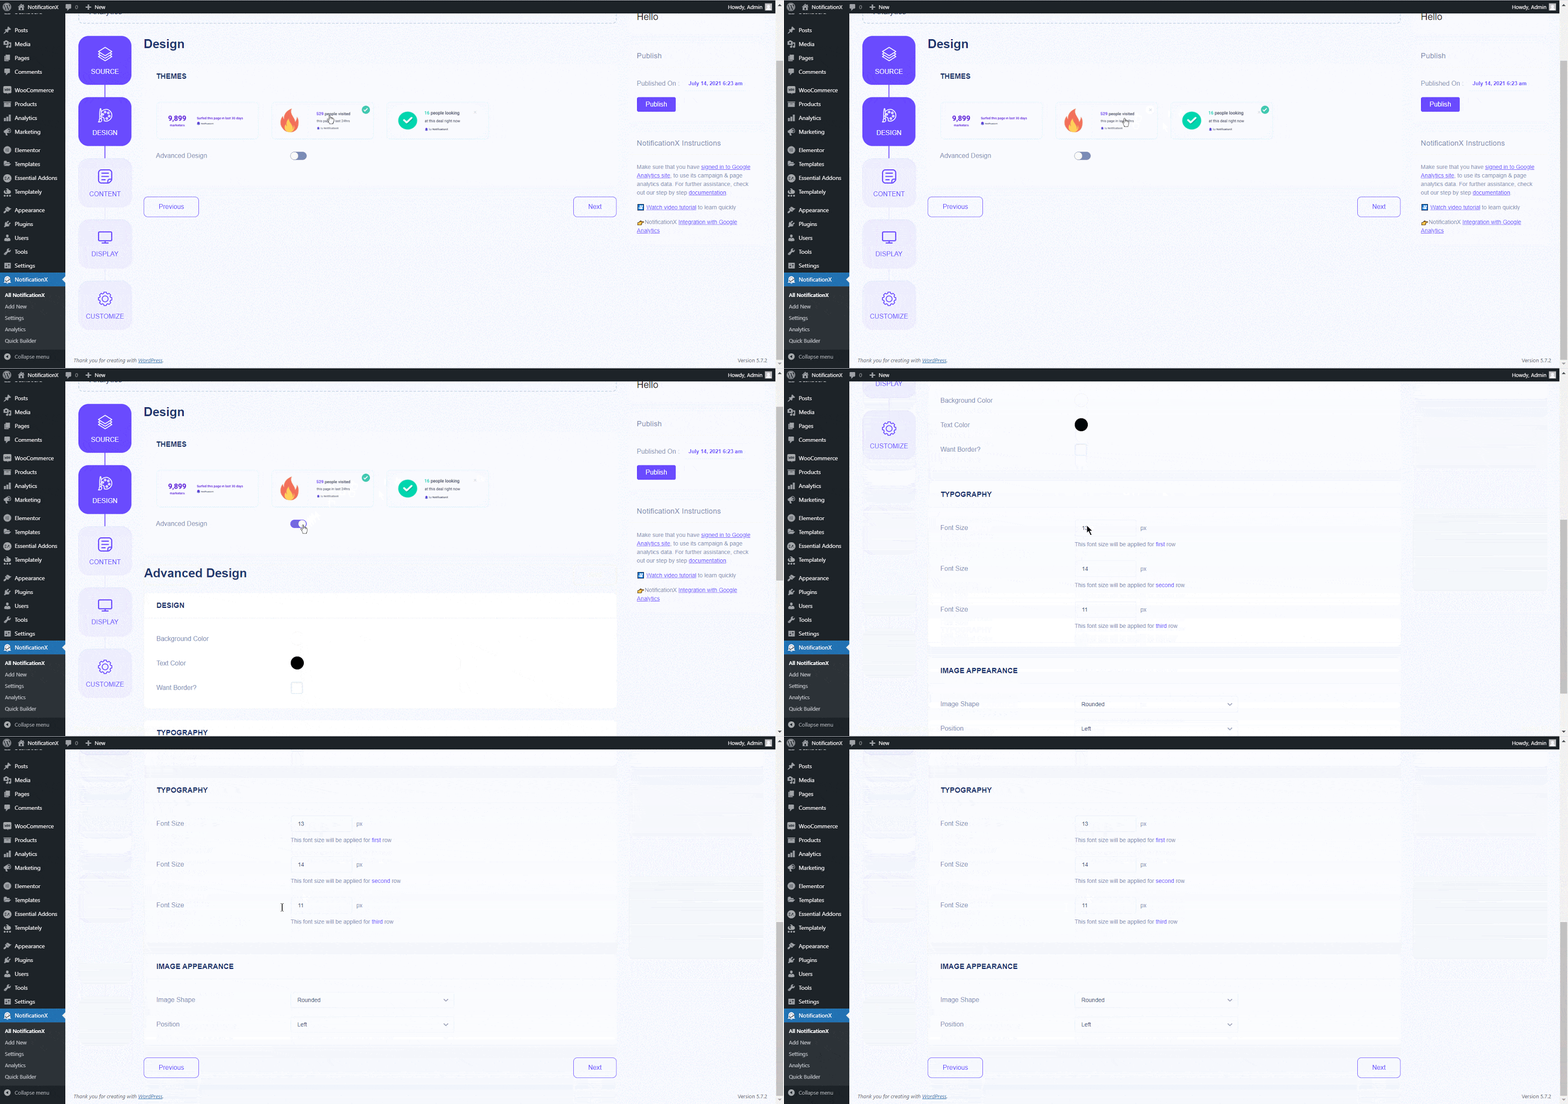
Từ 'Thiết kế' tab, bạn có thể chọn bố cục và cũng có thể linh hoạt sử dụng tùy chọn 'Thiết kế nâng cao' để tùy chỉnh bố cục theo sở thích của bạn. Từ 'Chủ đề' phần, bố cục được chọn là cách cảnh báo thông báo Số lượng khách truy cập Google Analytics sẽ được hiển thị trên trang web của bạn.
Ngoài ra, bạn có thể sửa đổi Chủ đề đã chọn bằng cách tùy chỉnh Chủ đề thông qua 'Thiết kế tiên tiến ' Lựa chọn. Từ phần này, bạn sẽ có thể dễ dàng thêm kiểu dáng vào thiết kế, hình ảnh và kiểu chữ của bạn. Bạn có thể thêm màu Nền hoặc Văn bản cho cửa sổ bật lên thông báo. Bên cạnh đó, bạn cũng có thể thêm Border và thêm kiểu dáng cho nó. Từ phần 'Kiểu chữ', bạn cũng có thể thay đổi Kích thước Phông chữ cho mỗi hàng.
Bước 4 - Cấu hình nội dung mẫu #
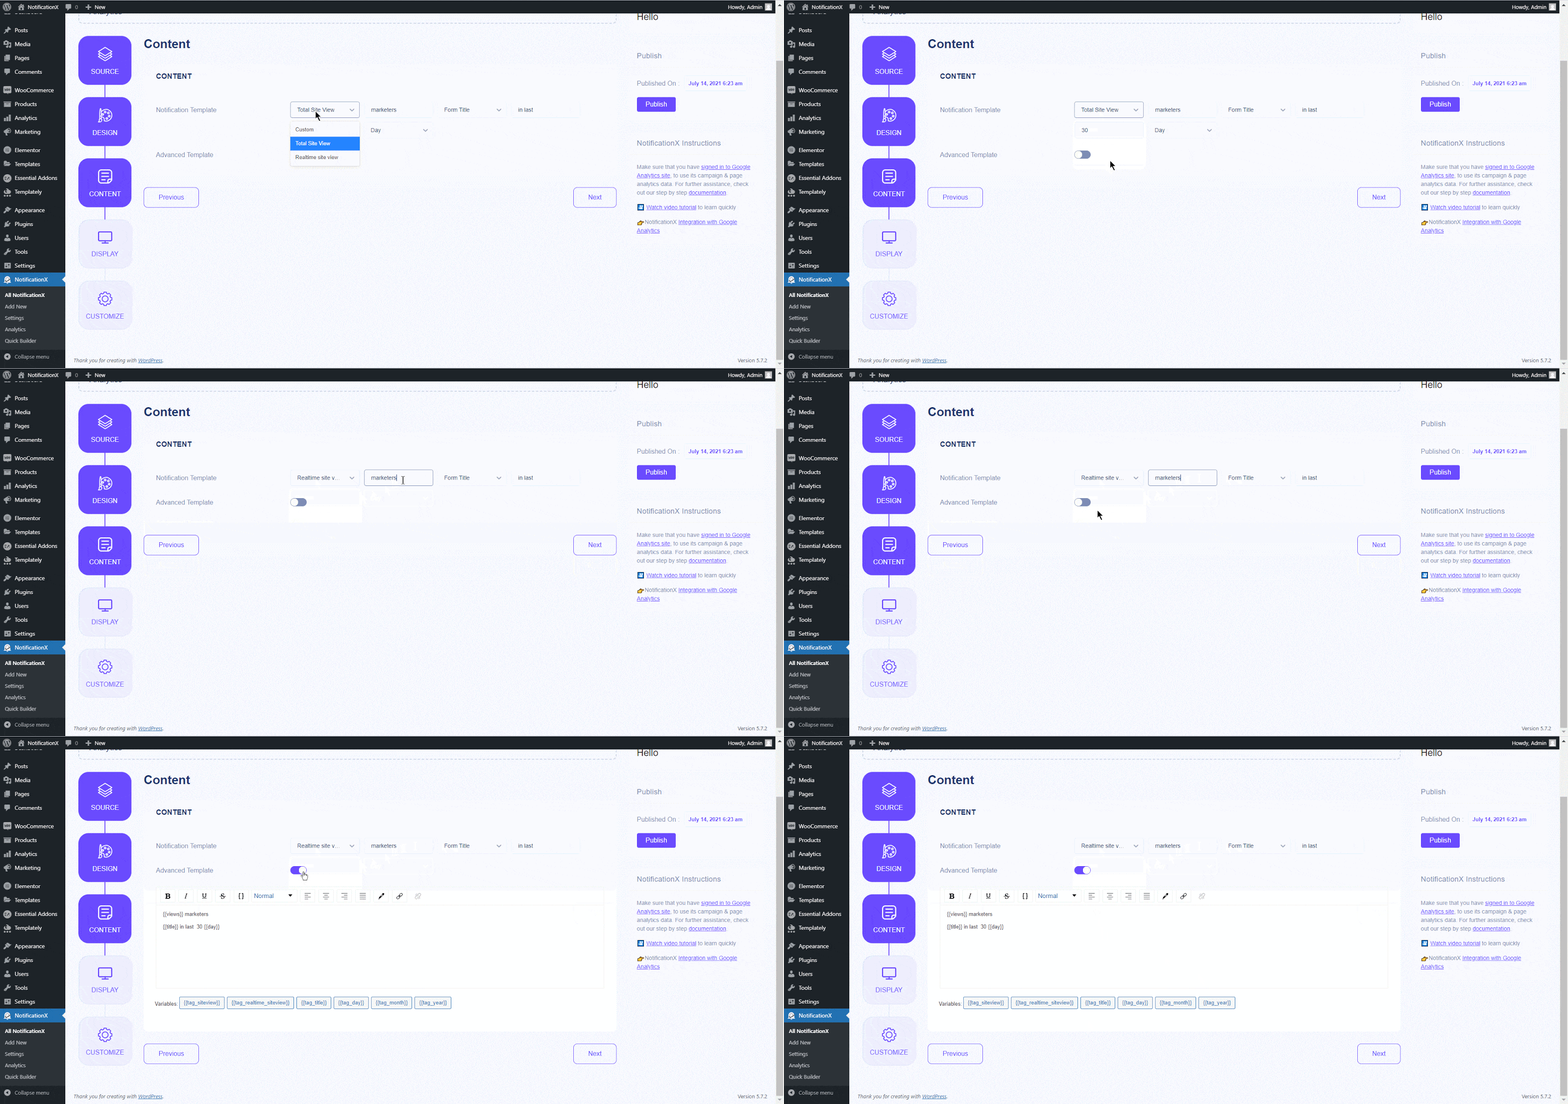
Sau đó bạn sẽ được chuyển hướng đến 'Nội dung' tab từ nơi bạn có thể sửa đổi 'Mẫu thông báo' và thêm văn bản nội dung ưa thích của bạn. Bạn có thể dễ dàng đi trước và chọn các biến ưa thích của bạn. Các biến này giúp hiển thị số lượng khách truy cập đã truy cập trang web của bạn trong một khoảng thời gian nhất định ngày / tháng / năm.
Hơn nữa, bạn thậm chí có thể theo dõi các loại chiến dịch khác nhau thông qua NotificationX. 'Kiểm soát UTM' cho phép bạn thêm 'Chiến dịch', 'Trung bình' và 'Nguồn'vào Cảnh báo số lượng khách truy cập Google Analytics của bạn.
Bước 5 - Tùy chỉnh tùy chọn hiển thị #
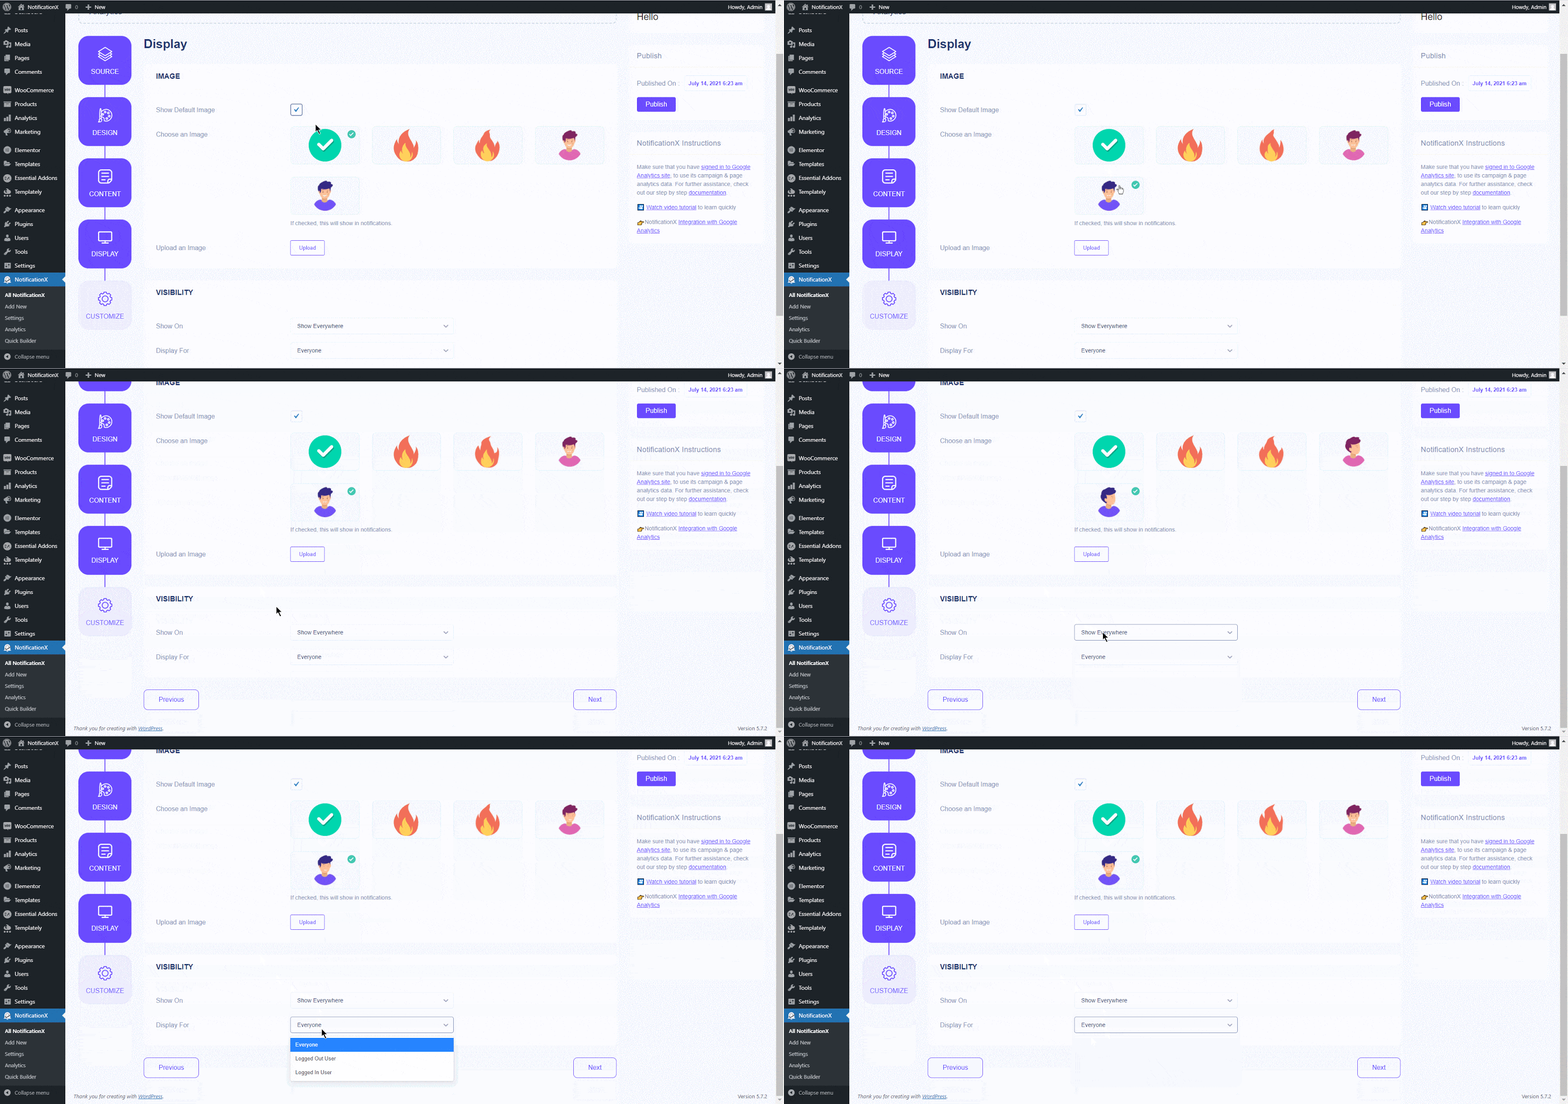
bên trong 'Trưng bày' tab, có hai phần có sẵn: 'Hình ảnh' & 'Hiển thị'. Từ phần 'Hình ảnh', bạn có thể sử dụng hộp kiểm để hiển thị hình ảnh mặc định hoặc hình đại diện trong cửa sổ bật lên thông báo. Nếu người dùng không có bất kỳ 'Gravatar' nào được đặt trong hồ sơ của họ, bạn chỉ cần hiển thị hình ảnh 'Mặc định' bằng cách chọn hộp kiểm 'Hình ảnh mặc định' và bằng cách chọn một trong số một số hình ảnh được xác định trước hoặc bằng cách tải lên một hình ảnh mặc định.
Từ 'Hiển thị' phần, bạn có thể đặt các trang mà bạn muốn hiển thị Thông báo số lượng khách truy cập Google Analytics. Bạn cũng có tùy chọn để hạn chế cửa sổ bật lên thông báo dựa trên một số vai trò người dùng nhất định: Luôn luôn, Đăng nhập & Đăng xuất. Theo mặc định, 'Show On' được đặt thành 'Hiển thị mọi nơi' kết quả là cửa sổ bật lên Đăng ký Email sẽ được hiển thị trên mỗi trang của trang web của bạn. Mặt khác, bạn cũng có thể chỉ định các trang mà bạn muốn hiển thị hoặc ẩn thông báo thông báo 'Số lượng khách truy cập Google Analytics'.
Sau khi bạn nhấp vào 'Kế tiếpnút ', bạn sẽ được chuyển hướng đến'Tùy chỉnh' Chuyển hướng.
Bước 6 - Thiết lập giao diện #
Phía dưới cái 'Tùy chỉnh' tab, bạn sẽ tìm thấy ba phần riêng biệt: Giao diện, Thời gian & Hành vi. Từ 'Xuất hiện' phần, bạn có thể đặt vị trí cho Thông báo số lượng khách truy cập Google Analytics ở phía dưới bên trái hoặc dưới cùng bên phải của trang web của bạn. Ngoài ra, bạn thậm chí có thể đặt chiều rộng tối đa cho Popup thông báo của mình. Bạn cũng có thể hiển thị 'Nút Đóng' có thể được bấm để loại bỏ cảnh báo Đăng ký Email. Hơn nữa, bạn có thể linh hoạt để ẩn 'Thông báo về số lượng khách truy cập Google Analytics' cho các thiết bị di động nếu bạn muốn là tốt.
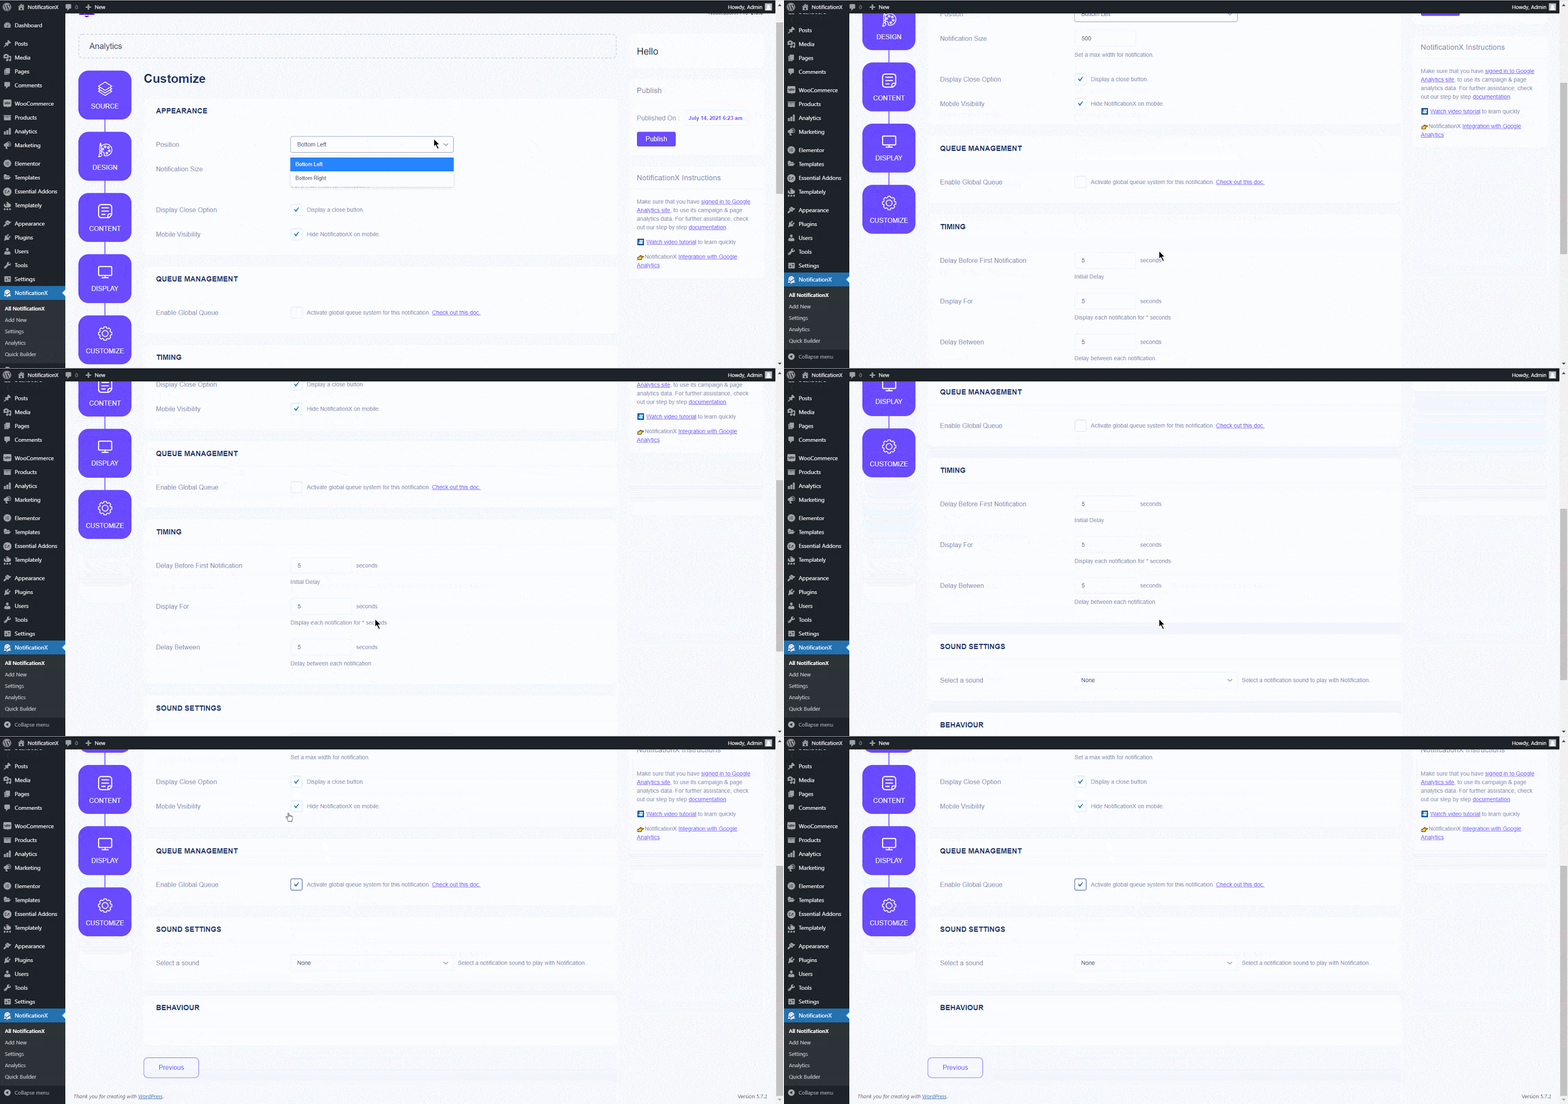
Ngoài ra, bạn cũng có quyền tự do đặt thời gian cho các tùy chọn 'Ban đầu', 'Hiển thị cho' & 'Trì hoãn giữa' theo sở thích của bạn từ "Thời gian" phần. Bạn có thể đặt thời gian ban đầu sau đó thông báo 'Thông báo về số lượng khách truy cập Google Analytics của bạn sẽ được bật lên. Theo mặc định, nó được đặt thành 5 giây.
Bạn cũng có thể đặt giới hạn thời gian cho khoảng thời gian bạn muốn mỗi cửa sổ bật lên thông báo của mình được hiển thị bằng cách sửa đổi trường 'Hiển thị cho'. Để chọn khoảng thời gian giữa hai thông báo về Thông báo số lượng khách truy cập Google Analytics, chỉ cần đặt thời gian trong trường 'Hiển thị giữa'.

Từ 'Hành vi' phần, bằng cách chọn hộp 'Thông báo vòng lặp', cửa sổ bật lên thông báo sẽ tiếp tục hiển thị. Bạn có thể vô hiệu hóa điều này là tốt. Khi khách truy cập nhấp vào cửa sổ bật lên thông báo, bạn có thể kiểm soát xem bạn muốn liên kết mở trong cửa sổ mới hay tab mới từ hộp kiểm 'Mở liên kết trong tab mới'.

Mặt khác, 'Cài đặt âm thanh' phần cho phép bạn chọn Thông báo âm thanh cho cửa sổ bật lên Số lượng khách truy cập Google Analytics của bạn. Bạn có thể kiểm soát Khối lượng của nó là tốt.

Bước 7 - Xuất bản thông báo của bạn #
Sau khi bạn hoàn thành bước 6, nhấp vào nút 'Xuất bản'. Do đó, 'Thông báo số lượng khách truy cập Google Analytics' sẽ được tạo thành công. Bằng cách làm theo các bước được đề cập này và sửa đổi & tạo kiểu thêm một chút, kết quả cuối cùng của bạn sẽ giống như thế này.
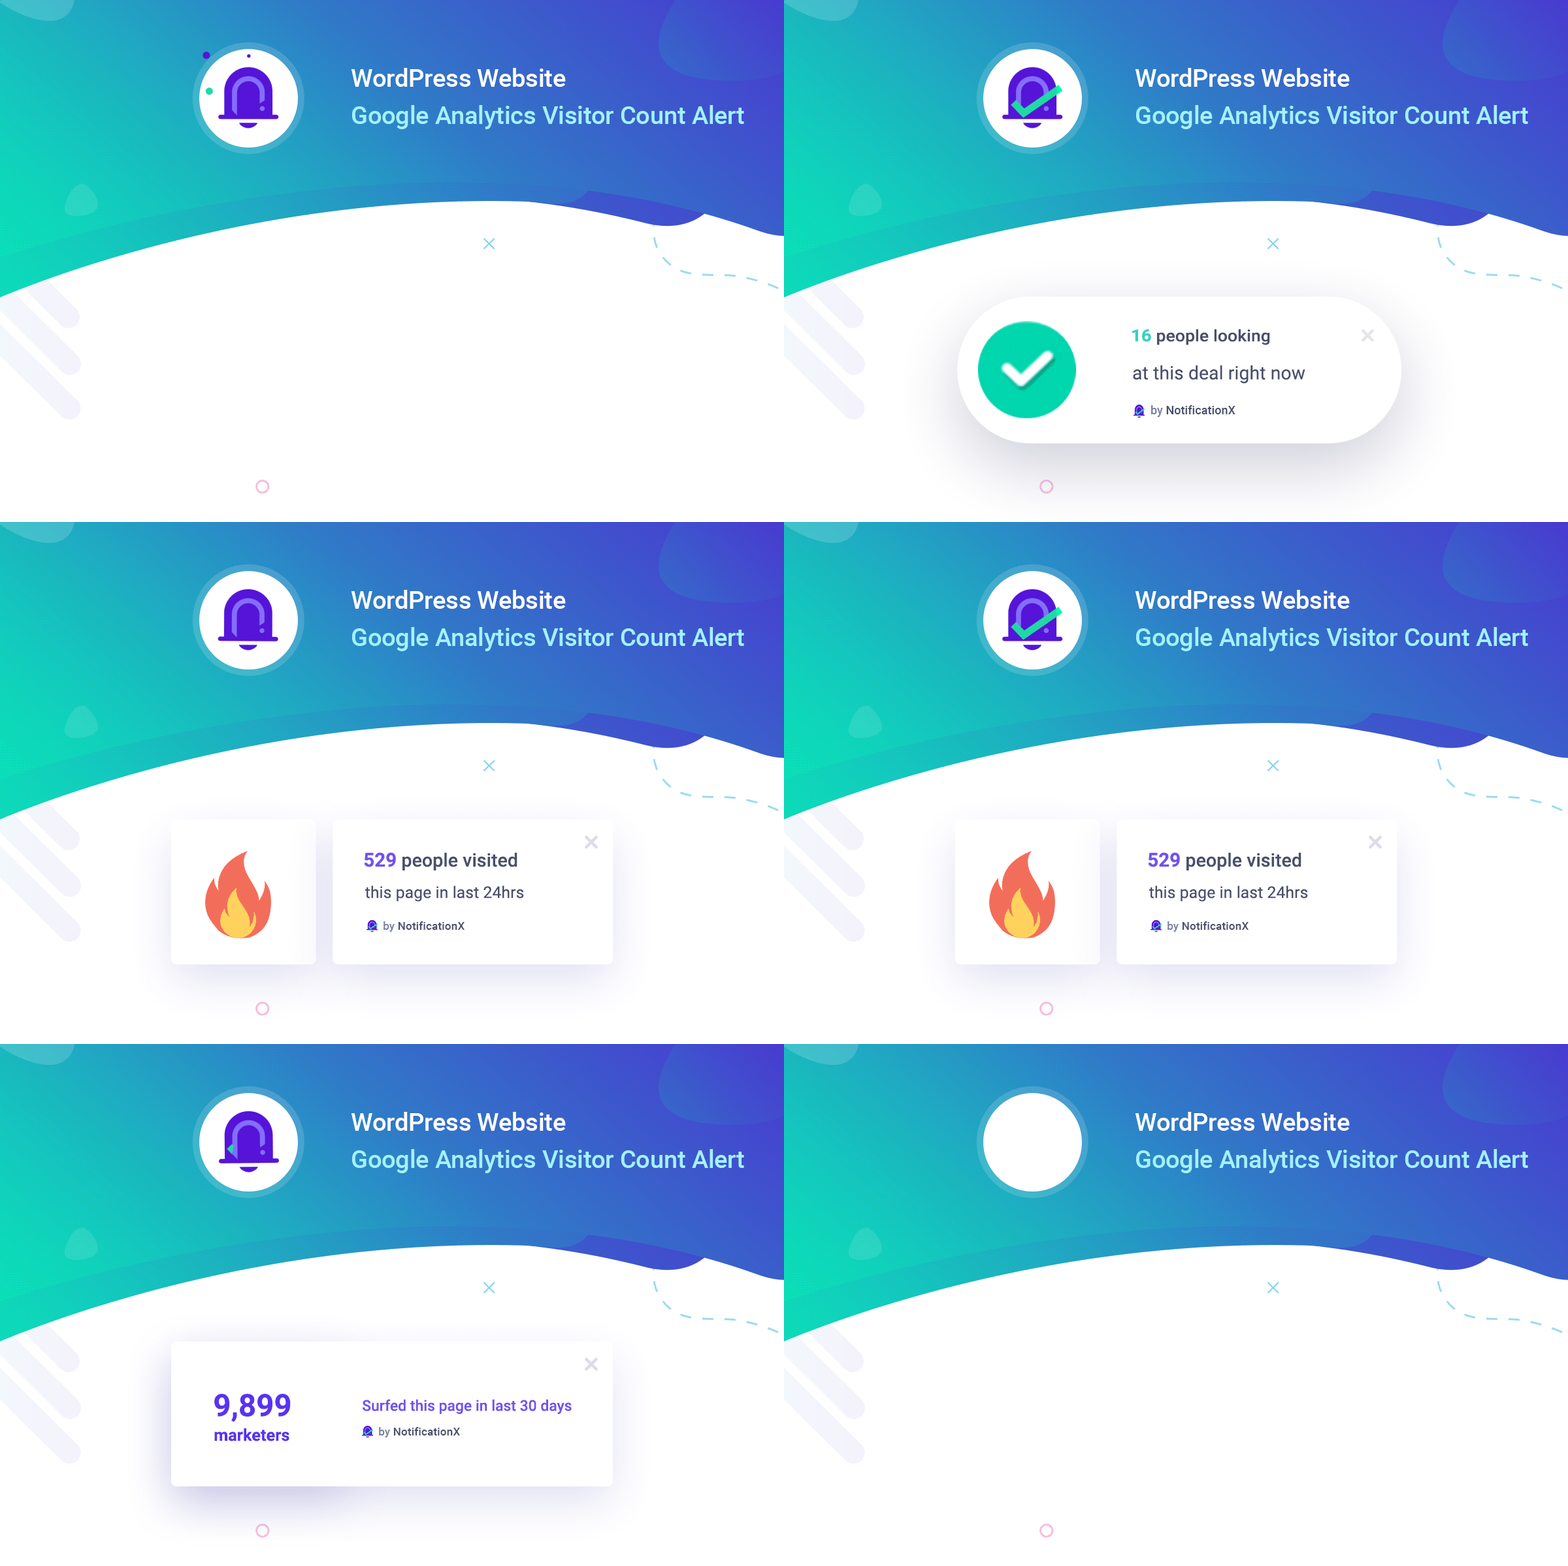 Đây là cách bạn có thể dễ dàng thiết kế và hiển thị hấp dẫn 'Số lượng khách truy cập Google Analytics' cảnh báo trên trang web WordPress của bạn bằng NotificationX.
Nếu bạn gặp phải bất kỳ vấn đề nào, bạn có thể liên hệ với Nhóm hỗ trợ của chúng tôi đây.


 English
  Arabic
  Indonesian
  Spanish
  Portuguese
  German
  Dutch
Dutch  Russian
  Hindi
Hindi  French
  Japanese
  Chinese
  Vietnamese
  Malay
Malay