NotificationX 最も人気のあるWordPress多言語翻訳プラグインとの完全な互換性を提供します WPML。それはあなたがすることができます NotificationXを翻訳する ユーザーインターフェイスのコンテンツを任意の言語に変換し、多言語のWebサイトに適用します。以下のステップバイステップガイドに従って、NotificationXユーザーインターフェイスと文字列をWPMLで翻訳します。
WPMLプラグイン設定を構成する方法は? #
NotificationXをWPMLで翻訳するには、まず、WordPressサイトに次のプラグインをインストールしてアクティブ化します。 WPML多言語CMS そして WPML文字列翻訳. You can check out this WPMLドキュメント to configure it on your WordPress site for more information.

After installing these plugins on your WordPress website, go to ‘WPML’→ ‘Setup’ from your dashboard and select the current language and the language you want to translate to. For instance, we are selecting the ‘German’ language to translate our website.

Follow the on-screen instructions in the WPML Setup wizard and add your site key. Select the site URL format from the three options to choose from. Click on the ‘Continue’ button for the next step

Enter the site key from your WPML account. After that, click on the ‘Continue’ button to proceed to the next step.

Next, you will find the AI Translations option. Here, you can set the context and target audience for your language settings. First, add the product/ service/ website name. Then describe more about the website. After that, select the “Target Audience”, that you want to translate for.

Besides the AI translation, next, you can choose human translation as well. Select how you would like to set up your human translation from the setup.

Now, to get faster support and compatibility alerts, you can choose to get theme and plugin information if required.

Once you complete the previous steps, the WPML plugin will be ready. You can now use it on your WordPress website.

Now, to enable translation, go to ‘WPML’ → ‘Languages’. Set your native language, and select any language you prefer.

Now, navigate to ‘WPML‘→ ‘Settings‘. Enable ‘Private Translation Cloud (PTC)’ options. Afterward, click on the ‘Save’ button before hitting the ‘Apply’ button at the bottom of the page.

How To Use The WPML Automatic Translation Option? #
NotificationXおよび NotificationX PRO プラグインはと互換性があります WPML’s automatic translation feature. In the Translation Management section of the WPML plugin dashboard, you can access this advanced feature.
With this, you can automatically translate your website’s content, including NotificationX alerts. Simply toggle the “Translate Everything Automatically’ button to enable it. You can also select a review option for each translation. You will have the option to change it later from the WPML Settings option.
注意: You can enable Translate Everything Automatically after sending some content for translation.

After that, go to ‘WPML’ ⮕ ‘Languages’ to change the default language, add or remove the translation language for the NotificationX plugin.

WPMLを使用して管理インターフェース文字列を翻訳する方法は? #
WPML文字列翻訳 goes beyond regular WPML translation. It lets you translate all alerts, including the plugin elements of NotificationX, for a multilingual WordPress site.
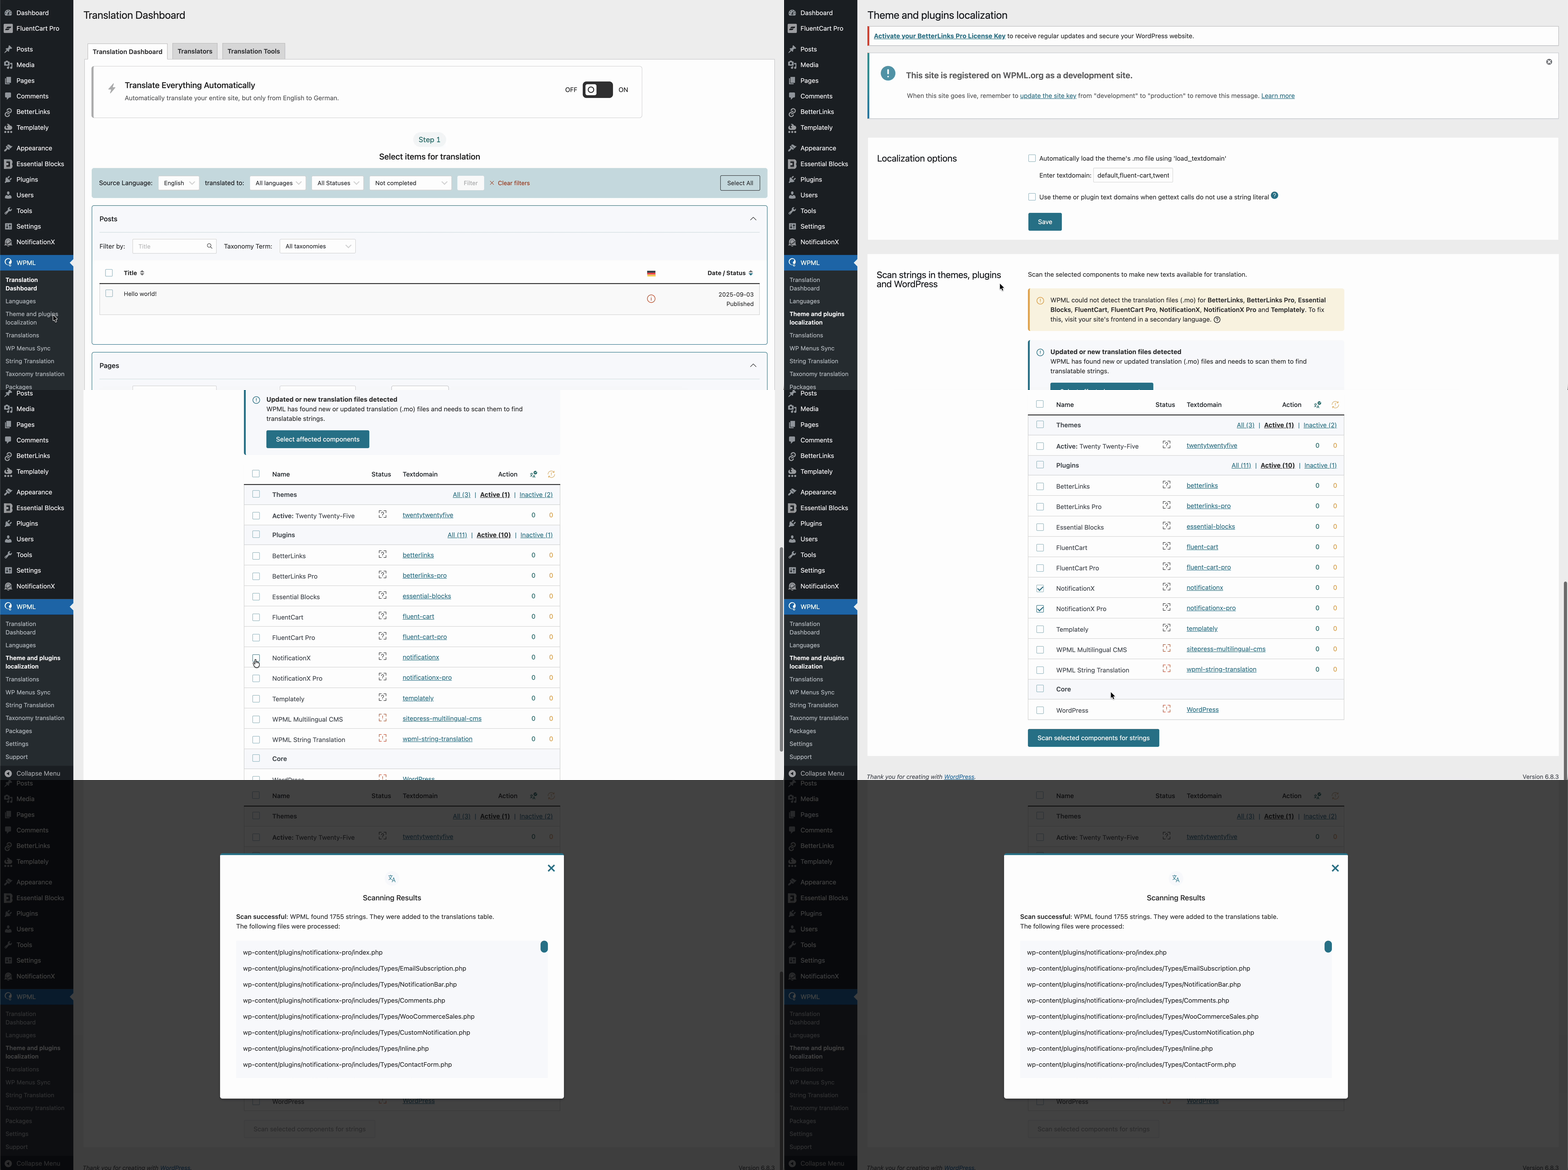
Navigate to ‘WPML’→’Theme and plugins localization’ from your WordPress dashboard. Select the ‘NotificationX’ and ‘NotificationX PRO’ plugins and hit the ‘Scan selected components for strings' ボタン。

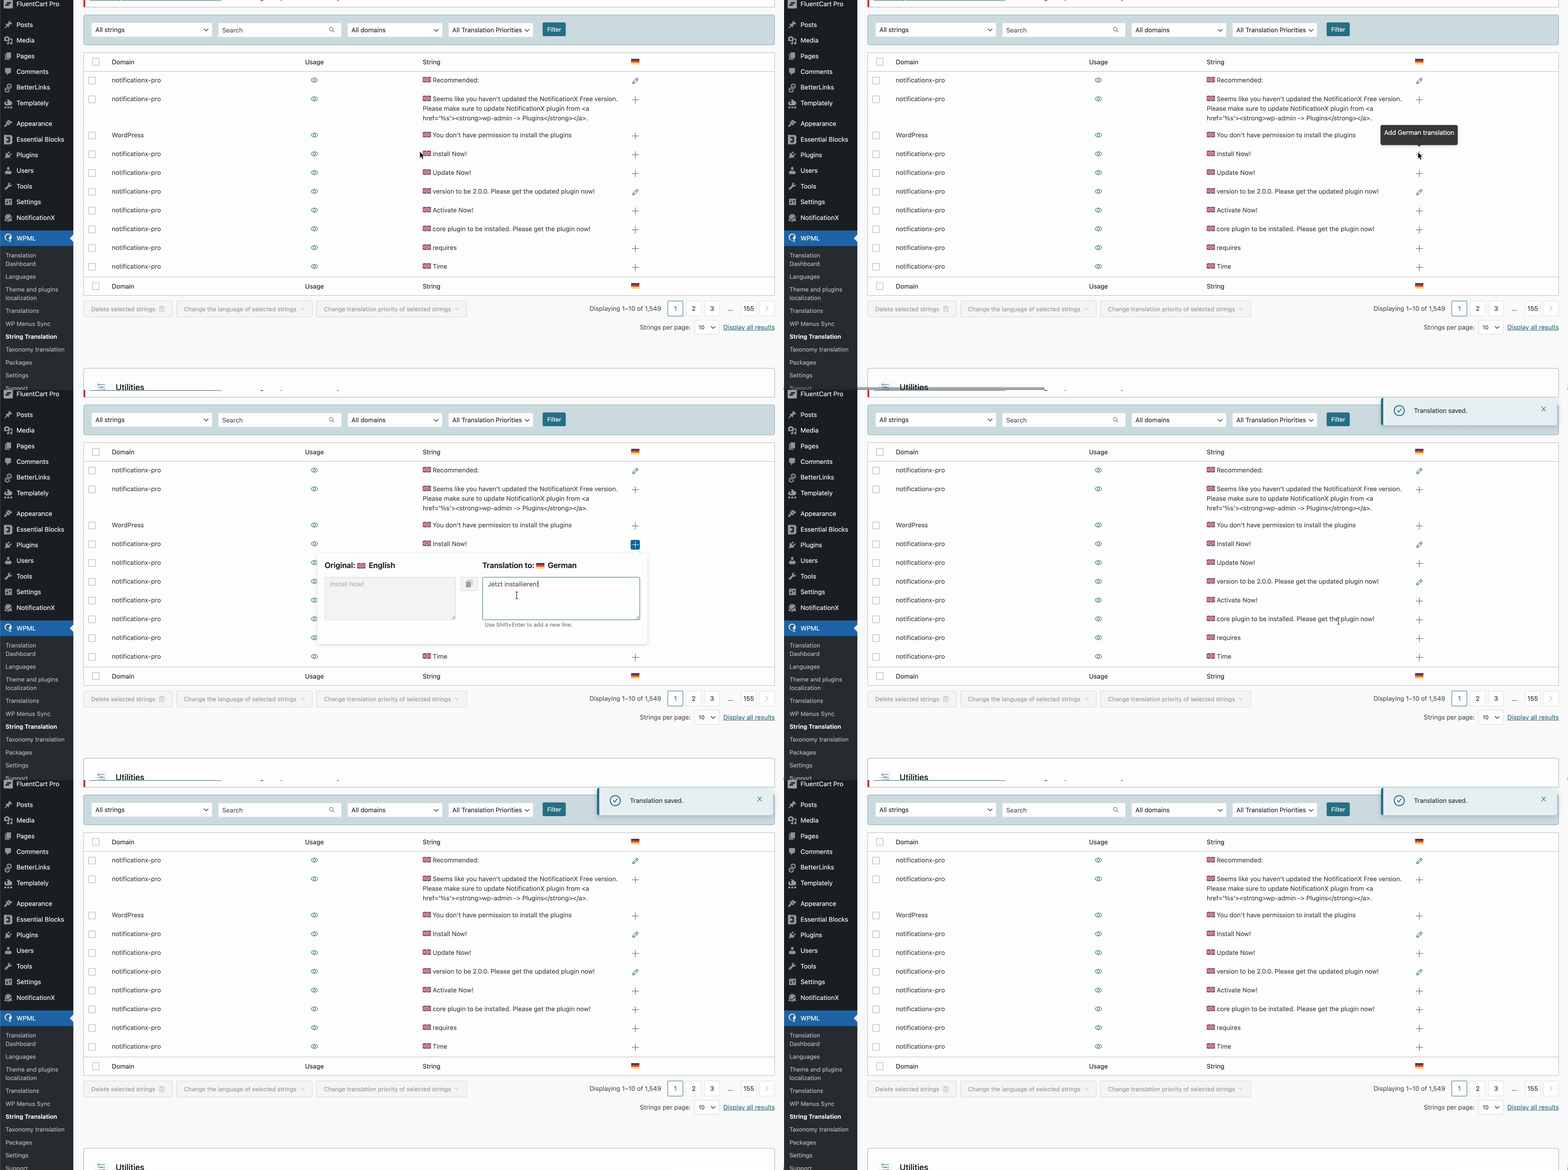
After you have scanned all the strings on your plugin, now you can navigate to ‘WPML’ → ‘String Translation’ 必要な文字列を翻訳します。翻訳したい文字列を検索できます。これは、ユーザーインターフェイスからの任意の文字列にすることができます。

をクリックして '+' icon, you can choose the language you want to translate the string to. After that, you can manually add the translation to the text.
For example, for this doc, we are translating NotificationX strings to the German language. Hit the '+' アイコンをクリックし、文字列の翻訳版を入力フィールドに入力します。エンターボタンを押すと、翻訳を保存できます。

Finally, you can go to the NotificationX interface and check the translated string from the dashboard.

NotificationX入力フィールドを変換する場合は、必ず ‘admin_texts_notificationx’ domain from ‘WPML’ → ‘String Translation’ 上記と同じプロセスに従ってください。
通知アラートをNotificationXで変換する方法は? #
に移動するだけです すべてのNotificationX from your NotificationX Dashboard and select the three-dot action option on a Notification type you want to translate. Here, you will find the translate option. Clicking on this icon will take you to the WPML String settings so you can translate the string as you want.

と呼ばれる新しいウィンドウが表示されます ‘String Translation,’ where you will find the string you want to translate. Click on the ‘+’ button to add a translation for the string.

Now, to translate NotificationX, you can click on the ‘+’ icon to translate the string and paste your translated text in the box. Click '入力' 翻訳を適用します。翻訳は正常に保存されました。

今ライブサイトに行き、 下にスクロールしてすべての言語を表示します 翻訳するように設定しました。このドキュメントでは、 'コメント' ドイツ語に注意してください。クリックしてください 言語アイコン コメントアラートは自動的に翻訳されます。

How To Translate The Notification Bar Built With Elementor? #
If you have made a notification bar with Elementor, you can translate it too. Go to ‘All NotificationX’ from the dashboard and click the three dots on the one you want to translate. Then, click the ‘Translate’ icon to open WPML’s String Management settings.

From the new window, select the notification bar and click on the “Add Note for translator” button to add information for your alerts translation.

Now navigate to String Translation again and add translation of each section of the notification bar build with Elementor. click on the ‘+’ icon to translate the string and paste your translated text in the box. Click '入力' 翻訳を適用します。翻訳は正常に保存されました。

Go to your live website and change the language. Your Elementorで構築されたNotificationXバー 正常に翻訳されます。

これで、ライブサイトにアクセスすると、多言語翻訳プラグインを使用して言語を切り替えることで、通知バーの翻訳を簡単に確認できます。 NotificationXを使用したWPML. This is how easily you can translate NotificationX interface, comments and notification bar using the WPML plugin.
はまる?お気軽にお問い合わせください 専任サポートチーム さらなる支援と質問のために。


