NotificationX 为您提供与最流行的 WordPress 多语言翻译插件的完全兼容性 WPML.它允许您 翻译 NotificationX 将用户界面内容转换为任何语言并将其应用于您的多语言网站。按照下面的分步指南使用 WPML 翻译 NotificationX 用户界面和字符串。
如何配置 WPML 插件设置? #
要使用 WPML 翻译 NotificationX,首先,在您的 WordPress 站点上安装并激活以下插件; WPML 多语言内容管理系统 和 WPML 字符串翻译. You can check out this WPML 文档 to configure it on your WordPress site for more information.

After installing these plugins on your WordPress website, go to ‘WPML’→ ‘Setup’ from your dashboard and select the current language and the language you want to translate to. For instance, we are selecting the ‘German’ language to translate our website.

Follow the on-screen instructions in the WPML Setup wizard and add your site key. Select the site URL format from the three options to choose from. Click on the ‘Continue’ button for the next step

Enter the site key from your WPML account. After that, click on the ‘Continue’ button to proceed to the next step.

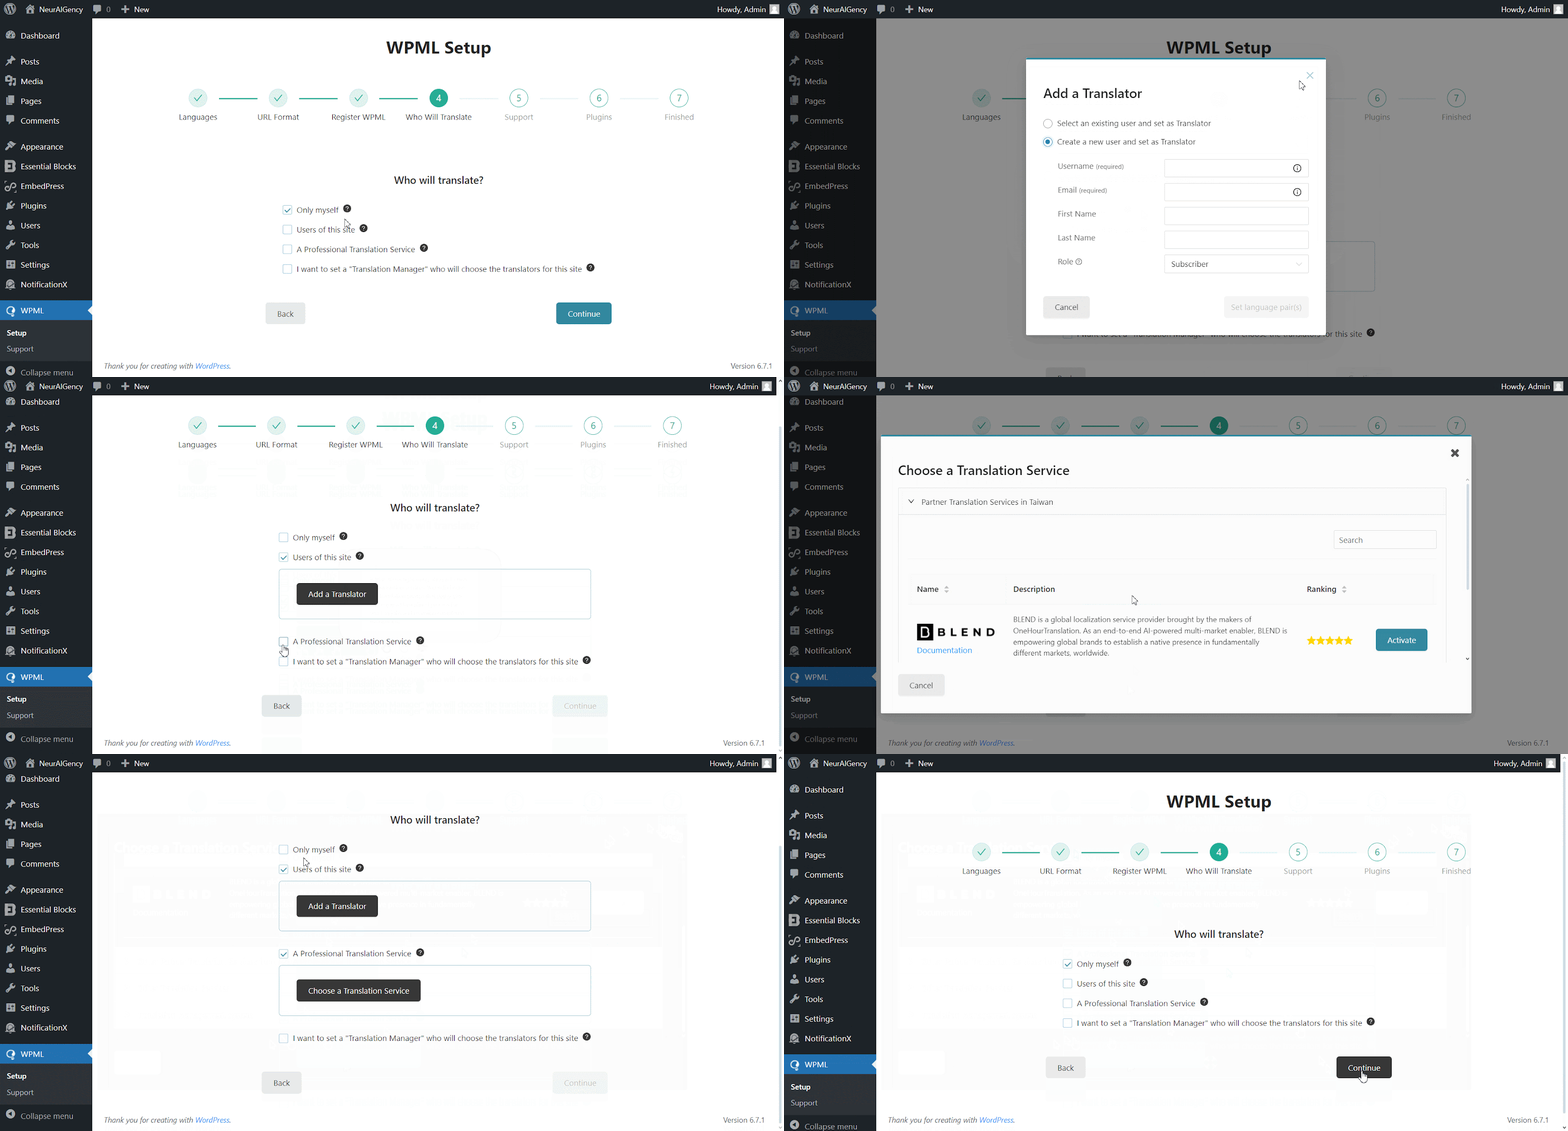
You will be asked how you want to translate your website. You have Four options: ‘Only myself’ to translate solely by yourself, ‘Users of this site’ to set up a team of translators from your WordPress site, ‘A Professional Translation Service’ to select one service from over 70 translation services options integrated with WPML, to assign a user of your site as ‘Translation Manager’ preferred when building site for a client. Choose your preferred one and click on ‘Continue'。

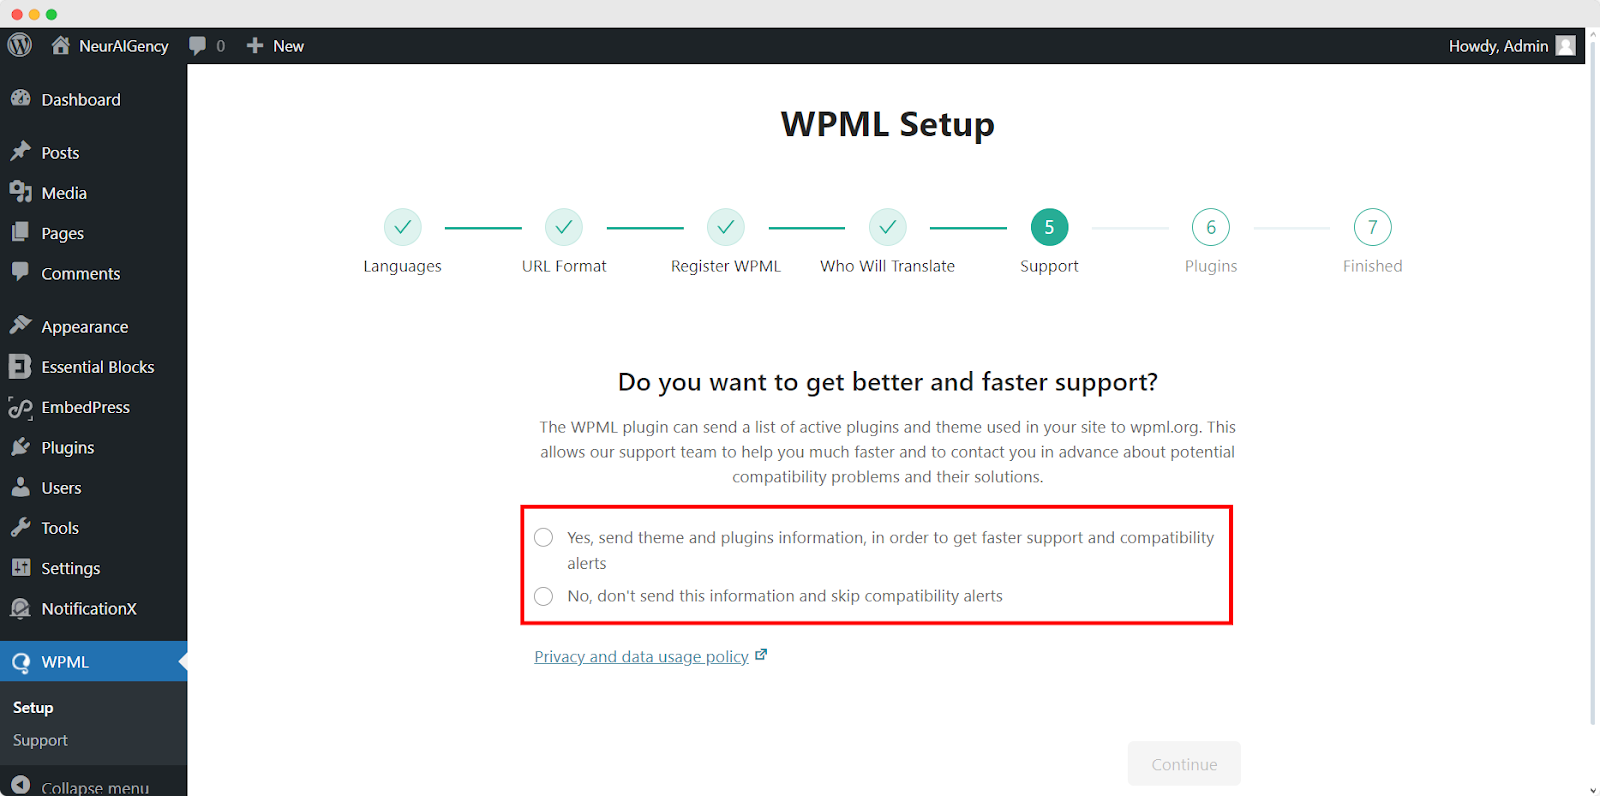
Continuing to the Support section, Choose ‘是的’ option to send your site theme & plugin information to WPML.org in order to get faster support and compatibility alerts or ‘No’ option skip sending the information. After choosing one option click ‘Continue'。

For the Plugin sections, follow the prompted instructions according to your needs. After configuring the WPML with selected options, it will automatically complete the setup.
This is how your plugin can be configured the way you want to translate your website.

How To Use The WPML Automatic Translation Option? #
NotificationX 和 NotificationX PRO 插件兼容 WPML’s automatic translation feature. In the Translation Management section of the WPML plugin dashboard, you can access this advanced feature. With this, you can automatically translate your website’s content, including NotificationX alerts. Simply toggle the “Translate Everything Automatically’ button to enable it. You can also select a review option for each translation. You will have the option to change it later from the WPML Settings option.
注意: You can enable Translate Everything Automatically after sending some content for translation.

After that, go to ‘WPML’ ⮕ ‘Languages’ to change the default language, add or remove the translation language for the NotificationX plugin.

如何使用 WPML 翻译您的管理界面字符串? #
WPML 字符串翻译 goes beyond regular WPML translation. It lets you translate all alerts, including the plugin elements of NotificationX, for a multilingual WordPress site.
Navigate to ‘WPML’→’Theme and plugin localization’ from your WordPress dashboard. Select the ‘NotificationX’ and ‘NotificationX PRO’ plugins and hit the ‘Scan selected components for strings' 按钮。

After you have scanned all the strings on your plugin, now you can navigate to ‘WPML’ → ‘String Translation’ 翻译任何你想要的字符串。您可以搜索要翻译的字符串。这可以是来自用户界面的任何字符串。

通过点击 '+' icon, you can choose the language you want to translate the string to. After that, you can manually add the translation to the text.
For example, for this doc, we are translating NotificationX strings to the German language. Hit the '+' 图标并在输入字段中写入字符串的翻译版本。您可以按回车键保存翻译。

Finally, you can go to the NotificationX interface and check the translated string from the dashboard.

如果要翻译 NotificationX 输入字段,请确保选择 ‘admin_texts_notificationx’ domain from ‘WPML’ → ‘String Translation’ 只需遵循上述相同的过程即可。

如何通过 NotificationX 翻译通知警报? #
只需导航到 全部 NotificationX from your NotificationX Dashboard and select the three-dot action option on a Notification type you want to translate. Here, you will find the translate option. Clicking on this icon will take you to the WPML String settings so you can translate the string as you want.

将显示一个新窗口,称为 ‘String Translation,’ where you will find the string you want to translate. Click on the ‘+’ button to add a translation for the string.

Now, to translate NotificationX, you can click on the ‘+’ icon to translate the string and paste your translated text in the box. Click '进入' 应用翻译。您的翻译已成功保存。

现在转到实时站点并 向下滚动以查看所有语言 你已经开始翻译了。对于本文档,我们翻译了 '评论' 警惕成德语。点击 语言图标 并且您的评论提醒将被自动翻译。

How To Translate The Notification Bar Built With Elementor? #
If you have made a notification bar with Elementor, you can translate it too. Go to ‘All NotificationX’ from the dashboard and click the three dots on the one you want to translate. Then, click the ‘Translate’ icon to open WPML’s String Management settings.

From the new window, select the notification bar and click on the “Add Note for translator” button to add information for your alerts translation.

Now navigate to String Translation again and add translation of the each section of the notification bar build with Elementor. click on the ‘+’ icon to translate the string and paste your translated text in the box. Click '进入' 应用翻译。您的翻译已成功保存。

Go to your live website and change the language. Your 使用 Elementor 构建的 NotificationX 杆 将被成功翻译。

现在,如果您转到您的实时站点,您可以通过使用多语言翻译插件切换语言轻松看到通知栏的翻译 带有 NotificationX 的 WPML.
This is how easily you can translate NotificationX interface, comments and notification bar using the WPML plugin.Getting Stuck? Feel free to contact our 专门的支持团队 以获得进一步的帮助和查询。


