NotificationX vous offre une compatibilité complète avec le plugin de traduction multilingue WordPress le plus populaire WPML. Il vous permet de traduire NotificationX contenu de l'interface utilisateur dans n'importe quelle langue et appliquez-le à votre site Web multilingue. Suivez ce guide étape par étape ci-dessous pour traduire l'interface utilisateur et les chaînes NotificationX avec WPML.
Comment configurer les paramètres du plugin WPML ? #
Pour traduire NotificationX avec WPML, installez et activez d'abord les plugins suivants sur votre site WordPress ; CMS multilingue WPML et Traduction de chaînes WPML. You can check out this document WPML to configure it on your WordPress site for more information.

After installing these plugins on your WordPress website, go to ‘WPML’→ ‘Setup’ from your dashboard and select the current language and the language you want to translate to. For instance, we are selecting the ‘German’ language to translate our website.

Follow the on-screen instructions in the WPML Setup wizard and add your site key. Select the site URL format from the three options to choose from. Click on the ‘Continue’ button for the next step

Enter the site key from your WPML account. After that, click on the ‘Continue’ button to proceed to the next step.

Next, you will find the AI Translations option. Here, you can set the context and target audience for your language settings. First, add the product/ service/ website name. Then describe more about the website. After that, select the “Target Audience”, that you want to translate for.

Besides the AI translation, next, you can choose human translation as well. Select how you would like to set up your human translation from the setup.

Now, to get faster support and compatibility alerts, you can choose to get theme and plugin information if required.

Once you complete the previous steps, the WPML plugin will be ready. You can now use it on your WordPress website.

Now, to enable translation, go to ‘WPML’ → ‘Languages’. Set your native language, and select any language you prefer.

Now, navigate to ‘WPML‘→ ‘Settings‘. Enable ‘Private Translation Cloud (PTC)’ options. Afterward, click on the ‘Save’ button before hitting the ‘Apply’ button at the bottom of the page.

How To Use The WPML Automatic Translation Option? #
NotificationX et NotificationX PRO les plugins sont compatibles avec WPML’s automatic translation feature. In the Translation Management section of the WPML plugin dashboard, you can access this advanced feature.
With this, you can automatically translate your website’s content, including NotificationX alerts. Simply toggle the “Translate Everything Automatically’ button to enable it. You can also select a review option for each translation. You will have the option to change it later from the WPML Settings option.
Remarque: You can enable Translate Everything Automatically after sending some content for translation.

After that, go to ‘WPML’ ⮕ ‘Languages’ to change the default language, add or remove the translation language for the NotificationX plugin.

Comment traduire les chaînes de votre interface d'administration à l'aide de WPML ? #
Traduction de chaînes WPML goes beyond regular WPML translation. It lets you translate all alerts, including the plugin elements of NotificationX, for a multilingual WordPress site.
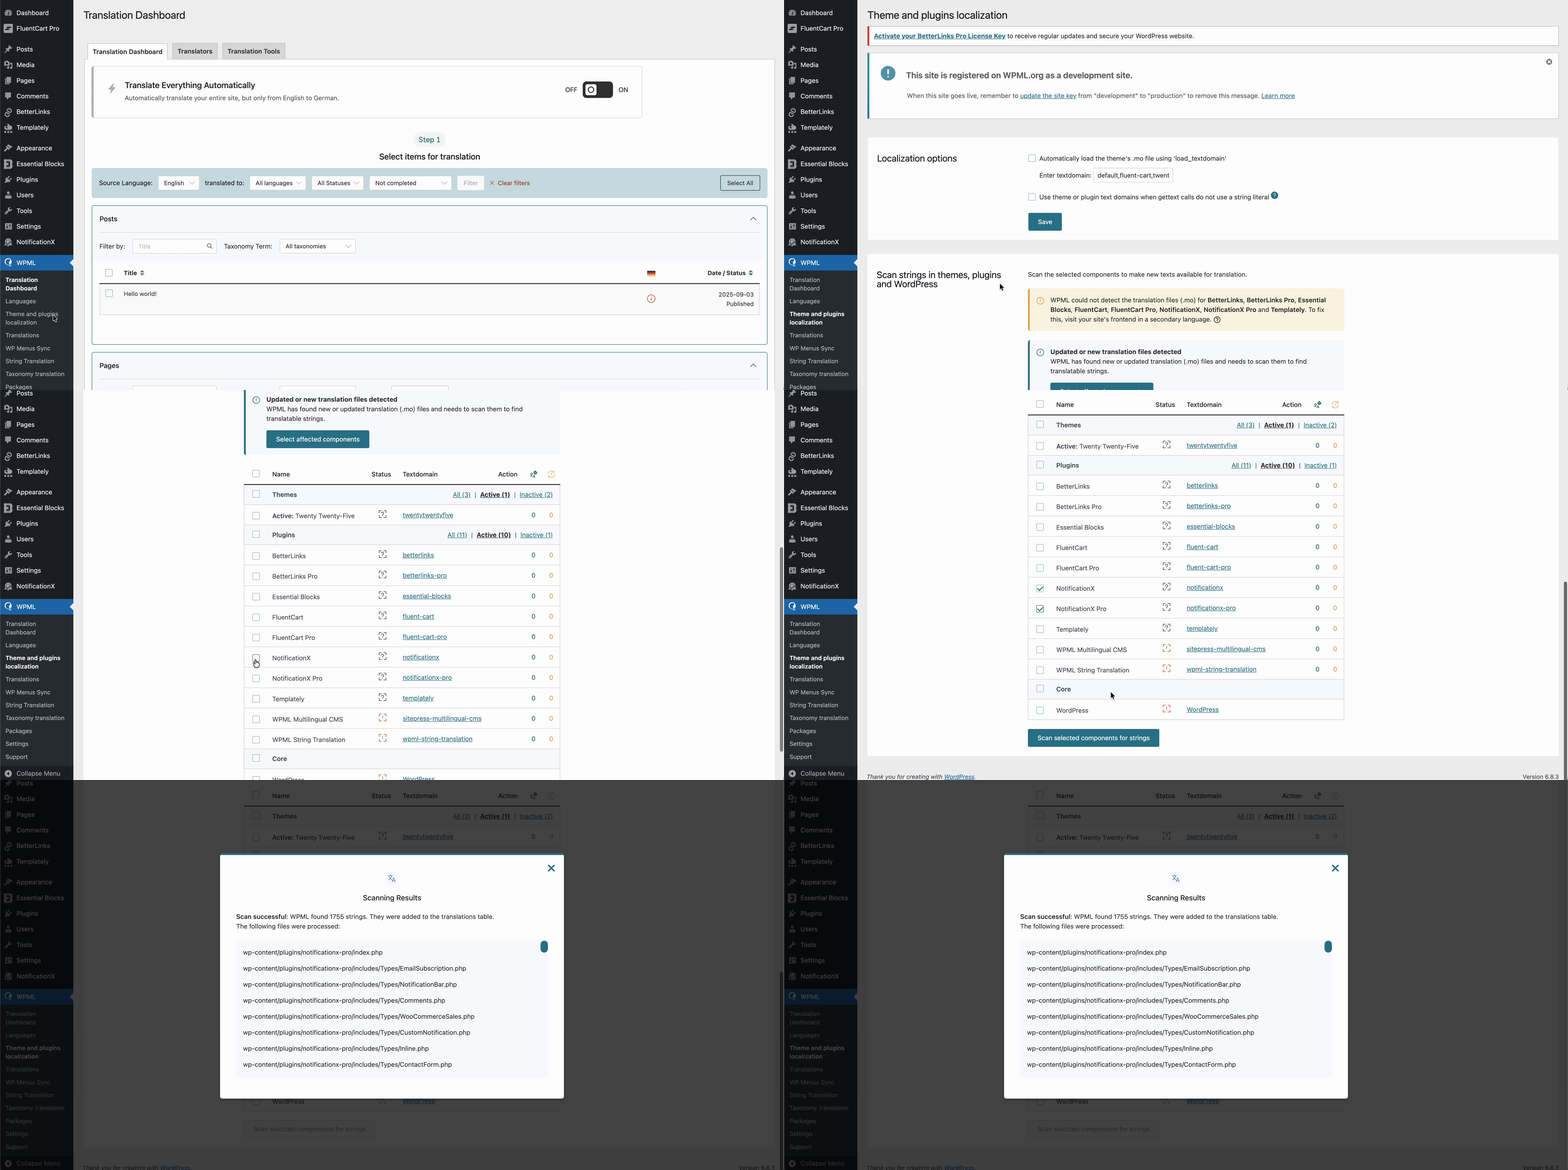
Navigate to ‘WPML’→’Theme and plugins localization’ from your WordPress dashboard. Select the ‘NotificationX’ and ‘NotificationX PRO’ plugins and hit the ‘Scan selected components for strings' bouton.

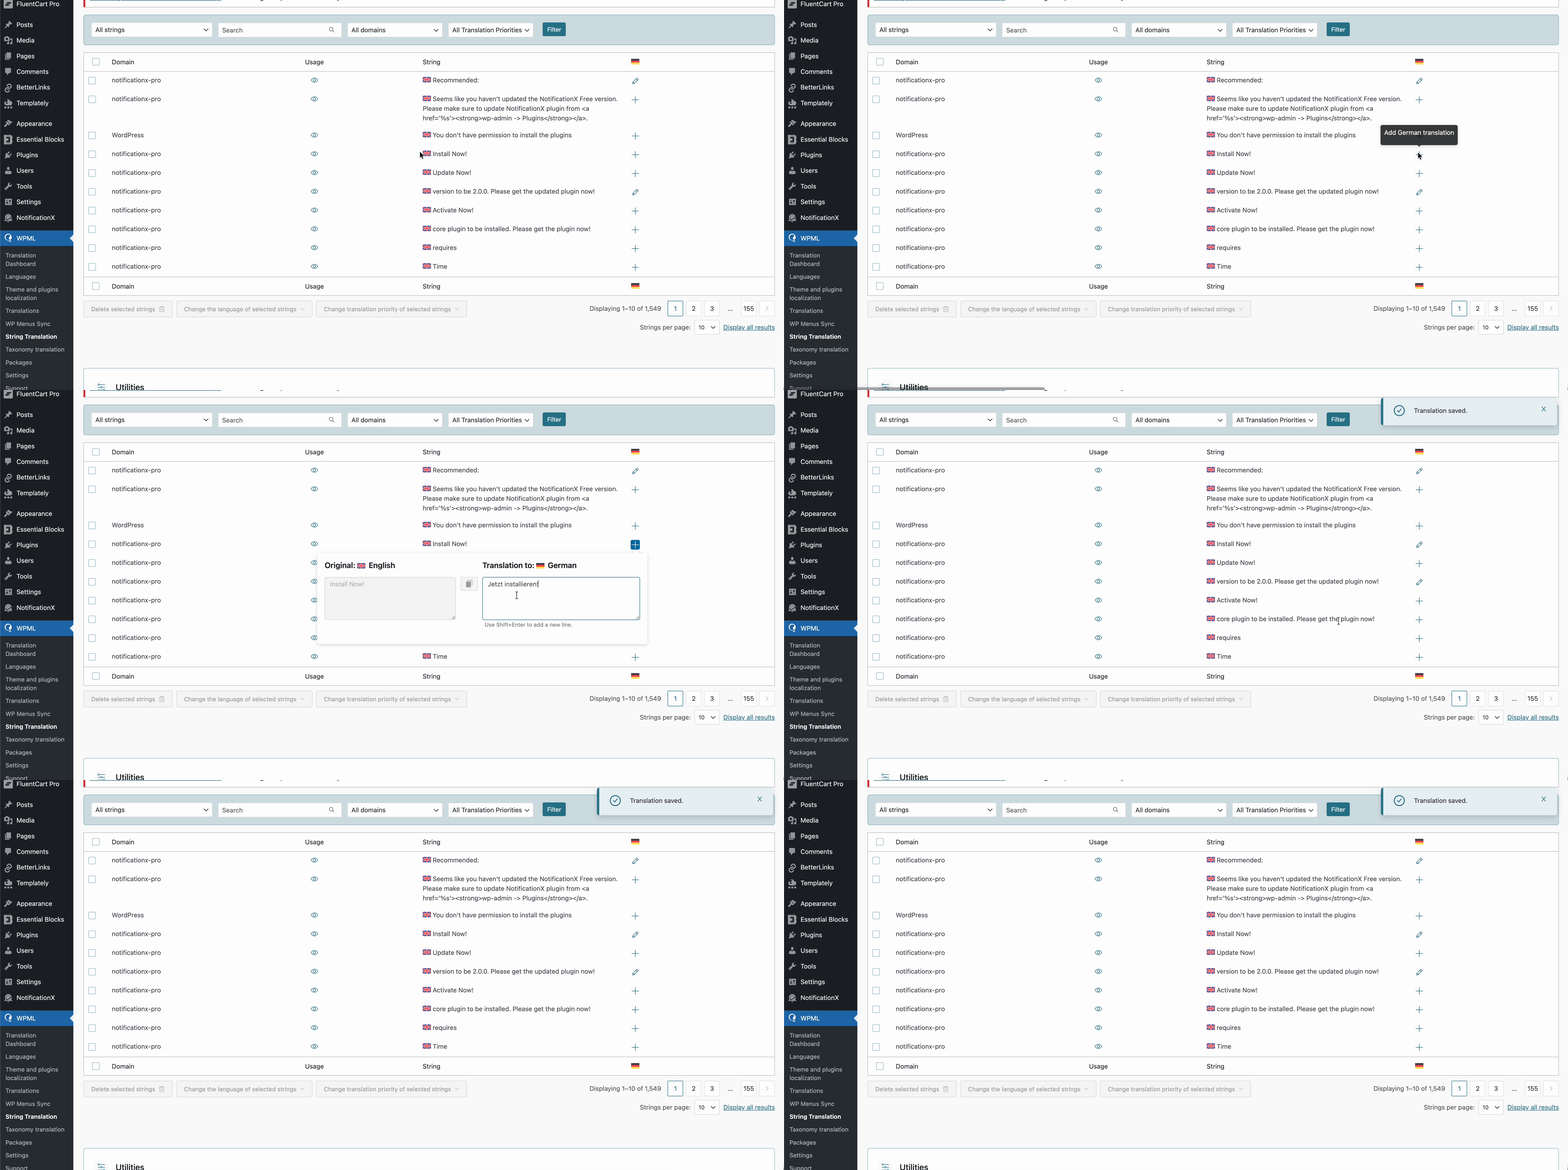
After you have scanned all the strings on your plugin, now you can navigate to ‘WPML’ → ‘String Translation’ pour traduire n'importe quelle chaîne que vous voulez. Vous pouvez rechercher la chaîne que vous souhaitez traduire. Il peut s'agir de n'importe quelle chaîne de l'interface utilisateur.

En cliquant sur le '+' icon, you can choose the language you want to translate the string to. After that, you can manually add the translation to the text.
For example, for this doc, we are translating NotificationX strings to the German language. Hit the '+' et écrivez la version traduite de la chaîne dans le champ de saisie. Vous pouvez enregistrer la traduction en appuyant sur le bouton Entrée.

Finally, you can go to the NotificationX interface and check the translated string from the dashboard.

Si vous souhaitez traduire les champs de saisie NotificationX, assurez-vous simplement de choisir le ‘admin_texts_notificationx’ domain from ‘WPML’ → ‘String Translation’ et suivez simplement le même processus mentionné ci-dessus.
Comment traduire les alertes de notification par NotificationX ? #
Naviguez simplement vers Tous les NotificationX from your NotificationX Dashboard and select the three-dot action option on a Notification type you want to translate. Here, you will find the translate option. Clicking on this icon will take you to the WPML String settings so you can translate the string as you want.

Une nouvelle fenêtre s'affichera, appelée ‘String Translation,’ where you will find the string you want to translate. Click on the ‘+’ button to add a translation for the string.

Now, to translate NotificationX, you can click on the ‘+’ icon to translate the string and paste your translated text in the box. Click 'Entrer' pour appliquer la traduction. Votre traduction a été enregistrée avec succès.

Allez maintenant sur le site en direct et faites défiler vers le bas pour voir toutes les langues vous avez mis à traduire. Pour cette documentation, nous avons traduit le 'Commenter' alerte dans la langue allemande. Clique sur le icône de langue et votre alerte commentaire sera traduite automatiquement.

How To Translate The Notification Bar Built With Elementor? #
If you have made a notification bar with Elementor, you can translate it too. Go to ‘All NotificationX’ from the dashboard and click the three dots on the one you want to translate. Then, click the ‘Translate’ icon to open WPML’s String Management settings.

From the new window, select the notification bar and click on the “Add Note for translator” button to add information for your alerts translation.

Now navigate to String Translation again and add translation of each section of the notification bar build with Elementor. click on the ‘+’ icon to translate the string and paste your translated text in the box. Click 'Entrer' pour appliquer la traduction. Votre traduction a été enregistrée avec succès.

Go to your live website and change the language. Your Barre NotificationX construite avec Elementor sera traduit avec succès.

Maintenant, si vous allez sur votre site en direct, vous pouvez facilement voir la traduction de la barre de notification en changeant de langue à l'aide du plugin de traduction multilingue. WPML avec NotificationX. This is how easily you can translate NotificationX interface, comments and notification bar using the WPML plugin.
Être coincé? N'hésitez pas à contacter notre équipe d'assistance dédiée pour plus d'aide et de questions.


