NotificaciónX le ofrece compatibilidad completa con el complemento de traducción multilingüe de WordPress más popular WPML. Te permite traducir NotificationX contenido de la interfaz de usuario en cualquier idioma y aplicarlo a su sitio web multilingüe. Siga esta guía paso a paso a continuación para traducir la interfaz de usuario y las cadenas de NotificationX con WPML.
¿Cómo configurar los ajustes del complemento WPML? #
Para traducir NotificationX con WPML, primero, instale y active los siguientes complementos en su sitio de WordPress; CMS multilingüe WPML y Traducción de cadenas WPML. You can check out this Documento WPML to configure it on your WordPress site for more information.

After installing these plugins on your WordPress website, go to ‘WPML’→ ‘Setup’ from your dashboard and select the current language and the language you want to translate to. For instance, we are selecting the ‘German’ language to translate our website.

Follow the on-screen instructions in the WPML Setup wizard and add your site key. Select the site URL format from the three options to choose from. Click on the ‘Continue’ button for the next step

Enter the site key from your WPML account. After that, click on the ‘Continue’ button to proceed to the next step.

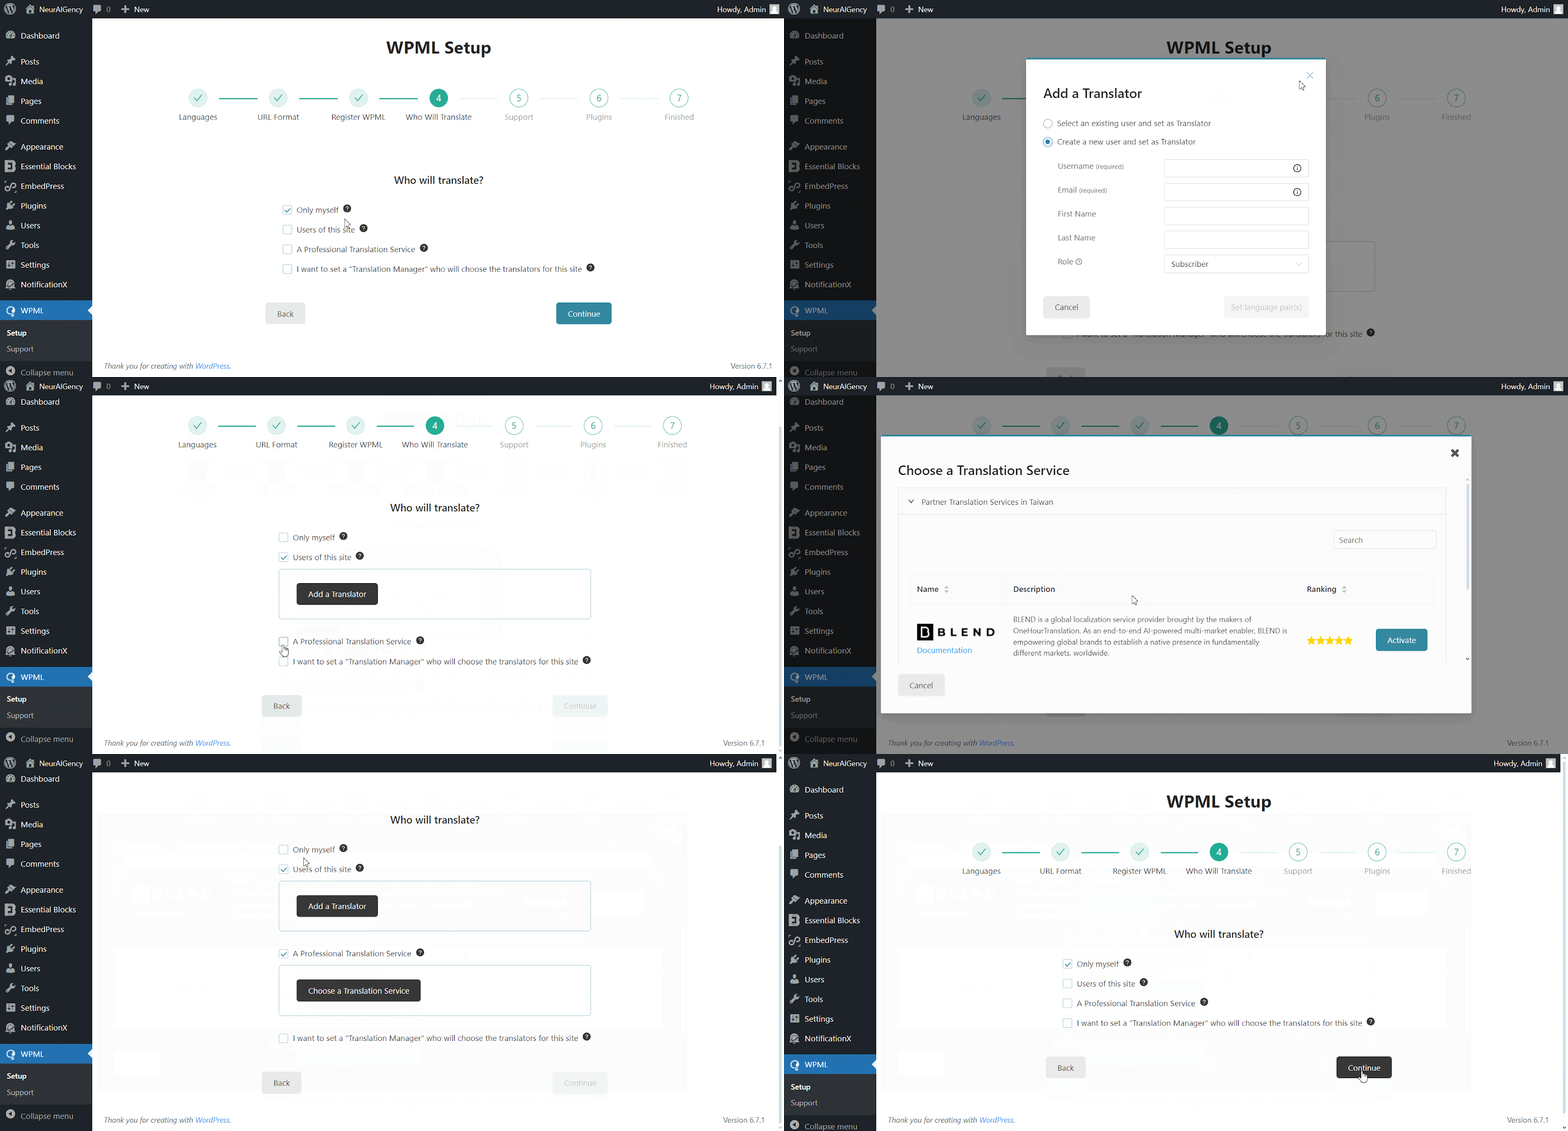
You will be asked how you want to translate your website. You have Four options: ‘Only myself’ to translate solely by yourself, ‘Users of this site’ to set up a team of translators from your WordPress site, ‘A Professional Translation Service’ to select one service from over 70 translation services options integrated with WPML, to assign a user of your site as ‘Translation Manager’ preferred when building site for a client. Choose your preferred one and click on ‘Continue'.

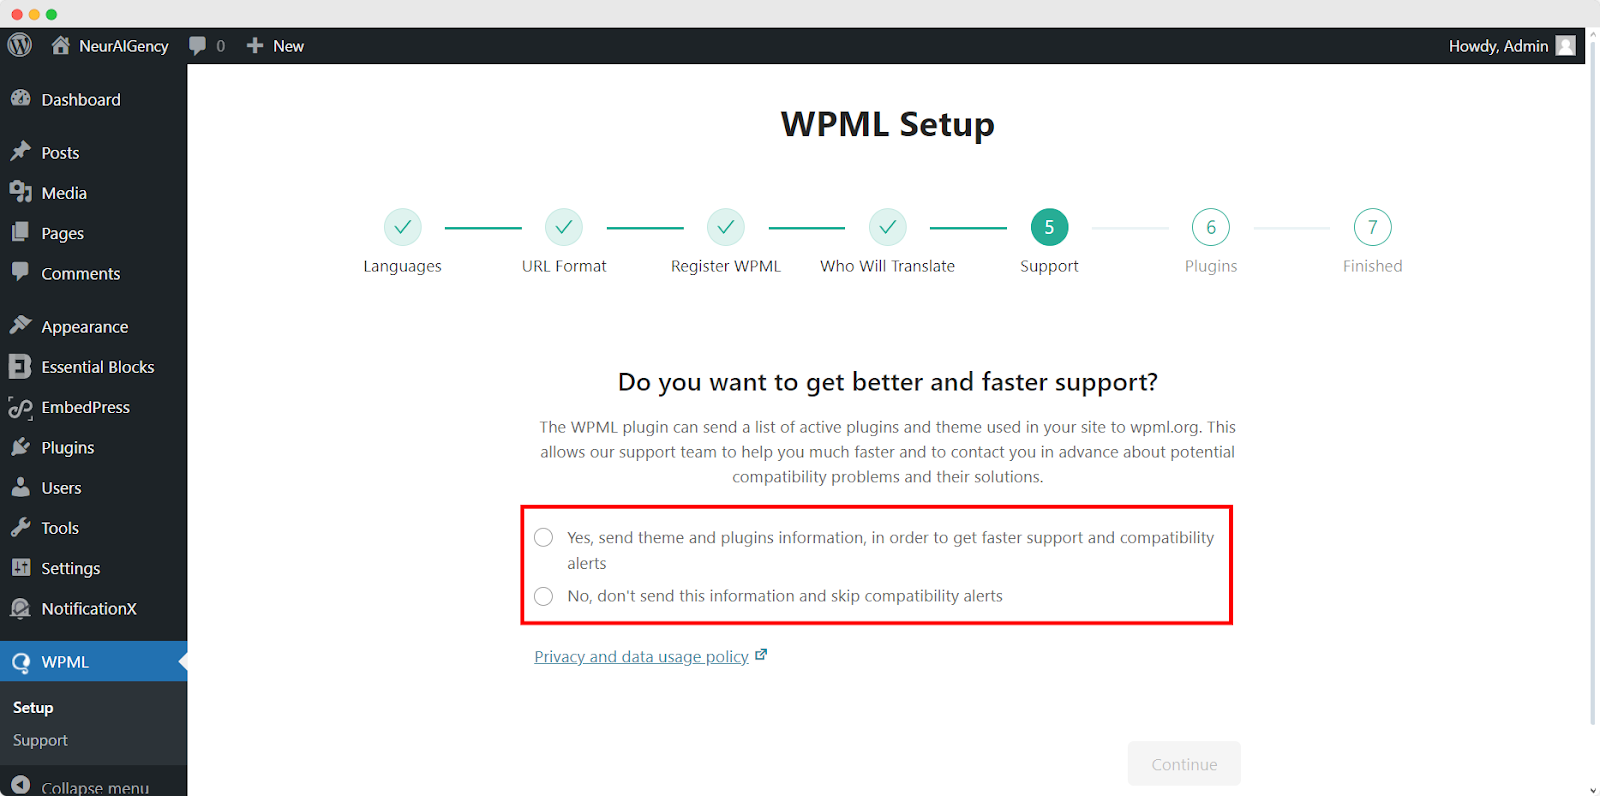
Continuing to the Support section, Choose ‘sí’ option to send your site theme & plugin information to WPML.org in order to get faster support and compatibility alerts or ‘No’ option skip sending the information. After choosing one option click ‘Continue'.

For the Plugin sections, follow the prompted instructions according to your needs. After configuring the WPML with selected options, it will automatically complete the setup.
This is how your plugin can be configured the way you want to translate your website.

How To Use The WPML Automatic Translation Option? #
NotificationX y NotificationX PRO Los complementos son compatibles con WPML’s automatic translation feature. In the Translation Management section of the WPML plugin dashboard, you can access this advanced feature. With this, you can automatically translate your website’s content, including NotificationX alerts. Simply toggle the “Translate Everything Automatically’ button to enable it. You can also select a review option for each translation. You will have the option to change it later from the WPML Settings option.
Nota: You can enable Translate Everything Automatically after sending some content for translation.

After that, go to ‘WPML’ ⮕ ‘Languages’ to change the default language, add or remove the translation language for the NotificationX plugin.

¿Cómo traducir las cadenas de la interfaz de administración con WPML? #
Traducción de cadenas WPML goes beyond regular WPML translation. It lets you translate all alerts, including the plugin elements of NotificationX, for a multilingual WordPress site.
Navigate to ‘WPML’→’Theme and plugin localization’ from your WordPress dashboard. Select the ‘NotificationX’ and ‘NotificationX PRO’ plugins and hit the ‘Scan selected components for strings' botón.

After you have scanned all the strings on your plugin, now you can navigate to ‘WPML’ → ‘String Translation’ para traducir cualquier cadena que desee. Puede buscar la cadena que desea traducir. Puede ser cualquier cadena de la interfaz de usuario.

Al hacer clic en el '+' icon, you can choose the language you want to translate the string to. After that, you can manually add the translation to the text.
For example, for this doc, we are translating NotificationX strings to the German language. Hit the '+' icono y escriba la versión traducida de la cadena en el campo de entrada. Puede guardar la traducción presionando el botón Enter.

Finally, you can go to the NotificationX interface and check the translated string from the dashboard.

Si desea traducir los campos de entrada NotificationX, asegúrese de elegir el ‘admin_texts_notificationx’ domain from ‘WPML’ → ‘String Translation’ y simplemente siga el mismo proceso mencionado anteriormente.

¿Cómo traducir las alertas de notificación por NotificationX? #
Simplemente navega a Todo NotificationX from your NotificaciónX Dashboard and select the three-dot action option on a Notification type you want to translate. Here, you will find the translate option. Clicking on this icon will take you to the WPML String settings so you can translate the string as you want.

Se mostrará una nueva ventana, llamada ‘String Translation,’ where you will find the string you want to translate. Click on the ‘+’ button to add a translation for the string.

Now, to translate NotificationX, you can click on the ‘+’ icon to translate the string and paste your translated text in the box. Click 'Ingresar' para aplicar la traducción. Tu traducción se ha guardado correctamente.

Ahora ve al sitio en vivo y desplácese hacia abajo para ver todos los idiomas has configurado para traducir. Para esta documentación, tradujimos el 'Comentario' alert al idioma alemán. Clickea en el icono de idioma y su alerta de comentario se traducirá automáticamente.

How To Translate The Notification Bar Built With Elementor? #
If you have made a notification bar with Elementor, you can translate it too. Go to ‘All NotificationX’ from the dashboard and click the three dots on the one you want to translate. Then, click the ‘Translate’ icon to open WPML’s String Management settings.

From the new window, select the notification bar and click on the “Add Note for translator” button to add information for your alerts translation.

Now navigate to String Translation again and add translation of the each section of the notification bar build with Elementor. click on the ‘+’ icon to translate the string and paste your translated text in the box. Click 'Ingresar' para aplicar la traducción. Tu traducción se ha guardado correctamente.

Go to your live website and change the language. Your Barra NotificationX construida con Elementor será traducido con éxito.

Ahora, si va a su sitio en vivo, puede ver la traducción de la barra de notificaciones fácilmente cambiando el idioma usando el complemento de traducción multilingüe WPML con NotificationX.
This is how easily you can translate NotificationX interface, comments and notification bar using the WPML plugin.Getting Stuck? Feel free to contact our equipo de soporte dedicado para obtener más ayuda y consultas.


