NotificationX Analytics

Everything You Need to Know About NotificationX Analytics: Measure ROI From Social Proof Campaign

Planning successful marketing campaigns with social proof can be a challenge. That’s why, to help you understand how effective your strategies are, you can use NotificationX Analytics & Reporting feature to easily evaluate your current social proof campaigns. 
NotificationX Analytics

With the power to instantly create social proof popups for boosting credibility, NotificationX is an amazing WordPress marketing solution trusted by more than 20,000 businesses. 

From helping you create stunning popups for sales, comments, reviews, download counts and much more, NotificationX can help you plan and launch social proof campaigns with which you can get free traffic and skyrocket your conversions. 

But how will you know for sure that your social proof marketing campaigns are effective? That’s where NotificationX Analytics & Reporting comes in. With this advanced feature, you can easily measure ROI from each of your social proof campaigns and evaluate how effective they really are.

Table of Contents

Tips To Evaluate Campaigns With NotificationX Analytics

To evaluate and measure the ROI of your social proof marketing campaigns, you will need to know what metrics you should measure and set realistic goals for each metric. 

With the advanced NotificationX Analytics & Reporting feature, evaluating your social proof marketing campaigns can be done in just a few minutes. You will get insightful data by simply configuring the analytics feature from your dashboard and checking your reports periodically. This way, you will be able to decide and choose the right, effective marketing strategies to grow your business.

But before we show you how to do that, let’s go over a few things you should keep in mind when measuring your social proof marketing campaigns.

Set Realistic And Achievable Goals For Your Campaigns

Everything You Need to Know About NotificationX Analytics: Measure ROI From Social Proof Campaign

If you are setting unrealistic goals for your business, then you will never be able to come up with proper, effective, and sustainable strategies. So, before evaluating any campaign, make sure to set goals that are both realistic and can be achieved in a given period of time.

Know Which Metrics You Need To Measure For Your Campaign
notificationx analytics

Depending on what kind of campaign you are running, and what goals you have set, you may need to focus on different metrics for each of your social proof marketing campaigns. 

Some of the most important metrics include ‘View’ which tells you how many visitors have seen your social proof popup. Similarly, ‘Clickthrough Rates’ will tell you how many of your visitors who have viewed your campaigns have also clicked on your social proof popups.

You can easily measure these metrics by using NotificationX Analytics & Reporting tool. It will help you decide whether to continue on with a particular campaign, make changes to improve a campaign and much more.

Evaluate Your Social Proof Marketing Campaigns Regularly

Of course, one of the most important things to remember is to evaluate your social proof marketing campaigns on a regular basis. You want to keep track of how well a particular strategy is doing during specific time periods.

For example, a top-bar optin or a WordPress notification bar maybe most effective during peak sales seasons such as during Halloween sales, Black Friday sales, Christmas or other similar shopping seasons. 

So, by keeping track of the performance of your marketing campaigns on a regular basis, you will be able to know which strategy will work best during any specific time of the year.

How To Measure ROI With NotificationX Analytics Tool

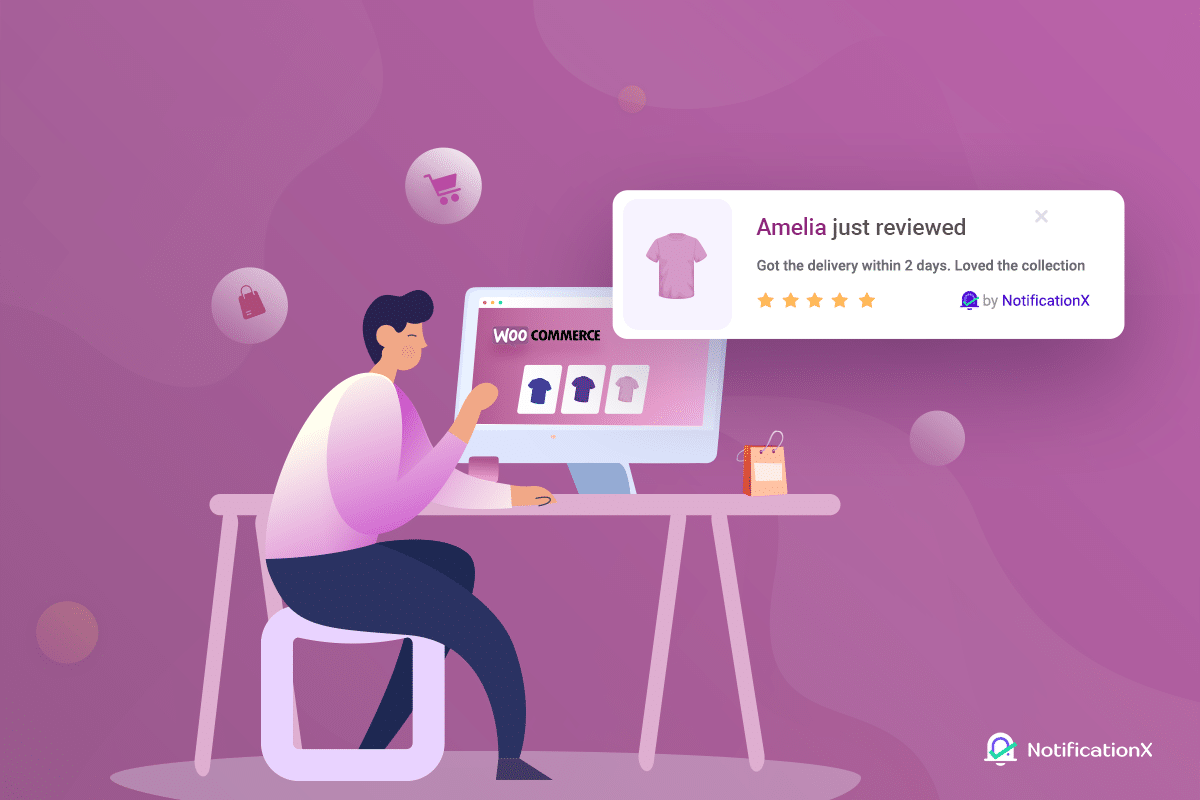
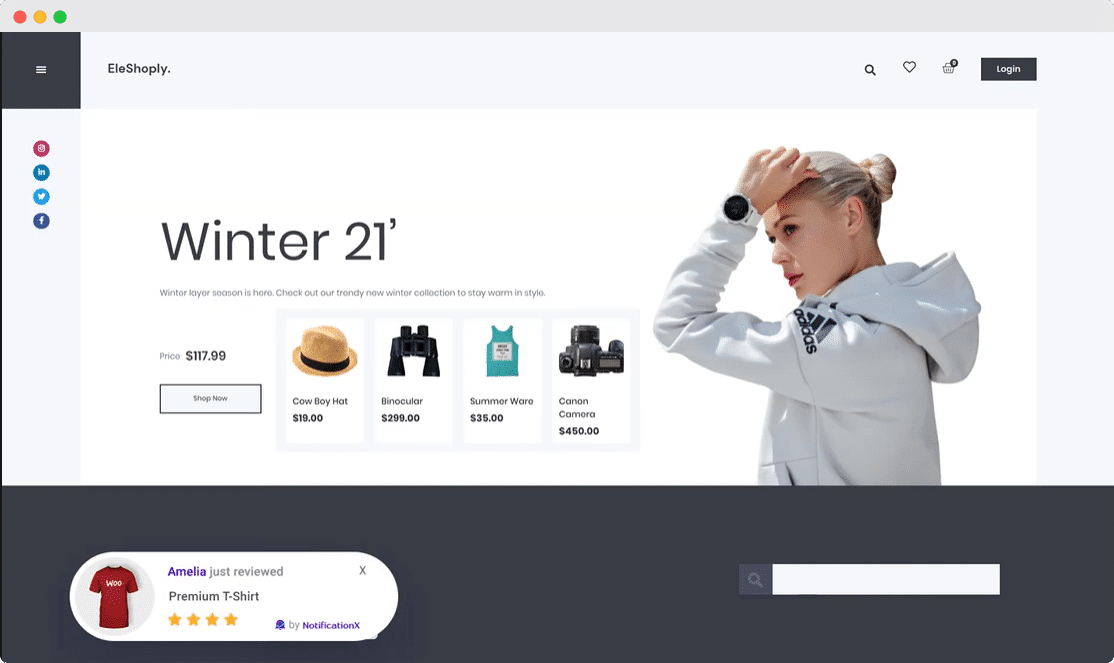
Suppose you have created a social proof marketing campaign to boost your sales for WooCommerce. This could be a review popup or teaser to build trust among your potential customers and influence them to make a purchase. When you create this kind of WooCommerce review popups with NotificationX, this is how it will appear on your website pages.
NotificationX Analytics

Now, you might be wondering whether this kind of popups are truly effective in boosting your WooCommerce sales. The best way to find the answer for this type of questions is by using NotificationX Analytics & Reporting tool.

This advanced feature comes exclusively with NotificationX Pro. By using this feature, you will be able to know whether your social proof campaigns like the one shown above are actually helping you grow your business.

Let’s find out how you can configure NotificationX Analytics & Reporting tool and measure the ROI from your social proof marketing strategies.

Step 1: Install And Activate NotificationX On Your Website

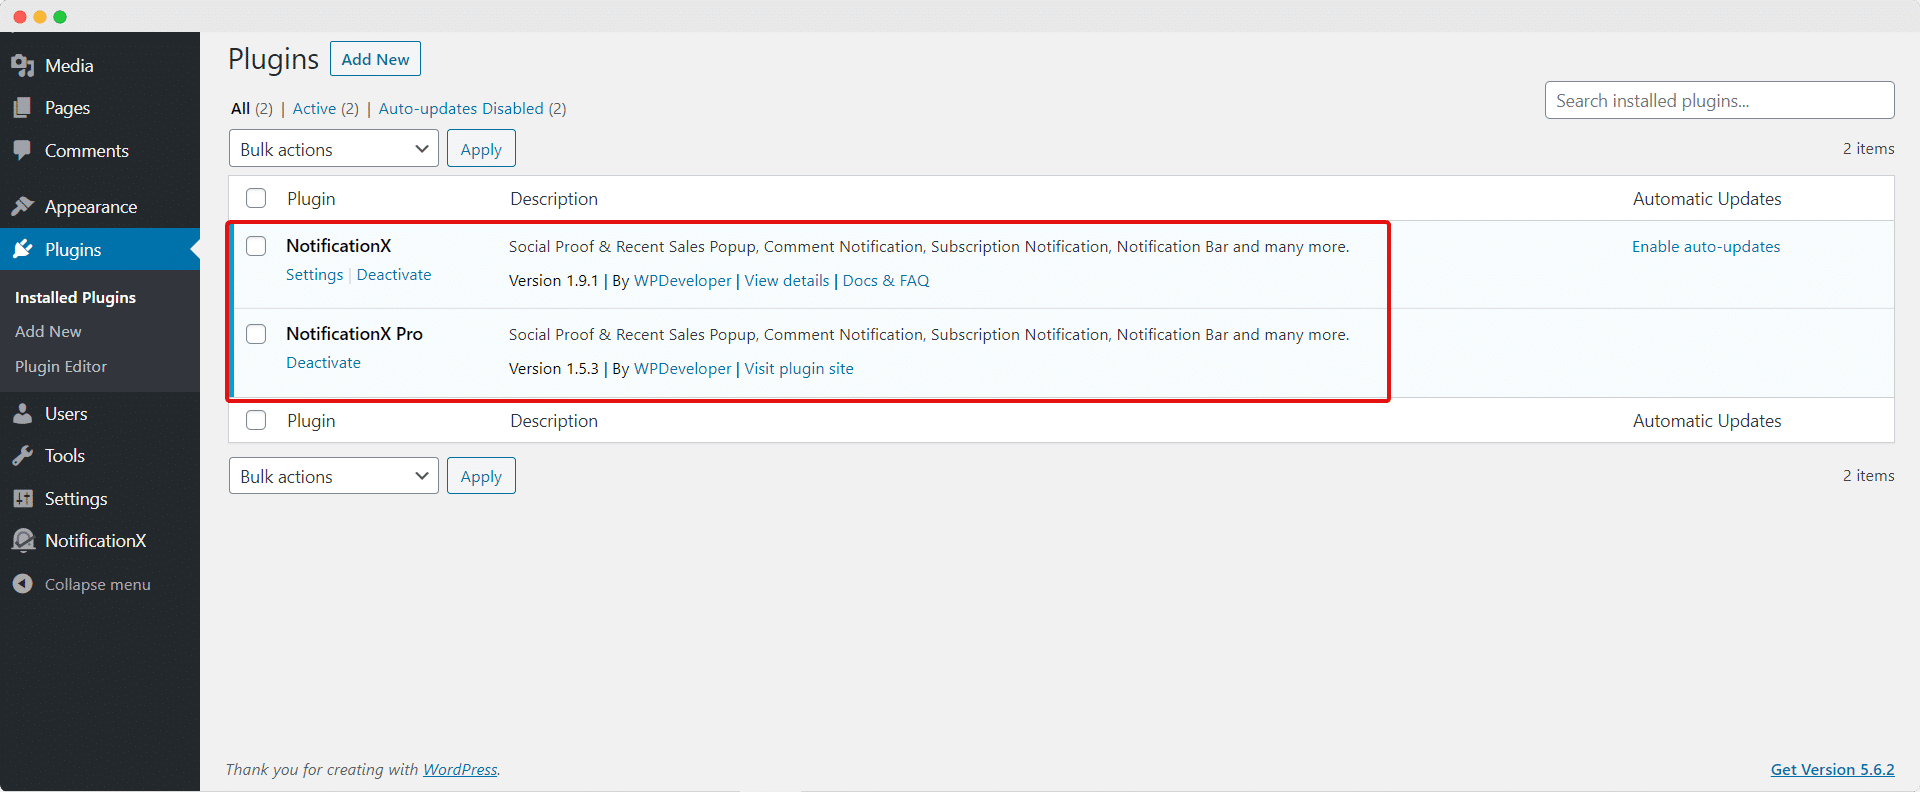
If you don’t already have NotificationX installed, then you have to start by installing the free version of NotificationX on your WordPress website. Once that’s done, you will need to purchase and install NotificationX Pro as well, since the Analytics & Reporting tool is an exclusive and advanced feature.
NotificationX Analytics

Step 2: Create A Social Proof Marketing Campaign With NotificationX

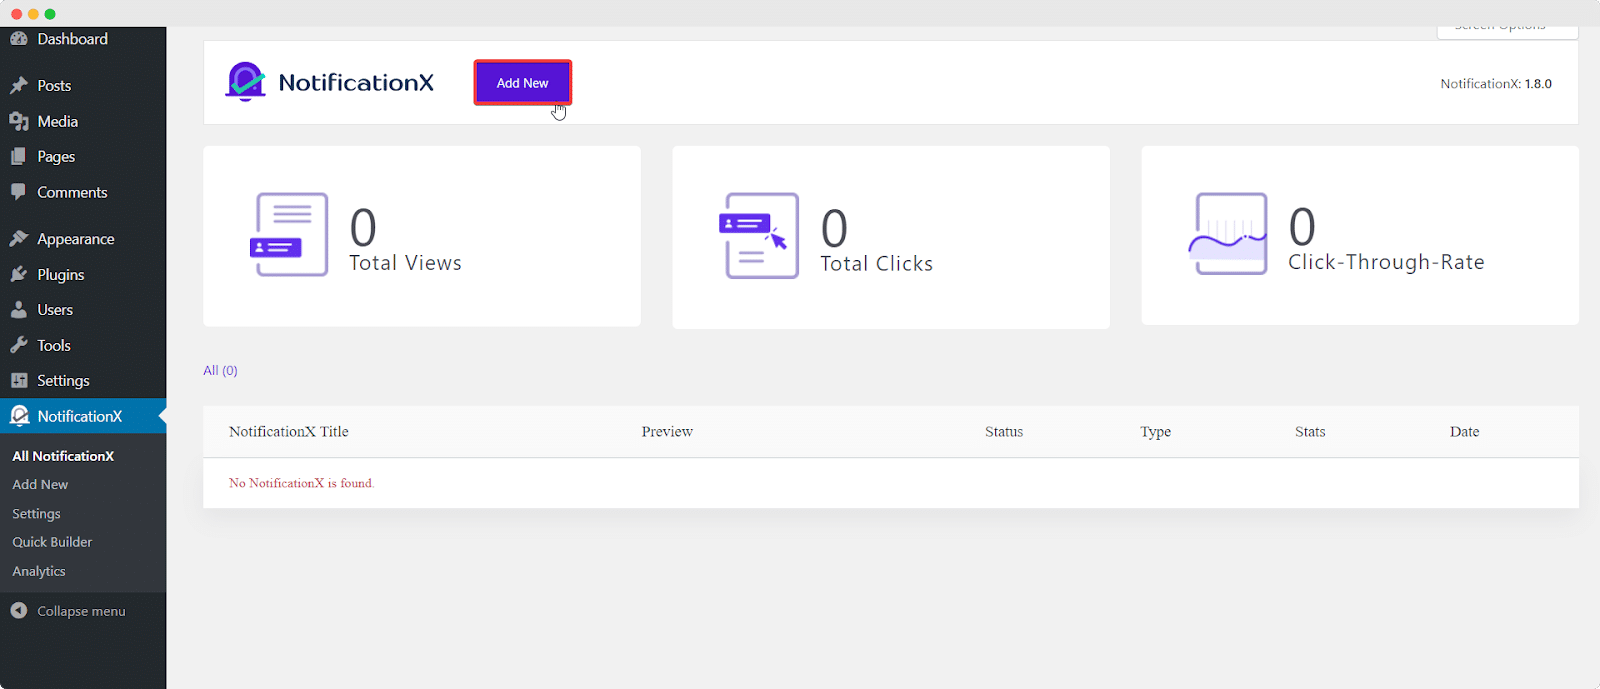
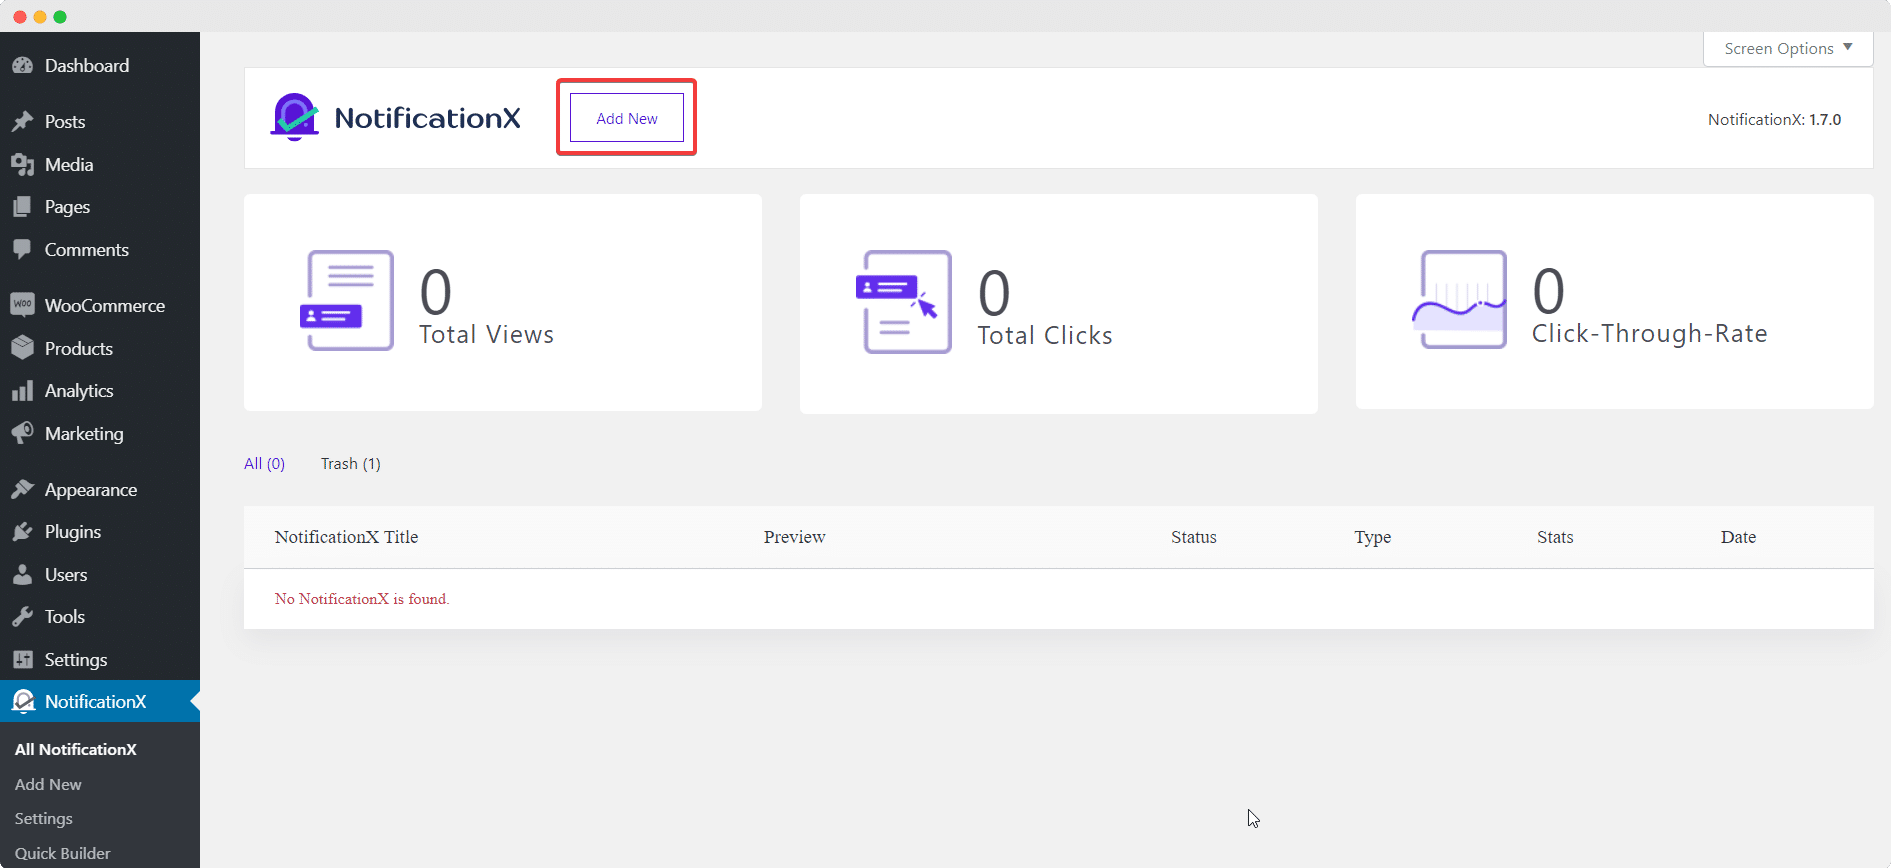
After installing both free and premium versions of NotificationX, you have to create a social proof marketing campaign. You can do this directly from your WordPress dashboard by going to NotificationX–> Add New and then choose the type of your popup and the source for your popup. 

For this tutorial, we will be creating a WooCommerce review popup. To learn more about how to create social proof popups with NotificationX, check out our detailed documentation here

notificationX analytics

Step 3: Configure NotificationX Analytics Tool For Your Campaigns

After your campaign has been created and published, you can check how many views and clicks your social proof marketing campaign has received by using the Analytics & Reporting tool with NotificationX. 

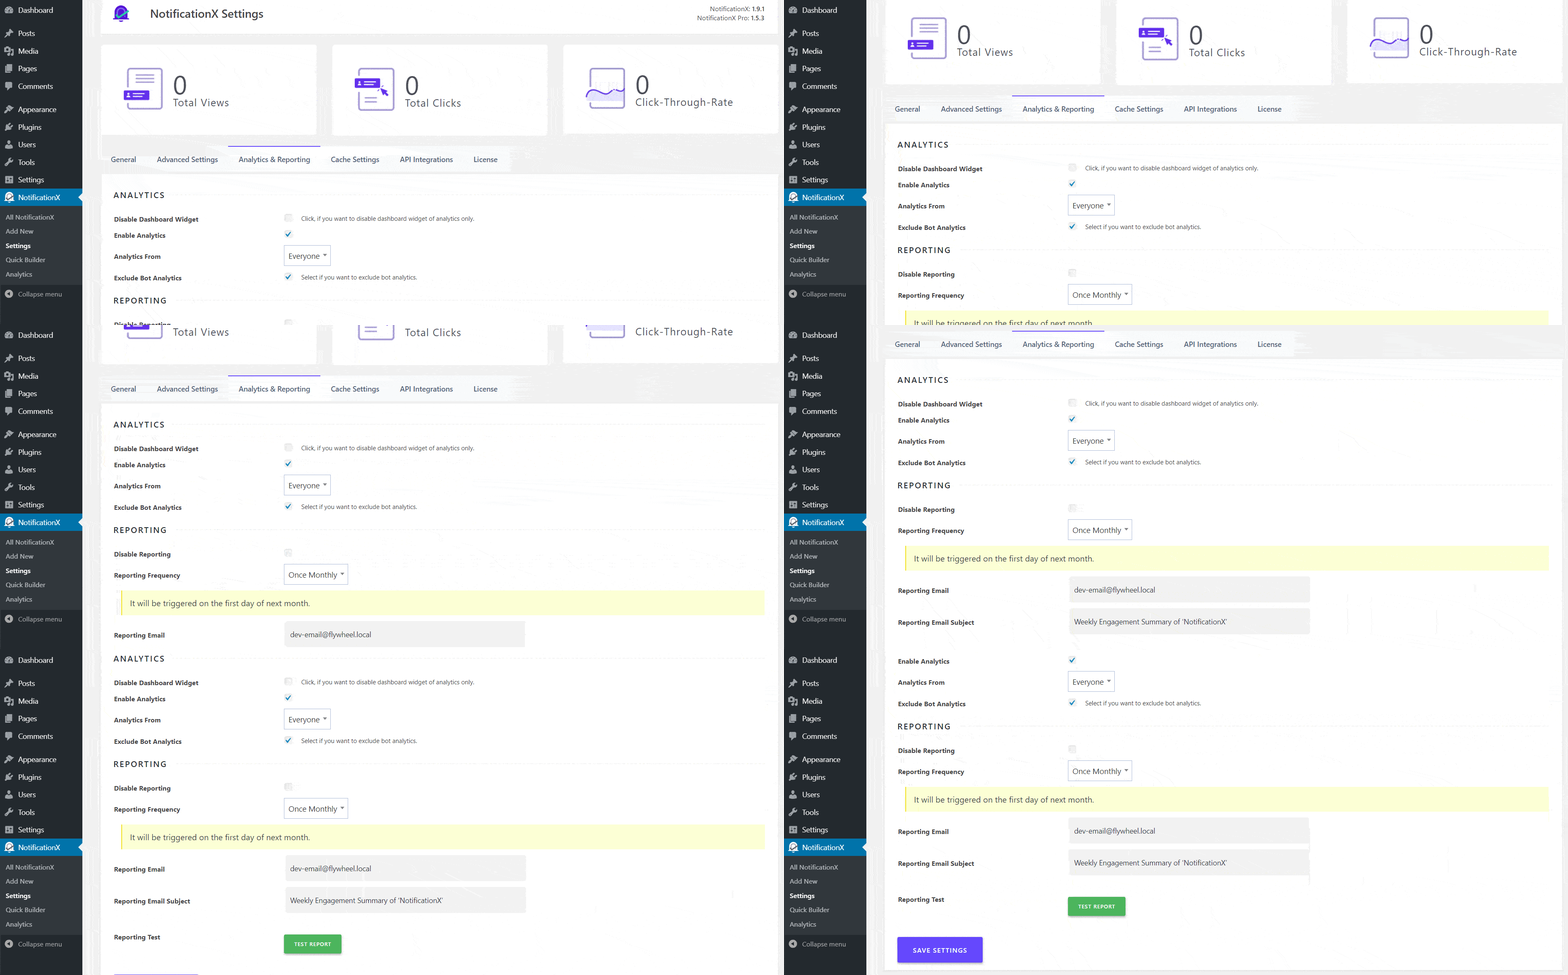
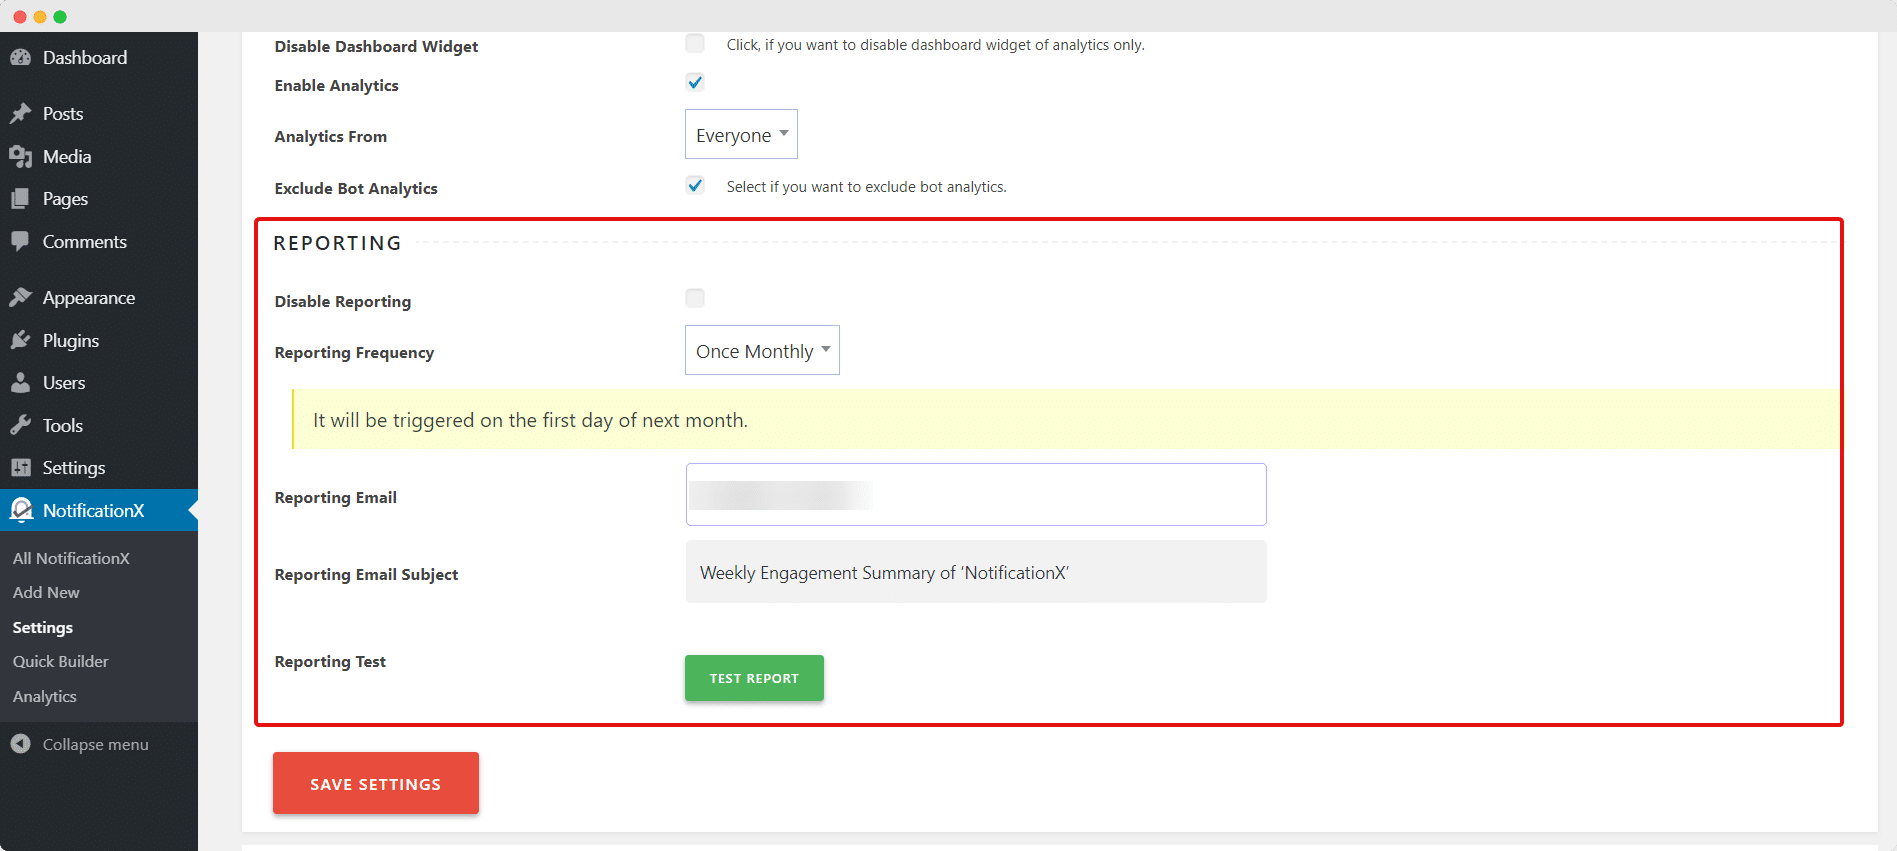
To do this, you have to configure Analytics by navigating to NotificationX–> Analytics & Reporting from your WordPress dashboard.
NotificationX Analytics

From here, under the ‘Analytics’ section, you can choose which set of users you want to generate analytics and data from. You can also choose to exclude Bot Analytics.

From the ‘Reporting’ section, you can choose to enable or disable reporting, set the frequency for your reports, and add your email address to receive reports about your campaign performance automatically. You can even send yourself a test report just to see how it all works.

Play around with the settings and adjust them to your preferences. Afterwards, make sure to click on the ‘Save Settings’ button to update your changes.
NotificationX Analytics

Step 4: Check Your Campaign Performance With NotificationX

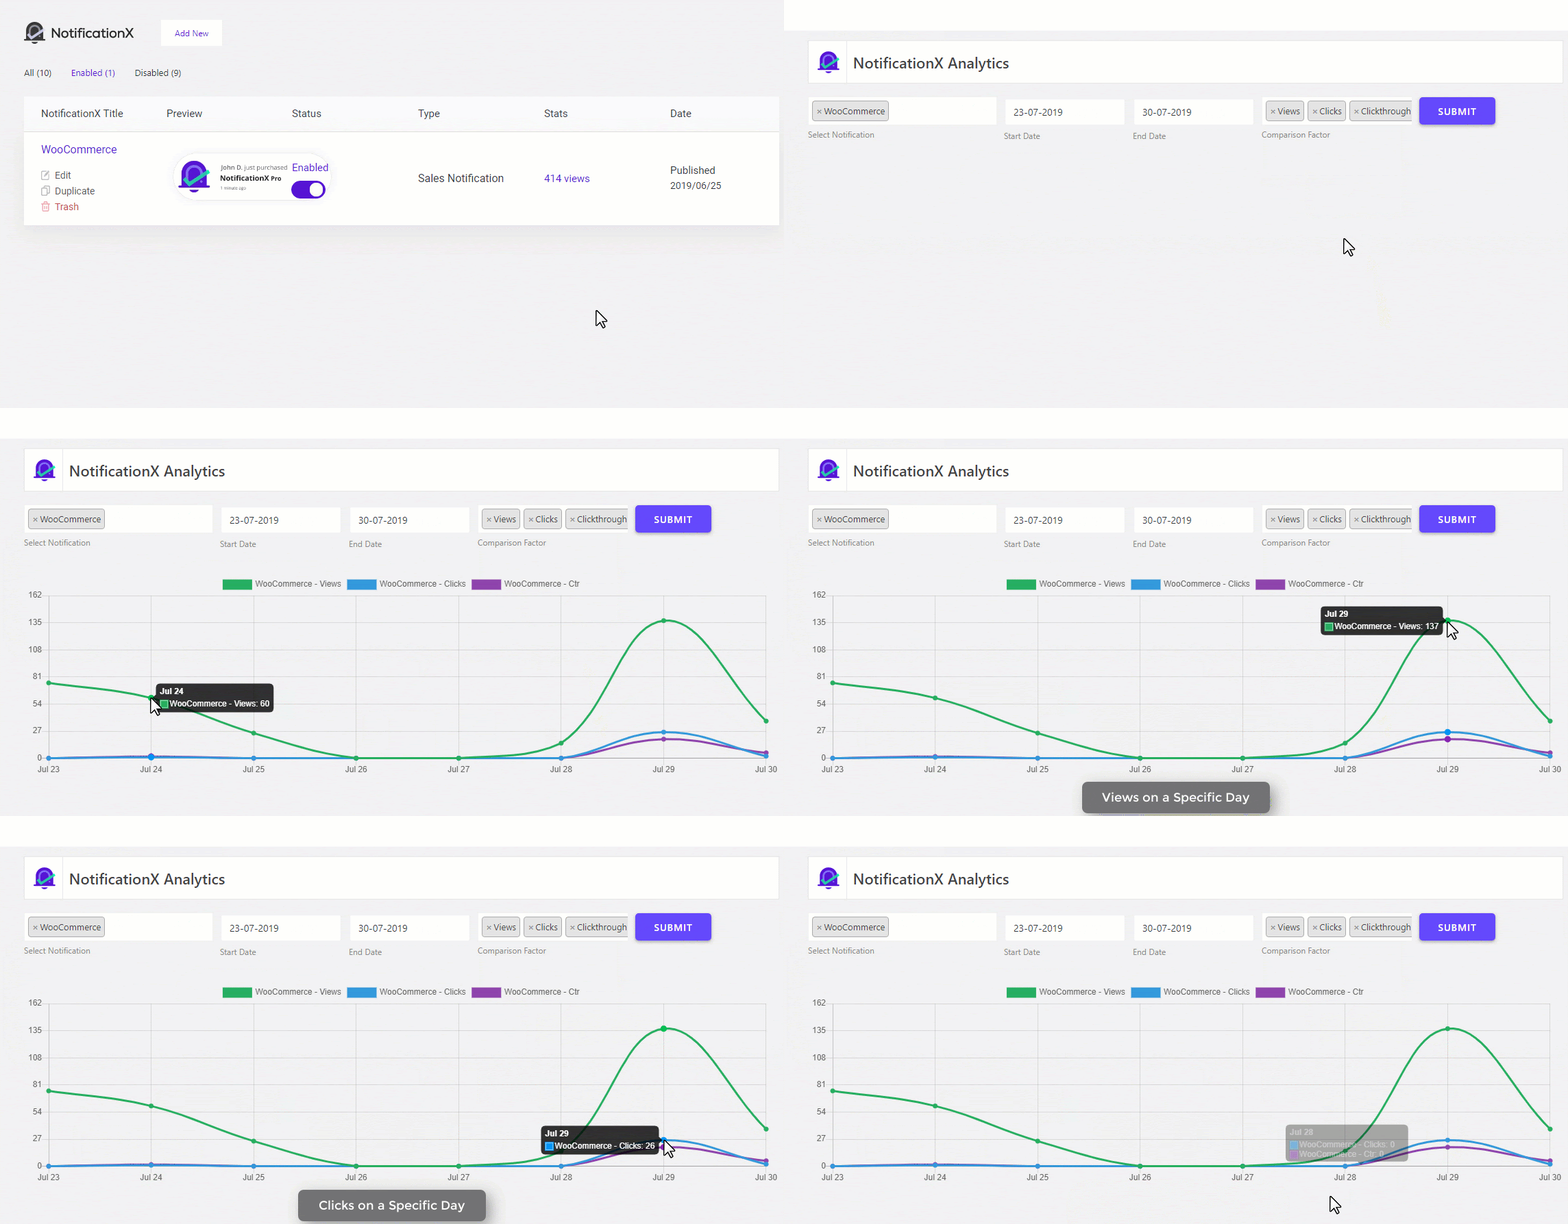
Now that you have configured your Analytics & Reporting feature, it’s time to measure the ROI from your social proof marketing campaigns. To do this, simply go back to NotificationX–> All Notifications from your WordPress dashboard. Here you will see all the campaigns you have created and the views each campaign has received.

If you want more detailed insights, all you have to do is click on the campaign’s statistics as shown below and NotificationX will display its ‘Views,’ ‘Clicks’ and ‘Clickthroughs’  in a visual, interactive graphical chart.
NotificationX Analytics

With these simple steps, you can easily check the insights and data about your social proof marketing campaigns with NotificationX Analytics & Reporting tool. Now, in just a few clicks, you will be able to get detailed reports of campaigns and evaluate them easily. 

More Advanced Features With NotificationX Pro
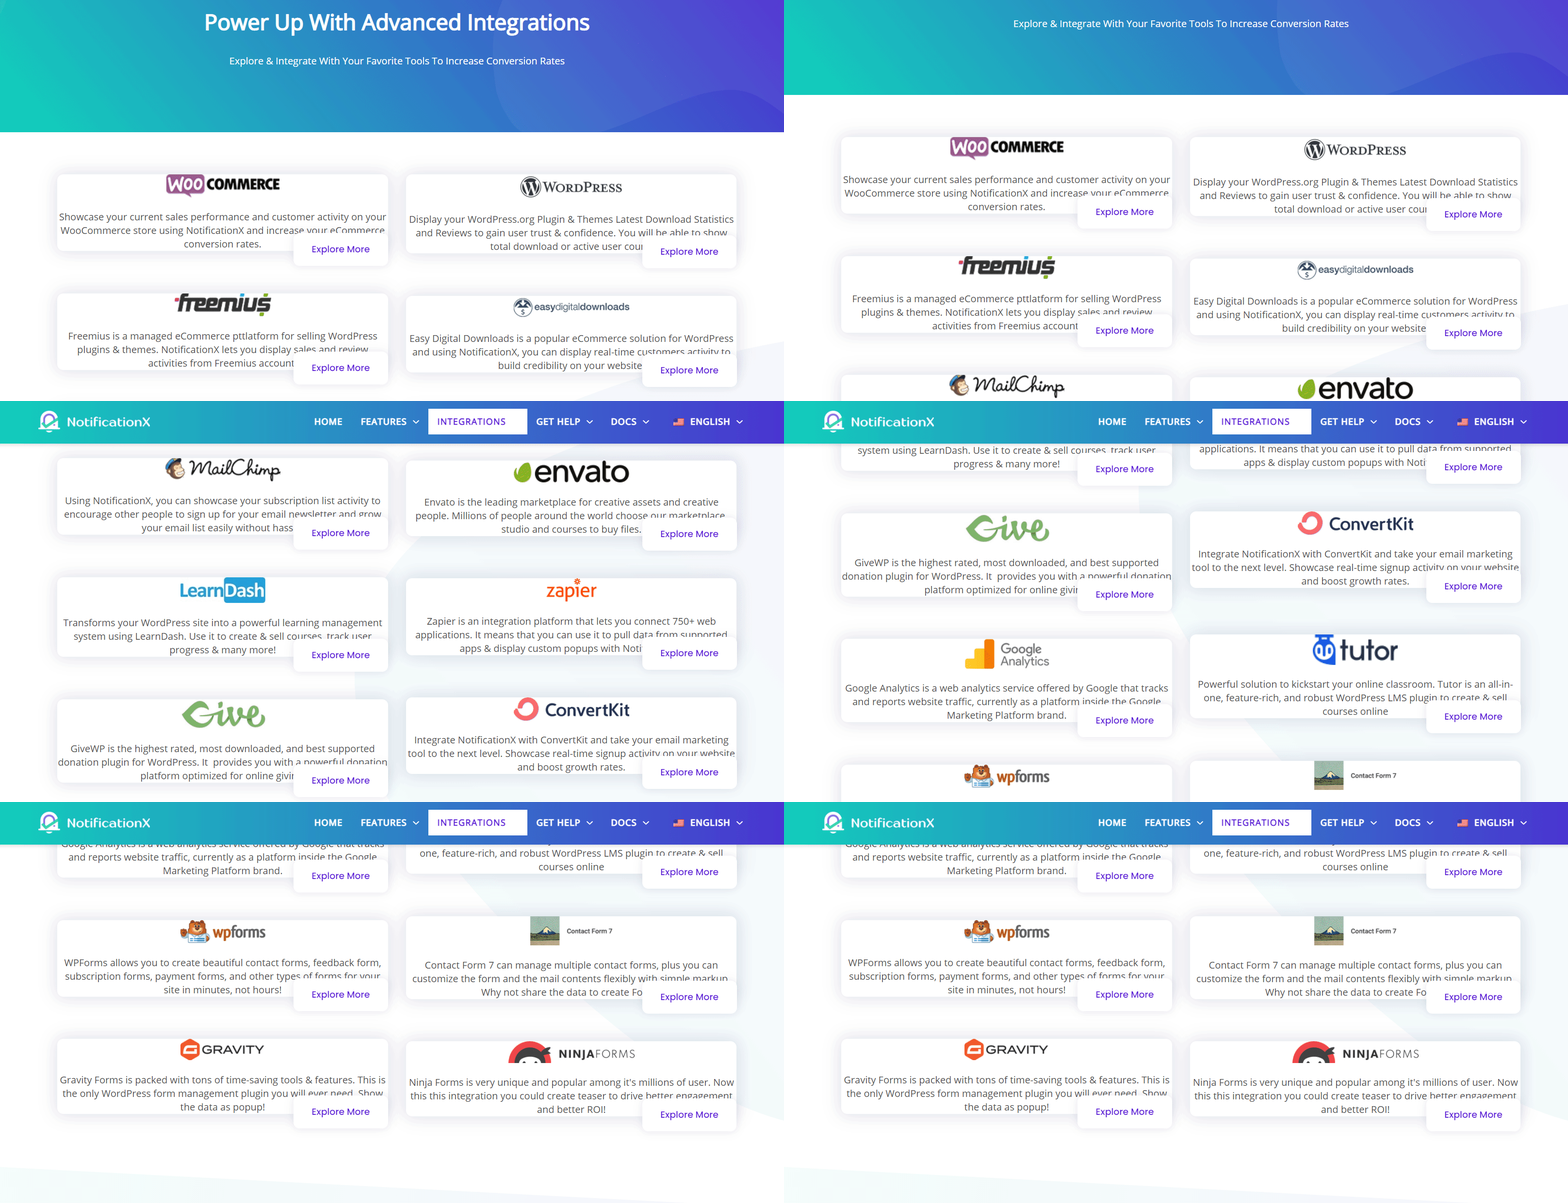
Analytics & Reporting isn’t the only amazing feature from NotificationX Pro. You can also get access to seamless integration with tons of popular platforms like Freemius, Zapier, MailChimp, Envato and much more.

Everything You Need to Know About NotificationX Analytics: Measure ROI From Social Proof Campaign

In addition to this, you will also be able to integrate NotificationX with Google Analytics and display real-time popups for visitor counts, views and even geophysical data. All of these will help you grow your website and get more engagement.

Give NotificationX Pro a try today and skyrocket your conversions by measuring your campaign ROI with its advanced Analytics & Reporting feature

If you have any suggestions or requests for a feature, let us know in the comments below or reach out to us. We would love to hear your experience and help you grow your website.

Get Free Traffic

Hacks To Get FREE Traffic To Your Website Using WordPress Plugin

Get Free Traffic

One of the biggest challenges of creating a successful website is finding ways to get free traffic with super effective marketing strategies. Even when you are creating interesting, relevant content and posting consistently on schedule, your visitor count may not be growing. 

Sometimes, it’s not simply enough to create and promote content; you have to go one step further if you want more visitors to come to your website and boost your conversions. In today’s post, we are going to teach you some clever hacks to get free traffic using WordPress plugins.

Top Hacks To Get Free Traffic To Your Website

Whether you are running an online business on WordPress, or your personal website, increasing your number of visitors should definitely be one of your first priorities. The more free traffic you can get, the higher chances you have to boost your conversions. Check out some of these growth hacks that you can use to get free traffic and boost engagement on your WordPress website.

Share Your Content On Social Media Platforms

Get Free Traffic

This may seem obvious, but you should never underestimate the power of social media networks. With nearly nearly 3.8 billion actively using platforms like Facebook and Twitter, sharing your content on these social networks is crucial. So, always make sure to share your content on all the popular social media platforms at the right time. Check out our top ways to increase your Twitter engagement rate if you want to get free traffic to your WordPress website from your Twitter account.

Get Free Traffic To Your Website From Forums

Building an online community can also help you get free traffic to your website. Online forums like Reddit or Quora are great places to meet and connect with your target audience. You can communicate with them on these forums and focus on building your network. Once you have built your community, you will be able to easily get free traffic to your website by participating actively in these forums.

Build Trust & Credibility With Social Proof

Get Free Traffic

If you want people to visit your website frequently, then you need to show them that you are reliable and trustworthy. Thankfully, this is very easy to go with a marketing tactic known as social proof. These include any and all user-generated content such as comments, sales, reviews, tweets and even website visits and download counts. By showing your site visitors that other people are also visiting your website, commenting on your posts or tweeting about your products, you can build trust and get free traffic.

NotificationX: Best WordPress Plugin For Social Proof To Get Free Traffic

Thankfully, it is very easy to use social proof and get free traffic using WordPress plugins. With the help of NotificationX, a powerful social proof solution, you can get free traffic to your website by displaying attractive popups for comments, reviews, sales, and much more. 

Want to find out how it works? Then let’s dive in to see how you can use NotificationX WordPress plugin to grow your website with social proof.

Display Stunning Comment Popups To Boost Engagement

If you want new visitors to remain on your website, you need to show them what other people are saying about your site. An easy way to do this is by displaying comment popups on your web pages. By leveraging comments from your previous site visitors, you can get free traffic and boost engagement with NotificationX. 

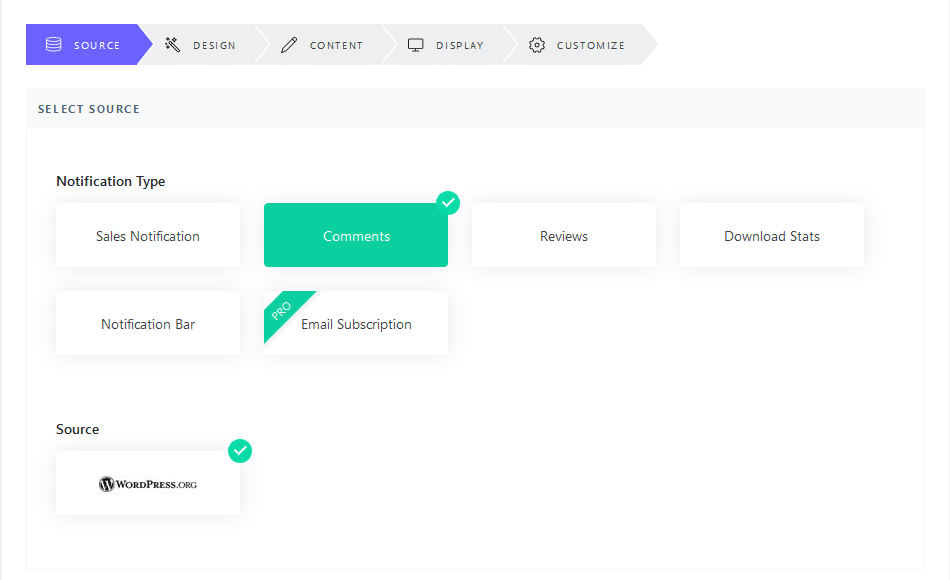
To do this, all you have to do is install and activate NotificationX. Then, create a new comment popup notification by going to NotificationX→ Add New and choosing ‘Comments’ as your ‘Source’

Get Free Traffic

Next, configure the content, design and appearance of your comment popup in NotificationX. There are tons of options in NotificationX to help you customize your comment popup easily in any way you want. It will take less than two minutes to set it all up, and you won’t have to worry about coding either. 

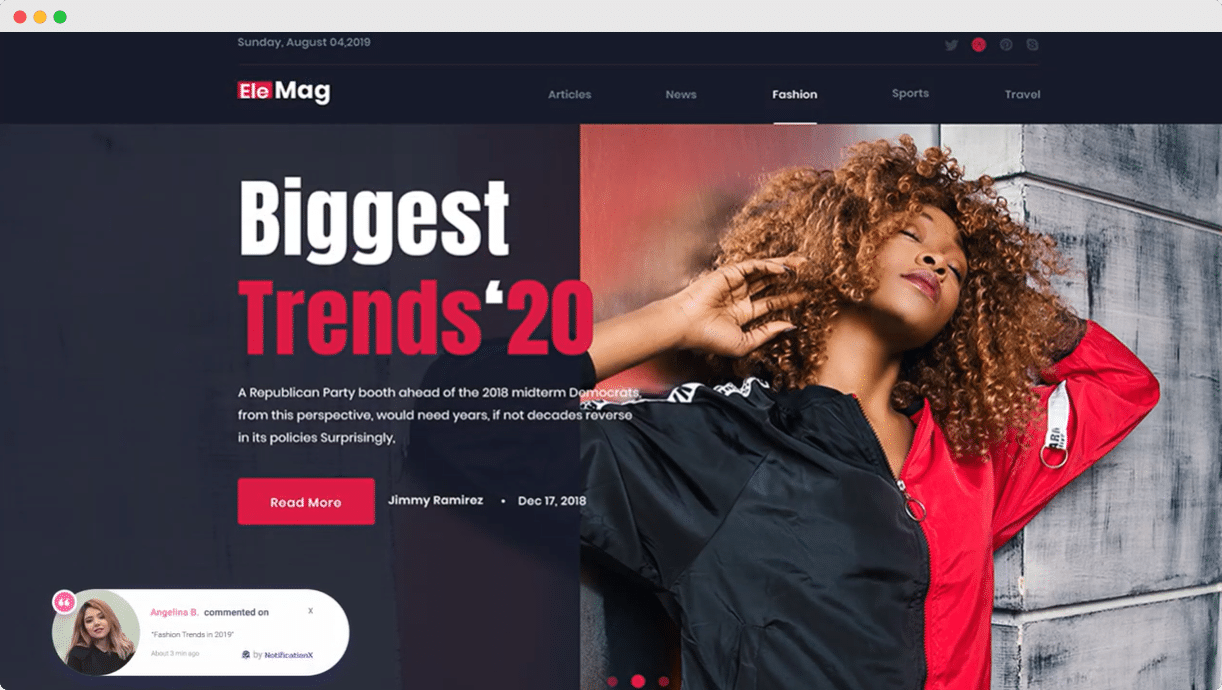
When you are done, your site visitors will be able to see beautiful comment popups on your website as shown below. This way, you can gain credibility and get free traffic by encouraging visitors to continue browsing through your website. Check out this detailed documentation to find out how to customize and configure the content of your comment popups with NotificationX.
Get Free Traffic

Get Free Traffic By Gaining Trust With Review Popups 

You can gain trust from new visitors by creating review popups in NotificationX and get free traffic that way. When a new site visitor sees reviews from other people on your website, they will be able to view as someone who is reliable and trustworthy. This may encourage them to visit your website again, make purchases or recommend you to their friends and family. 

For eCommerce businesses, sharing customer reviews and gaining trust is extremely important. Thankfully, with NotificationX, you can get free traffic to your website no matter what type of WordPress eCommerce platform you are using. NotifcationX comes with powerful integrations with many popular WordPress solutions like WooCommerce, Freemius, Easy Digital Downloads and more.

For example, if you are using WooCommerce, you can gain credibility and trust from potential customers by displaying review popups with NotificationX.  This way, you will be able to skyrocket your WooCommerce sales with NotificationX.

Get Free Traffic

Use WordPress Notification Bars To Increase Conversions

Another easy hack to get free traffic with NotificationX is by creating a WordPress notification bar for your website. A notification bar is essentially a small banner displayed at the top or bottom of your page. You can use it for special announcements, sales promotions, or even to invite visitors to subscribe for your newsletter. 
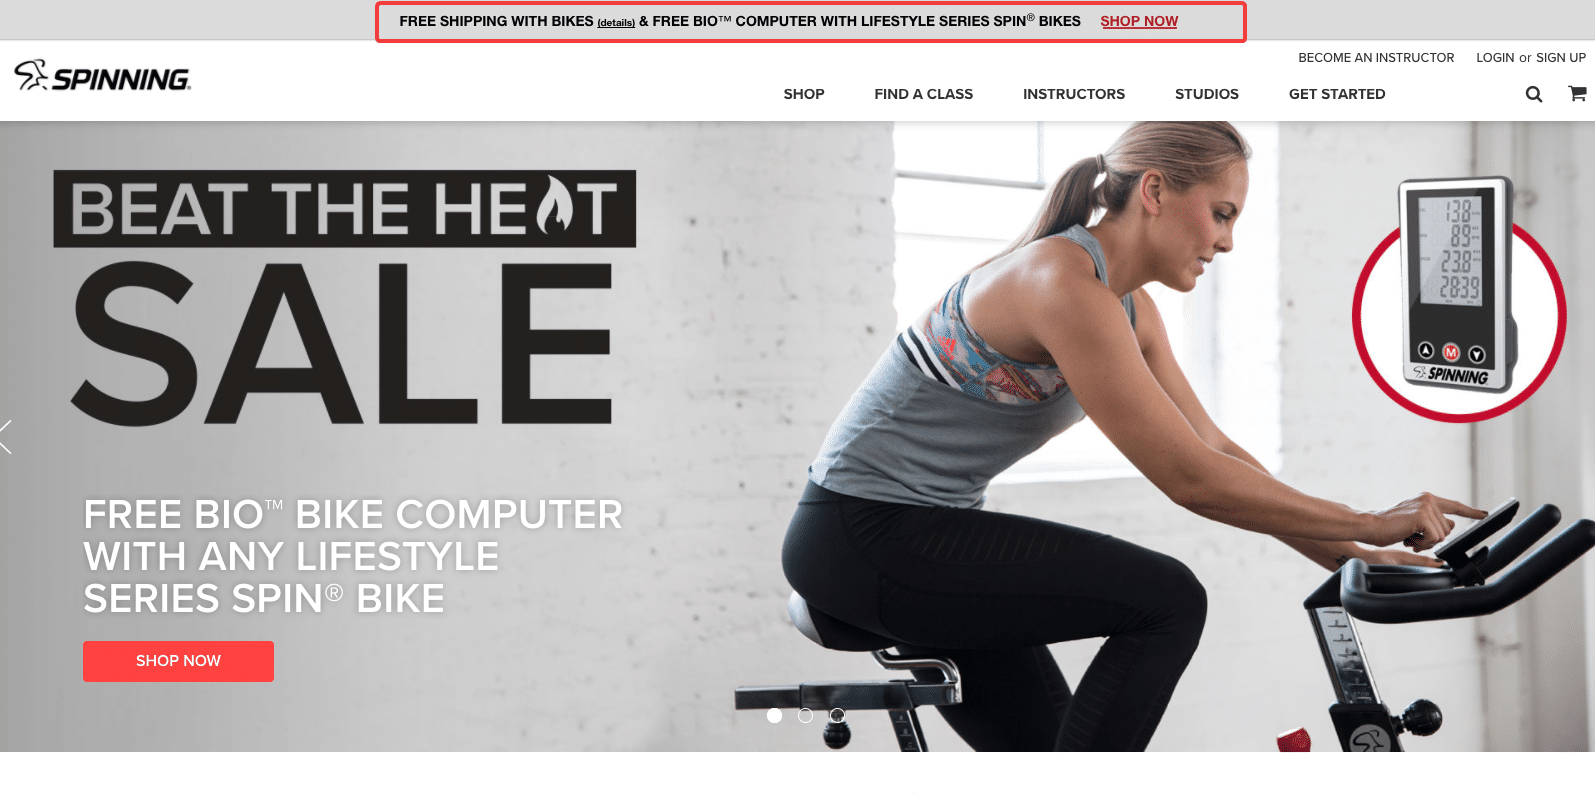
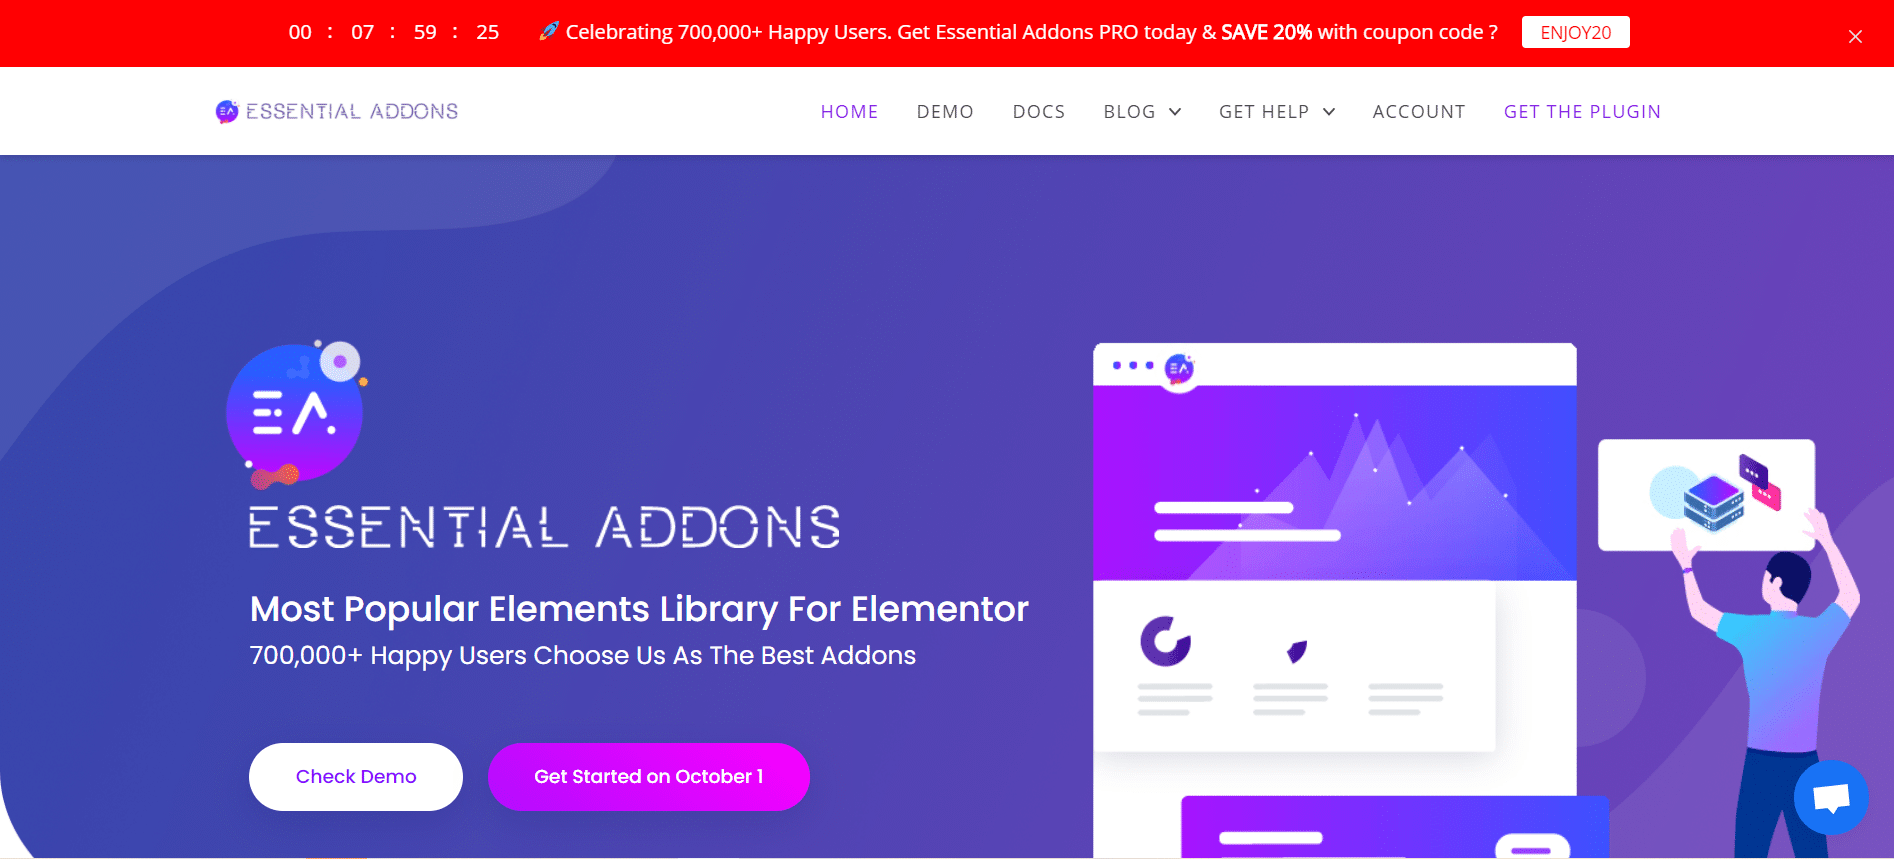
With NotificationX, you can design and display stunning WordPress notification bars complete with eye-catching Call To Action buttons, animated countdown and even use dynamic evergreen timers too. This way, whenever your site visitor clicks on the button on your notification bar, you will be able to increase your conversions and get free traffic to your website.
WordPress Notification Bar In Elementor

Use Google Analytics With NotificationX To Display Visitor Counts

Did you know that you can leverage your current visitor count to get even more traffic to your website? Using NotificationX integration with Google Analytics, you can display the number of people who have visited your website during a particular time period using attractive popup alerts. 

This way, whenever new site visitors are browsing your web pages, they will see that other people have also visited your website. They will be see your visitor count and feel more confident about the authenticity of your website.
Displaying visitor count alerts would require a few additional steps as you have to connect NotificationX with Google Analytics. However, the end result is worth it, as you will be able to leverage your current visitor statistics to get even more traffic to your website.
Get Free Traffic

Grow Your Mailing List By Displaying Email Subscription Counts

Besides this, there is another way to get more traffic to your WordPress website. If you want your visitors to keep returning, then you should focus on growing your email subscribers list.

Using social proof, you can create beautiful popup alerts in NotificationX whenever someone subscribes to your email list. This will encourage others to sign up for your newsletter as well. Thus, you will be able to get more traffic by sending emails for new content, updates and announcements to your subscribers.

To help you do this, NotificationX Pro comes with seamless integration with several popular WordPress email marketing tools. These include MailChimp, ConvertKit, ContactForms and much more. This way, you will be able to improve your email marketing strategy with social proof and get more traffic to your website.

Want to find out more? Check out this video to get a quick tutorial on how to create email subscription popup alerts in NotificationX. 

Wrapping Up

To sum it up, there are several ways you can get free traffic to your website using WordPress plugins like NotificationX. Try these growth hacks for yourself, and share your experience with us in the comments below. 

Make sure to subscribe to our blog to get the latest updates, fun tutorials, and more. You can also join our Facebook community and connect with other WordPress users like yourself.

WordPress Knowledge Base

BetterDocs: Best WordPress Knowledge Base Plugin To Boost Customer Support

WordPress Knowledge Base

Delivering the customer support can be a struggle. But, you can make it easy for yourself and your team with a WordPress knowledge base for your products. This way, you can set up a self-service for your customers so they can resolve common issues by themselves. All you have to do is provide solutions to common issues in the form of documentation. Your customers will then be able to use those documentation to resolve issues.

This way, your customers will be more satisfied, and that will help you increase your sales even more. After all, according to this study by HubSpot, nearly 90% of consumers consider customer service as a major factor for choosing to purchase and support a business.

Sounds interesting? Read on below to find out how you can use WordPress knowledge base to boost customer support.

Table of Contents

Using WordPress Knowledge Base To Scale Customer Support

Whether you are selling products or services, your customers may have many questions for you. For example, they may not know how to properly use your products. Often, you may find yourself answering the same question for every customer. But you don’t have to waste time dealing with these same queries for all of them. You can scale customer support with WordPress knowledge base instead.

Have you ever visited a website and noticed they have a “FAQ” page? That is one example of a knowledge base. But, if you want to be more efficient at customer support, you need to do better than that. 


This is where WordPress knowledge base plugins come in. With knowledge base plugins, you can quickly create documentation for your products. Think of these as instruction manuals. Their main purpose is to provide answers to customer questions.  They contain all the instructions needed for customers to resolve their queries. This way, the workload on your support team will be reduced so they can focus on more complex tasks.

Best Practices For Managing Your WordPress Knowledge Base

WordPress Knowledge Base

Before you begin to look for the best WordPress knowledge base plugin, take a moment to learn how to manage your documentation. After all, you need to know how to create a high performing knowledge base if you want to boost customer support. Let’s find out some of the best practices for managing your WordPress knowledge base.

Make It Easy For Your Readers To Understand

First of all, you have to make sure that your knowledge base is easy for readers to understand. The whole point of creating documentation is so that customers can understand how to resolve their issues. So, avoid using technical jargon when creating your knowledge base, and think of your audience when preparing it. 

Keep Your WordPress Knowledge Base Organized

It is always a good idea to keep your WordPress knowledge base properly organized. Use tags, categories, and tables of content to make your knowledge base easy to navigate. This way customers can find what they need more quickly. It will also be easier for you to redirect them to the relevant documentation if needed.

Evaluate, Improve & Update Your Knowledge Base Regularly

The most important step when boosting customer support is to make sure your knowledge base is updated. The information you provide in your documentation must be accurate at all times. More importantly, if customers are still facing issues after reading your knowledge base, then you need to make improvements.  Otherwise, your customers will feel even more frustrated and dissatisfied. 

So, always make sure to evaluate, improve and update your WordPress knowledge base regularly. This way you can create a high performing knowledge base to boost customer support.

BetterDocs: The Ultimate WordPress Knowledge Base Solution

You now know how to create and manage a proper WordPress knowledge base. But which knowledge base plugin should you use? There are several documentation plugins available for WordPress, and one of the best ones among them is BetterDocs. This powerful WordPress knowledge base plugin will help you create and manage your documentation easily. You can create stunning documentation without coding, get insightful analytics, and most importantly, easily boost customer support with BetterDocs.

How To Use BetterDocs To Boost Customer Support

If you want to find out what makes BetterDocs the ultimate WordPress knowledge base plugin, then let’s take a deep dive into its features. In this section, we are going to explore everything BetterDocs has to offer. Without further ado, let’s find out how you can use BetterDocs to boost customer support.

Create Stunning Documentation In BetterDocs

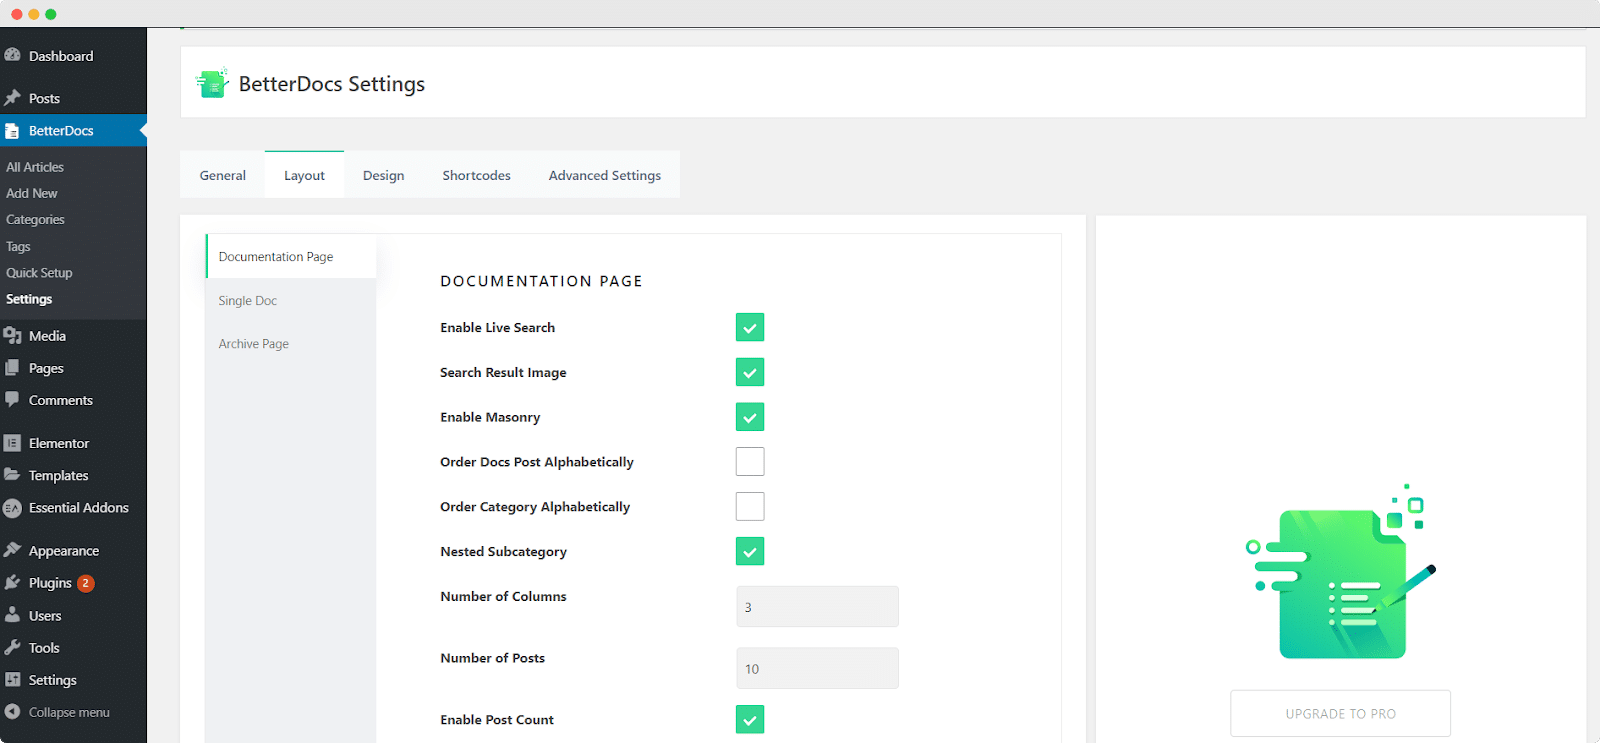
BetterDocs comes with several beautiful ready templates with which you can instantly create stunning documentation for your WordPress knowledge base. You can start by configuring your documentation home page. All you have to do is navigate to BetterDocs→ Settings→ Layout from your WordPress dashboard. From here you can choose the number of columns, and posts you want for your WordPress knowledge base. You can also choose to enable live search bar, use a masonry layout and much more.

WordPress Knowledge Base

In the same way, you can also configure your ‘Single Doc’ page and your ‘Archives Page’ in BetterDocs. All you have to do is click on the respective tabs and play around with the settings there.

Next, you have to create and publish your documentation by navigating to BetterDocs→ Add New. This will open up the editor for you, where you can write the content of your documentation. Make sure to manage categories and tags so that your WordPress knowledge base is properly organized.

Style Your Documentation With Built-in Customizer

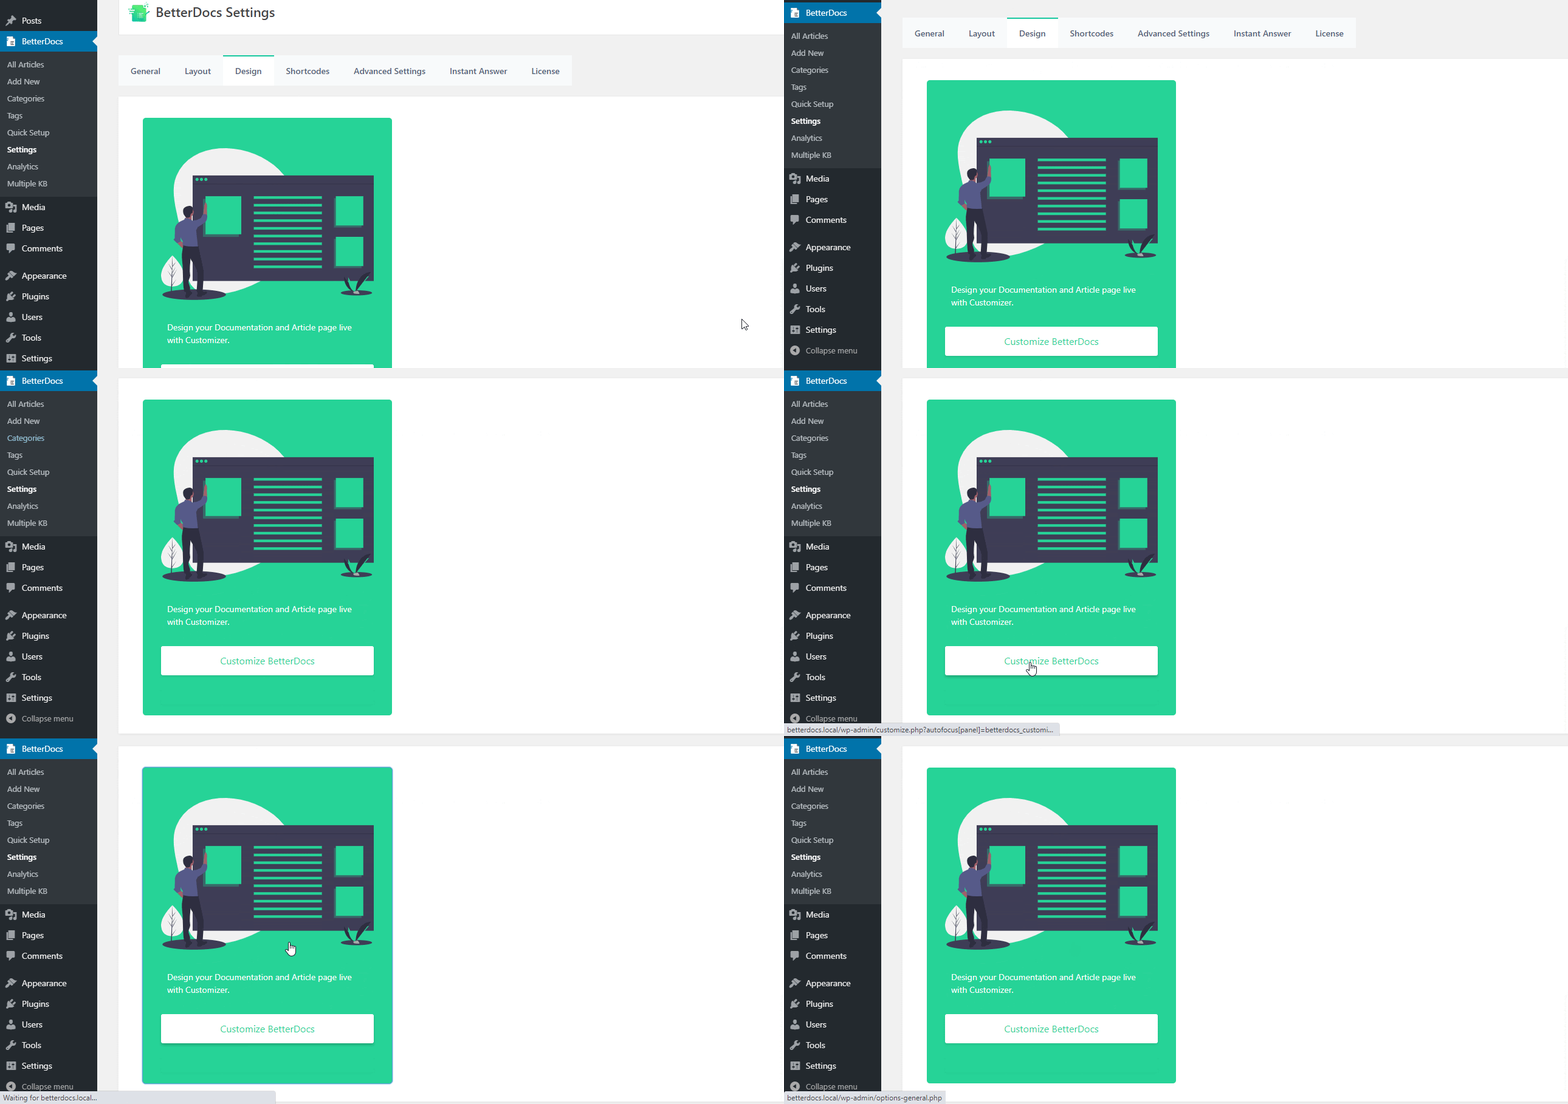
You can style your documentation in any way you want with the built-in Customizer in BetterDocs. You can use this Customizer by navigating to BetterDocs→ Settings from your WordPress dashboard as shown below.

WordPress Knowledge Base

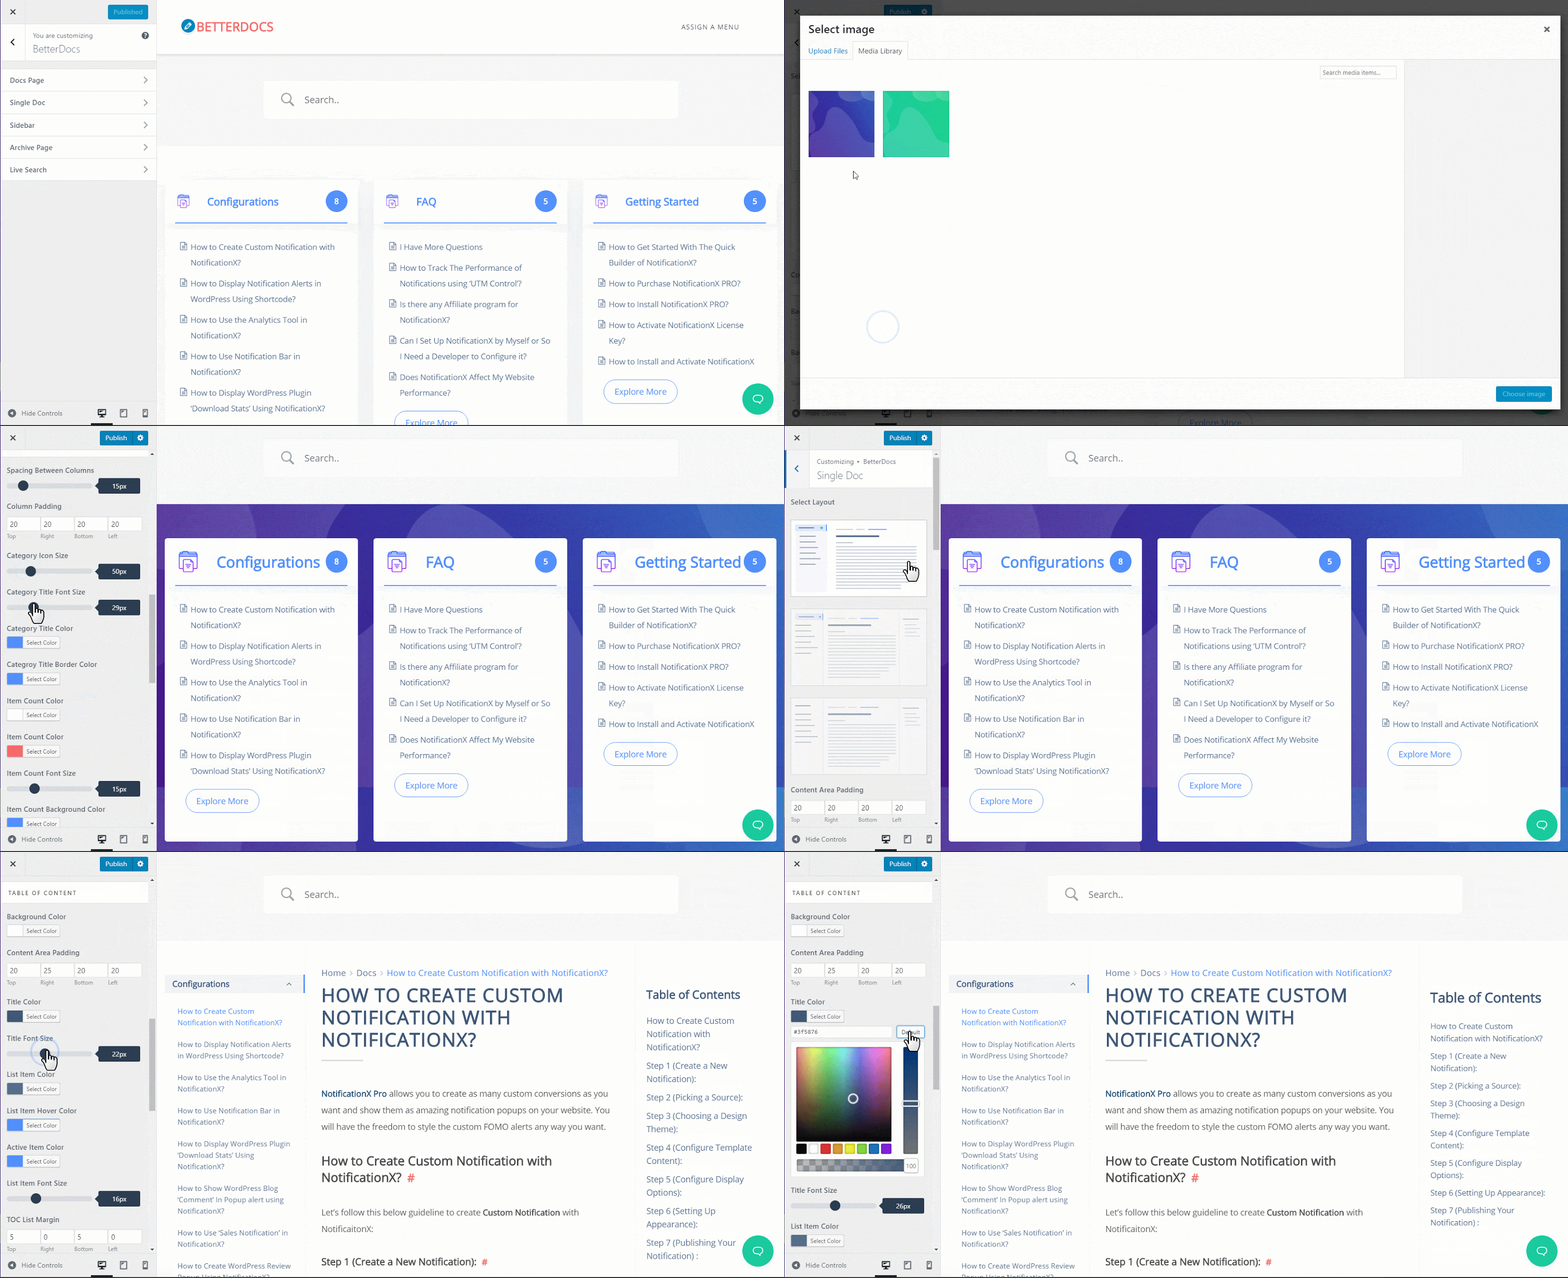
When you click on the ‘Customize BetterDocs’ button, you will be redirected to a new page from where you can style your WordPress knowledge base in any way you want. Change the background colors, font styles and more. Tweak the settings available until you are happy with the look of your WordPress knowledge base.

WordPress Knowledge Base

Make Navigation Easier With Advanced Live Search

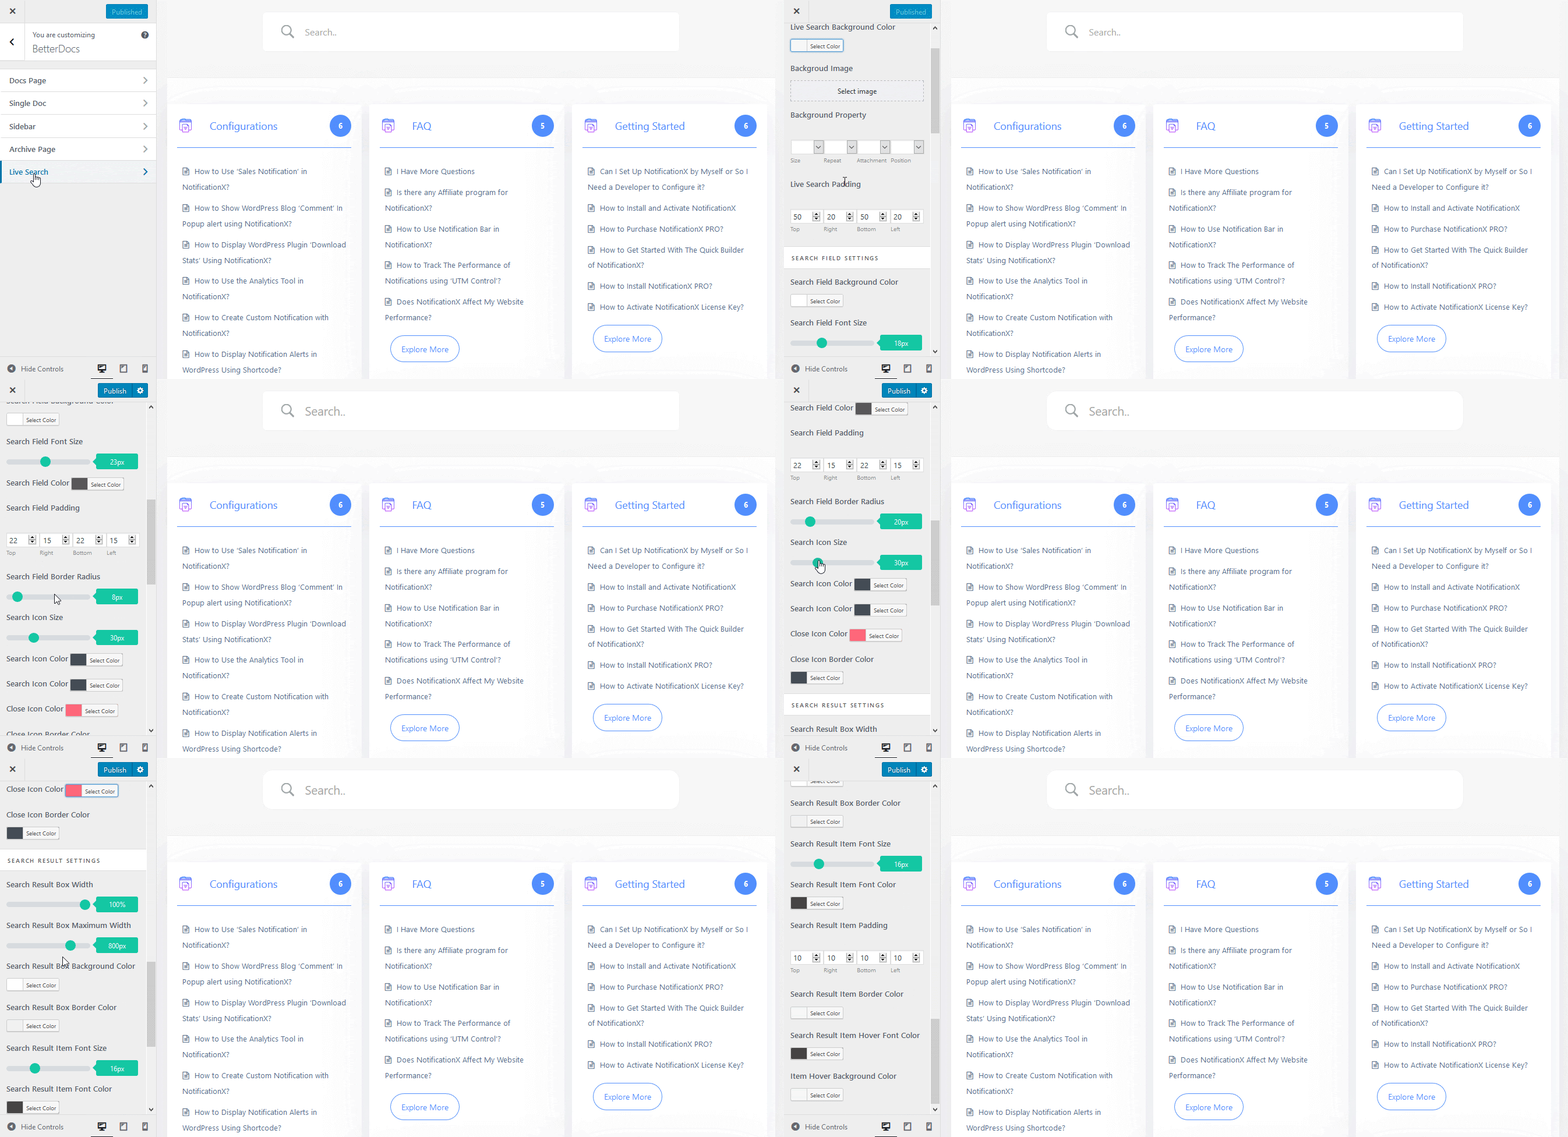
With BetterDocs you have the option to add an advanced live search  to your WordPress knowledge base. From the Customizer page shown in the above step, you will find an option called ‘Live Search’

Click on this tab and play around with the settings there to add an advanced live search to your WordPress knowledge base. This will make it easier for site visitors to navigate through your documentation. When you are happy with your style, make sure to save your changes.

BetterDocs: Best WordPress Knowledge Base Plugin To Boost Customer Support

Seamless Integration With Elementor & Essential Addons

If you are a fan of the page builder Elementor, then we have some good news for you. BetterDocs comes with seamless integration with Elementor. You can use this powerful ‘drag and drop’ page builder with BetterDocs to create your WordPress knowledge base in minutes. Let’s find out more.

Design Beautiful Single Doc Templates With Elementor Theme Builder

With BetterDocs, you can design a Single Doc in Elementor without any coding by using the Theme Builder. Once you design a template for your Single Doc page, you can save it and then reuse it again for each of your single documentation pages.

From the Theme Builder in Elementor you will be able to create a new template. If you have BetterDocs installed, you will see a new template type called ‘Single Doc’. This your basic single doc template. When you click on the ‘Create Template’ button to customize your template, you will find 10 different BetterDocs elements for Elementor.

WordPress Knowledge Base

Using these elements, you can create a stunning single doc template in Elementor with BetterDocs. You can then use this same template for each single doc page throughout your WordPress knowledge base.

Create Attractive Documentation Pages With Essential Addons

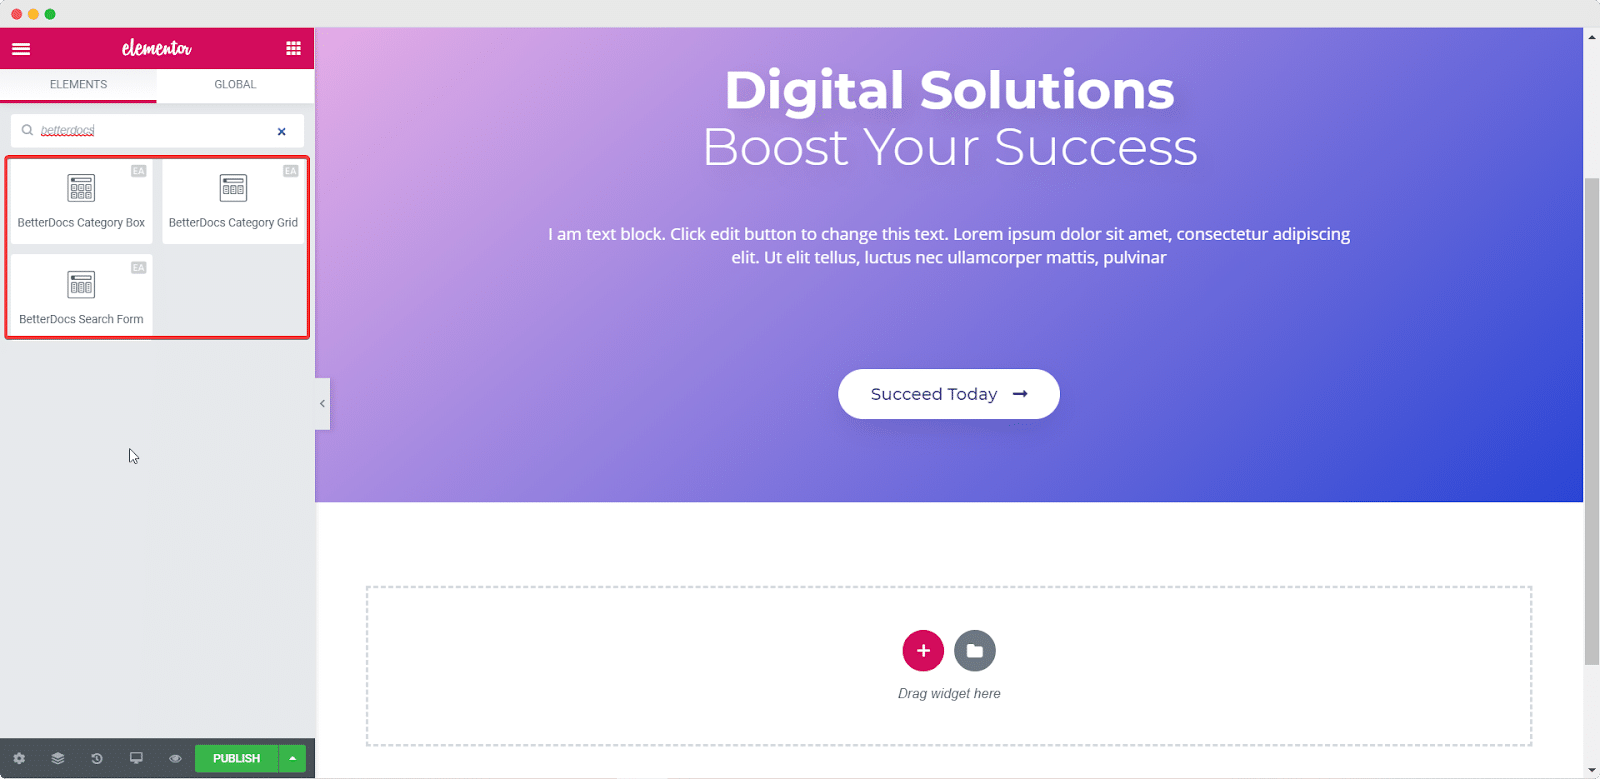
Besides this, BetterDocs can also be integrated with Essential Addons For Elementor. This is one of the most popular elements library for Elementor. With Essential Addons, you get access to 70+ amazing widgets to enhance your Elementor experience. This includes 3 knowledge base elements for BetterDocs. This includes:

✔️ BetterDocs Category Grid

✔️ BetterDocs Category Box

✔️ BetterDocs Search Form

WordPress Knowledge Base

Advanced Features With BetterDocs PRO

If you want the most of BetterDocs, then you can install BetterDocs PRO and unlock all the features available. Want to find out more about these premium features? Take a look below to see what BetterDocs PRO has to offer.

Manage Multiple Knowledge Base In One WordPress Site

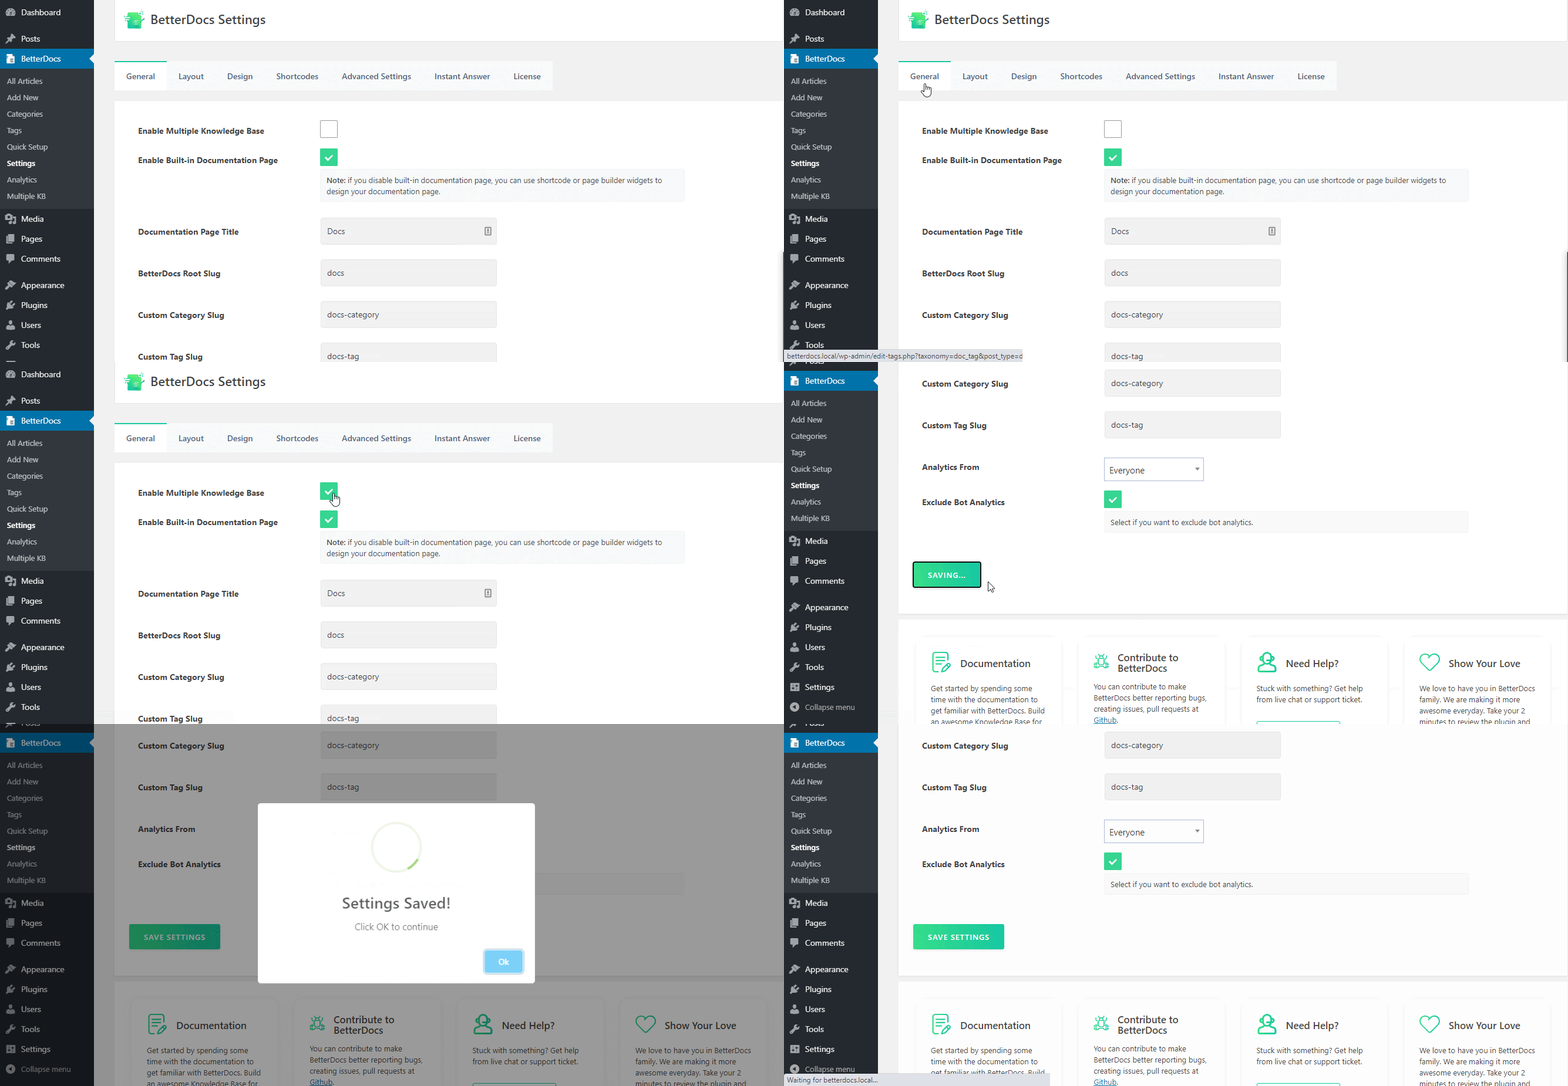
With BetterDocs Pro you have the option to enable multiple knowledge base in one WordPress website. You can easily enable this option by going to BetterDocs–> Settings–> General from your WordPress dashboard. Just click on the ‘Enable Multiple Knowledge Base’ checkboxes at the very top of the page
BetterDocs: Best WordPress Knowledge Base Plugin To Boost Customer Support

You can also customize the appearance of your multiple knowledge base in BetterDocs. When you go to the Customizer in WordPress, you will see a section called ‘Multiple KB’. There are two layouts available currently; pick the one that you like best. Then, change the background colors, content area width, title color, and more. Play around with the settings here until you are happy with the appearance of your multiple knowledge base.

Evaluate Knowledge Base Performance With Analytics & Reports

We mentioned that improving your WordPress documentation is an essential part of setting up a better documentation. With BetterDocs PRO, you get the option to configure analytics to evaluate the performance of your WordPress knowledge base. From the ‘General’ tab in BetterDocs Settings, you can set up how you want your Analytics to be applied. You can also choose to enable or disable Bot Analytics.

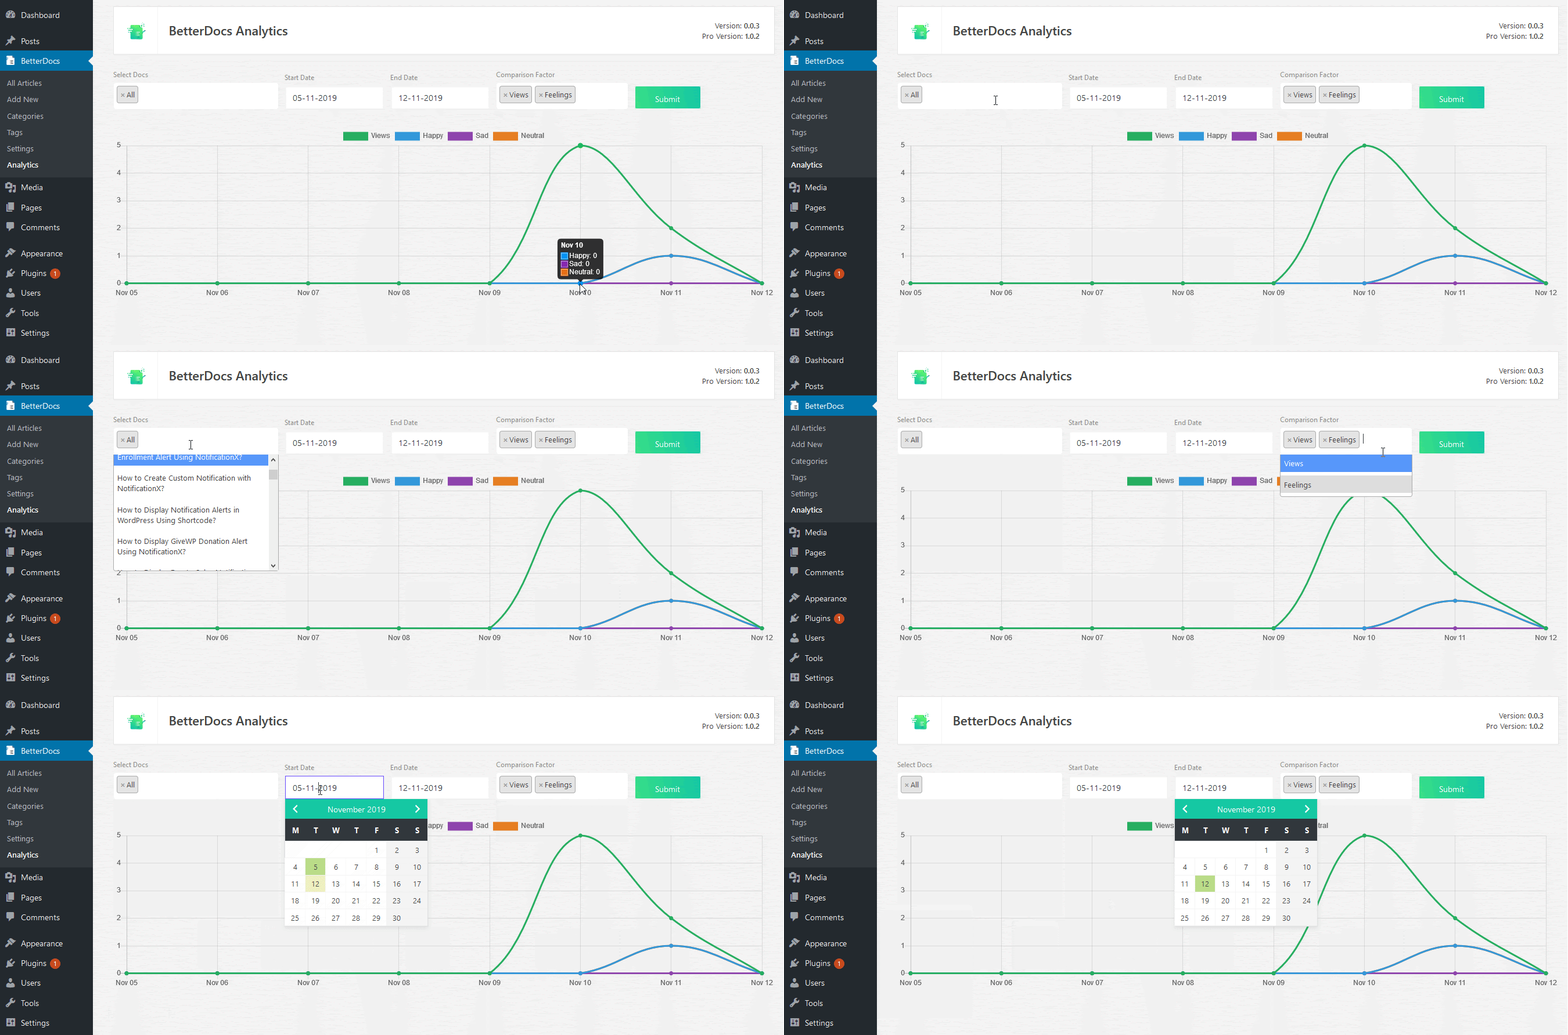
You can now evaluate the performance of your WordPress knowledge base by clicking on the ‘Analytics’ option in BetterDocs. From here  you will be able to check the performance of individual documentation articles. You can also get insightful data for specific time periods.

WordPress Knowledge Base

Quickly Resolve Customer Queries With Instant Answers ChatBot

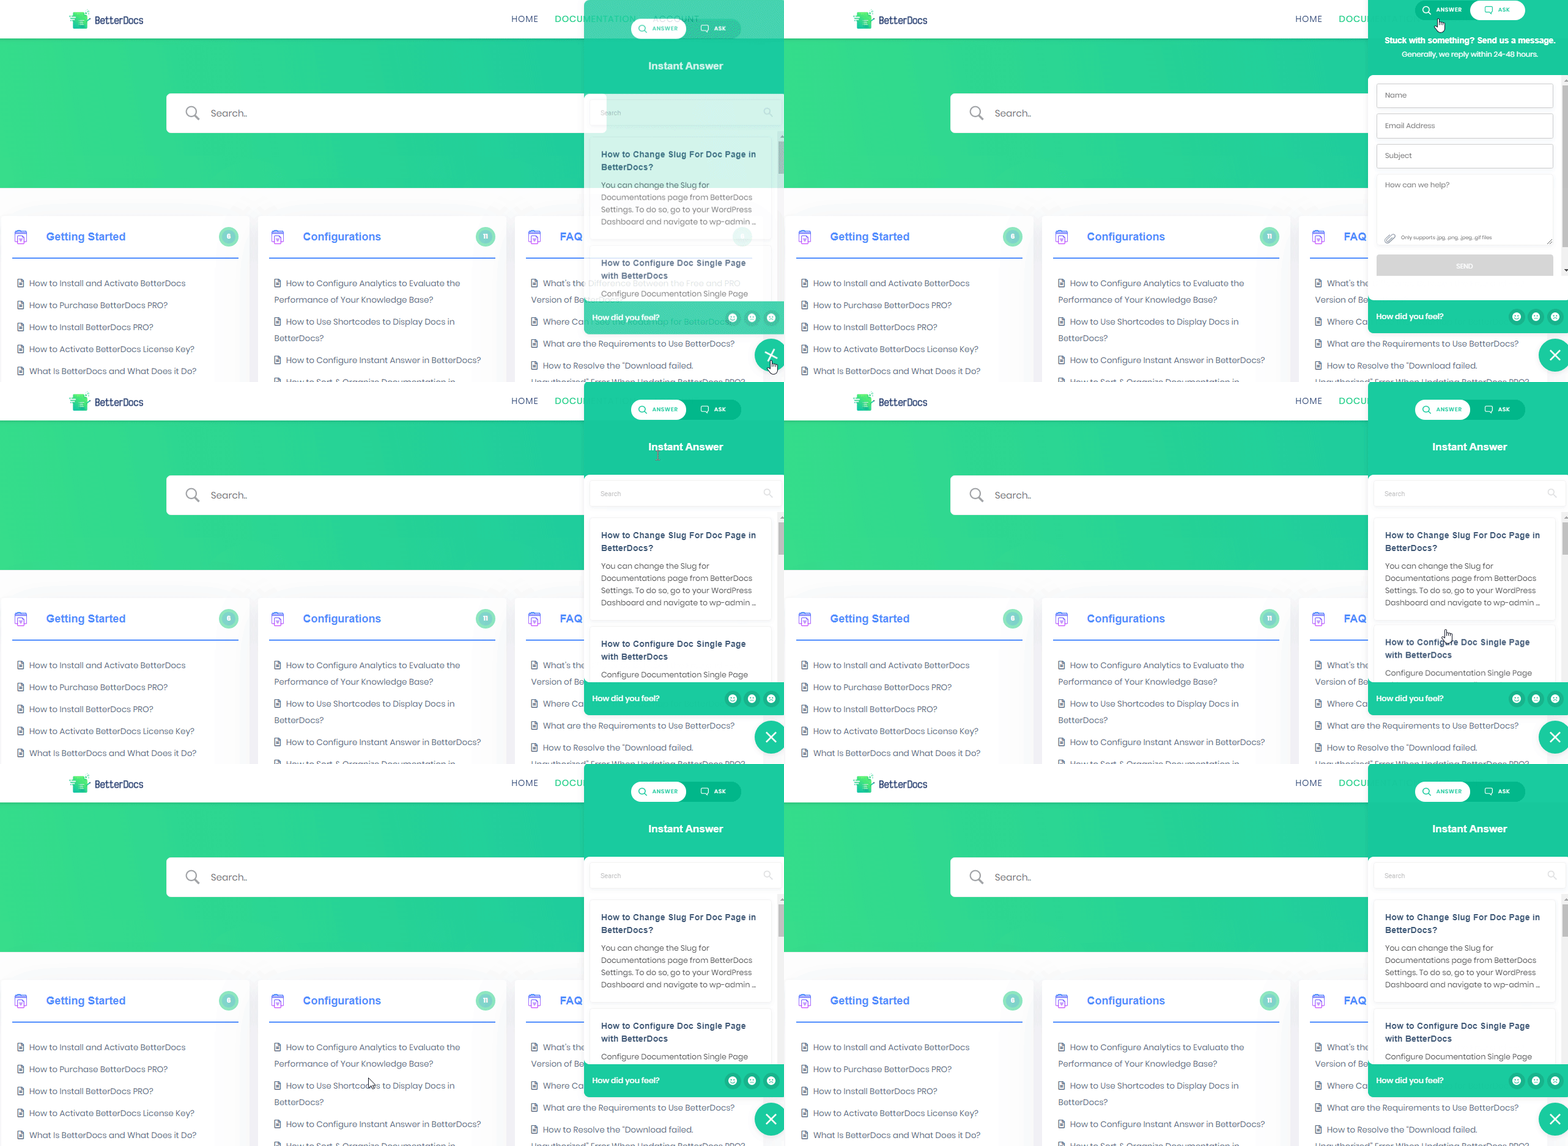
If you want to boost customer support and streamline your workload, you should configure an Instant Answers ChatBot in BetterDocs. With this option customers can resolve their problems quickly with the ChatBot instead of waiting for the support team. Afterwards you can set up the Instant Answers ChatBot to your preferences. You can tweak around with the options in the ‘Chat Settings’ section, the ‘Appearance Settings’ section, and much more.

WordPress Knowledge Base

As you can see, there are many useful advanced features that you can get with BetterDocs Pro. You can check out their flexible pricing plans here if you are interested in getting these premium features.

Ready to boost your customer support? Try out BetterDocs for free and create a stunning, content-rich WordPress knowledge base. If you like what they have to offer, feel free to check out BetterDocs Pro and unlock all features. 

For more news, fun tutorials and updates, subscribe to our blog or join our Facebook Community to connect with other WordPress users like yourself.

Social Proof Popup Queue

How To Manage Centralized Social Proof Popup Queue in NotificationX

If you want to boost conversions, one of the easiest ways to do this is by using different social proof popup alerts on your site. But, to do that, you need to be able to control their timing. With the centralized queue management feature in NotificationX, this is very easy to do. In today’s post, we will show you how to use this powerful feature in three easy steps. 
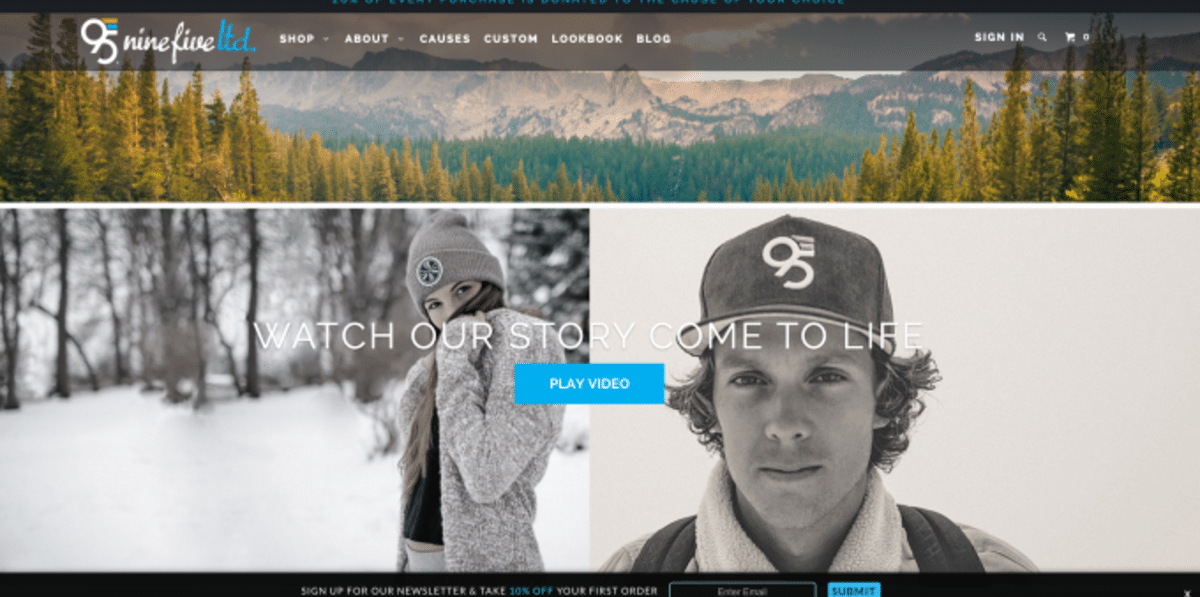
Table of Contents

How Does A Centralized Queue Help You Manage Social Proof Popups?

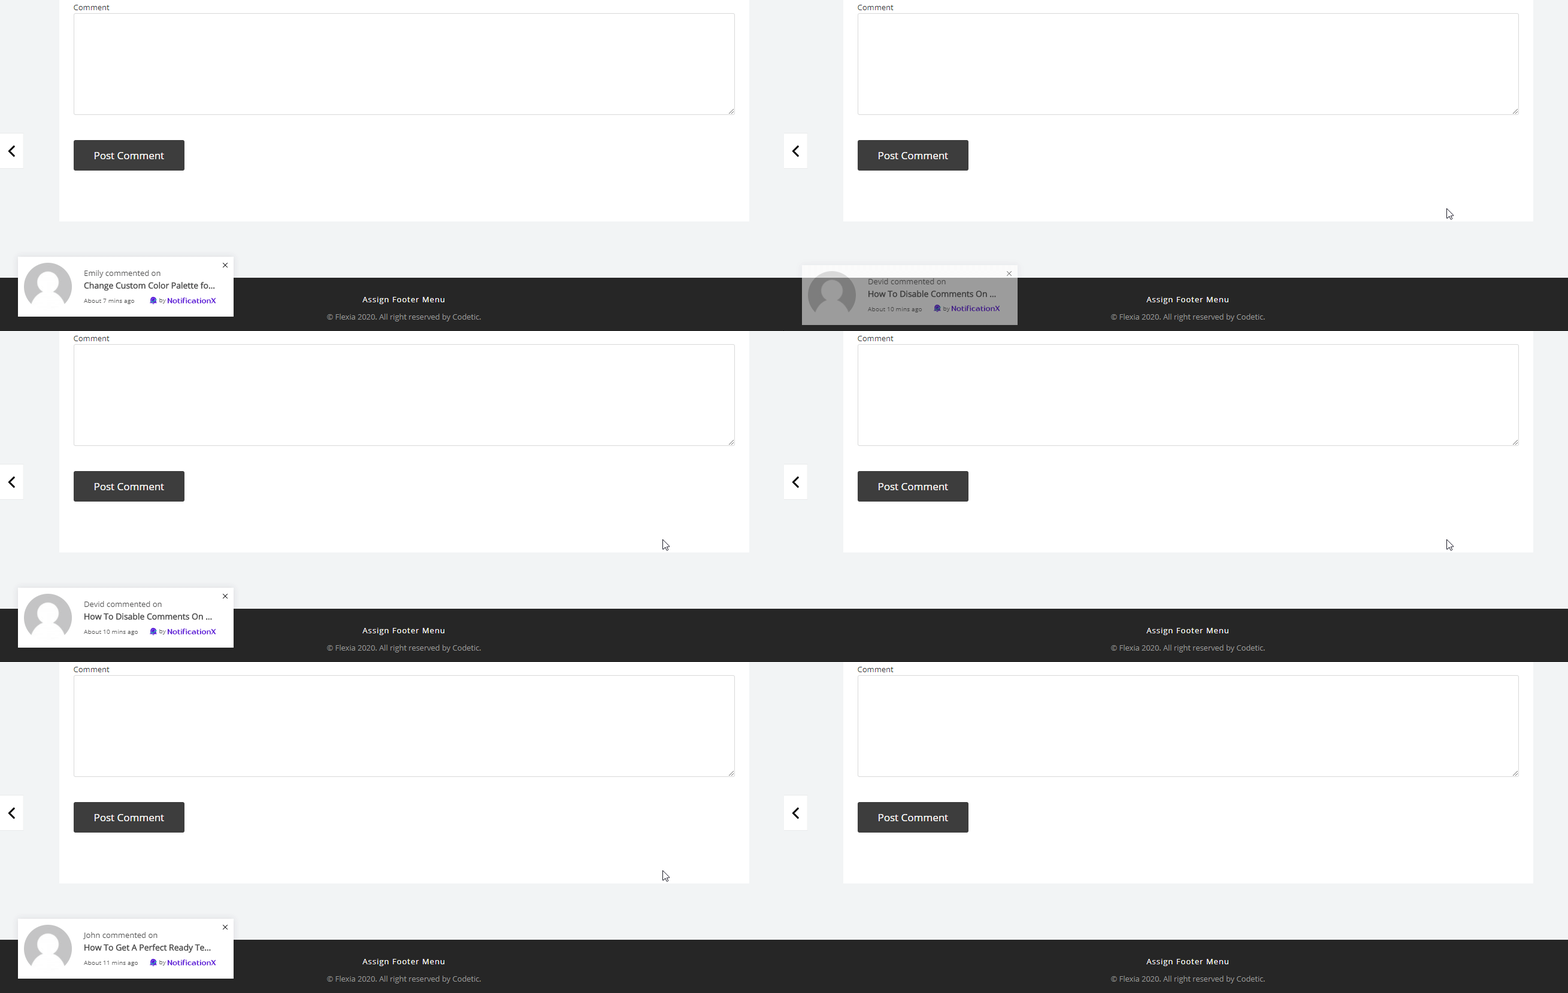
A centralized queue system lets you control the timing of your social proof popup alerts. This feature automatically checks for the latest notification alerts. This way, it makes sure that all of your social proof popup alerts are displayed in sequence. 

For example, suppose one customer has purchased a product. Two minutes later, another customer leaves a review for your product. Now, you can display both of these notifications as social proof popup on the same section of your site. You can manually set the time for each social proof popup so that they do not overlap. But it will take too much time and effort. Or, you can do it using centralized queue management. This powerful feature is available in NotificationX, and is called ‘Global Queue Management’.
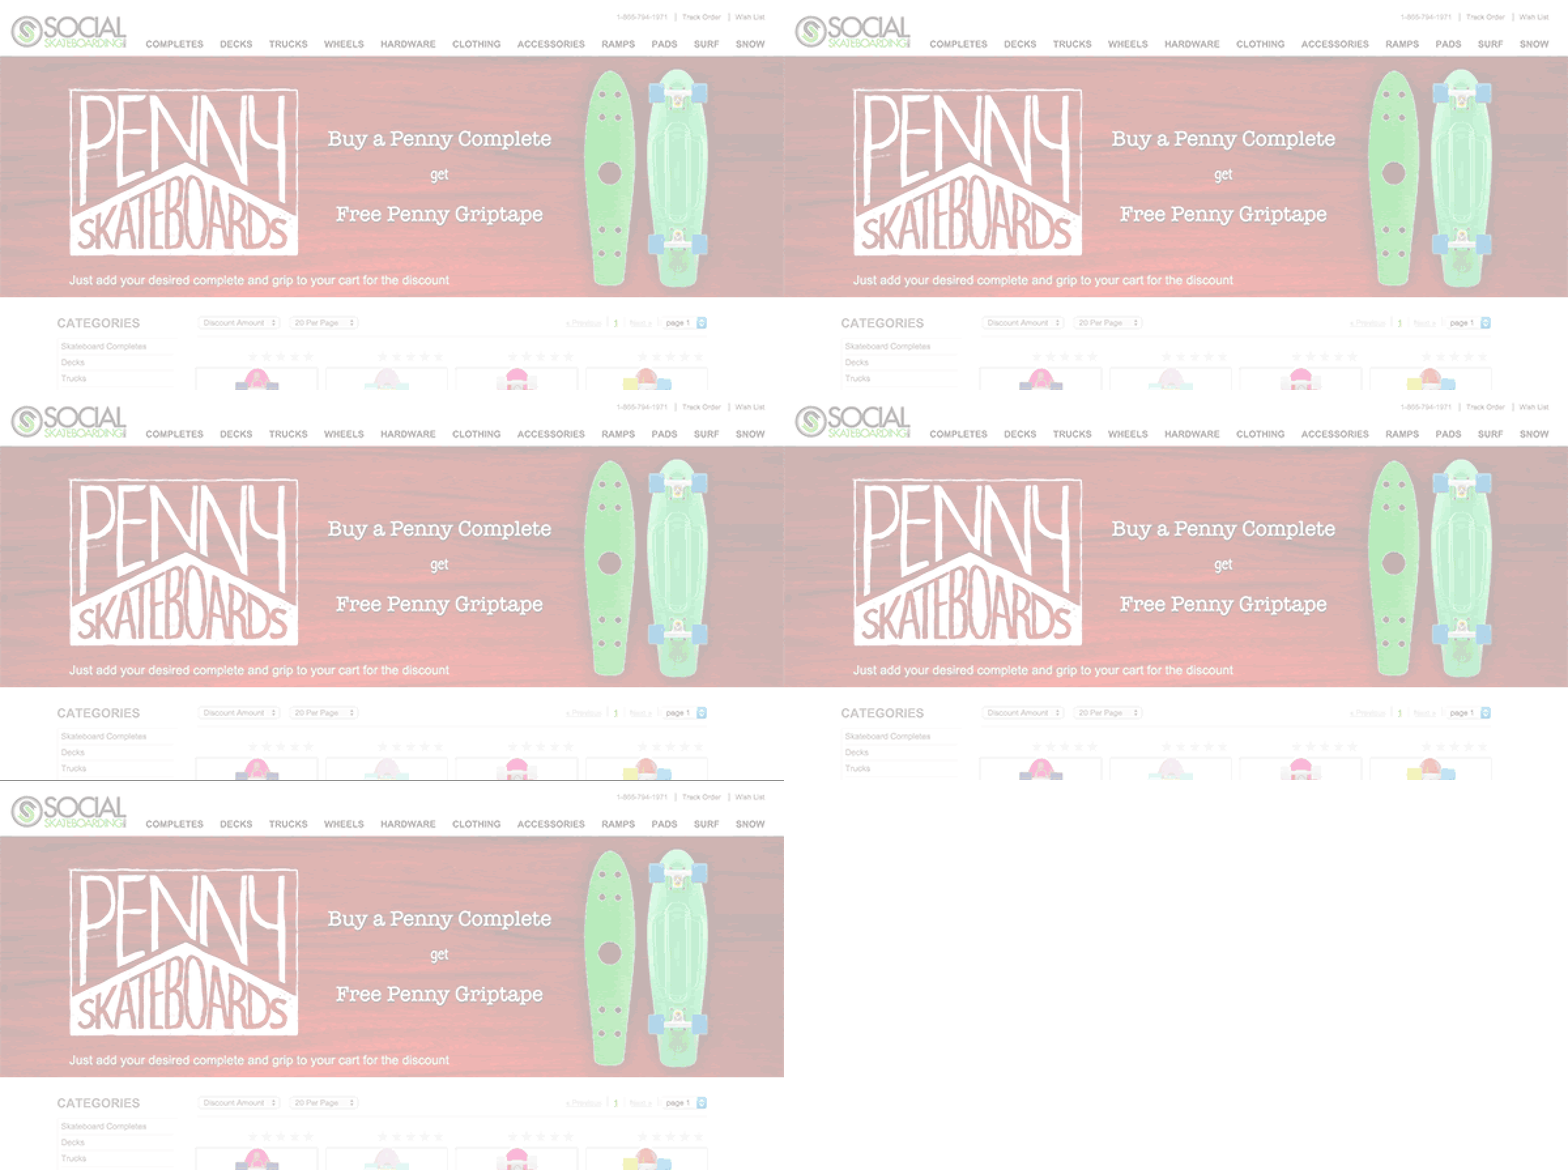
With this feature, you only need to configure the timing in one place . It will then display your social proof popup alerts in sequential order on your website. This way, you will not have to worry about displaying the most recent social proof popup alerts by yourself. The centralized queue management system in NotificationX will take care of it.
How To Manage Social Proof Popups With Centralized Queue In NotificationX?

If you do not want to waste time configuring each social proof popup on your website, then you are in the right place. Read on below to find out how you can use NotificationX to manage centralized social proof popups queue. 

To get started, you must have NotificationX installed and activated on your website. Since the ‘Global Queue Management’ option is a premium feature, you will need to install NotificationX Pro on your site. Once that’s done, follow these step-by-step guidelines given below.

Step 1: Configure Settings For Global Queue Management In NotificationX

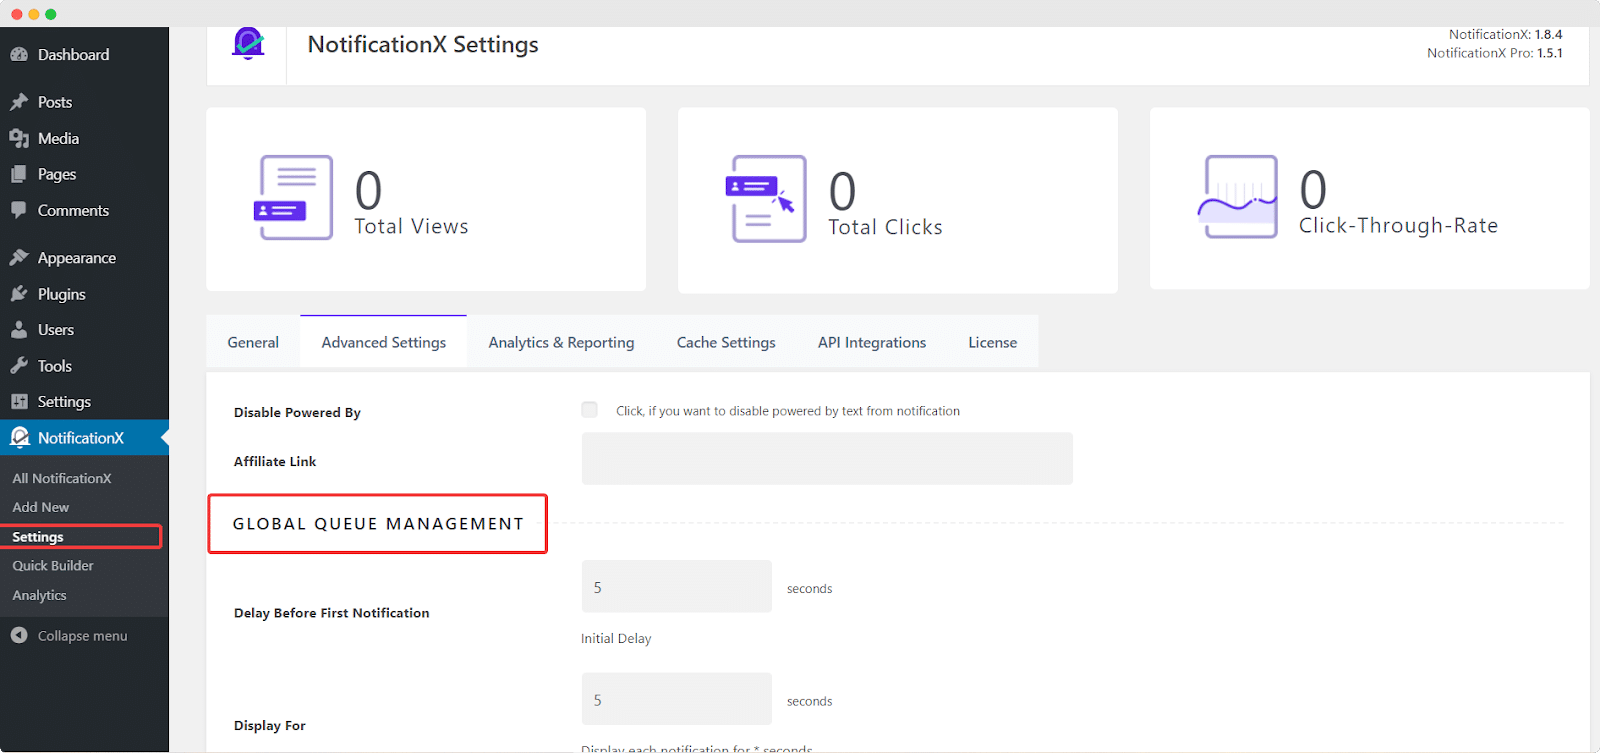
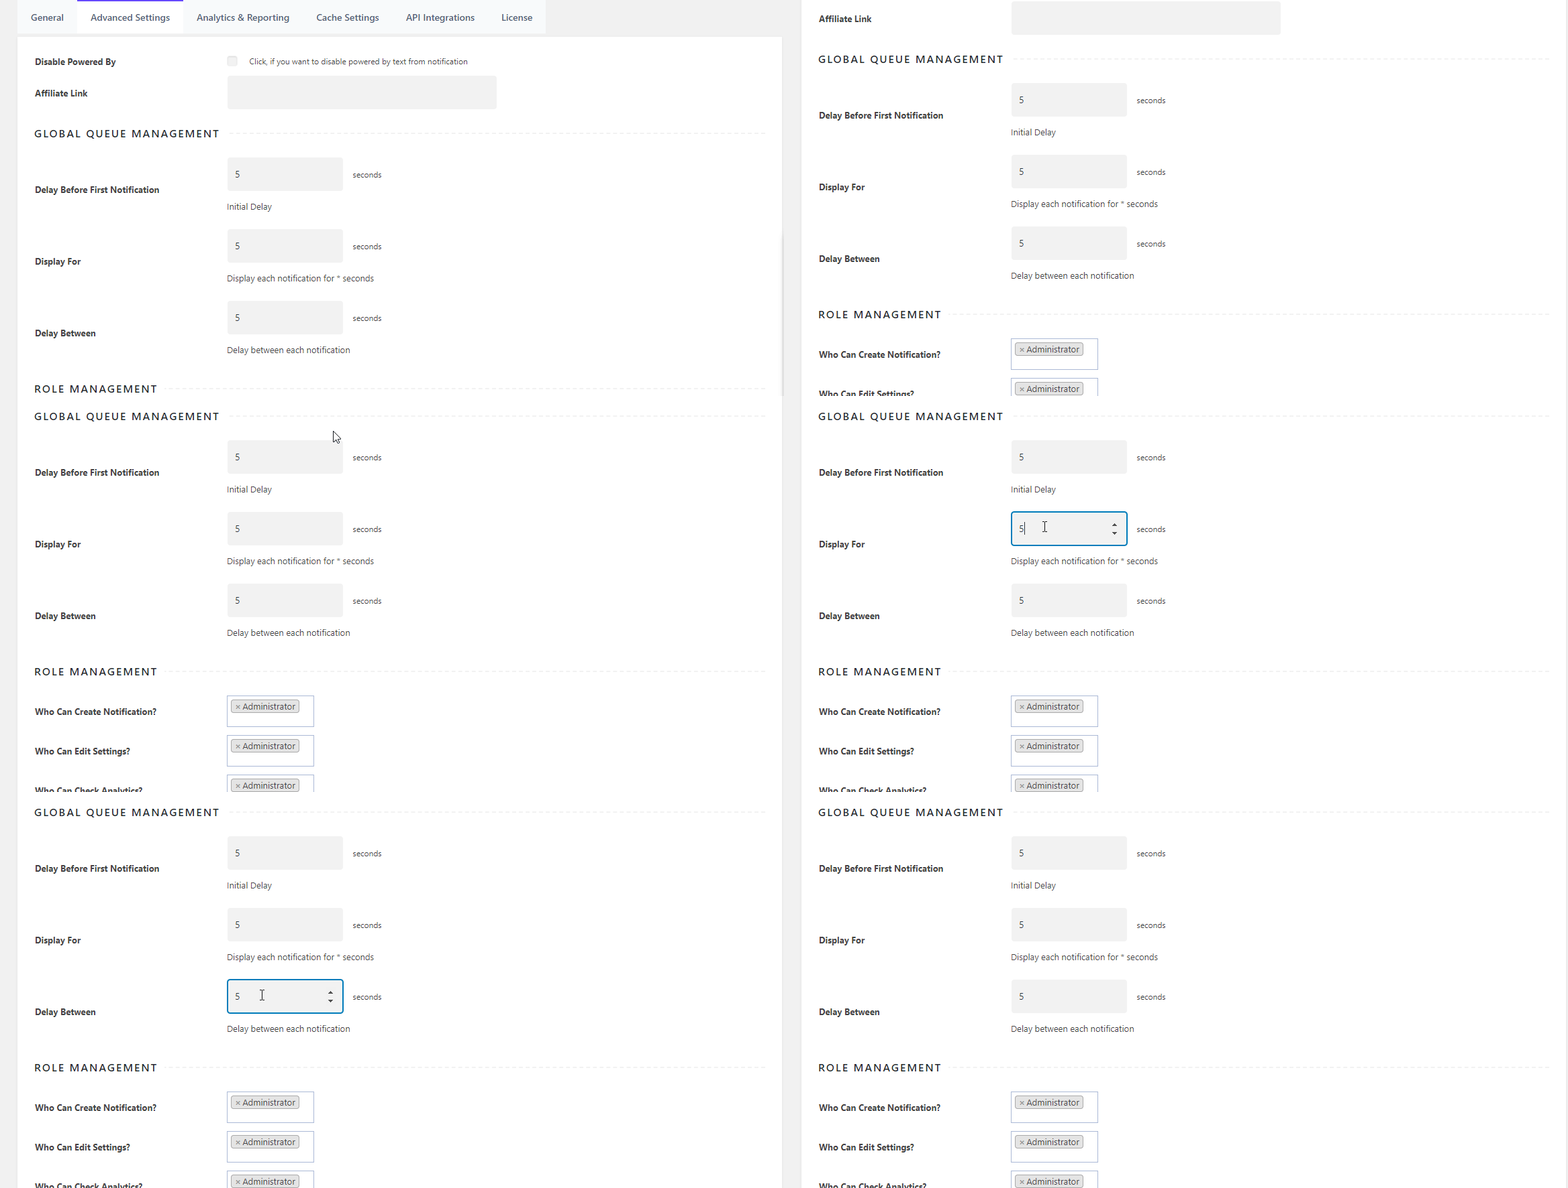
To configure the settings for the centralized queue, head over to your WordPress dashboard. Next, you will need to navigate to NotificationX→ Advanced Settings→ Global Queue Management. You will see there are several options here as shown below. We will go over what these options can do for you in the next step.

social proof popup queue

Step 2: Set The Timing For Global Queue Management

You can set the timing for your social proof popups from the options under ‘Global Queue Management’ section. Here, you can set the number of seconds to delay before the first notification alert on your site. You can also control how long your social proof popups should be displayed. For different notification alerts, you can control the time delay between each popup.

Centralized Queue

Change these settings to suit your personal preference. If you are done, then give yourself a pat on the back. You have successfully set the timing for global queue management. Now all that’s left to do is enable the global queue for each social proof popup on your website. Move on to the next step to find out how that’s done.

Step 3: Enable Global Queue In NotificationX

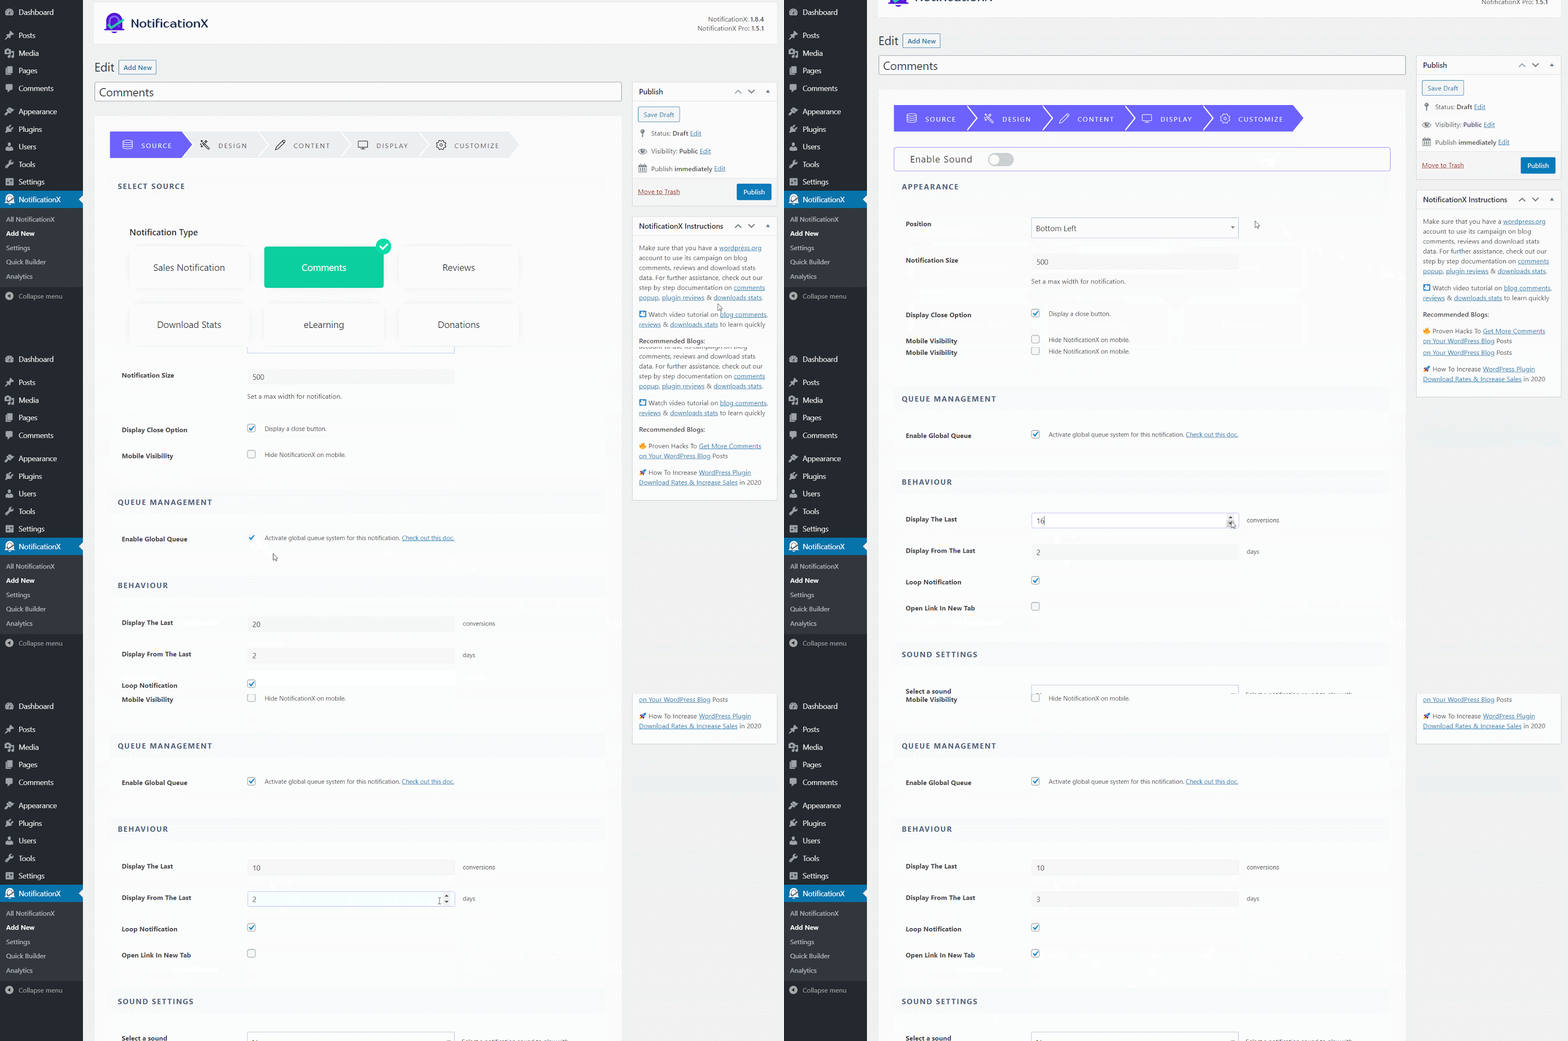
To manage the centralized social proof popup queue you need to enable the option for each popup. You can do this with a single click of your mouse. When you are creating a new notification alert in NotificationX, you can enable the global queue from the ‘Customize’ tab as shown below. All you have to do is check the ‘Enable Global Queue’ option. 

Social Proof Popup Queue

Afterwards, you can configure the behavior of your social proof popup. You can choose the number of most recent conversions. If you want, you can also control the number of days to display alerts from.

When you are happy with your settings, publish or update or your notification alert. NotificationX will automatically display your social proof popups in sequential order as per your settings.

social proof popup queue

Just like that, you have managed a centralized social proof popup queue in NotificationX in less than 5 minutes. Amazing, isn’t it? Now you can sit back and relax, because NotificationX will display all of your alerts in sequential order.


Enjoyed this post? Try out this amazing centralized social proof popup queue management with NotificationX Pro. See it in action for yourself, and share your experience with us in the comments below. Feel free to contact our support team, or join our Facebook Community if you need any assistance.

WordPress Notification Bar In Elementor

Introducing WordPress Notification Bar In Elementor To Boost Engagement

A WordPress notification bar is a great way to boost engagement on any kind of website. You can use it for important announcements, sales promotions and much more. It is a creative way to attract the attention of site visitors and increase your conversions. 

Thankfully, you don’t need to learn coding to add a beautiful WordPress notification bar on your website. With the integration of NotificationX and the page builder Elementor, you can create stunning WordPress Notification bars in less than 5 minutes. Sounds amazing, doesn’t it? Let’s dive in and find out how you can design your WordPress notification bar in Elementor.

Table of Contents

What Is A WordPress Notification Bar?

Have you ever visited a website and noticed a small banner at the top or bottom of the page? That’s a WordPress notification bar. These can be used to instantly grab a site visitor’s attention for many purposes.

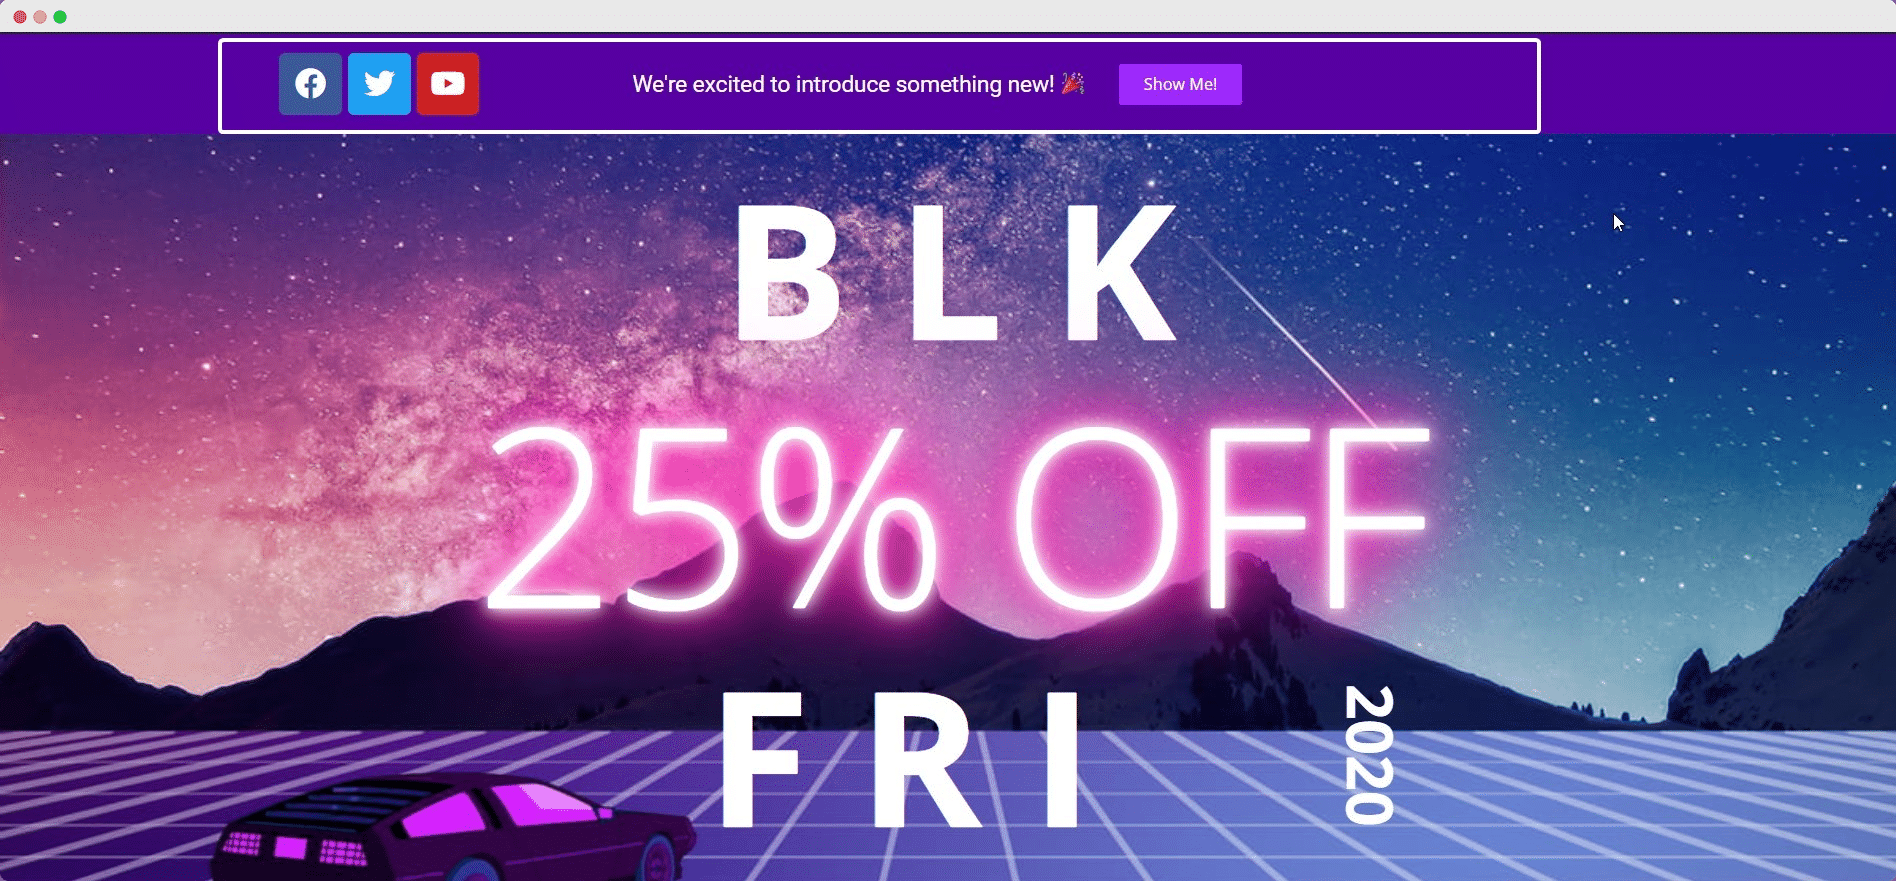
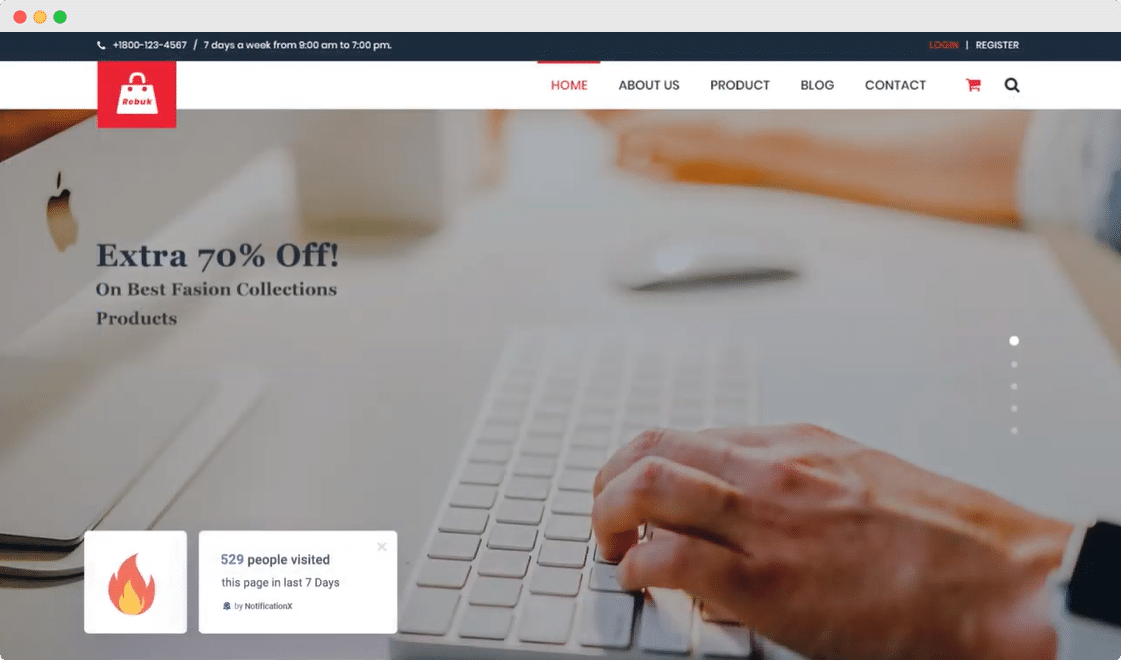
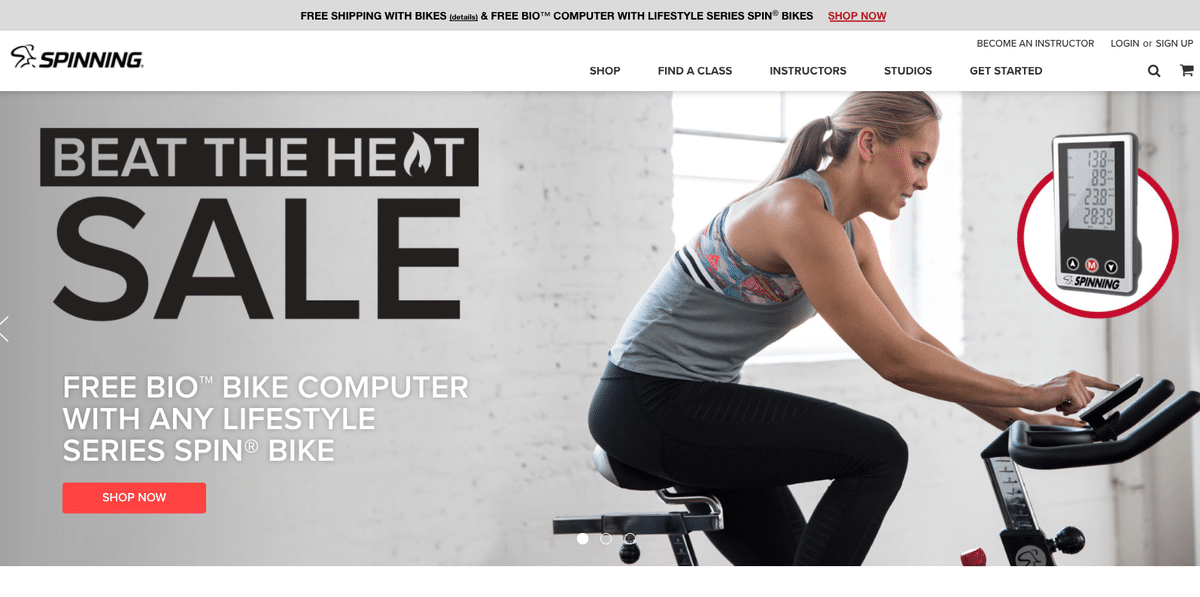
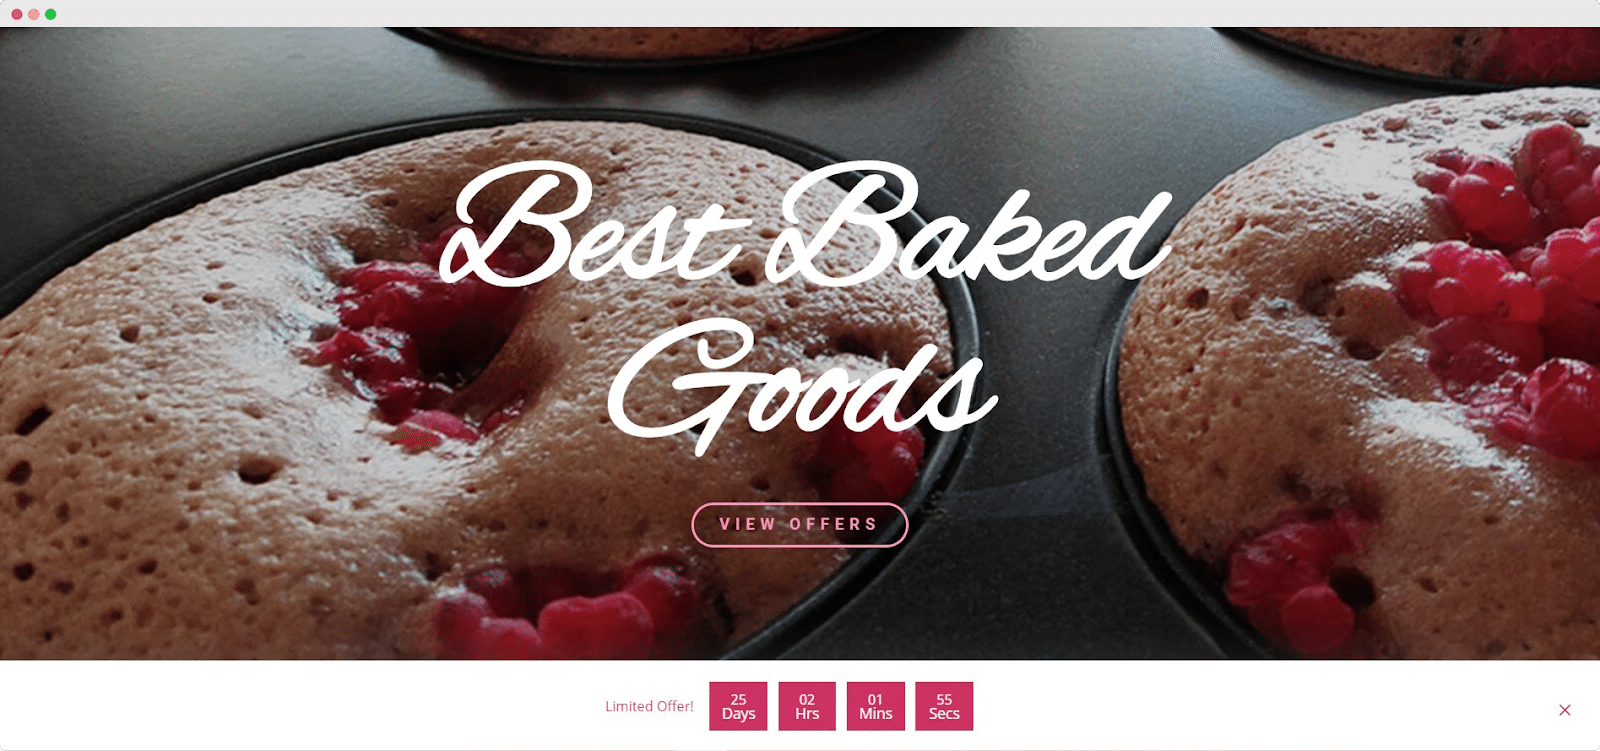
For example, if you are running sales promotions, you can display the announcement using a notification bar. This way, whenever a site visitor comes to your page, they will immediately see the sales offer on the notification bar. Want to see it in action? Take a look at how these websites below are using notification bars on their WordPress websites.

Moreover, if you add a dynamic timer to your notification bar, site visitors might feel a sense of urgency to make a purchase. This is known as FOMO marketing (Fear Of Missing Out). You can use this kind of marketing strategy to boost conversions using a WordPress notification bar.

You can also use a WordPress notification bar to grow your mailing list. If a site visitor likes your content, they can simply click on your notification bar and subscribe to your newsletter with their email address. Similarly, you can use a WordPress notification bar for important announcements, or to provide contact details.

3 Ways To Make Your WordPress Notification Bar Stand Out

Of course, it’s not simply enough to just add a notification bar to your webpages. For the best results, you need to customize your  notification bar to make it stand out. There are several ways you can do this without having to mess with codes or CSS. With NotificationX, the ultimate social proof and FOMO solution for WordPress, you can create attractive notification bars with a few clicks.

Add Attractive Buttons With Your WordPress Notification Bar

If you want to boost conversions with your WordPress notification bar, then you should add eye-catching buttons. This way, your visitors can simply click on the button to avail discounts, make purchases or subscribe for your newsletter. With NotificationX, you get to access different ready templates for your notification bar, all of which have beautiful buttons added to them.

Add An Animated Countdown To Create Urgency 

FOMO marketing is all about creating a sense of urgency in your site visitors, and the best way to do this is by using countdown timers. This way, your site visitors can see that the time is running out for them to make a quick decision. So, they will feel compelled to quickly make a purchase before the offer runs out.

Use Evergreen Timers To Make Your Notification Bar More Dynamic

With NotificationX, you can make your notification bar more dynamic by using an evergreen timer. These timers use cookies as trackers. They start the timer as soon as a potential customer visits your website for the first time. What this means, is that your countdown be unique for every visitor. This makes your countdown timer more dynamic and creates an even greater sense of urgency in site visitors.

Watch The Video Tutorial Here

How To Create A WordPress Notification Bar In Elementor Using NotificationX

The pagebuilder Elementor is one of the most popular WordPress solutions to create whole websites without any coding. You can now use Elementor with NotificationX, the ultimate FOMO solution for WordPress, to create a stunning notification bar without coding. Just follow this step-by-step guide below, to create a WordPress notification bar in Elementor using NotificationX.

Step 1: Install And Activate NotificationX 

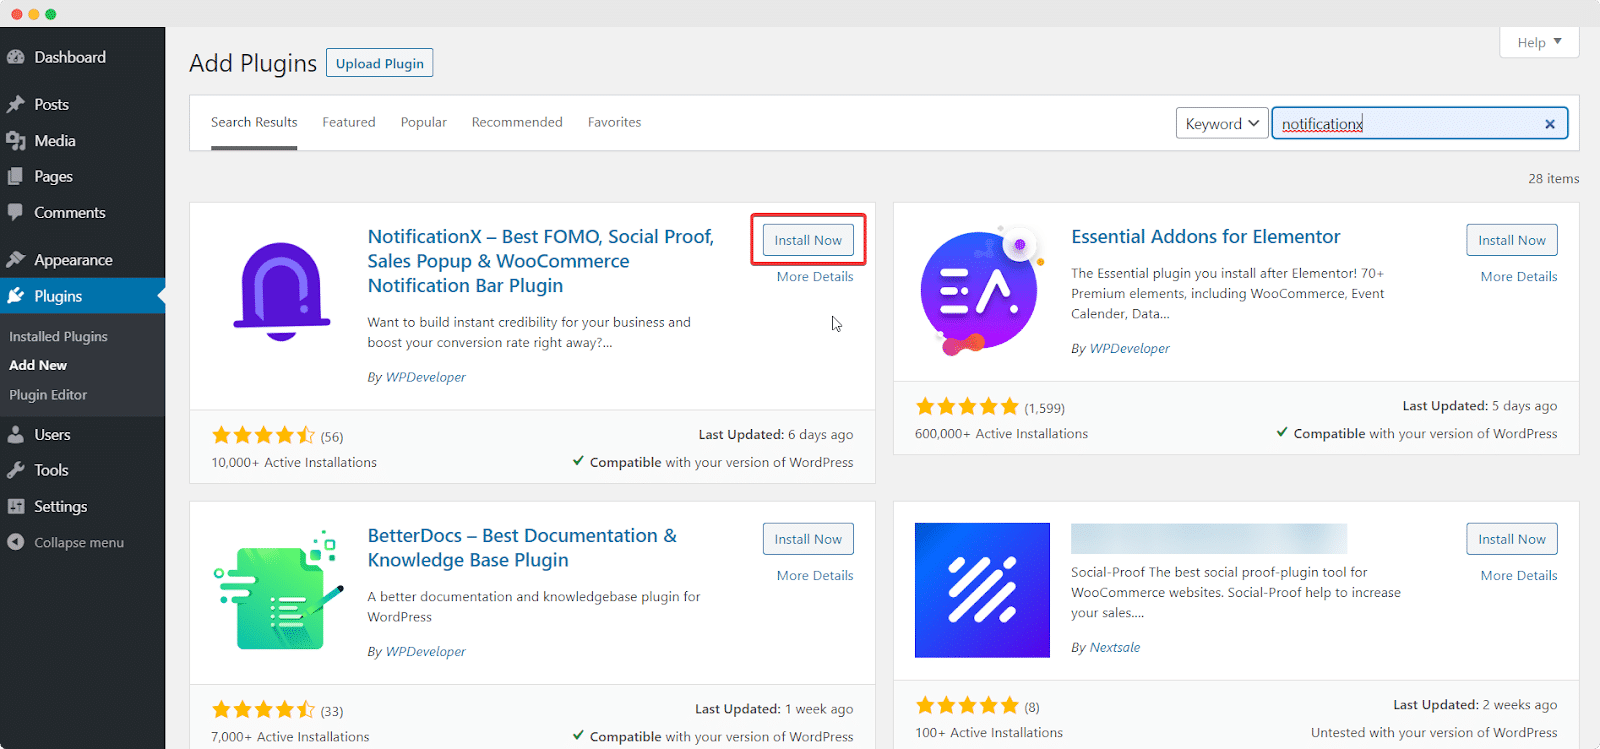
First, you will have to install and activate NotificationX on your WordPres website. You only need the free version for this tutorial. To do this, navigate to Plugins→ Add New from your WordPress dashboard and type ‘NotificationX’ in the search bar. Then click on ‘Install’ and later ‘Activate’.

Notification Bar

Step 2: Create A Notification Bar

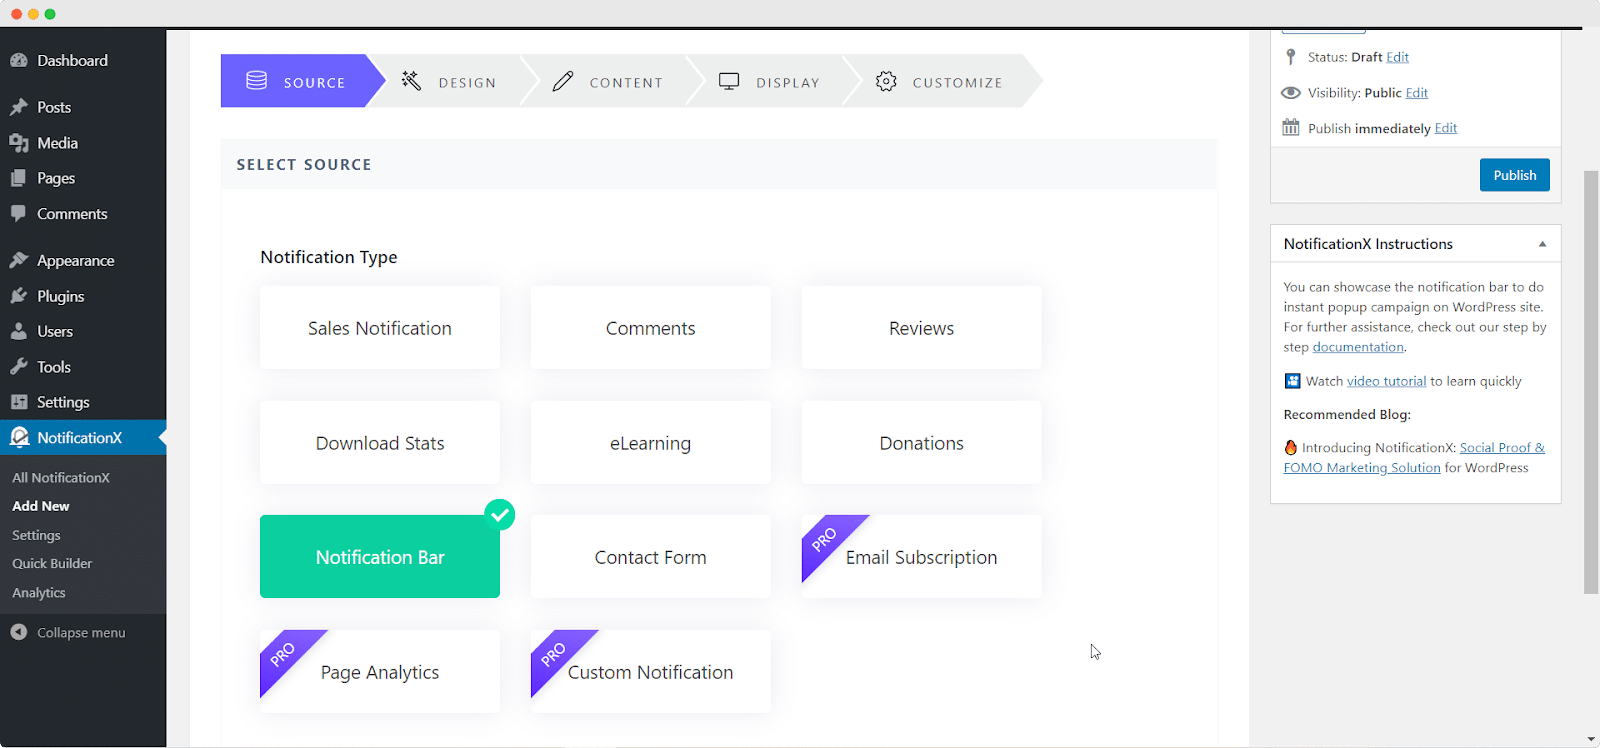
After you are done installing and activating NotificationX, you need to create a notification bar in NotificationX. You can do this by navigating to NotificationX→ Add New from your WordPress dashboard. You will be taken to a new page where you can choose ‘Notification Bar’ as your source as shown below.

Notification Bar

Step 3: Configure Your WordPress Notification Bar In NotificationX

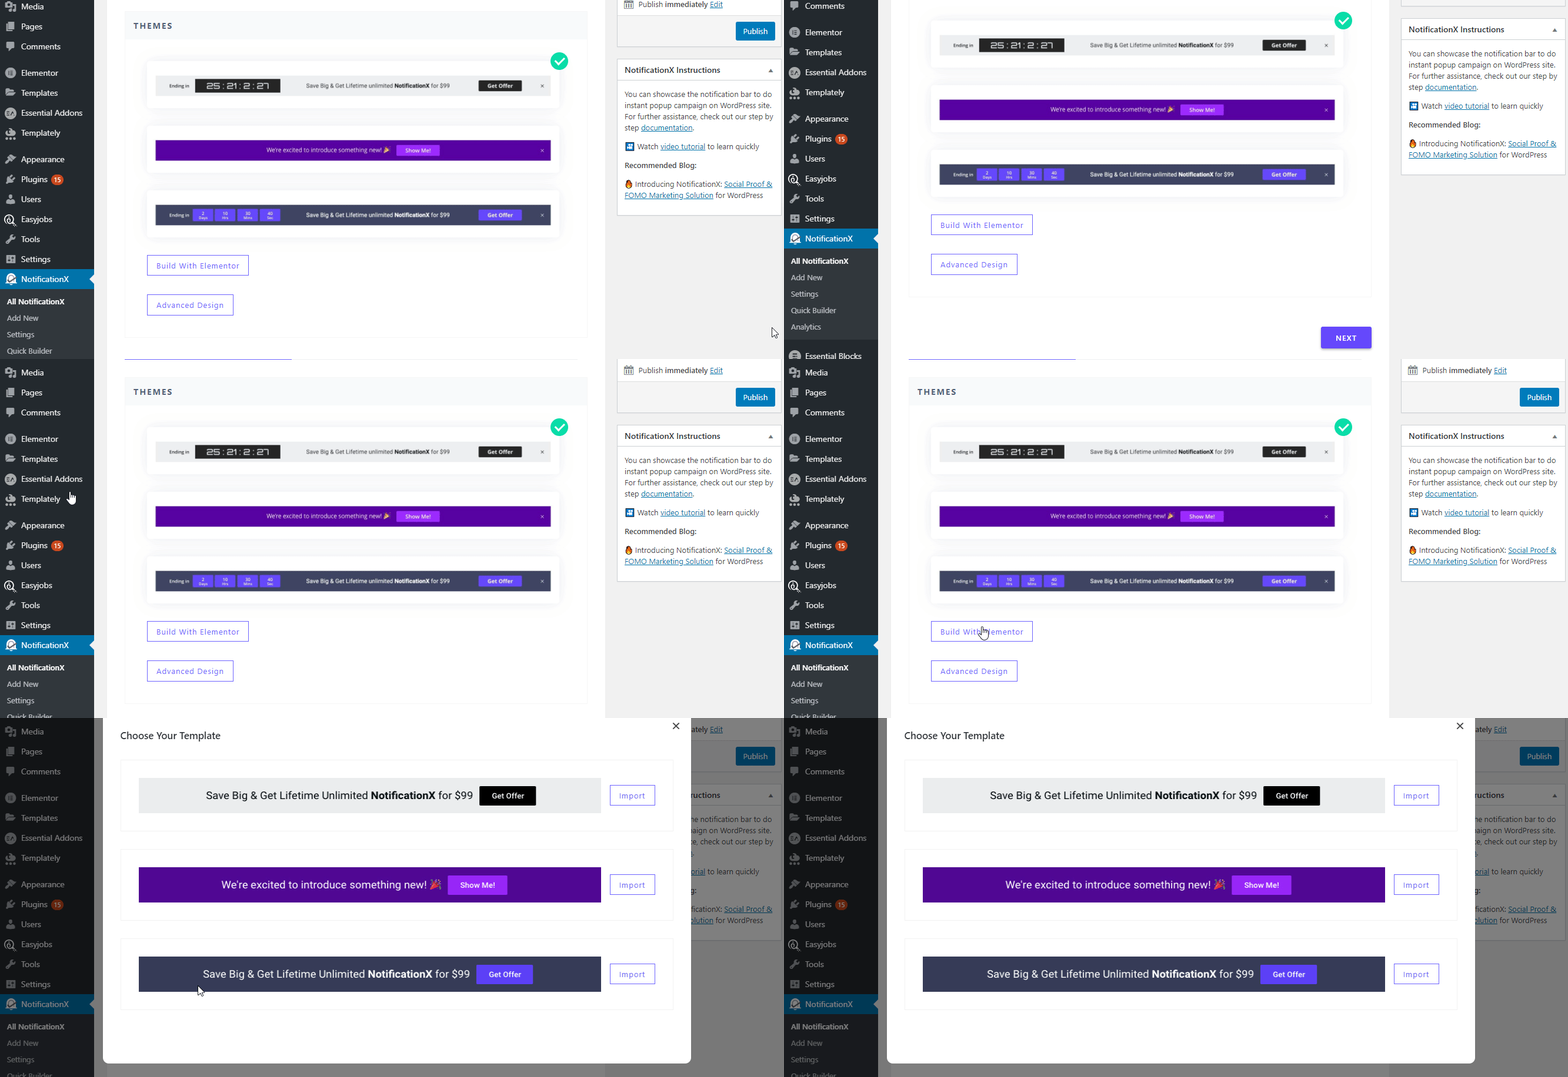
After choosing your source, head over to the ‘Design’ tab in NotificationX. Here, you will be able to configure your WordPress notification bar. If you scroll down, you will find an option called ‘Build with Elementor’. When you click this button, you will see a popup appear displaying different layouts of your WordPress notification bar. Choose any of these layouts that you like. Then, click on the ‘Import’ button next to the layout you have selected.

Notification Bar With Elementor

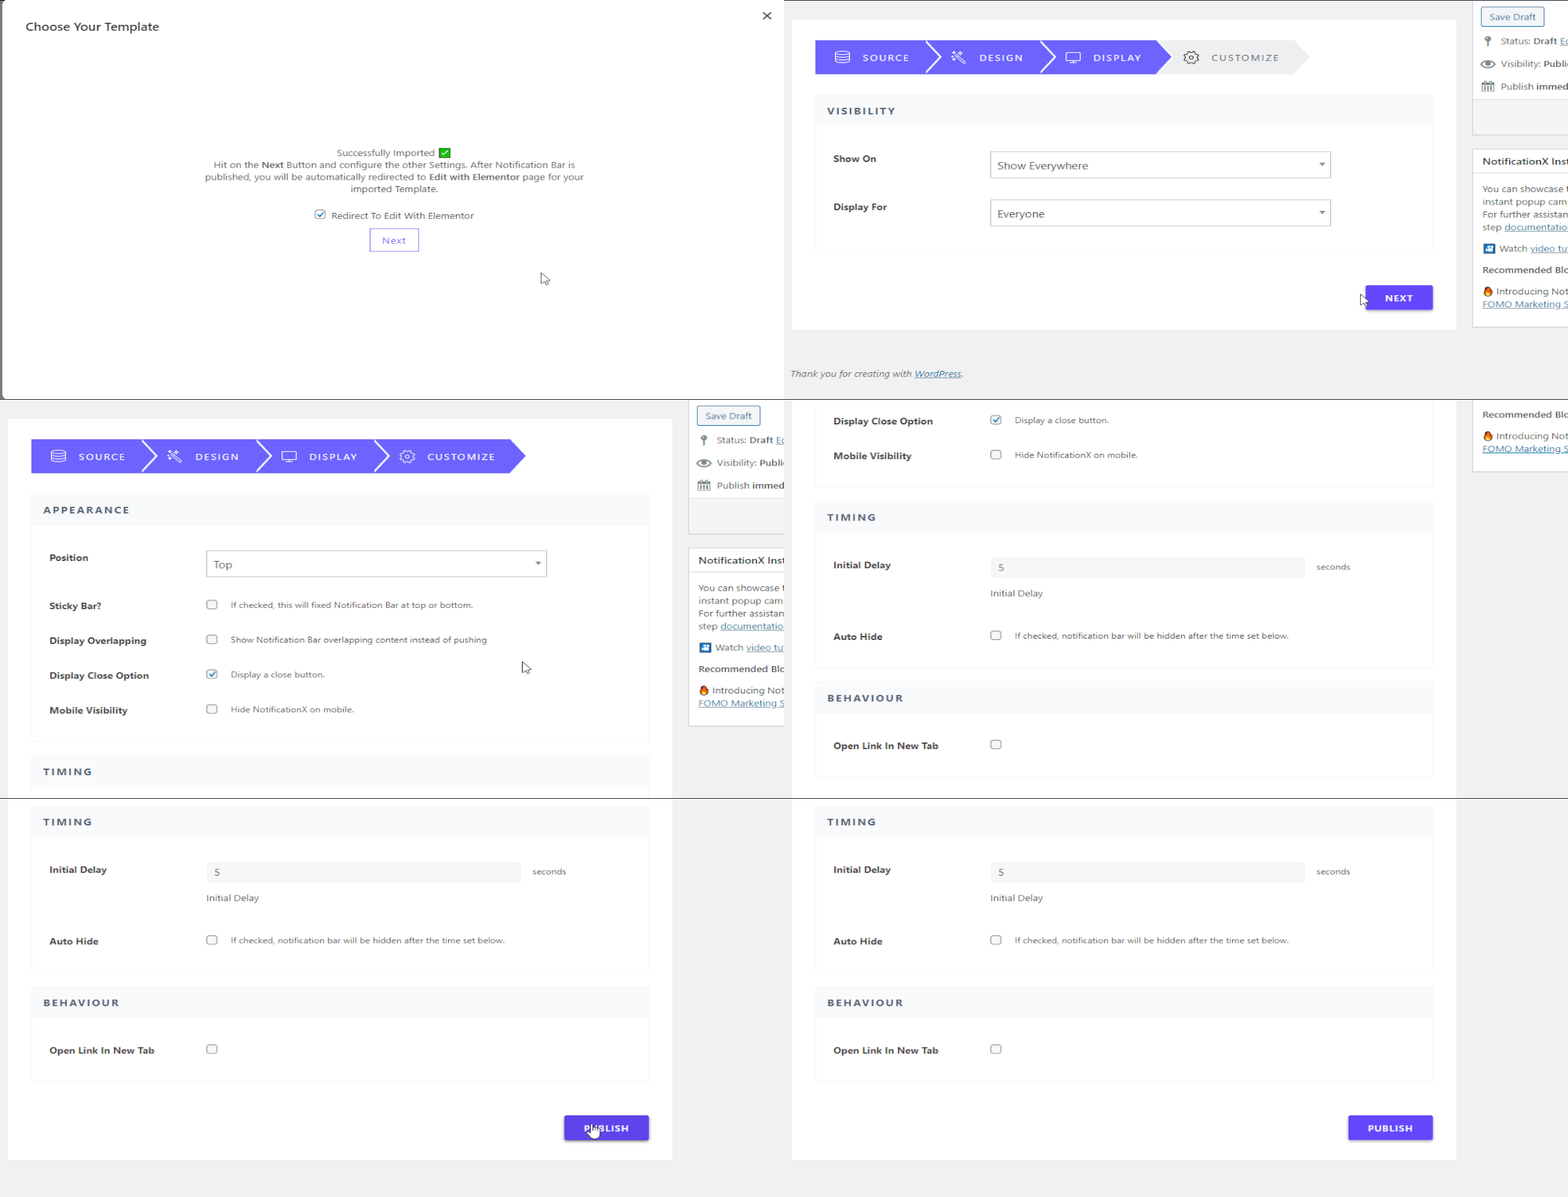
Next, you have to move to the ‘Display’ tab in NotificationX. Here, you can configure the settings to choose where you want to display your WordPress notification bar. You can also choose to display your notification bar to everyone who visits your site, or to specific people only.

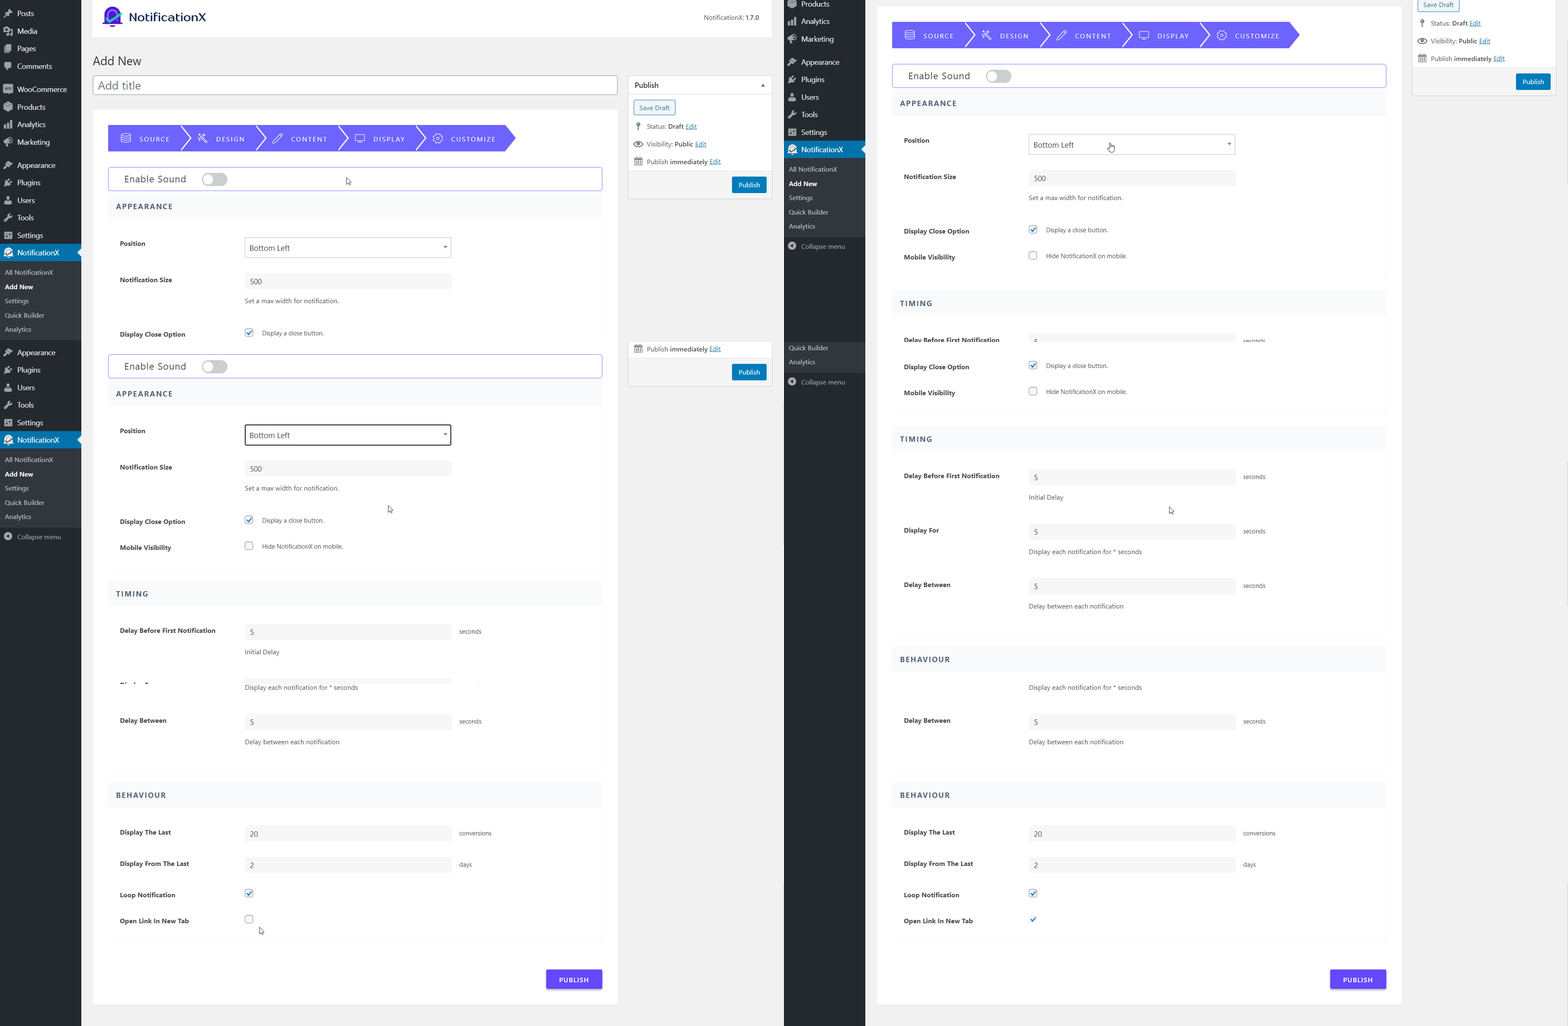
After you are done with this step move on to the ‘Customize’ tab in NotificationX. Play around with the settings here to choose the position of your notification bar, enable close option, mobile visibility and much more.

Introducing WordPress Notification Bar In Elementor To Boost Engagement

Step 4: Customize The Design Of Your WordPress Notification Bar In Elementor

When you are done with all of the above steps, click on ‘Publish’ from NotificationX dashboard. You will be redirected to the Elementor Editor. From here, you can design your WordPress notification bar in any way you want without touching a single line of code. You can even add any kind of Elementor widgets or add new sections next to your notification bar. 

Step 5: Preview Final Outcome

Once you are done customizing your WordPress notification bar in Elementor, make sure to save your changes. You can then preview your notification bar to see how it looks and publish it if you are happy with its appearance.

WordPress Notification Bar In Elementor

As you can see, with the integration of NotificationX with Elementor, creating your WordPress notification bar in Elementor is easier than ever. Try it out for yourself today, and share your experience with us in the comments below. If you face any difficulties, feel free to contact our support team for further assistance. Or, join our Facebook Community to connect with other WordPress users like yourself.

Evergreen Dynamic Notification Bar To Show Timer & Boost Sales In WordPress

Evergreen Dynamic Notification Bar To Show Timer & Boost Sales In WordPress

No matter what kind of online business you are running, using attractive notification bar is a great way to boost sales for your business. With NotificationX, you can now instantly create eye-catching evergreen notification bar with a dynamic timer to showcase exclusive promotional offers to potential customers. This is an amazing technique that creates a sense of urgency in your website visitors and thus helps you boost your sales.

Table of Contents

What Is A Notification Bar?

notification bar is a small banner usually placed at the top of your page or at the bottom. It is used to quickly and instantly grab your visitors attention to a particular news such as a product offering, discount, sales, or any kind of notice.

Although this blog post focuses on how a website notification bar can be used for sales promotion purposes, you can also use notification bars for other things such as:

  • Asking site visitors to subscribe to your newsletter
  • Notifying customers about business hours, shipping information or other updates
  • Providing quick contact information such as phone numbers
  • Updates related to your products or services

To give you an idea of all the ways you can use notification bars, check out how these brands are using notification bars on their websites for different purposes

Why Should You Use Countdown Timers with a notification bar?

Countdown timers and notification bars are an excellent way to boost sales on your WordPress website by helping you instantly grab your visitor’s attention. With a beautifully designed notification bar, you can showcase your sales promotion offers or discounts in a more creative way and display them anywhere on your website.

On the other hand, adding a countdown timer to your notification bar can help you influence your site visitors to make a purchase decision. By adding an animated countdown in your notification bar, your site visitors will know that your offer is for a very limited time only. This will make them feel a sense of urgency to quickly take advantage of your promotional offer before time runs out. This type of marketing tactic is used by many businesses, and it is known as FOMO marketing, or Fear Of Missing Out marketing. 

Evergreen Timers Vs. Fixed Countdown Timers: What’s The Difference?

There are two types of countdown timers — fixed countdown timers and evergreen timers. Fixed countdowns typically display the time period left before a sales promotion offer expires. 

For example, if you are displaying a timer for a sales offer that ends on August 31st, a fixed countdown timer will only be counting down to the days or hours left till August 31st which is when your sales offer will end.

Notification Bar

In case of evergreen timers, what happens is that it uses cookies as trackers and starts the timer as soon as a potential customer visits your website for the first time. This means that the countdown displayed will be unique for every visitor. For this reason, the evergreen timer is a powerful marketing tool, and is often called a dynamic timer.

While both types of countdown timers are great for boosting sales, evergreen timers are more dynamic and might be more useful to create a greater sense of anticipation or urgency in potential customers. So in that sense, one can argue that evergreen timers are better than fixed countdown timers. Ultimately, it depends on you and the marketing strategies that you want to use.

Watch Video Tutorial

Creating Notification Bar In WordPress: Step-By-Step Guide

If you want to get started with creating your own notification bar in WordPress, then you’re in the right place. The easiest way to do this by using NotificationX, most popular FOMO marketing solutions trusted by over 20,000 businesses powered by WordPress.

Evergreen Dynamic Notification Bar To Show Timer & Boost Sales In WordPress

With this powerful WordPress marketing plugin, you can design and implement successful marketing campaigns, enjoy seamless integrations with more than 14 popular solutions, gain credibility for your e-Commerce store by displaying product review popups, and much more. 

That’s not all, you can also display beautiful notification alerts for sales, comments and even get useful insights from the Analytics feature.

In this tutorial however, we will mainly focus on how you can create a stunning notification bar for your WordPress website by using NotificationX.

How To Create Evergreen Notification Bar On WordPress To Boost Sales

Now that you know all there is to know about using countdown timers to increase your sales, you might be wondering how you can create an evergreen notification bar on your WordPress website. It’s quite easy to do actually–all you need is NotificationX and you will be able to create your own evergreen notification bar to show a dynamic timer without any coding.

Step 1: Install NotificationX PRO For WordPress

To get started, you will need to install and activate NotificationX FREE & PRO plugin for WordPress. All you have to do is navigate to Plugins→ Add New from your WordPress dashboard and type ‘NotificationX’ in the search bar. Simply click on ‘Install’ and later ‘Activate’. Then you will need to install and activate NotificationX PRO to get evergreen notification bar.

Notification Bar

Step 2: Create Your Own Notification Bar

After you are done installing and activating NotificationX, you can start creating your own notification bar which you can do by navigating to NotificationX→ Add New.

Evergreen Dynamic Notification Bar To Show Timer & Boost Sales In WordPress

This will take you to a new page where you can choose ‘Notification Bar’ as your source as shown below..

Notification Bar

Next, you can pick a design for your notification bar going to the ‘Design’ tab. Choose the layout and change the colors, typography, position and much more to make your notification bar look unique and attractive to site visitors.

Notification Bar

Step 3: Configure Evergreen Timer In NotificationX

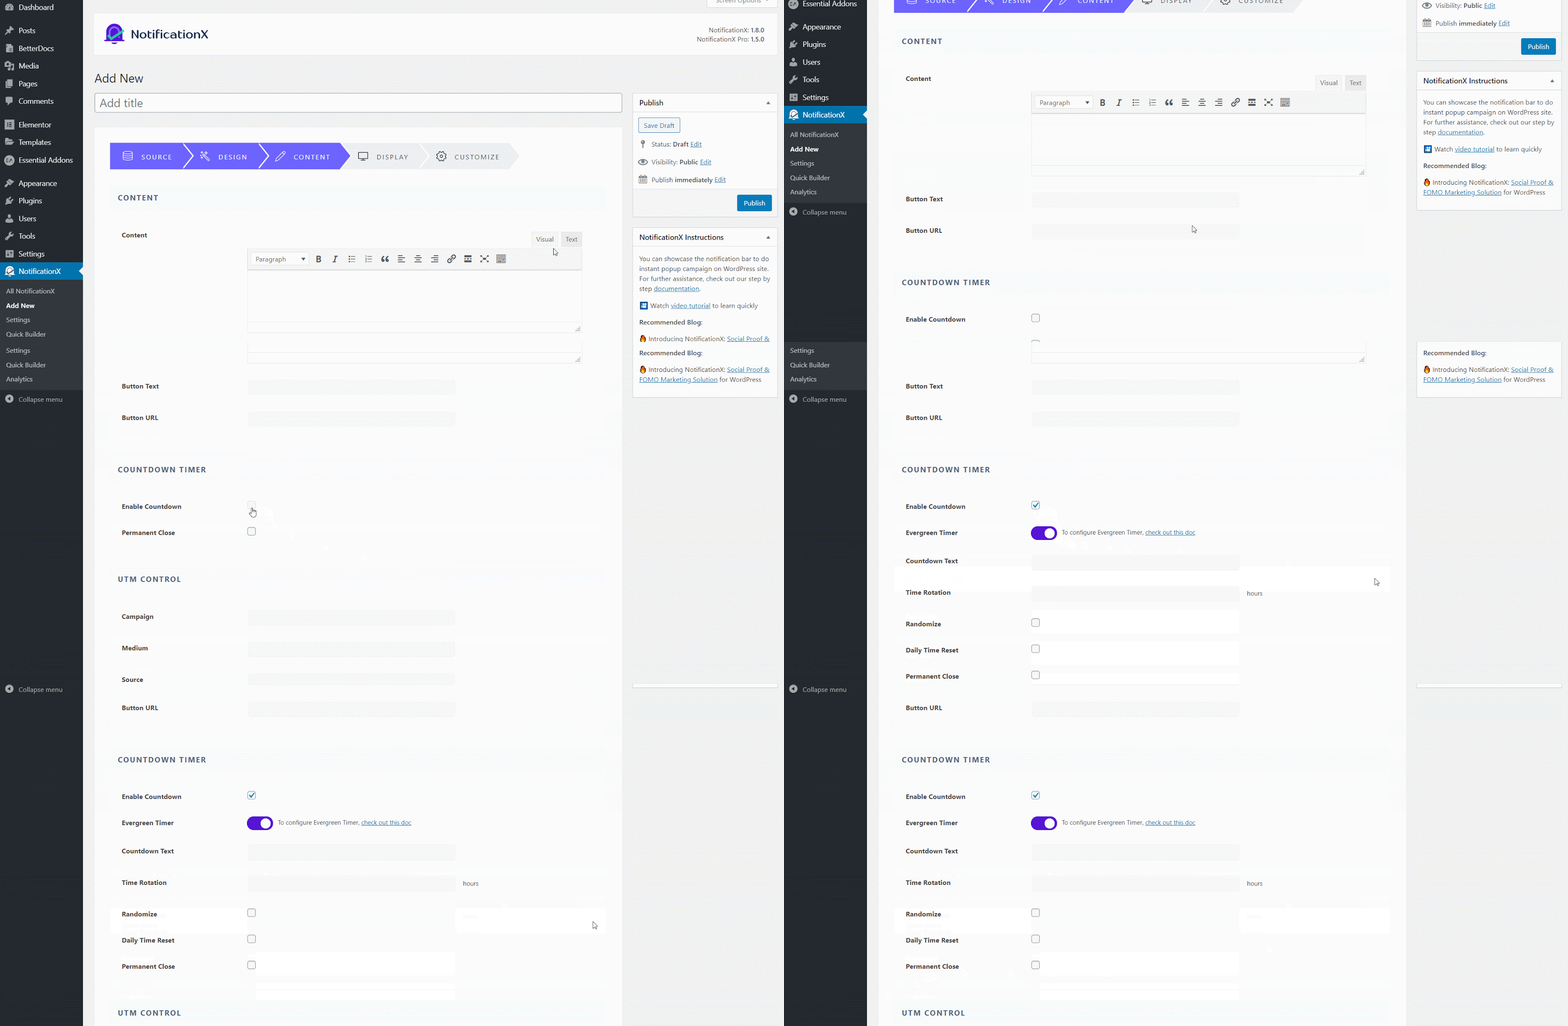
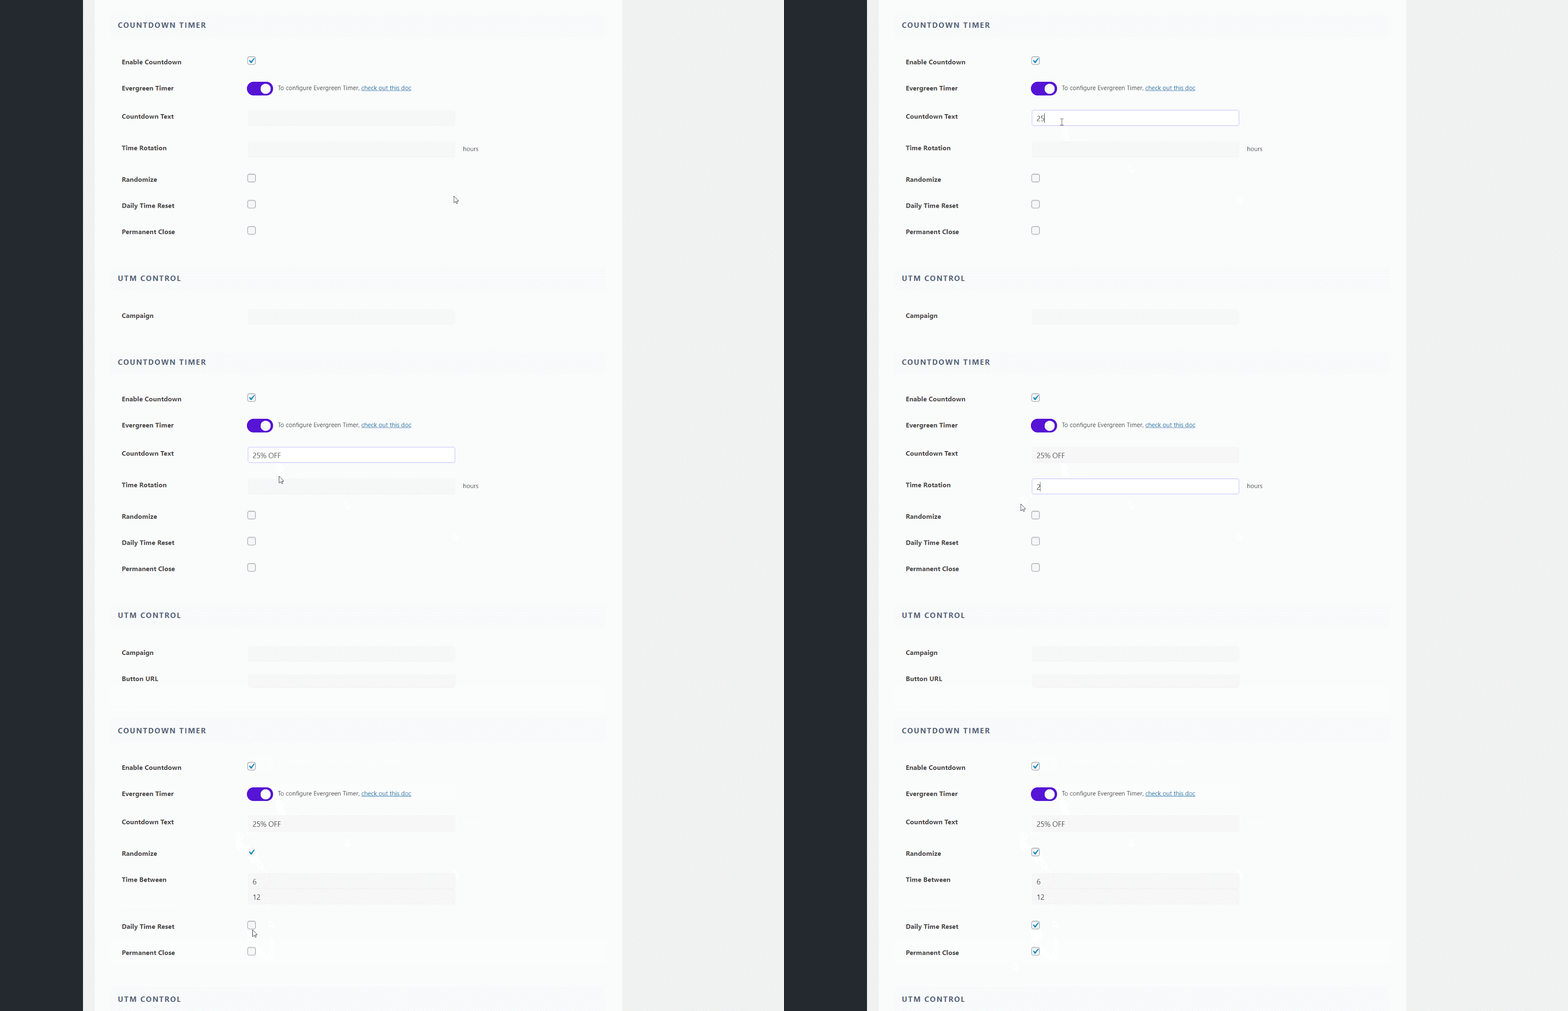
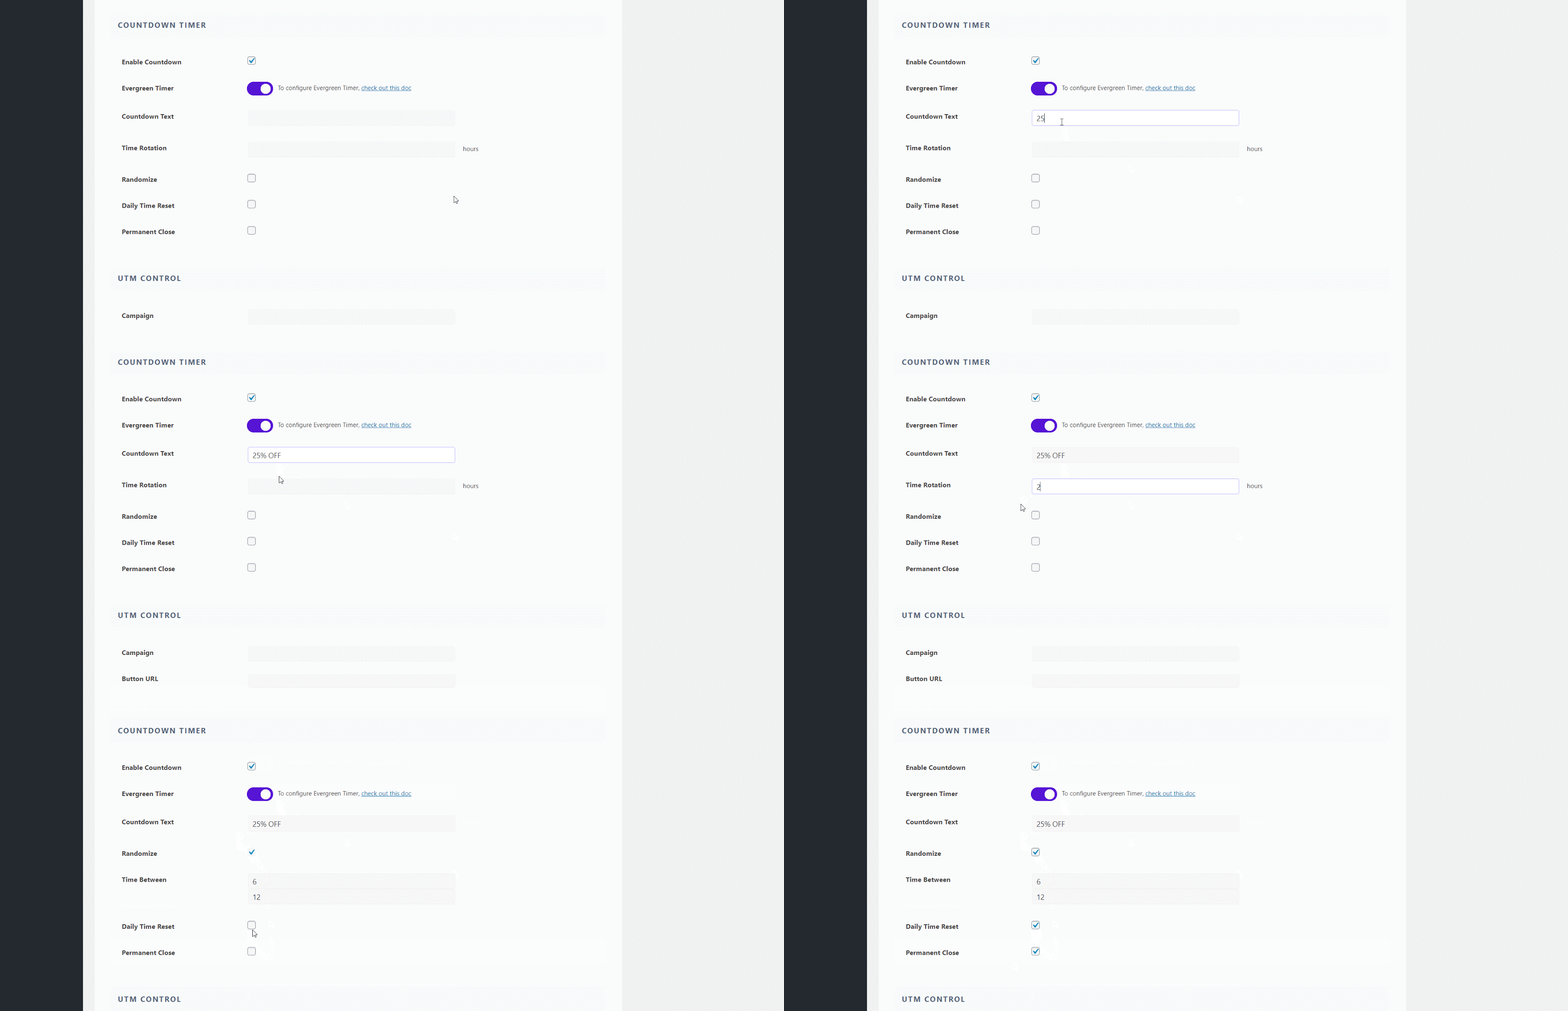
Now here comes the fun part. After you are done designing your notification bar, you need to configure the content and enable evergreen timer in NotificationX. Just head over to the ‘Content’ tab and check the ‘Enable Countdown’ box. Afterwards, toggle the ‘Evergreen Timer’ option to enable it

Notification Bar

Just like that, you have enabled an evergreen notification bar to show a dynamic timer on your WordPress website using NotificationX. You can further configure the content of your evergreen notification bar by adding countdown text, changing the time rotation, set up random times for your countdown, a daily time reset and much more.

Evergreen Dynamic Notification Bar To Show Timer & Boost Sales In WordPress

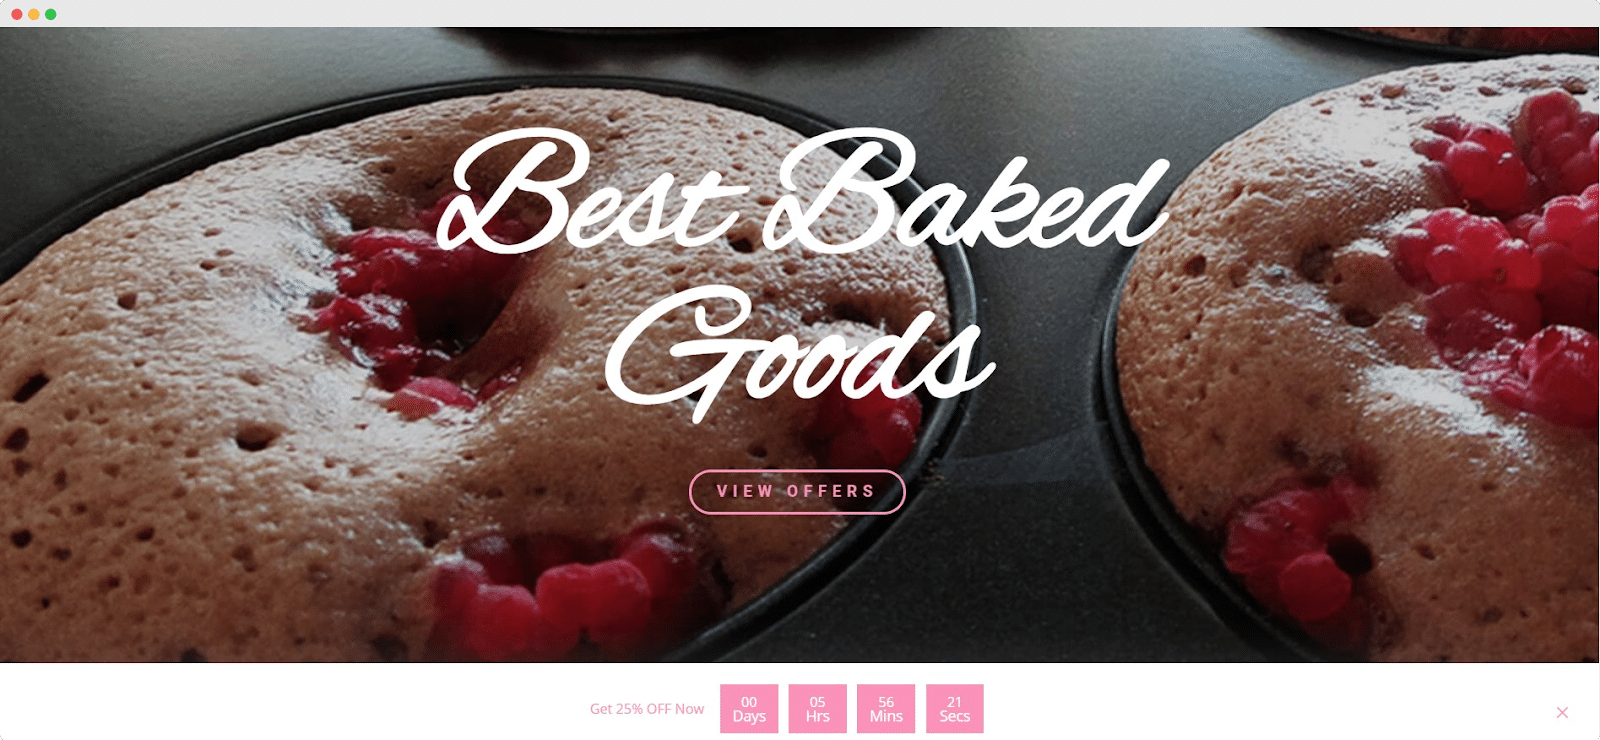
When you are done you should be able to see a stunning evergreen notification bar with a dynamic timer on your website. Isn’t it amazing?

Notification Bar

Wrapping Up

As you can see, it takes no time at all to create an amazing evergreen notification bar to show a dynamic timer and boost sales if you have NotificationX. We hope you find this tutorial helpful and easy to follow. For any difficulties, don’t hesitate to contact our support team for further assistance or join our Facebook community to connect with other WordPress users.

WooCommerce Product Reviews

How To Showcase WooCommerce Product Reviews Popup Using NotificationX & Boost Sales

No matter what kind of e-Commerce business you are running, customer product reviews can have a significant impact on boosting sales of your WooCommerce store. If you can showcase positive WooCommerce product reviews on your website, then your potential customers will feel more confident purchasing your products.

This is one of the main concepts of social proof marketing. The idea is that if a potential customer sees that other people are giving positive product reviews, then new customers will also want to make a purchase. In this tutorial, we’re going to show you how you can use social proof to boost sales by showcasing WooCommerce product reviews with NotifcationX.

Table of Contents

Importance of WooCommerce Product Reviews

There are several reasons why WooCommerce product reviews are important for any business. Not only do product reviews drive sales, but they also help enhance your brand image, your business’s reputation and even improve your SEO (Search Engine Optimization). Let’s take a quick look at how WooCommerce product reviews can help you grow your business.

Leverage WooCommerce Product Reviews For Credibility: 

What other people are saying about your products is one of the factors that determines your business’s credibility. Most potential customers will look at product reviews before they decide to buy anything. If a potential customer sees positive WooCommerce product reviews from other customers on your website, they will see you as a credible and trustworthy source.  So, by leveraging your positive WooCommerce product reviews, you can gain more credibility for your e-Commerce business.

Enhance Brand Image With WooCommerce Product Reviews

Detailed positive WooCommerce product reviews and ratings will help you enhance your brand image and let you distinguish your e-Commerce business as a reliable source for high quality products. This is especially useful as a good brand image can help you attract new customers while also encouraging previous customers to return to your store.

NotificationX Plugin Developer

Make Your Products Stand Out With User-Generated Content 

Your site visitors won’t just look at product reviews, they will also be looking at your product descriptions, and real-life images and videos of your products. This is where your WooCommerce product reviews can help you make your products stand out.

With the help of user-generated content in the form of customer’s photos and videos of your products, you can help your potential buyers see what your product looks like in real life. This will assure your customers about the quality of your products and help them make their purchase decision much easier.

Improve SEO With WooCommerce Product Reviews

The more reviews you get, the more customers are talking about your product online and this can help you rank higher on the search engine results page in several ways. As more and more positive reviews are added, the more new content you get for your product page. This helps you rank higher because when someone searches for similar products Google will feature more information about your WooCommerce products including ratings, information about delivery timing, and much more in the search results page.

Skyrocket WooCommerce Sales At No Extra Cost Using Social Proof

Social proof marketing doesn’t require you to spend extra money for promotions. One of the reasons why this strategy is so popular is because you can apply this strategy for free. All you have to do is find a way to creatively display your product reviews in a way that immediately catches your site visitors’s attention.

This is where NotificationX comes in. With NotifcationX, you can create stunning, attractive notification alerts every time a customer reviews your WooCommerce products and display them anywhere on your website.

As of now, NotificationX is trusted & used by more than 20,000+ businesses and comes with powerful advanced integrations with more than 14 popular platforms. Besides this, creating beautiful notification alerts using NotificationX will only take less than 5 minutes, and you can do it without worrying about touching a single line of code.

How To Display WooCommerce Product Reviews With NotificationX

In this section, we’re going to give you a quick and detailed walkthrough on how you can display WooCommerce product reviews with NotificationX. To get started, download the NotificationX plugin for WordPress and simply install and activate NotificationX on your website.

Step 1: Add New Notification Alert & Choose WooCommerce As Your Source

For the very first step, you need to choose WooCommerce as the source for your notification alerts. To do this, first navigate to NotificationX→ Add New from your WordPress Dashboard to create a new notification alert.

WooCommerce Product Reviews

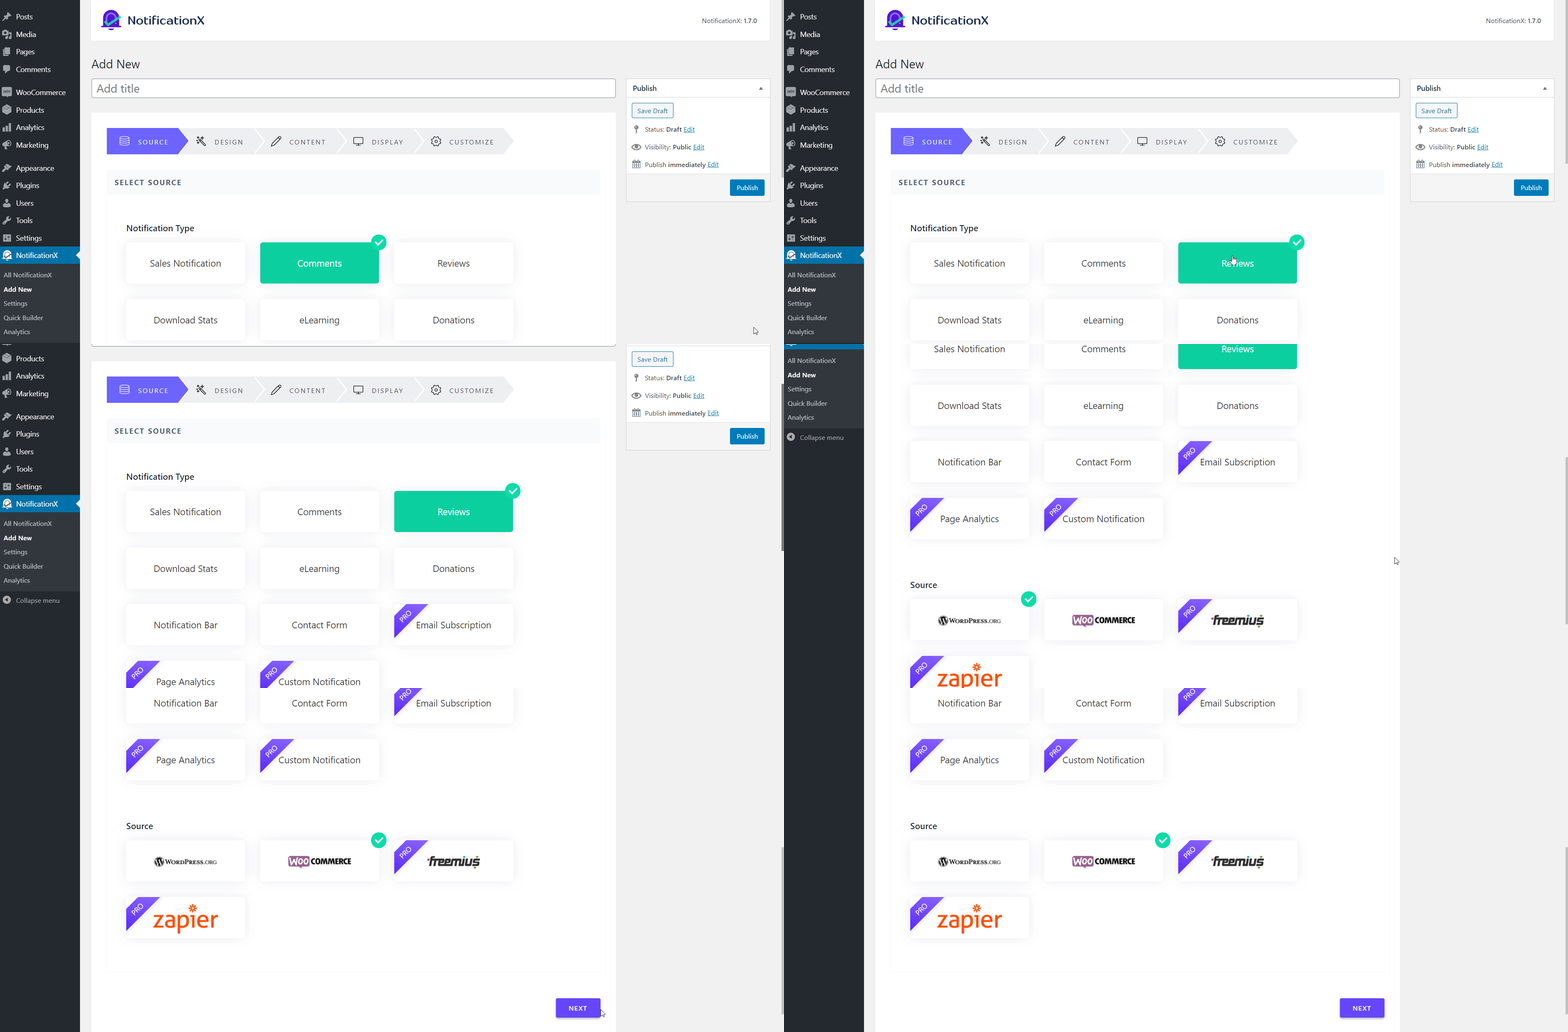
You will be redirected to the ‘Source’ tab  from where you have to choose the Notification Type for your new alert. First, select ‘Reviews’ as your Notification Type and then scroll down to choose WooCommerce as the ‘Source’ for your notification. 

WooCommerce Product Reviews

Step 2: Select A Design Theme For Your Notification Alert

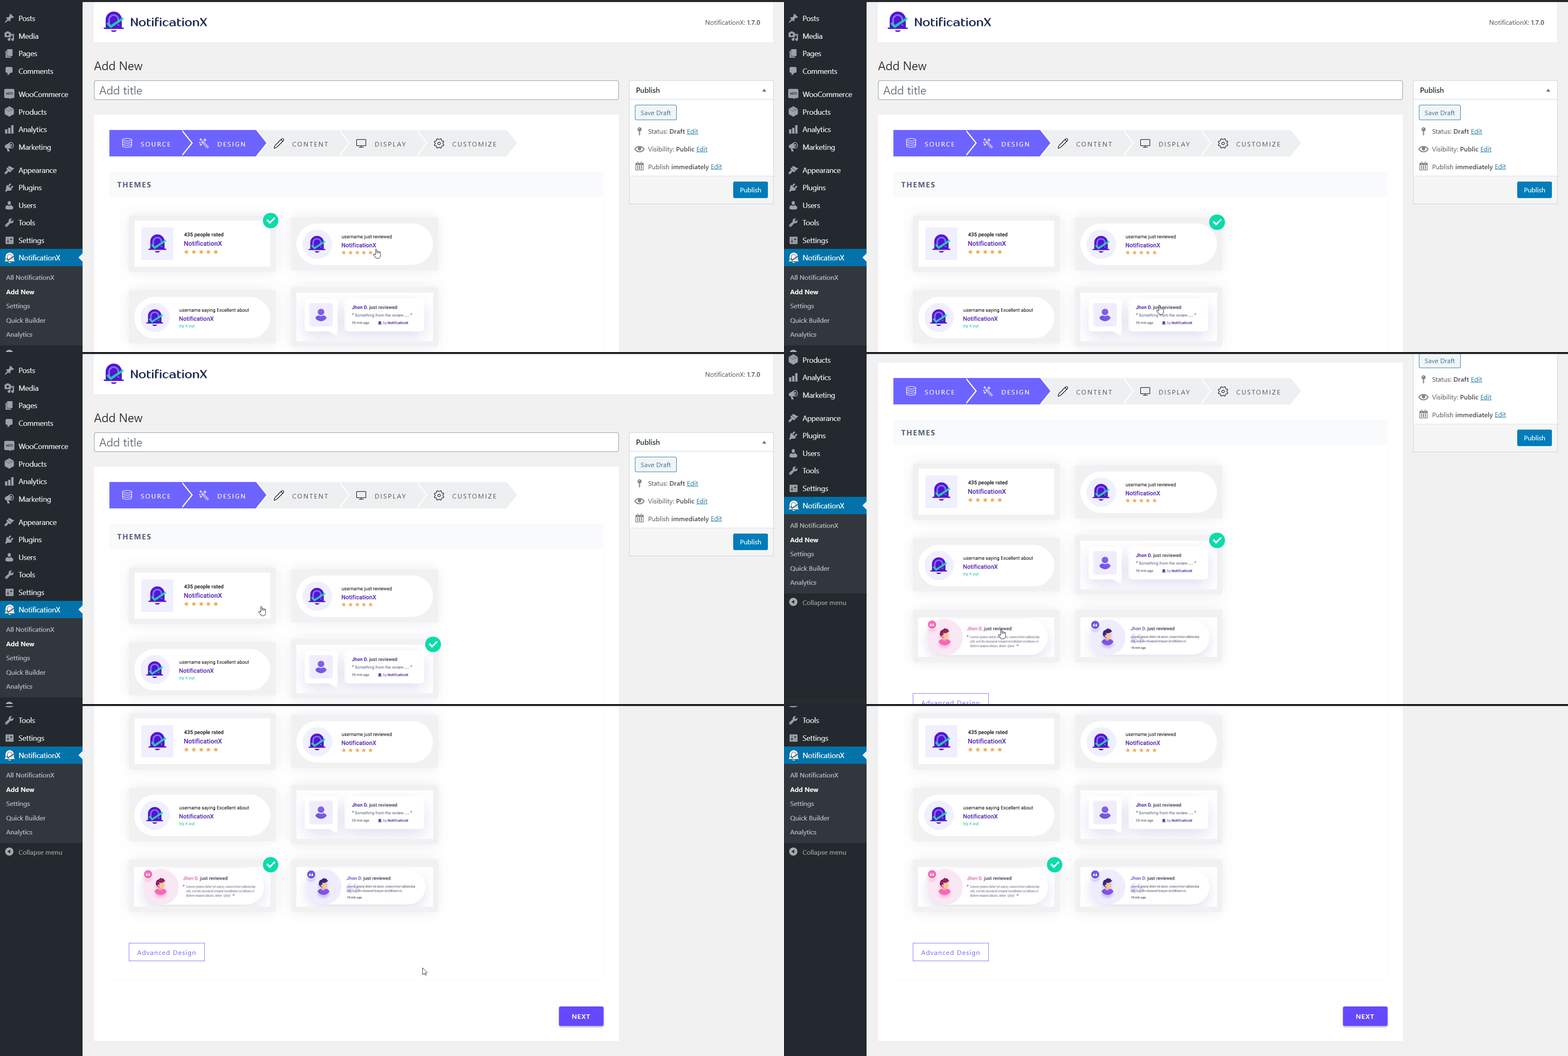
After you have successfully added a new notification alert for product reviews and selected WooCommerce as your source, you need to choose a design for your notification alert. From the ‘Design’ tab, select any of the design themes available.

WooCommerce Product Reviews

Step 3: Configure The Content Of Your WooCommerce Review Alerts

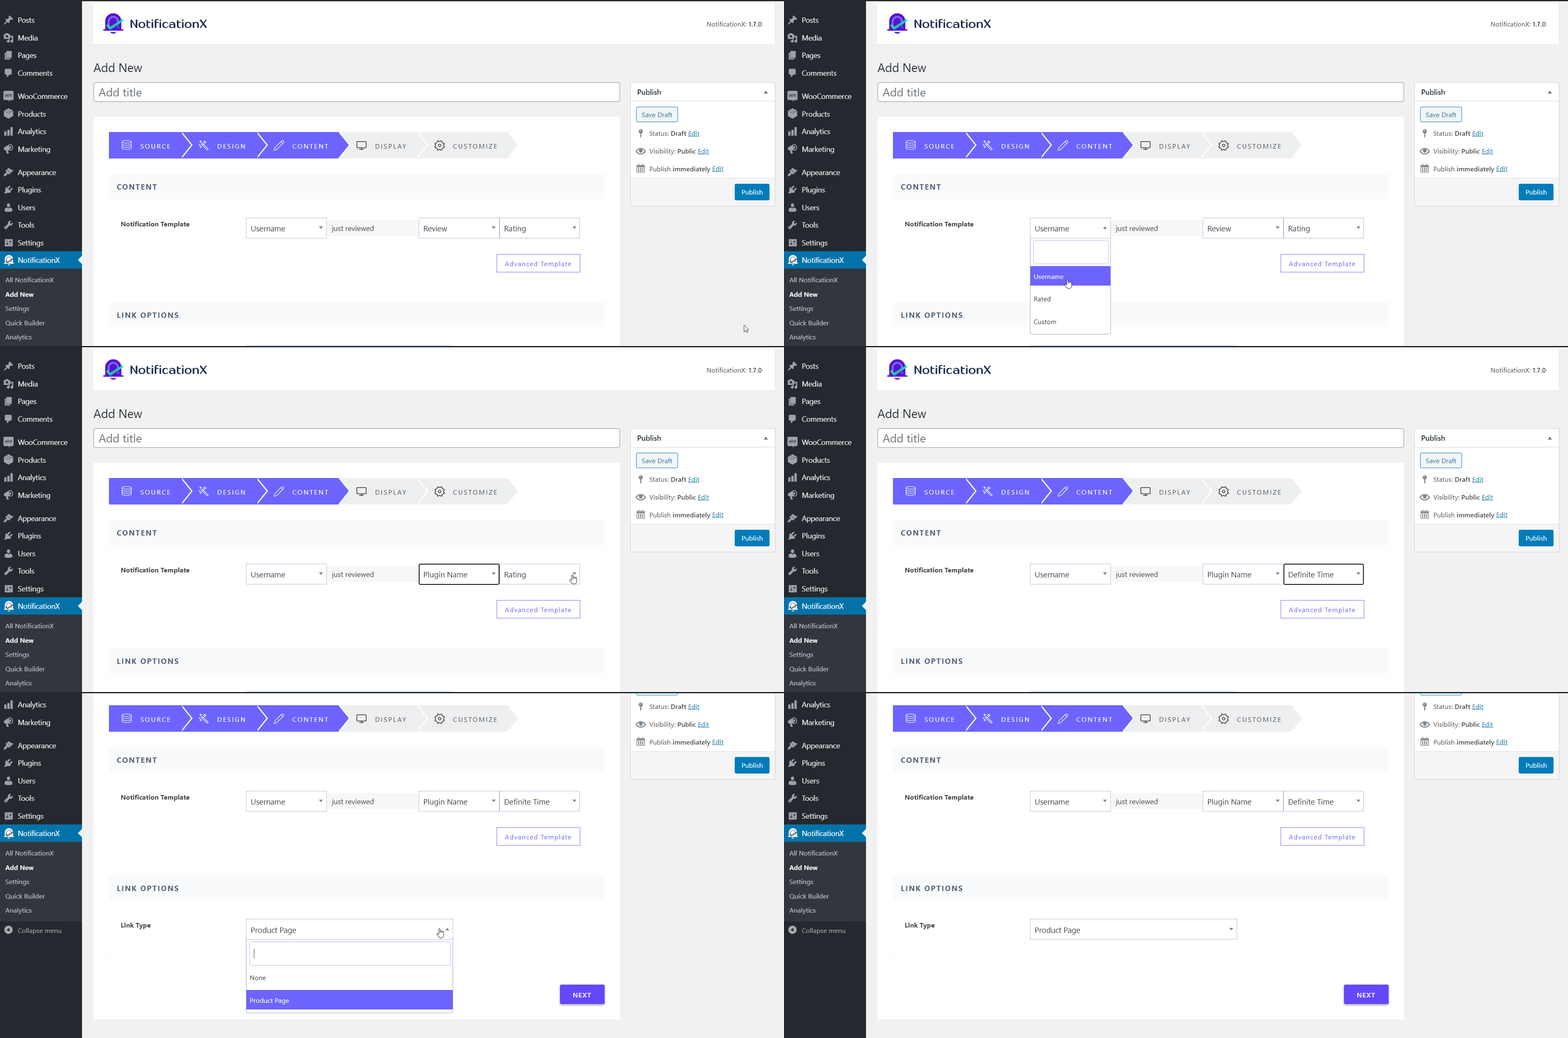
After this, you have to configure the content of your notification alerts from the ‘Content’ tab. There are many options available here. For example, from the Notification Template drop down menu, you can choose to show ‘User Name’, ‘Rated’ or ‘Custom’. 

WooCommerce Product Reviews

Step 4: Customize The Display Options For Your Notifications

When you are done configuring the content of your notification alerts, you can start customizing how you want your notifications to be displayed on your website pages. 

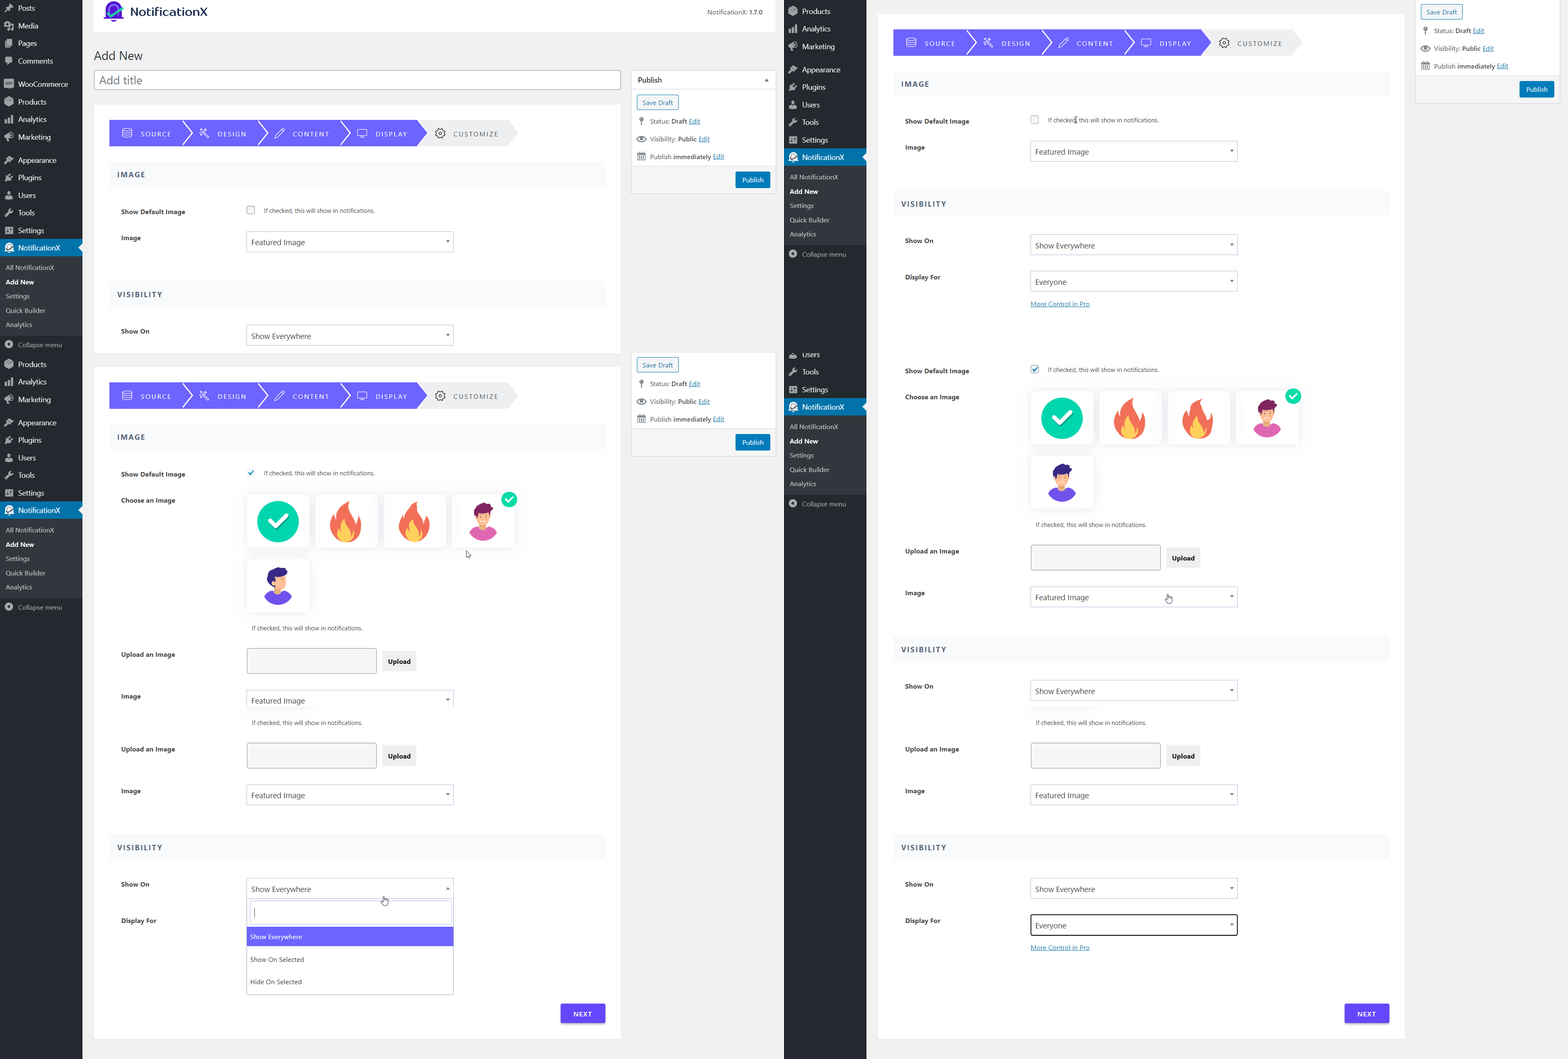
Go to the ‘Display’ tab, and you will see options like the Image settings, where you can check the box to show a default image and choose what the default image will be for your notification alerts. 

WooCommerce Product Reviews

There are tons of more options under the ‘Display’ tab in NotificationX. You can learn more about how to adjust the display options for your notifications in our detailed documentation here.

Step 5: Style The Appearance Of Your Notification Alerts

Finally, you can make your notification alerts even more attractive by styling the appearance of your notifications from the ‘Customize’ tab. You can add sound alerts by toggling ‘Enable Sound’ option, choose the ‘Position’ of your notifications, display a close button, and much more. Adjust the settings however you want and until you are happy with how your notification alerts appear.

WooCommerce Product Reviews

With these 5 simple steps, you can quickly and easily showcase WooCommerce product reviews using NotificationX. It only takes a few minutes to set everything up. You’re now ready to boost sales on WooCommerce using this powerful social proof solution.

Explore More Advanced Integrations With WooCommerce From NotificationX To Grow Your Business

As we mentioned before, NotificationX gives you powerful, seamless integration with popular platforms. Using all of these integrations, you can start to grow your e-Commerce business by displaying sales notifications, email subscription alerts, and much more.

You can even use Google Analytics to display real-time visitor counts and geolocation based sales notifications. To find out more, check out our post on how to create successful marketing campaigns in WordPress using NotificationX.

More Tips & Tricks To Boost Sales With Social Proof & FOMO Marketing

Now that you know how you can showcase WooCommerce product reviews using NotificationX to get more sales, you might be interested in checking out our other blog posts on how to boost your e-Commerce sales in 2023 using social proof. You can also check out our 6 proven no cost FOMO marketing examples to boost your e-Commerce sales for more ideas.

Get Access to WooCommerce Template Pack for Elementor

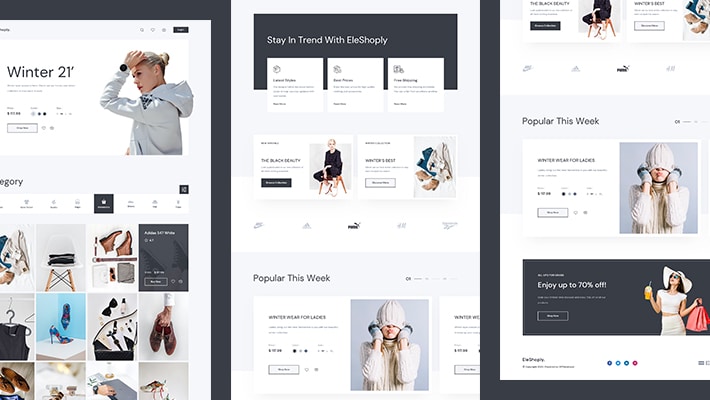
Try out the EleShoply template pack from Templately to instantly design your WooCommerce store without any coding.

Get FREE Template

Final Thoughts

As you can see, leveraging WooCommerce product reviews to increase your sales is a relatively easy and cost-free strategy which you can use by displaying WooCommerce review alerts with NotificationX. 

We hope you found this post useful, and would love to hear your feedback. If you face any difficulties, feel free to contact our support team for further assistance, or join our Facebook community to connect with other WordPress users like yourself.