NotificationX menawarkan keserasian lengkap kepada anda dengan Plugin Terjemahan Berbilang Bahasa WordPress yang paling popular WPML. Ia membolehkan anda menterjemah NotificationX kandungan antara muka pengguna ke dalam mana-mana bahasa dan gunakannya pada tapak web berbilang bahasa anda. Ikuti panduan langkah demi langkah ini di bawah untuk menterjemah antara muka dan rentetan pengguna NotificationX dengan WPML.
Bagaimana Untuk Mengkonfigurasi Tetapan Plugin WPML? #
Untuk menterjemah NotificationX dengan WPML, mula-mula, pasang dan aktifkan pemalam berikut pada tapak WordPress anda; CMS Berbilang Bahasa WPML dan Terjemahan Rentetan WPML. You can check out this WPML doc to configure it on your WordPress site for more information.

After installing these plugins on your WordPress website, go to ‘WPML’→ ‘Setup’ from your dashboard and select the current language and the language you want to translate to. For instance, we are selecting the ‘German’ language to translate our website.

Follow the on-screen instructions in the WPML Setup wizard and add your site key. Select the site URL format from the three options to choose from. Click on the ‘Continue’ button for the next step

Enter the site key from your WPML account. After that, click on the ‘Continue’ button to proceed to the next step.

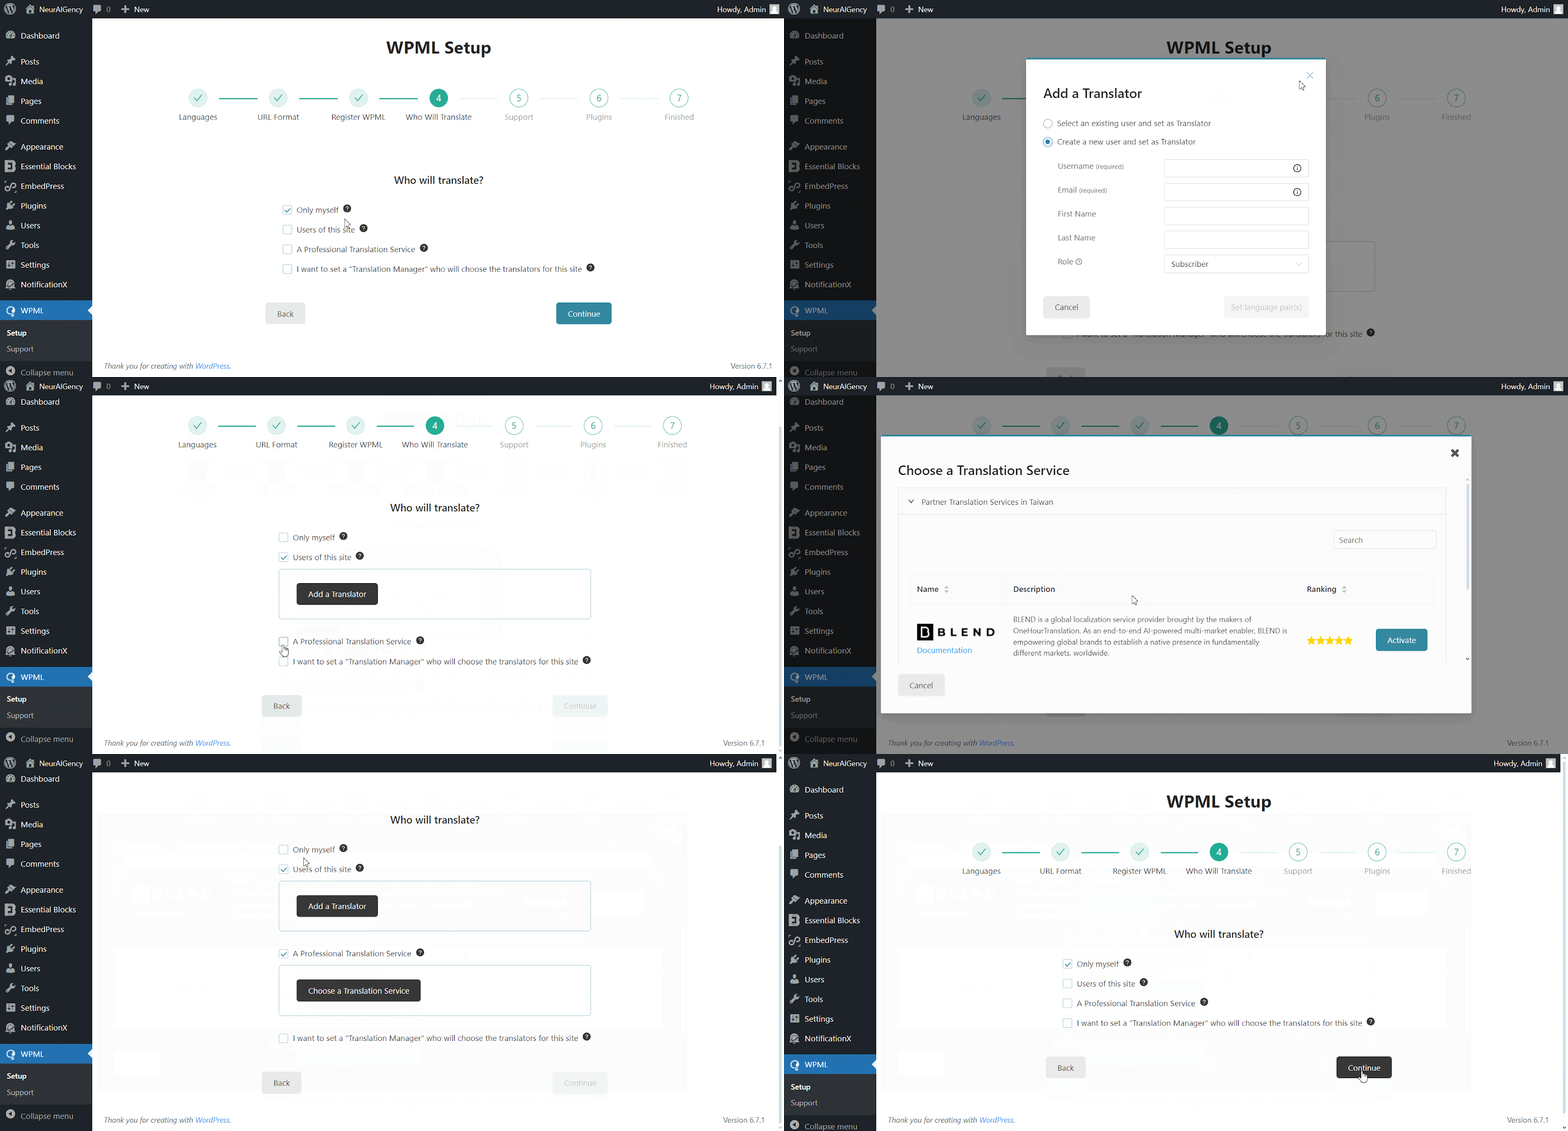
You will be asked how you want to translate your website. You have Four options: ‘Only myself’ to translate solely by yourself, ‘Users of this site’ to set up a team of translators from your WordPress site, ‘A Professional Translation Service’ to select one service from over 70 translation services options integrated with WPML, to assign a user of your site as ‘Translation Manager’ preferred when building site for a client. Choose your preferred one and click on ‘Continue'.

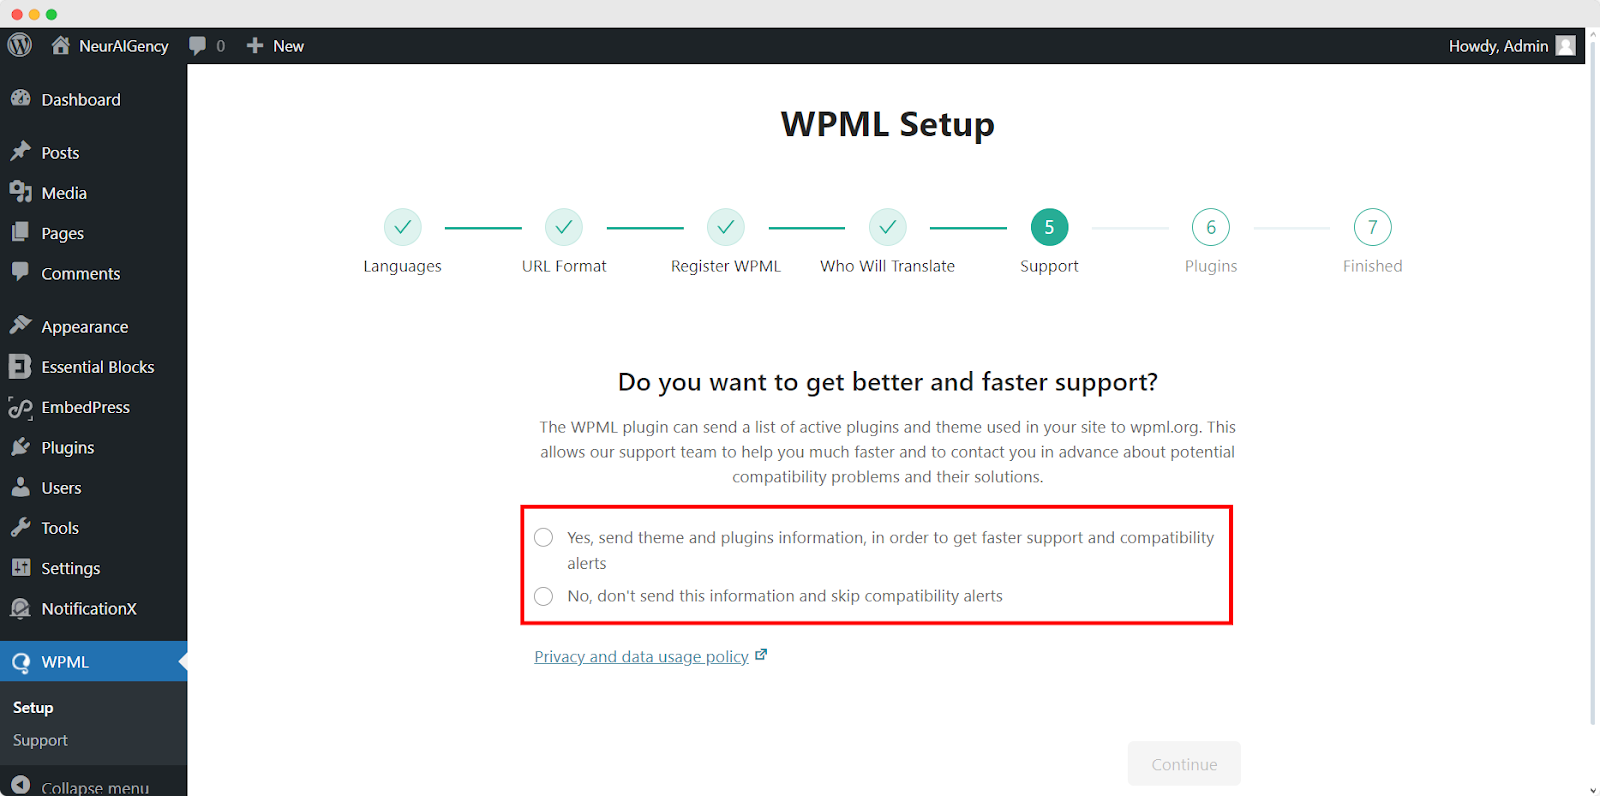
Continuing to the Support section, Choose ‘ya’ option to send your site theme & plugin information to WPML.org in order to get faster support and compatibility alerts or ‘No’ option skip sending the information. After choosing one option click ‘Continue'.

For the Plugin sections, follow the prompted instructions according to your needs. After configuring the WPML with selected options, it will automatically complete the setup.
This is how your plugin can be configured the way you want to translate your website.

How To Use The WPML Automatic Translation Option? #
NotificationX dan PRO NotificationX pemalam serasi dengan WPML’s automatic translation feature. In the Translation Management section of the WPML plugin dashboard, you can access this advanced feature. With this, you can automatically translate your website’s content, including NotificationX alerts. Simply toggle the “Translate Everything Automatically’ button to enable it. You can also select a review option for each translation. You will have the option to change it later from the WPML Settings option.
Nota: You can enable Translate Everything Automatically after sending some content for translation.

After that, go to ‘WPML’ ⮕ ‘Languages’ to change the default language, add or remove the translation language for the NotificationX plugin.

Bagaimana Untuk Menterjemah Rentetan Antara Muka Pentadbir Anda Menggunakan WPML? #
Terjemahan Rentetan WPML goes beyond regular WPML translation. It lets you translate all alerts, including the plugin elements of NotificationX, for a multilingual WordPress site.
Navigate to ‘WPML’→’Theme and plugin localization’ from your WordPress dashboard. Select the ‘NotificationX’ and ‘NotificationX PRO’ plugins and hit the ‘Scan selected components for stringsbutang '.

After you have scanned all the strings on your plugin, now you can navigate to ‘WPML’ → ‘String Translation’ untuk menterjemah sebarang rentetan yang anda mahukan. Anda boleh mencari rentetan yang ingin anda terjemahkan. Ini boleh menjadi sebarang rentetan daripada antara muka pengguna.

Dengan mengklik pada '+' icon, you can choose the language you want to translate the string to. After that, you can manually add the translation to the text.
For example, for this doc, we are translating NotificationX strings to the German language. Hit the '+' ikon dan tulis versi terjemahan rentetan dalam medan input. Anda boleh menyimpan terjemahan dengan menekan butang masukkan.

Finally, you can go to the NotificationX interface and check the translated string from the dashboard.

Jika anda ingin menterjemah medan input NotificationX, cuma pastikan anda memilih medan input ‘admin_texts_notificationx’ domain from ‘WPML’ → ‘String Translation’ dan hanya ikuti proses yang sama yang dinyatakan di atas.

Bagaimana Untuk Menterjemah Makluman Pemberitahuan Oleh NotificationX? #
Cukup navigasi ke Semua NotificationX from your NotificationX Dashboard and select the three-dot action option on a Notification type you want to translate. Here, you will find the translate option. Clicking on this icon will take you to the WPML String settings so you can translate the string as you want.

Tetingkap baharu akan ditunjukkan, dipanggil ‘String Translation,’ where you will find the string you want to translate. Click on the ‘+’ button to add a translation for the string.

Now, to translate NotificationX, you can click on the ‘+’ icon to translate the string and paste your translated text in the box. Click 'Masuk' untuk mengaplikasi terjemahan. Terjemahan anda telah berjaya disimpan.

Sekarang pergi ke tapak langsung dan tatal ke bawah untuk melihat semua bahasa anda telah menetapkan untuk menterjemah. Untuk dokumentasi ini, kami menterjemah 'Komen' berjaga-jaga ke dalam bahasa Jerman. Klik pada ikon bahasa dan makluman ulasan anda akan diterjemahkan secara automatik.

How To Translate The Notification Bar Built With Elementor? #
If you have made a notification bar with Elementor, you can translate it too. Go to ‘All NotificationX’ from the dashboard and click the three dots on the one you want to translate. Then, click the ‘Translate’ icon to open WPML’s String Management settings.

From the new window, select the notification bar and click on the “Add Note for translator” button to add information for your alerts translation.

Now navigate to String Translation again and add translation of the each section of the notification bar build with Elementor. click on the ‘+’ icon to translate the string and paste your translated text in the box. Click 'Masuk' untuk mengaplikasi terjemahan. Terjemahan anda telah berjaya disimpan.

Go to your live website and change the language. Your Bar NotificationX dibina dengan Elementor akan berjaya diterjemahkan.

Sekarang jika anda pergi ke tapak langsung anda, anda boleh melihat terjemahan bar pemberitahuan dengan mudah dengan menukar bahasa menggunakan pemalam terjemahan berbilang bahasa WPML dengan NotificationX.
This is how easily you can translate NotificationX interface, comments and notification bar using the WPML plugin.Getting Stuck? Feel free to contact our pasukan sokongan yang berdedikasi untuk bantuan dan pertanyaan lanjut.


