NotificationX предлагает вам полную совместимость с самым популярным плагином многоязычного перевода WordPress. WPML. Это позволяет вам перевести NotificationX содержимое пользовательского интерфейса на любой язык и применить его к своему многоязычному веб-сайту. Следуйте приведенному ниже пошаговому руководству, чтобы перевести пользовательский интерфейс и строки NotificationX с помощью WPML.
Как настроить параметры плагина WPML? #
Чтобы перевести NotificationX с помощью WPML, сначала установите и активируйте следующие плагины на своем сайте WordPress; WPML Многоязычная CMS а также Перевод строк WPML. You can check out this Документ WPML to configure it on your WordPress site for more information.

After installing these plugins on your WordPress website, go to ‘WPML’→ ‘Setup’ from your dashboard and select the current language and the language you want to translate to. For instance, we are selecting the ‘German’ language to translate our website.

Follow the on-screen instructions in the WPML Setup wizard and add your site key. Select the site URL format from the three options to choose from. Click on the ‘Continue’ button for the next step

Enter the site key from your WPML account. After that, click on the ‘Continue’ button to proceed to the next step.

Next, you will find the AI Translations option. Here, you can set the context and target audience for your language settings. First, add the product/ service/ website name. Then describe more about the website. After that, select the “Target Audience”, that you want to translate for.

Besides the AI translation, next, you can choose human translation as well. Select how you would like to set up your human translation from the setup.

Now, to get faster support and compatibility alerts, you can choose to get theme and plugin information if required.

Once you complete the previous steps, the WPML plugin will be ready. You can now use it on your WordPress website.

Now, to enable translation, go to ‘WPML’ → ‘Languages’. Set your native language, and select any language you prefer.

Now, navigate to ‘WPML‘→ ‘Settings‘. Enable ‘Private Translation Cloud (PTC)’ options. Afterward, click on the ‘Save’ button before hitting the ‘Apply’ button at the bottom of the page.

How To Use The WPML Automatic Translation Option? #
1ТП5Т и NotificationX PRO плагины совместимы с WPML’s automatic translation feature. In the Translation Management section of the WPML plugin dashboard, you can access this advanced feature.
With this, you can automatically translate your website’s content, including NotificationX alerts. Simply toggle the “Translate Everything Automatically’ button to enable it. You can also select a review option for each translation. You will have the option to change it later from the WPML Settings option.
Замечания: You can enable Translate Everything Automatically after sending some content for translation.

After that, go to ‘WPML’ ⮕ ‘Languages’ to change the default language, add or remove the translation language for the NotificationX plugin.

Как перевести строки интерфейса администратора с помощью WPML? #
Перевод строк WPML goes beyond regular WPML translation. It lets you translate all alerts, including the plugin elements of NotificationX, for a multilingual WordPress site.
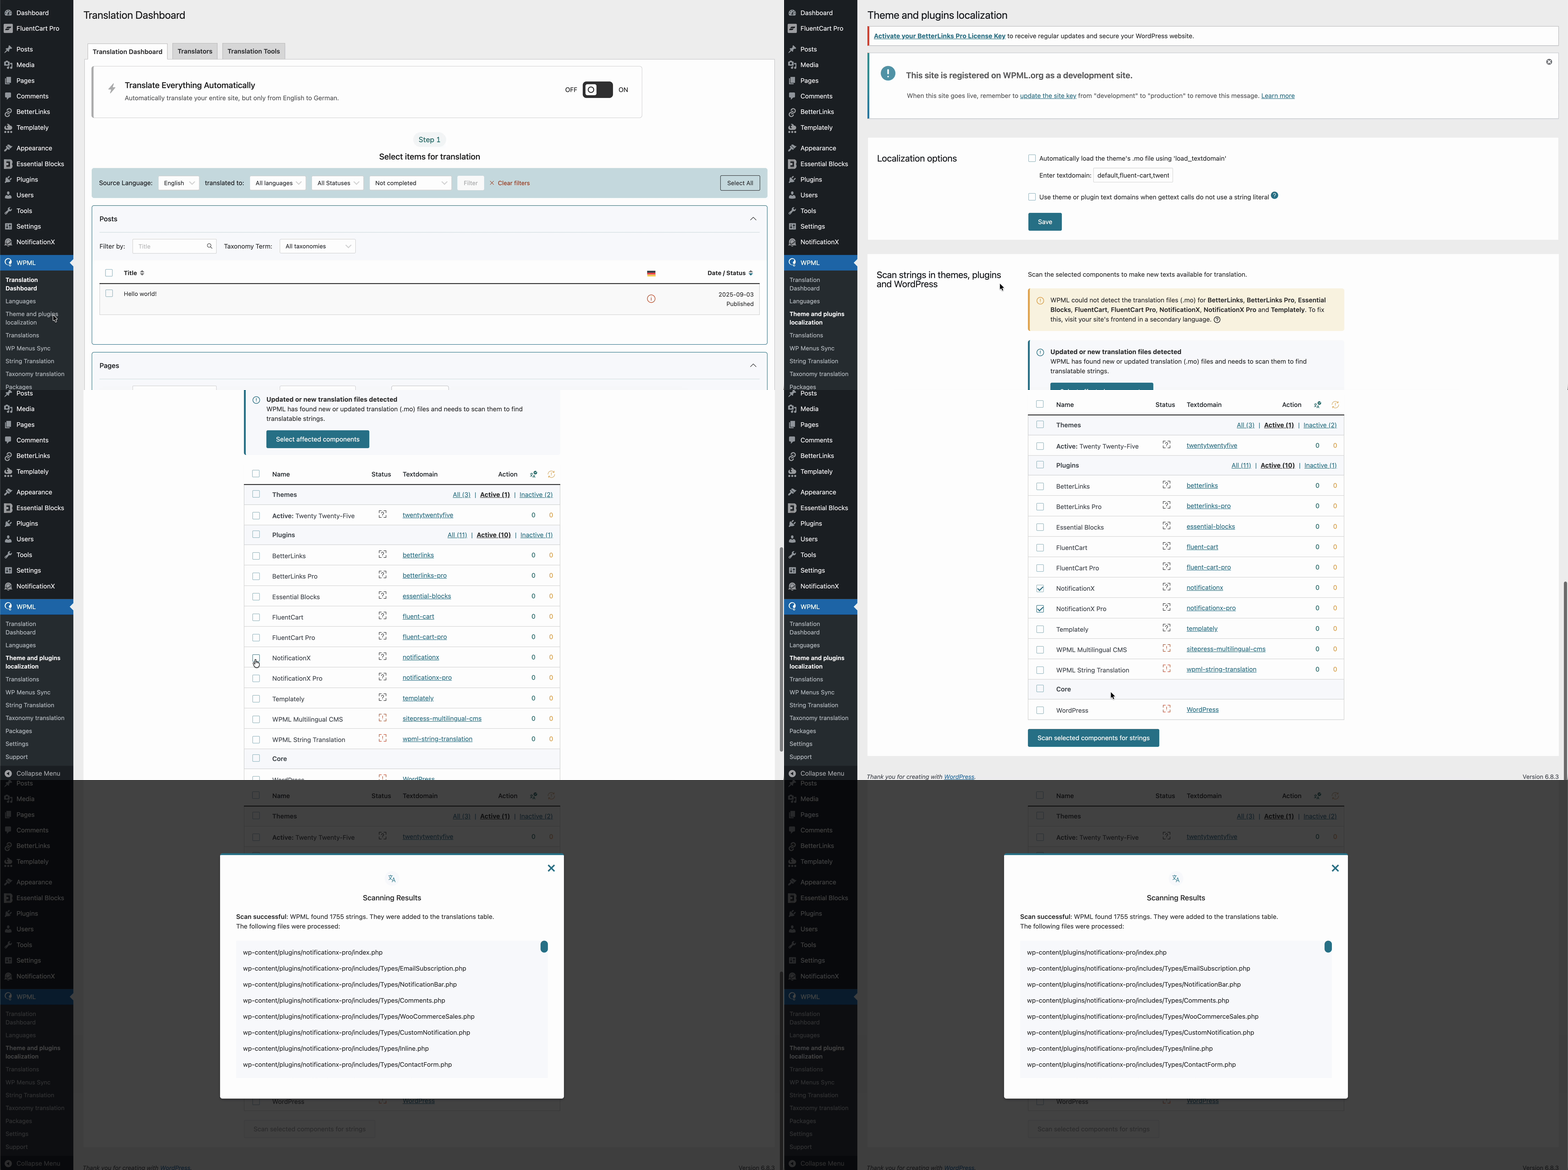
Navigate to ‘WPML’→’Theme and plugins localization’ from your WordPress dashboard. Select the ‘NotificationX’ and ‘NotificationX PRO’ plugins and hit the ‘Scan selected components for strings' кнопка.

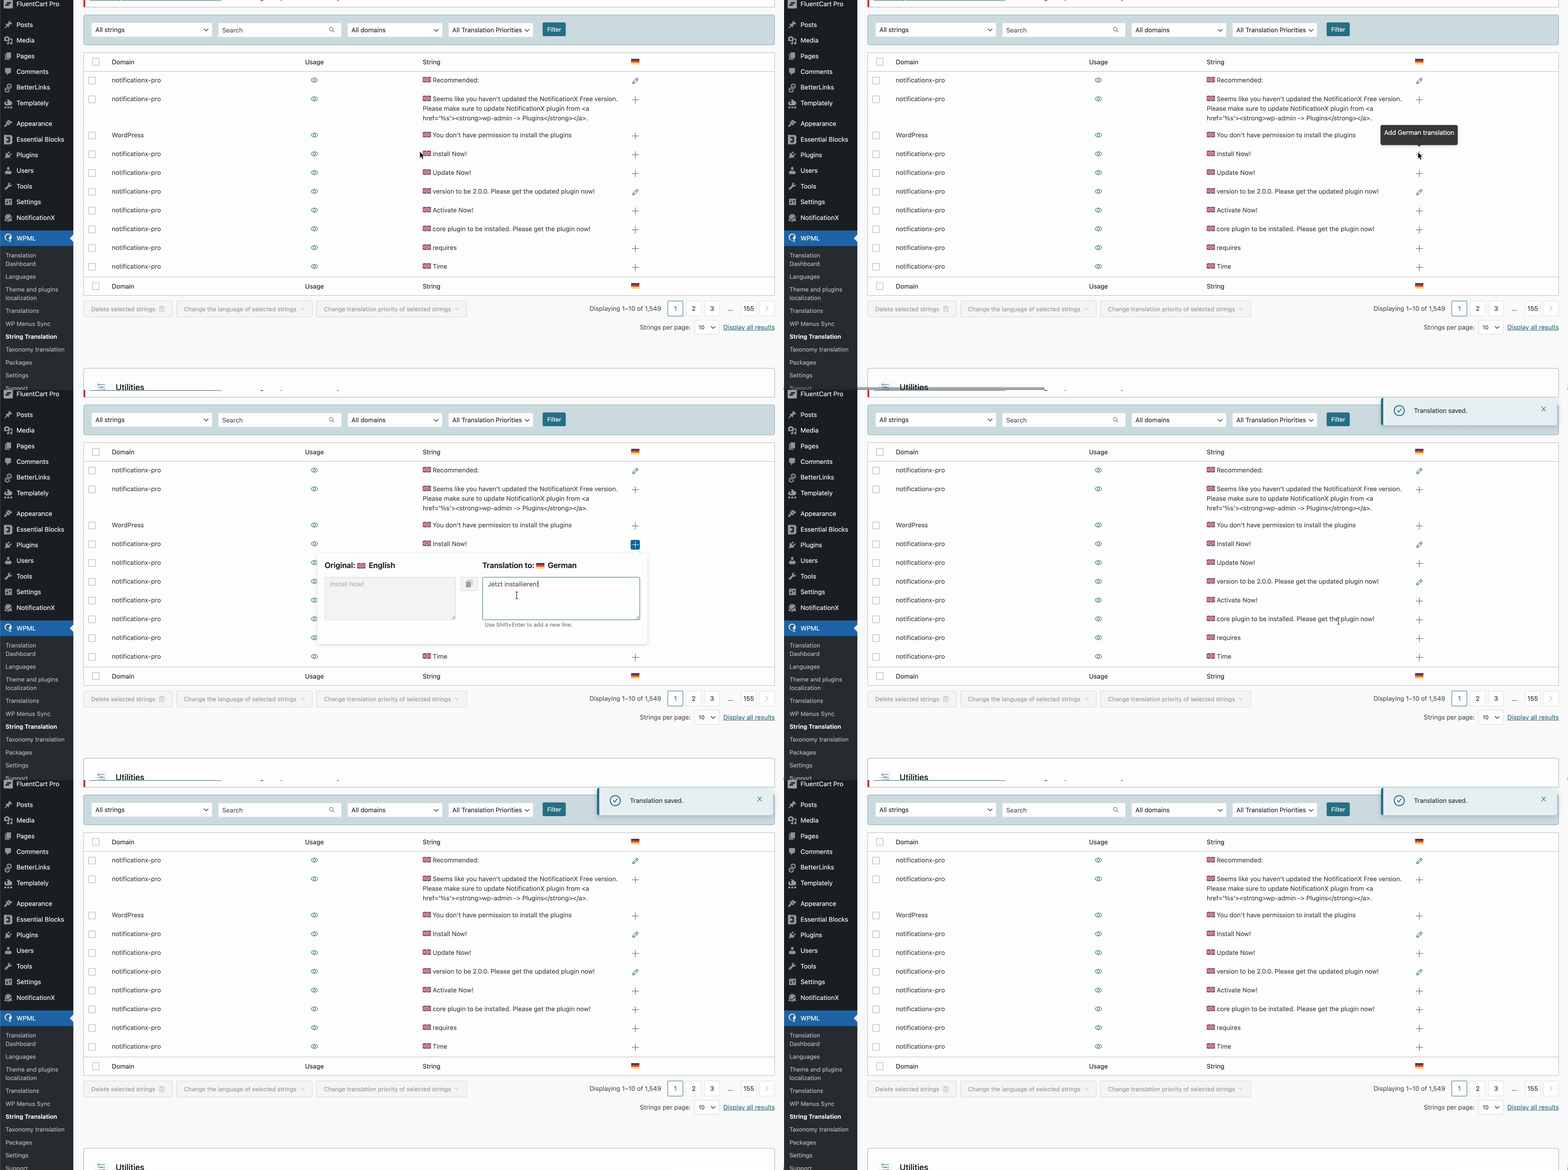
After you have scanned all the strings on your plugin, now you can navigate to ‘WPML’ → ‘String Translation’ чтобы перевести любую строку, которую вы хотите. Вы можете найти строку, которую хотите перевести. Это может быть любая строка из пользовательского интерфейса.

Щелкнув по '+' icon, you can choose the language you want to translate the string to. After that, you can manually add the translation to the text.
For example, for this doc, we are translating NotificationX strings to the German language. Hit the '+' значок и напишите переведенную версию строки в поле ввода. Вы можете сохранить перевод, нажав кнопку ввода.

Finally, you can go to the NotificationX interface and check the translated string from the dashboard.

Если вы хотите перевести поля ввода NotificationX, просто не забудьте выбрать ‘admin_texts_notificationx’ domain from ‘WPML’ → ‘String Translation’ и просто следуйте тому же процессу, упомянутому выше.
Как перевести уведомления с помощью NotificationX? #
Просто перейдите к Все NotificationX from your NotificationX Dashboard and select the three-dot action option on a Notification type you want to translate. Here, you will find the translate option. Clicking on this icon will take you to the WPML String settings so you can translate the string as you want.

Откроется новое окно с названием ‘String Translation,’ where you will find the string you want to translate. Click on the ‘+’ button to add a translation for the string.

Now, to translate NotificationX, you can click on the ‘+’ icon to translate the string and paste your translated text in the box. Click 'Входить' применить перевод. Ваш перевод успешно сохранен.

Теперь перейдите на действующий сайт и прокрутите вниз, чтобы увидеть все языки вы настроили перевод. Для этой документации мы перевели 'Комментарий' оповещение на немецкий язык. Нажать на значок языка и ваше уведомление о комментариях будет переведено автоматически.

How To Translate The Notification Bar Built With Elementor? #
If you have made a notification bar with Elementor, you can translate it too. Go to ‘All NotificationX’ from the dashboard and click the three dots on the one you want to translate. Then, click the ‘Translate’ icon to open WPML’s String Management settings.

From the new window, select the notification bar and click on the “Add Note for translator” button to add information for your alerts translation.

Now navigate to String Translation again and add translation of each section of the notification bar build with Elementor. click on the ‘+’ icon to translate the string and paste your translated text in the box. Click 'Входить' применить перевод. Ваш перевод успешно сохранен.

Go to your live website and change the language. Your Бар NotificationX построен с помощью Elementor будет успешно переведен.

Теперь, если вы перейдете на свой действующий сайт, вы можете легко увидеть перевод панели уведомлений, переключив язык с помощью плагина многоязычного перевода. WPML с NotificationX. This is how easily you can translate NotificationX interface, comments and notification bar using the WPML plugin.
Застрять? Не стесняйтесь обращаться к нашим специальная группа поддержки для получения дополнительной помощи и запросов.


