
NotificationX का उपयोग करते हुए जैपियर नोटिफिकेशन अलर्ट कैसे दिखाएं? #
NotificationX gives you the chance to integrate with your Zapier Account. As a result, you are able to display any sort of Zapier Notification Alerts, such as Email Subscription, Review, Sales Notifications and others.
Before you connect NotificationX with your Zapier Account, you need to create a Zapier Notification Alert on your website. Follow these steps to show the Zapier Notification popup with NotificationX:
जैपियर नोटिफिकेशन अलर्ट कैसे बनाएं और कॉन्फ़िगर करें #
चरण 1 - नई अधिसूचना जोड़ें #
शुरू करने के लिए, अपने वर्डप्रेस डैशबोर्ड पर जाएं और नेविगेट करें wp-admin -> सभी NotificationX -> NotificationX. Then, right at the top, click on ‘Add New’.

चरण 2 - एक स्रोत चुनें #
आप पाएंगे ‘Zapier’ इन अधिसूचना प्रकारों के अंदर स्रोत: बिक्री अधिसूचना, समीक्षा तथा ईमेल सदस्यता. For instance, if you want to display new emails from your Gmail account, you can pick the ‘Email Subscription’ विकल्प। अपना पसंदीदा अधिसूचना प्रकार चुनने के बाद, चुनना सुनिश्चित करें ‘Zapier’ अपने स्रोत के रूप में और पर क्लिक करें 'आगे'.
चरण 3 - एक डिज़ाइन थीम चुनें #
वहाँ से 'डिज़ाइन' टैब, आप एक लेआउट का चयन कर सकते हैं और यह भी उपयोग करने के लिए लचीलापन है 'उन्नत डिजाइन' अपनी पसंद के अनुसार इसे अनुकूलित करने का विकल्प। वहाँ से 'विषय-वस्तु' अनुभाग, चुना हुआ लेआउट है कि आपकी वेबसाइट पर अधिसूचना चेतावनी कैसे प्रदर्शित की जाएगी। इसके अलावा, आप अपने चुने हुए थीम को 'द्वारा अनुकूलित करके संशोधित कर सकते हैं'उन्नत डिजाइन ' विकल्प। इस खंड से, आप आसानी से अपने डिजाइन, छवि उपस्थिति और टाइपोग्राफी में स्टाइल जोड़ पाएंगे।
चरण 4 - टेम्पलेट सामग्री कॉन्फ़िगर करें #
फिर आप को पुनर्निर्देशित किया जाएगा 'सामग्री' टैब जहाँ से आप अपने 'अधिसूचना टेम्पलेट' को संशोधित कर सकते हैं और अपना पसंदीदा सामग्री पाठ जोड़ सकते हैं। इसके अलावा, NotificationX ऑफर 'अधिसूचना टेम्पलेट' आपकी सामग्री के लिए। आप आसानी से आगे बढ़ सकते हैं और अपने पसंदीदा चर चुन सकते हैं। दूसरी ओर, 'उन्नत टेम्प्लेट' संपूर्ण सामग्री को कस्टमाइज़ करने के लिए आपको पूरा नियंत्रण देता है। इसके अलावा, आप NotificationX के माध्यम से विभिन्न प्रकार के अभियानों को ट्रैक भी कर सकते हैं 'UTM नियंत्रण'।
चरण 5 - प्रदर्शन विकल्प समायोजित करें #
वहाँ से 'छवि' section, you can use the checkbox to display a default image or an avatar in the notification popup. Whereas the 'दृश्यता' अनुभाग आपको उन पृष्ठों को सेट करने की अनुमति देता है जहां आप ज़ापियर अधिसूचना चेतावनी प्रदर्शित करना चाहते हैं।
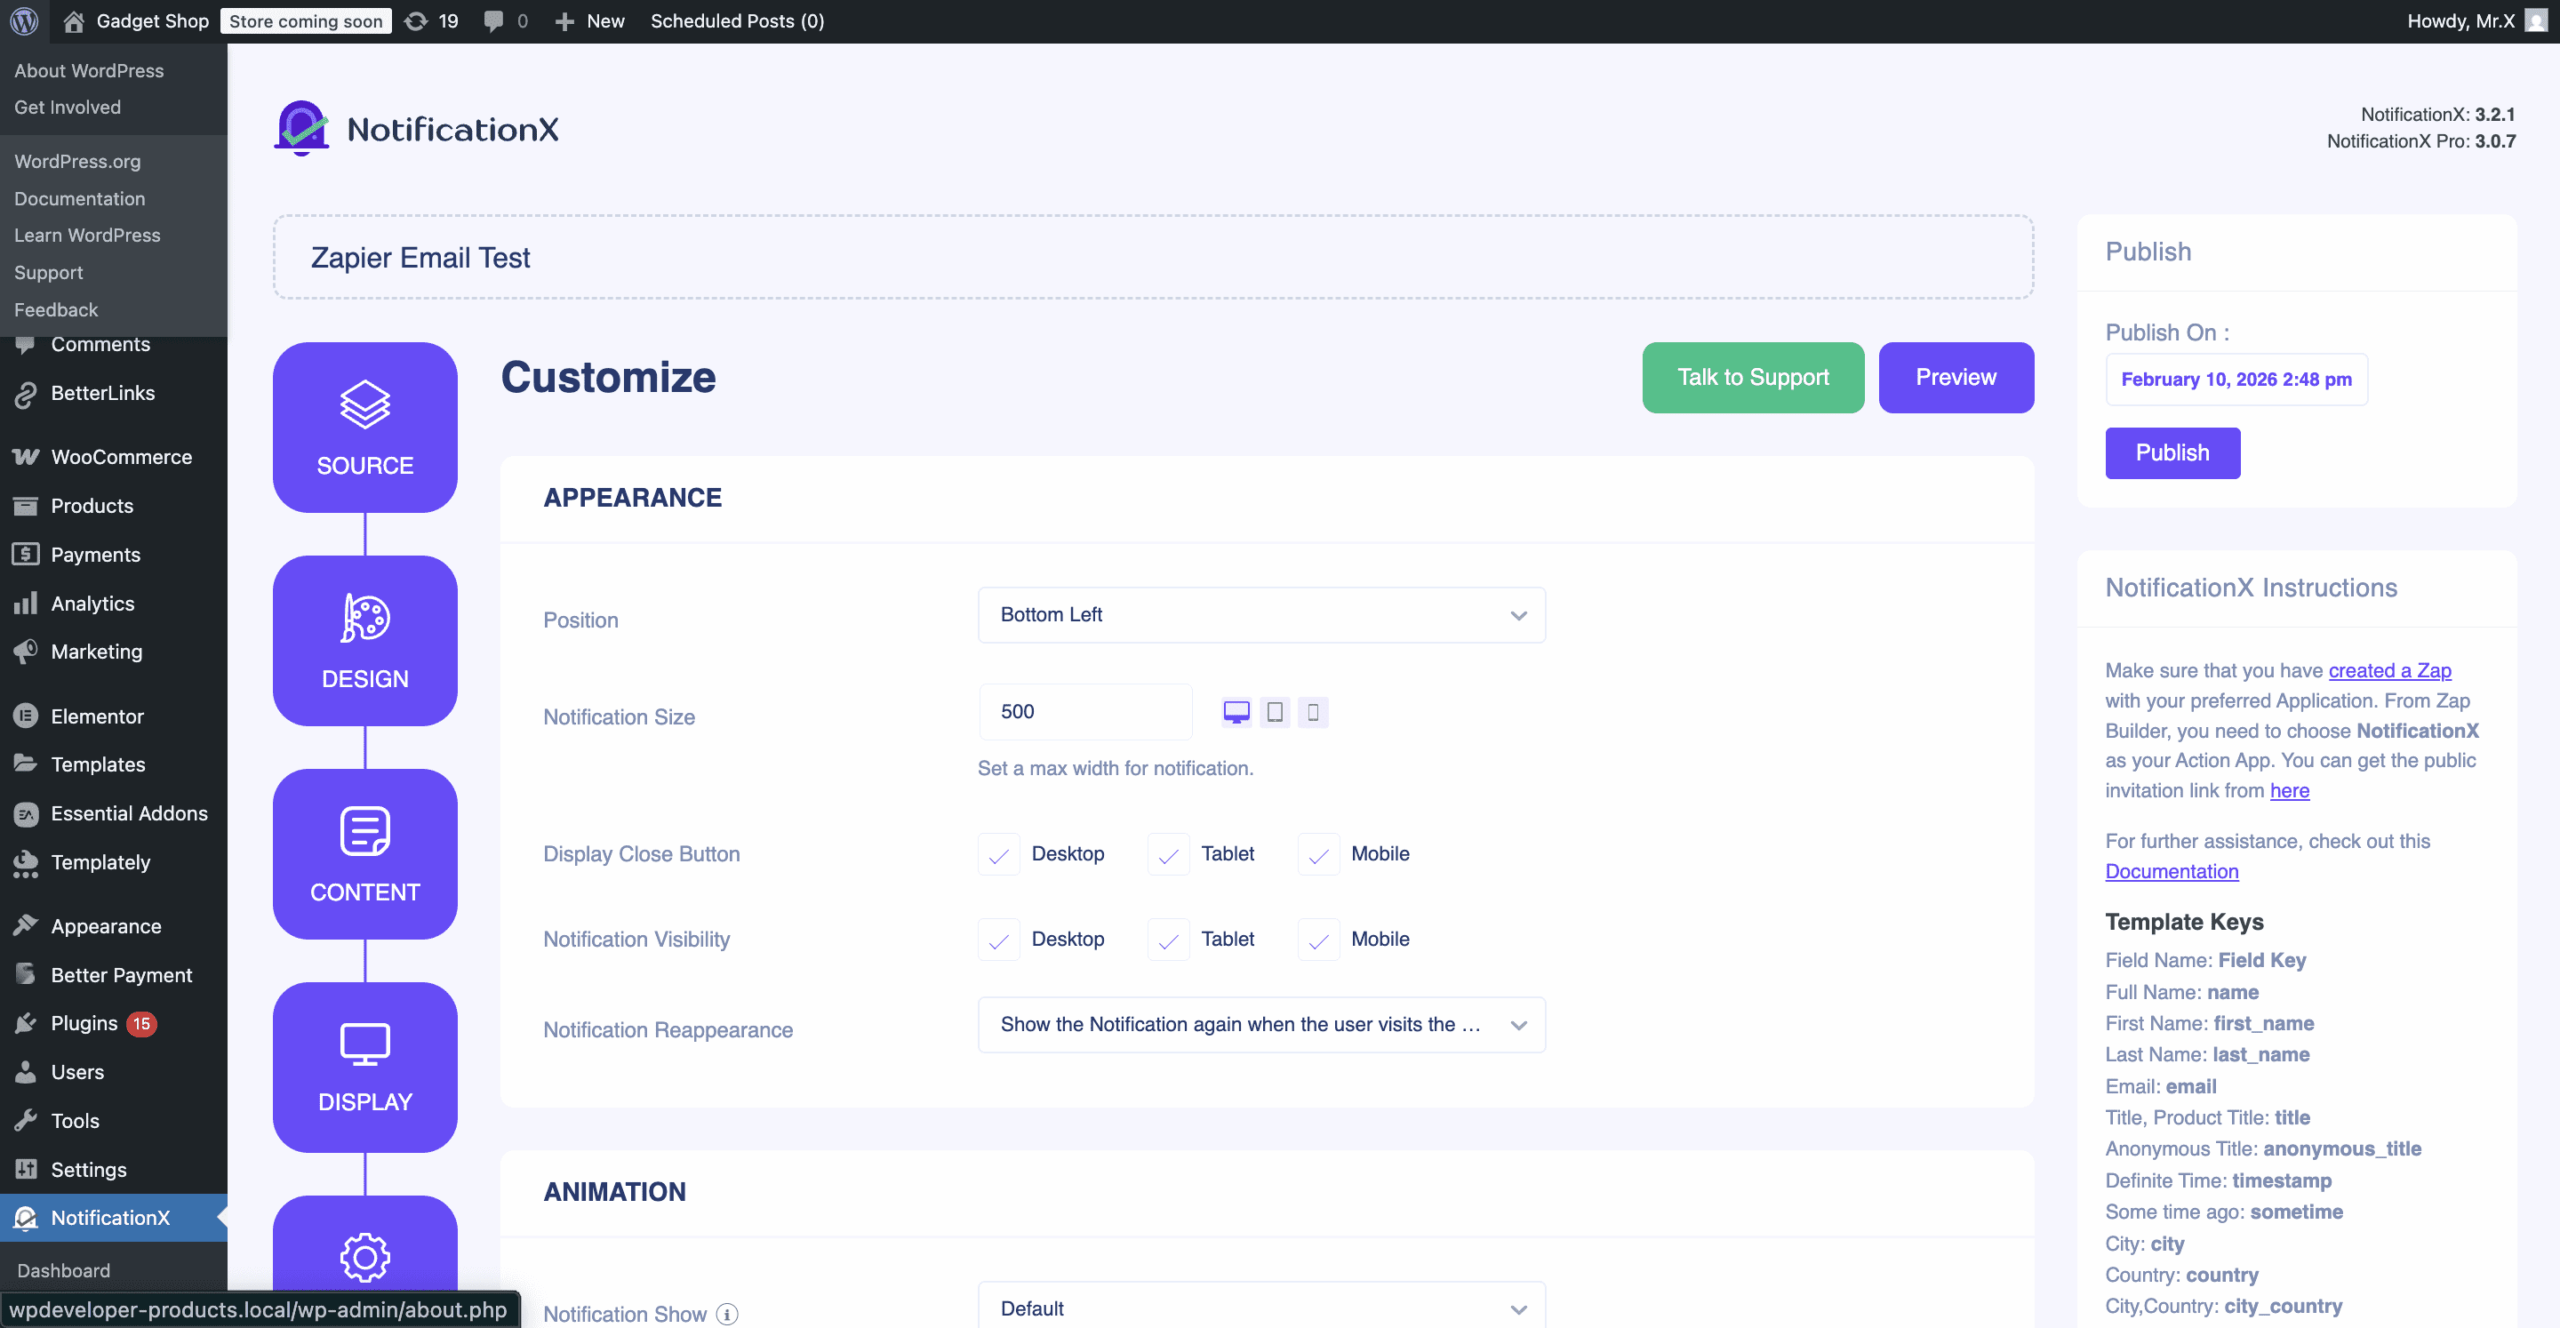
स्टेप 6 - अपियरेंस सेट करें #
वहाँ से'उपस्थिति' section, you can set the position and width for notificiation alert. From the ‘Timing’ section, you can control the ‘Display’ time duration and set an initial time after which your ‘Zapier notification alert’ will pop up. The ‘Behaviour’ section allows you to pick a number of conversions and specify a certain number of days that will be considered for the notification popup. Besides, the ‘Sound Settings’ section lets you pick a Sound Alert for your notification popup.

चरण 7: अपनी अधिसूचना प्रकाशित करें #
चरण 6 पूरा करने के बाद, पर क्लिक करें 'प्रकाशित बटन। नतीजतन, 'संपर्क फ़ॉर्म सबमिशन अलर्ट' सफलतापूर्वक बनाया जाएगा।
Zapier के साथ NotificationX कैसे कनेक्ट करें #
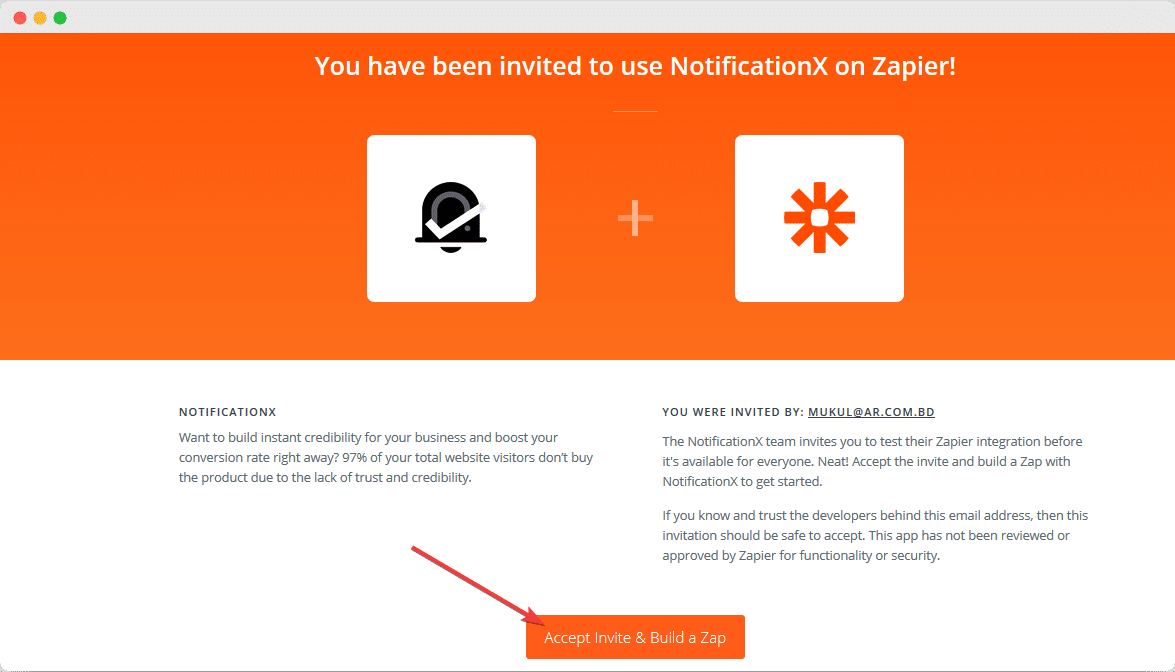
जब आपने अपना Zapier Notification Alert प्रकाशित किया है, तो आपको NotificationX को Zapier से जोड़ना होगा। ऐसा करने के लिए, सबसे पहले, आपको करने की आवश्यकता है अपने Zapier डैशबोर्ड में प्रवेश करें। Zapier में NotificationX का उपयोग करने के लिए, स्वीकार करना सुनिश्चित करें NotificationX का सार्वजनिक निमंत्रण लिंक। फिर, बस आगे बढ़ें और क्लिक करें ‘Accept Invite & Build a Zap’ बटन।
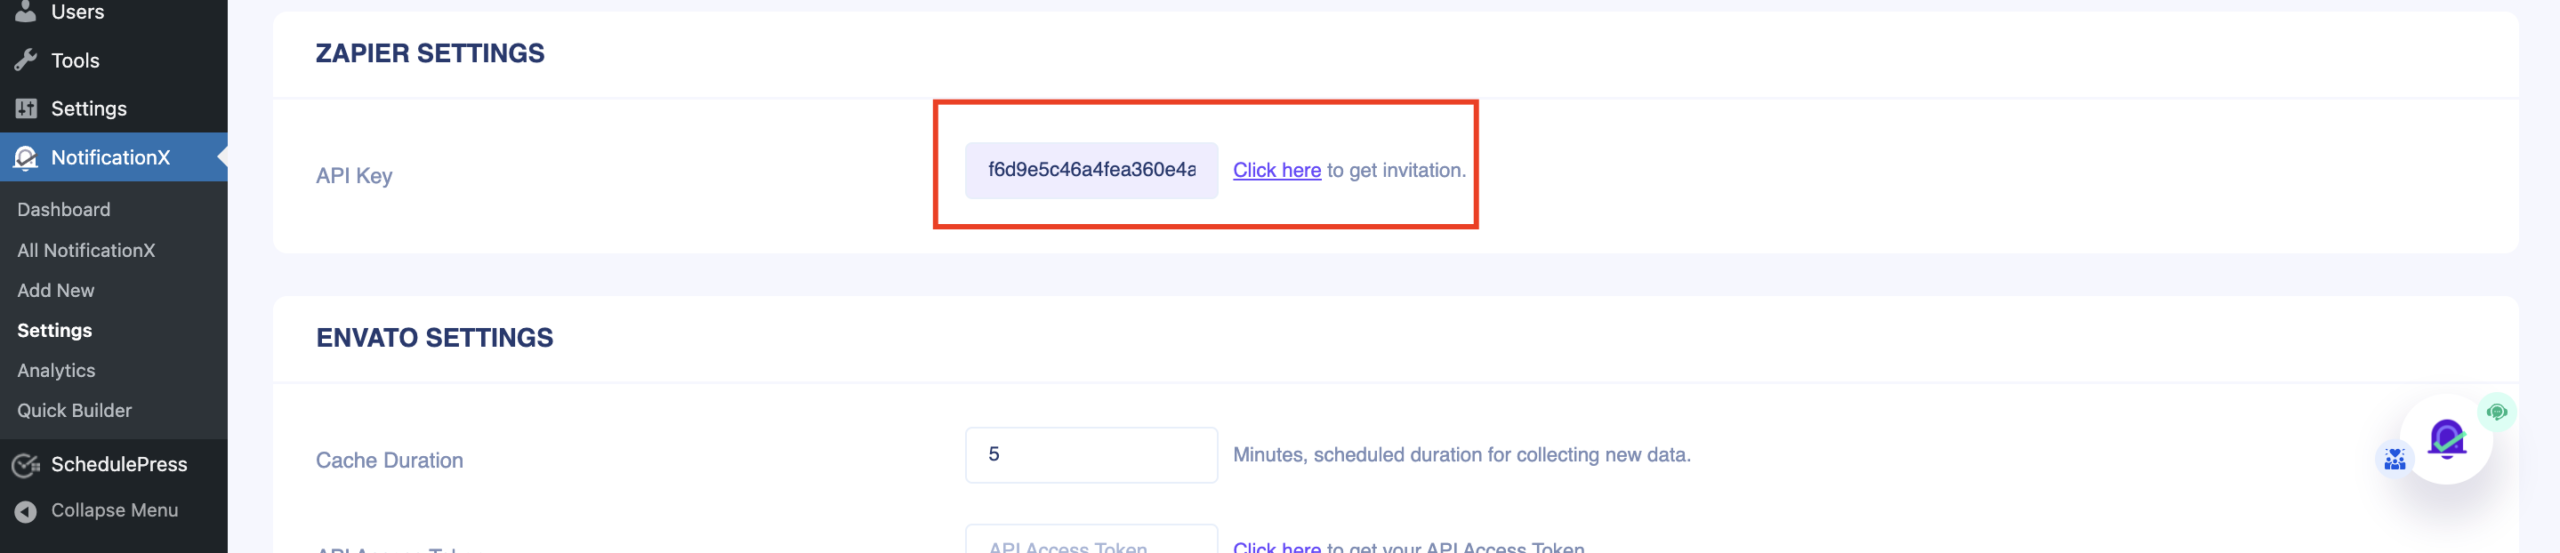
ध्यान दें: You will find the Zapier API key in the NotificationX settings option. There will be an API key, and you will get a public invitation link. You can add the link from the settings and get the invitation link here.
चरण 1 - एक जैप बनाएं #
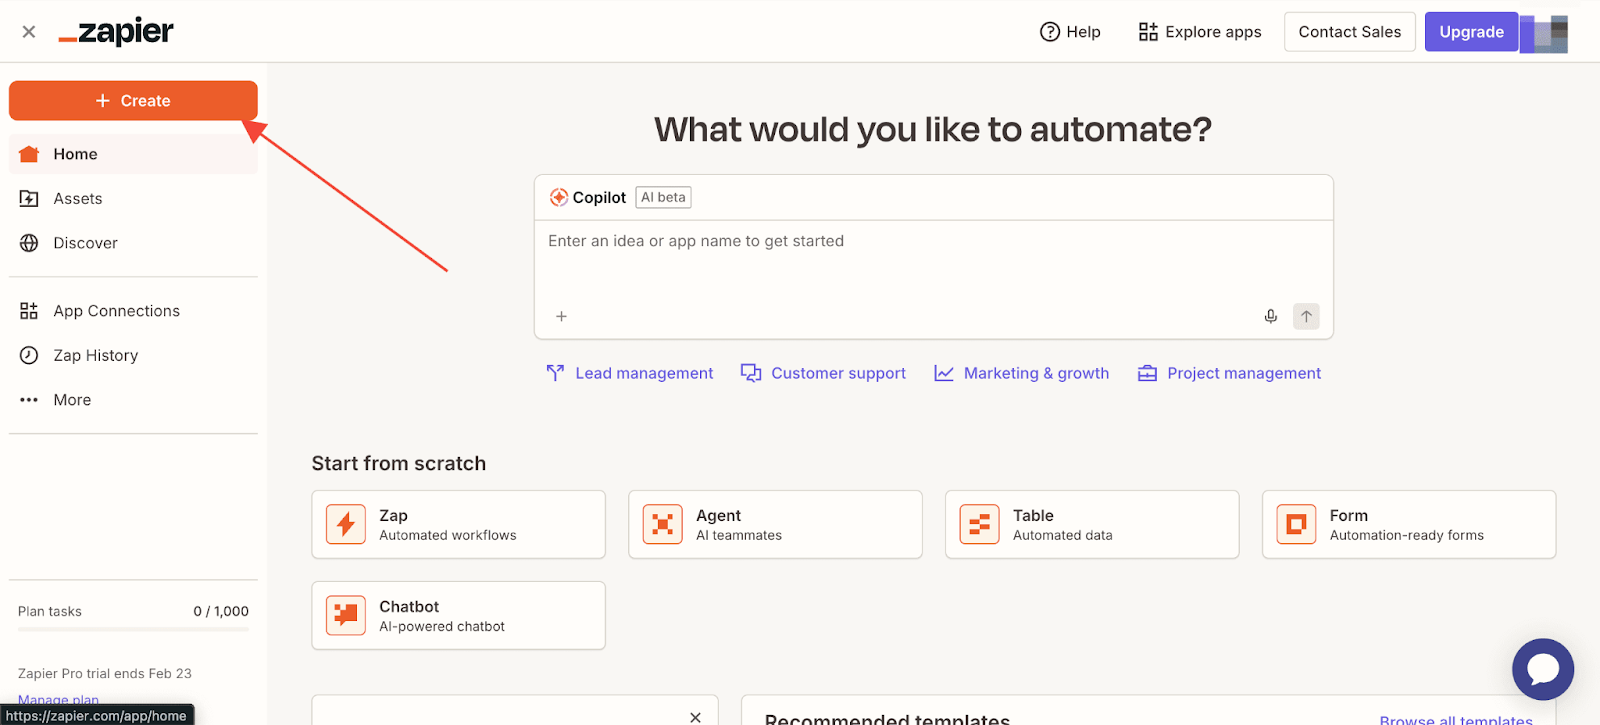
NotificationX को Zapier से जोड़ने के लिए, आपको इसकी आवश्यकता है एक जैप बनाएं अपने पसंदीदा अनुप्रयोग के साथ। तुम पाओगे ‘Create’ button on your Zapier Dashboard. Simply go ahead and click on it. After that, click on ‘Zaps’ to start automating your notification.
Step 2 – Choose App & Event #
एक बार जब आप Zapier संपादक पृष्ठ पर होते हैं, तो आप कर सकते हैं एक नाम सेट करें for the Zap you are creating from the top bar of the Editor. Click on the dropdown and click on ‘Rename’. You can name it whatever you want.

Afterward, you can describe the workflow. Here, you can write what this workflow is about and how it works on your website.
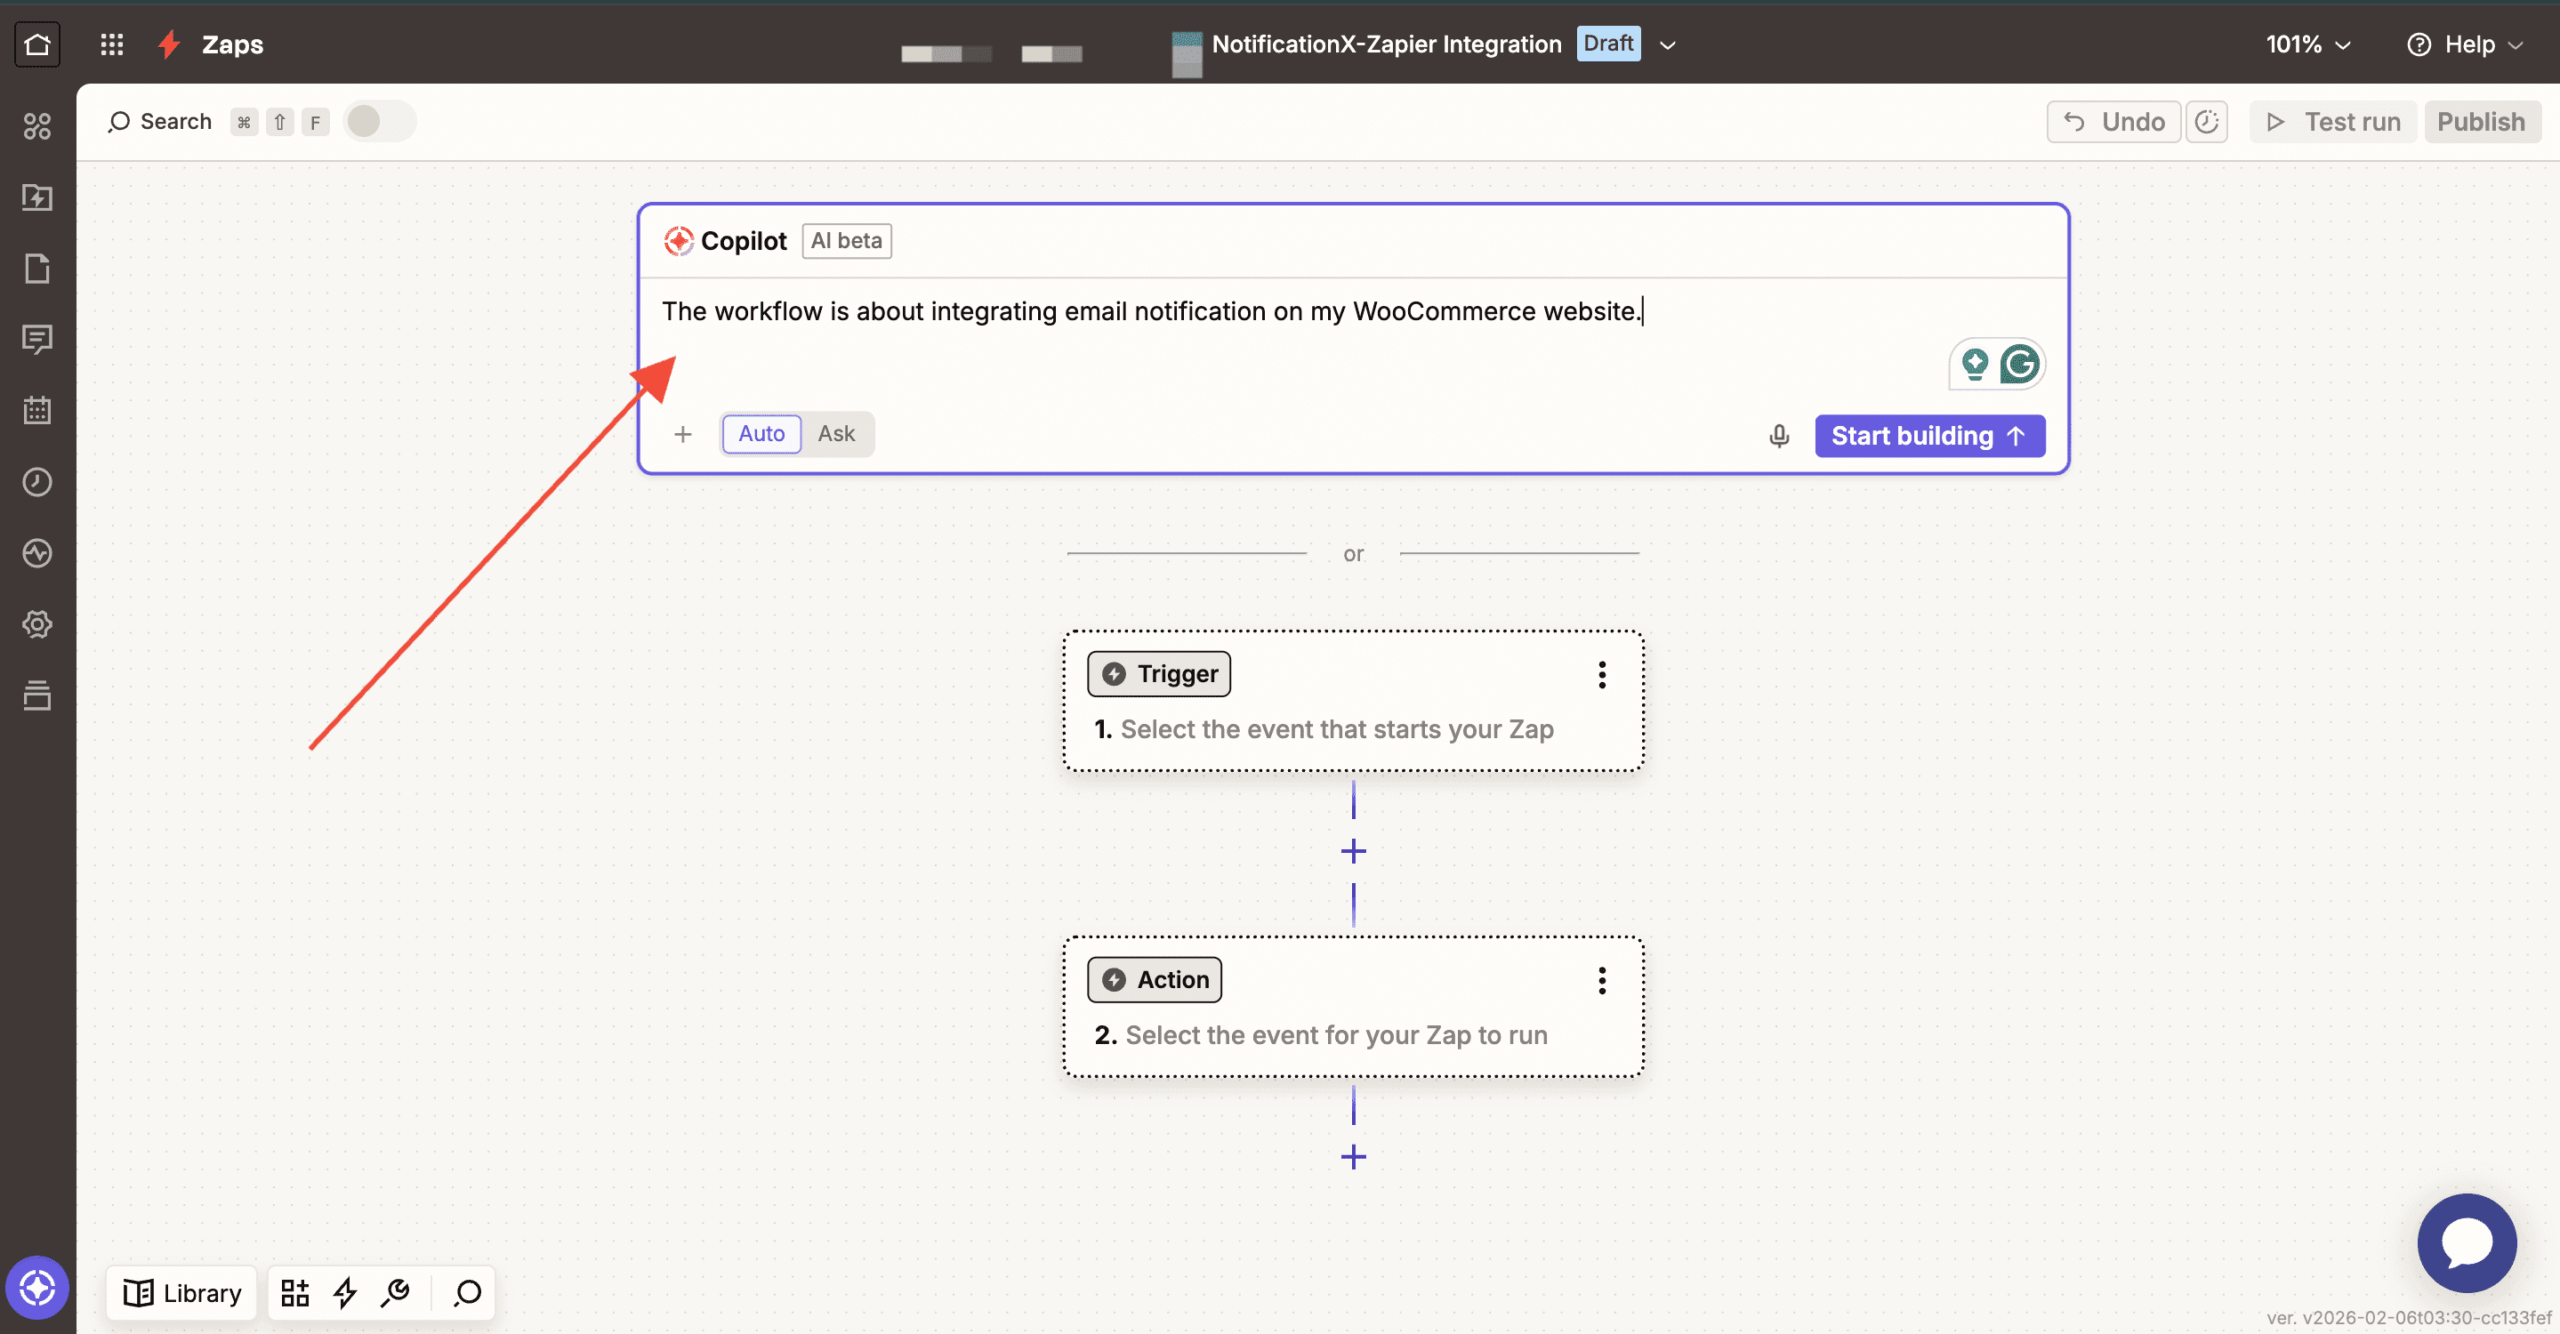
Alternatively, choose the app you want to integrate. Click on ‘Trigger,’ and then you will find a lot of options to choose the app. From there, select your preferred app.

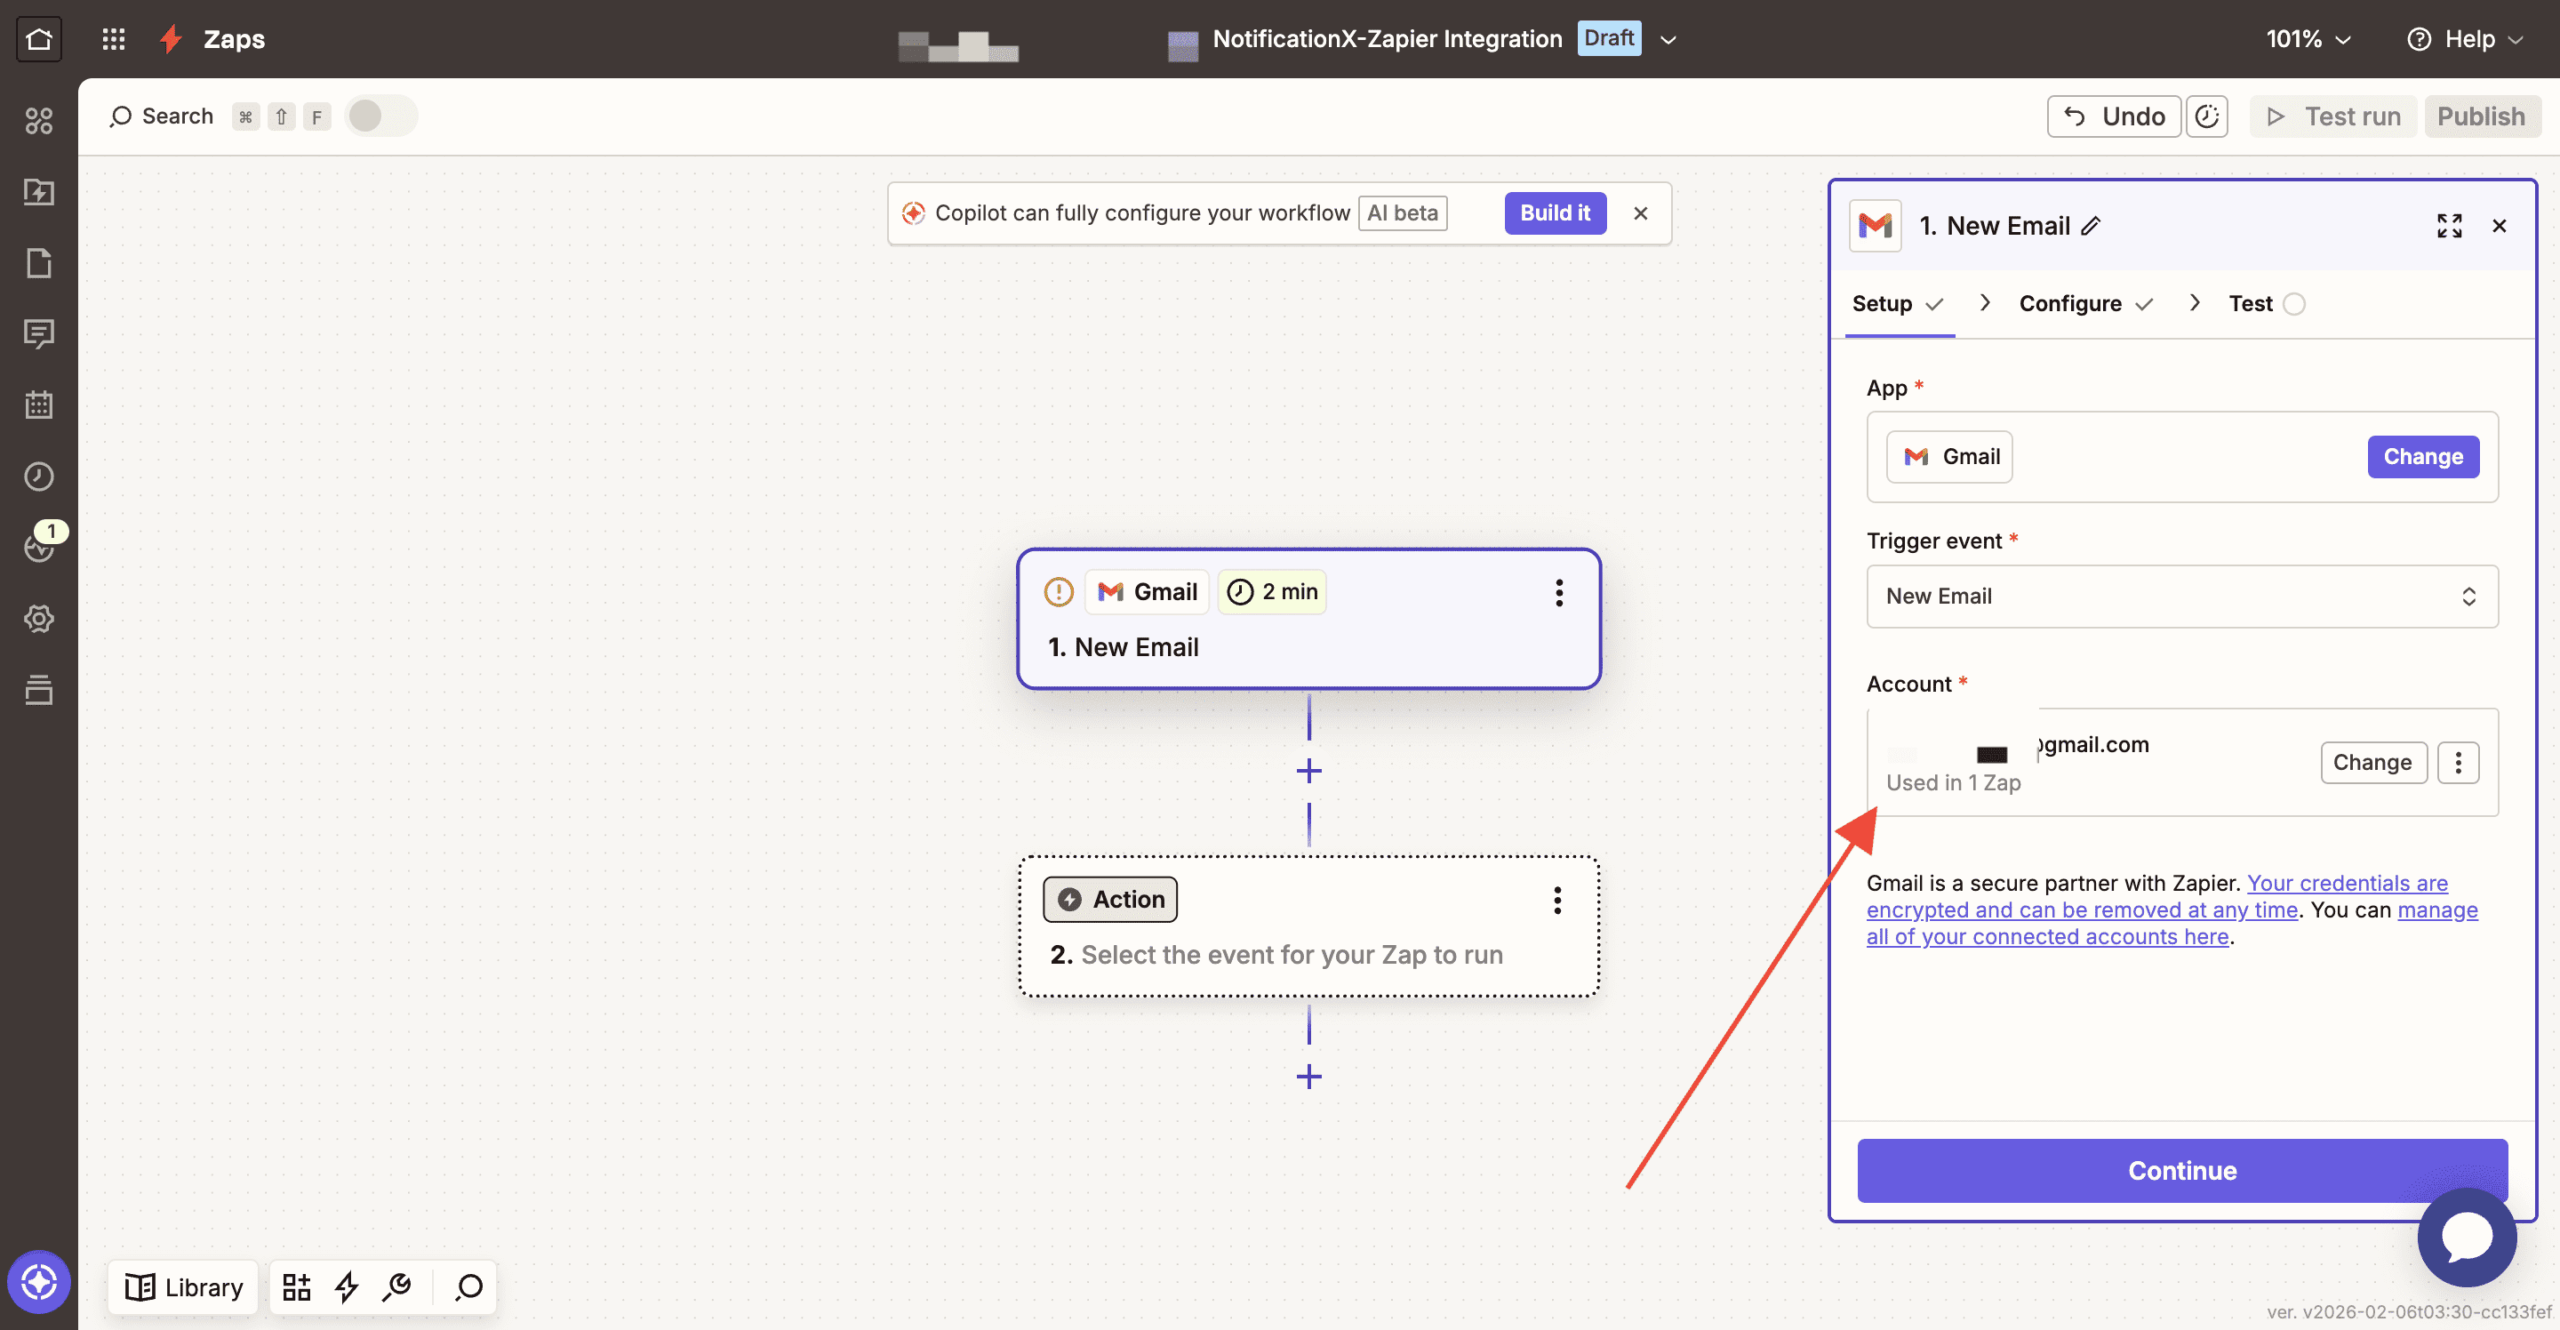
अपने ऐप को चुनने के बाद, आगे बढ़ें और चुनें ट्रिगर घटना इसके लिए। (उदाहरण: if you want to show a new email notification from your Gmail, then pick ‘New Email’ as your Trigger Event).
बाद में, आप से पूछा जाएगा अपना ऐप खाता कनेक्ट करें जैपियर के साथ। एक बार कनेक्शन स्थापित हो जाने के बाद, बस आगे बढ़ें और जारी रखें।
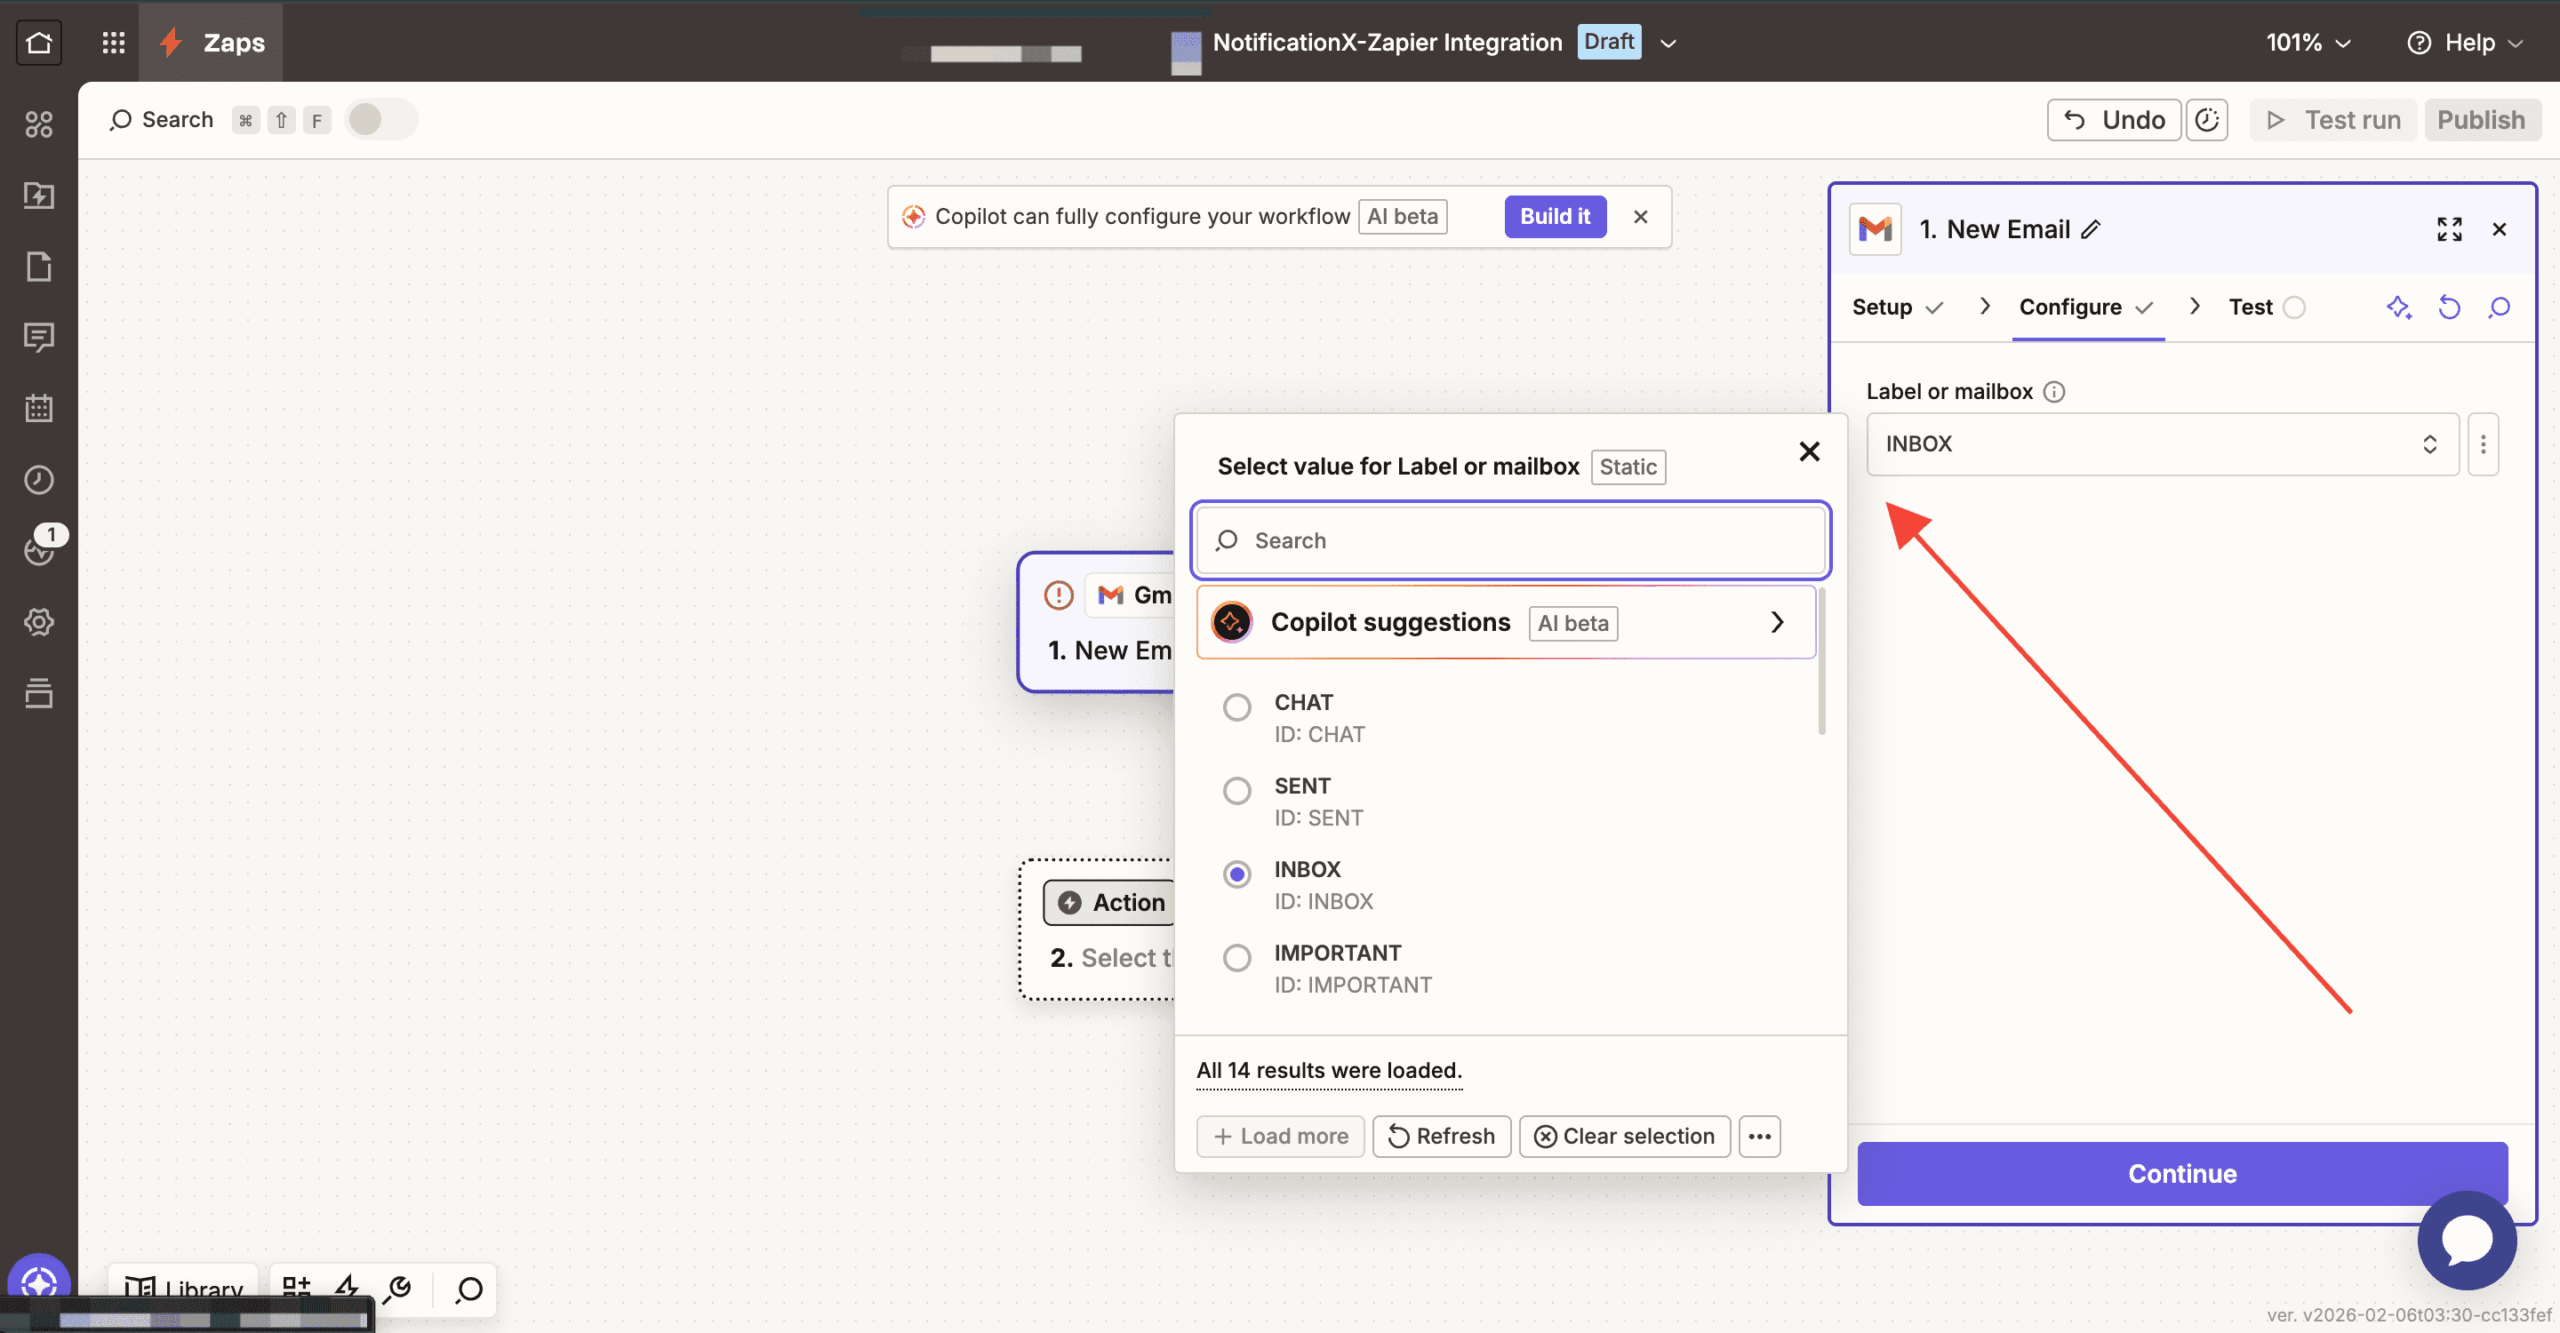
After that, click on the “Continue” button for the next stage. Then you have to add the ‘Configure’ section. In the ‘Configure’ section, choose the type of value label you want to choose.
For smooth flow in Zapier, next go to the ‘Test’ section. Here you can test if your email integration is working properly or not. Click on the ‘Test Trigger’ button to start the test.
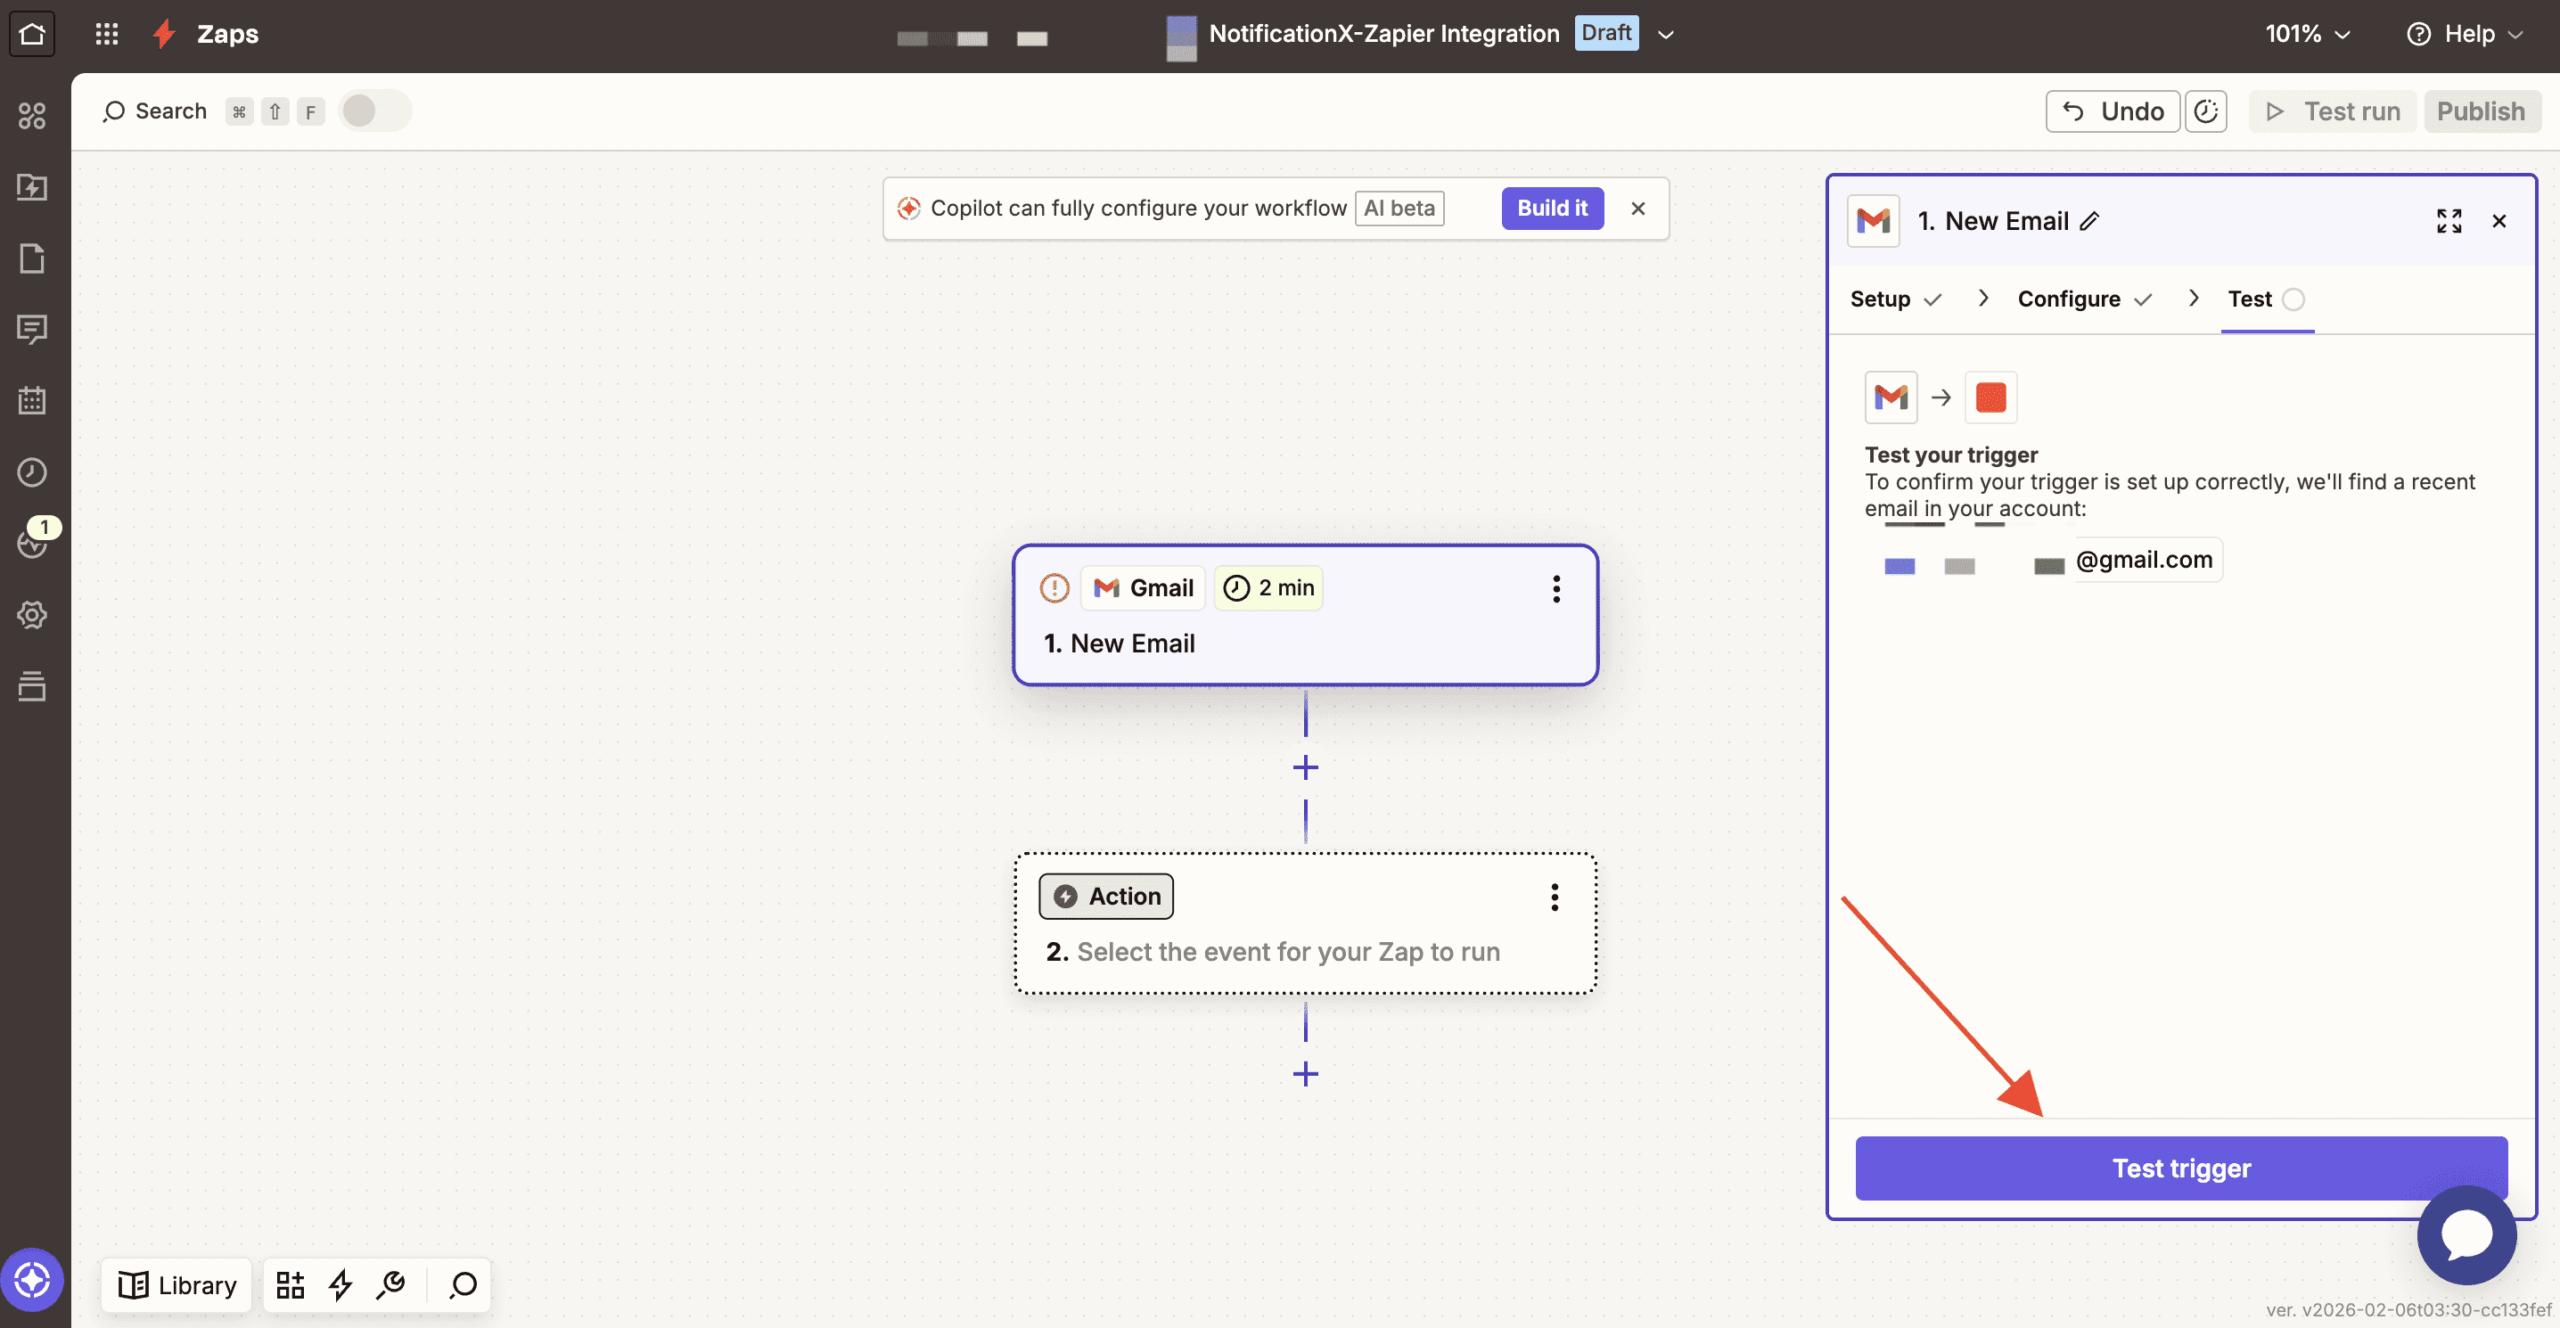
After that, from the fetched records by Zapier, you can start your testing. Click on “Continue with Selected Records” to get started.
Step 3 – Choose Action App & Action Event #
After you have successfully completed the previous step, from the action app, search for “NotificationX”. Afterward, choose‘Action Event’.

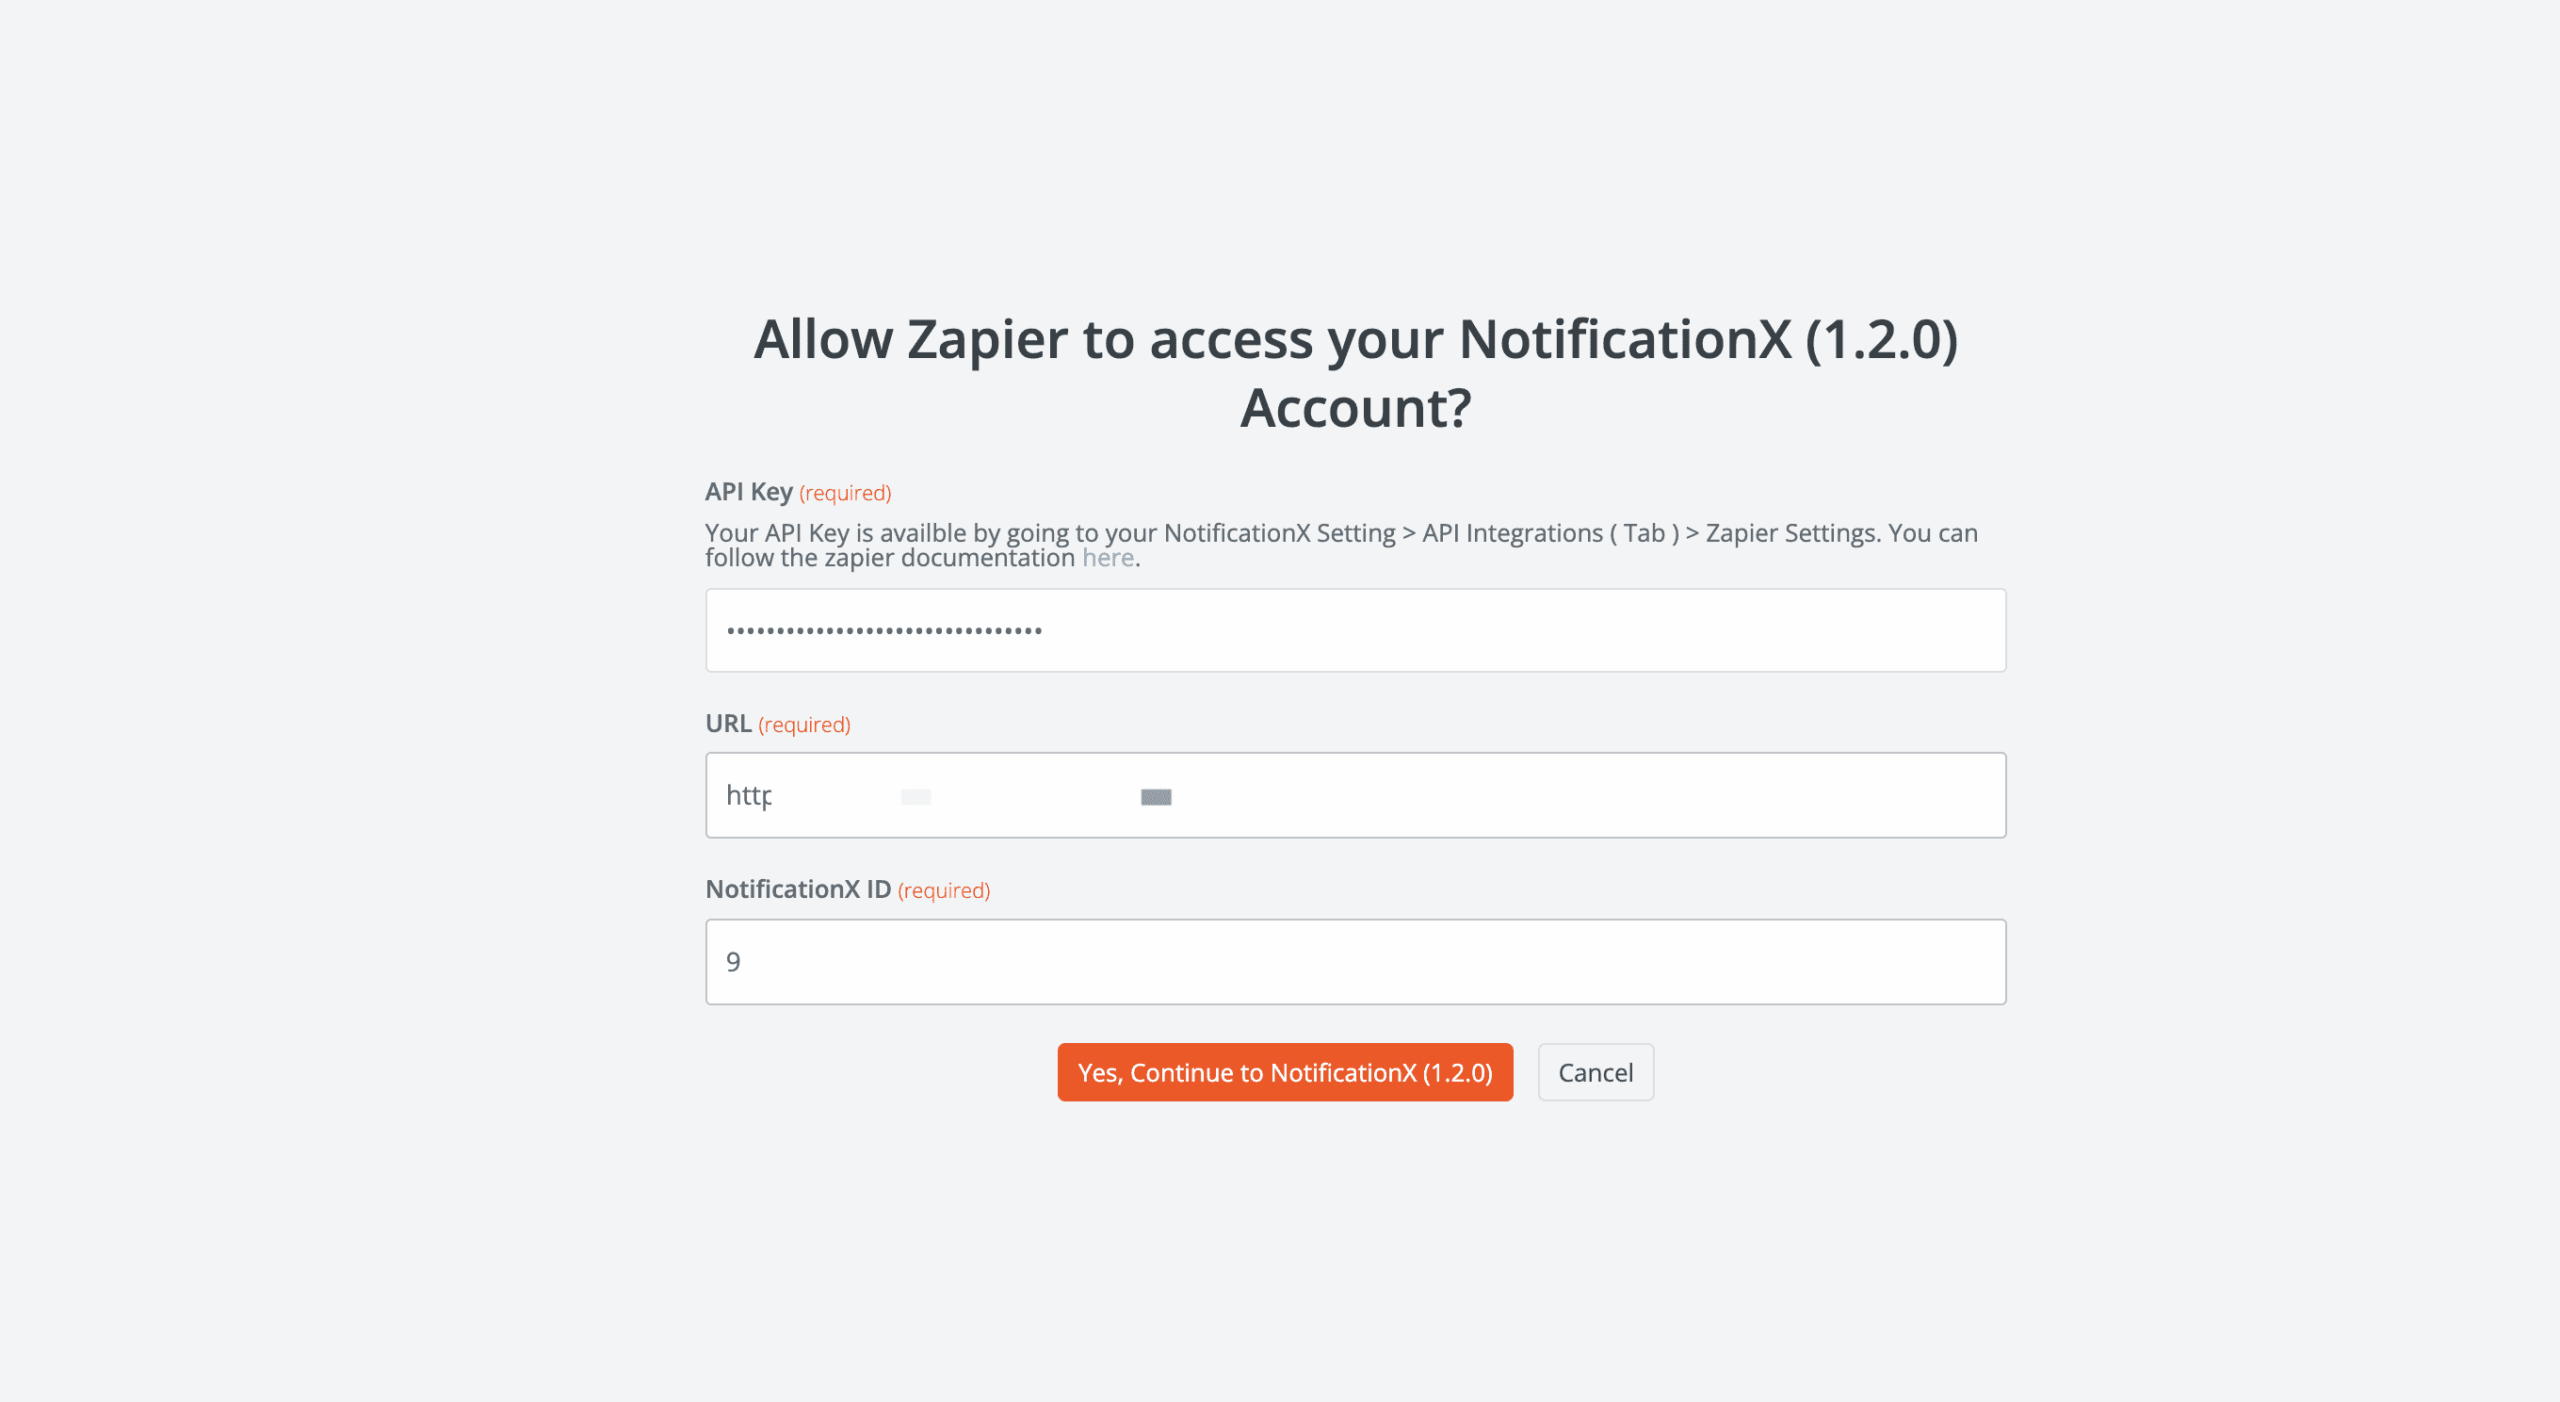
After that, connect your NotificationX account. After that, click on the “Yes, Continue to NotificationX” button. Then your account will be connected to the notification trigger. Then click on the “Continue” button.
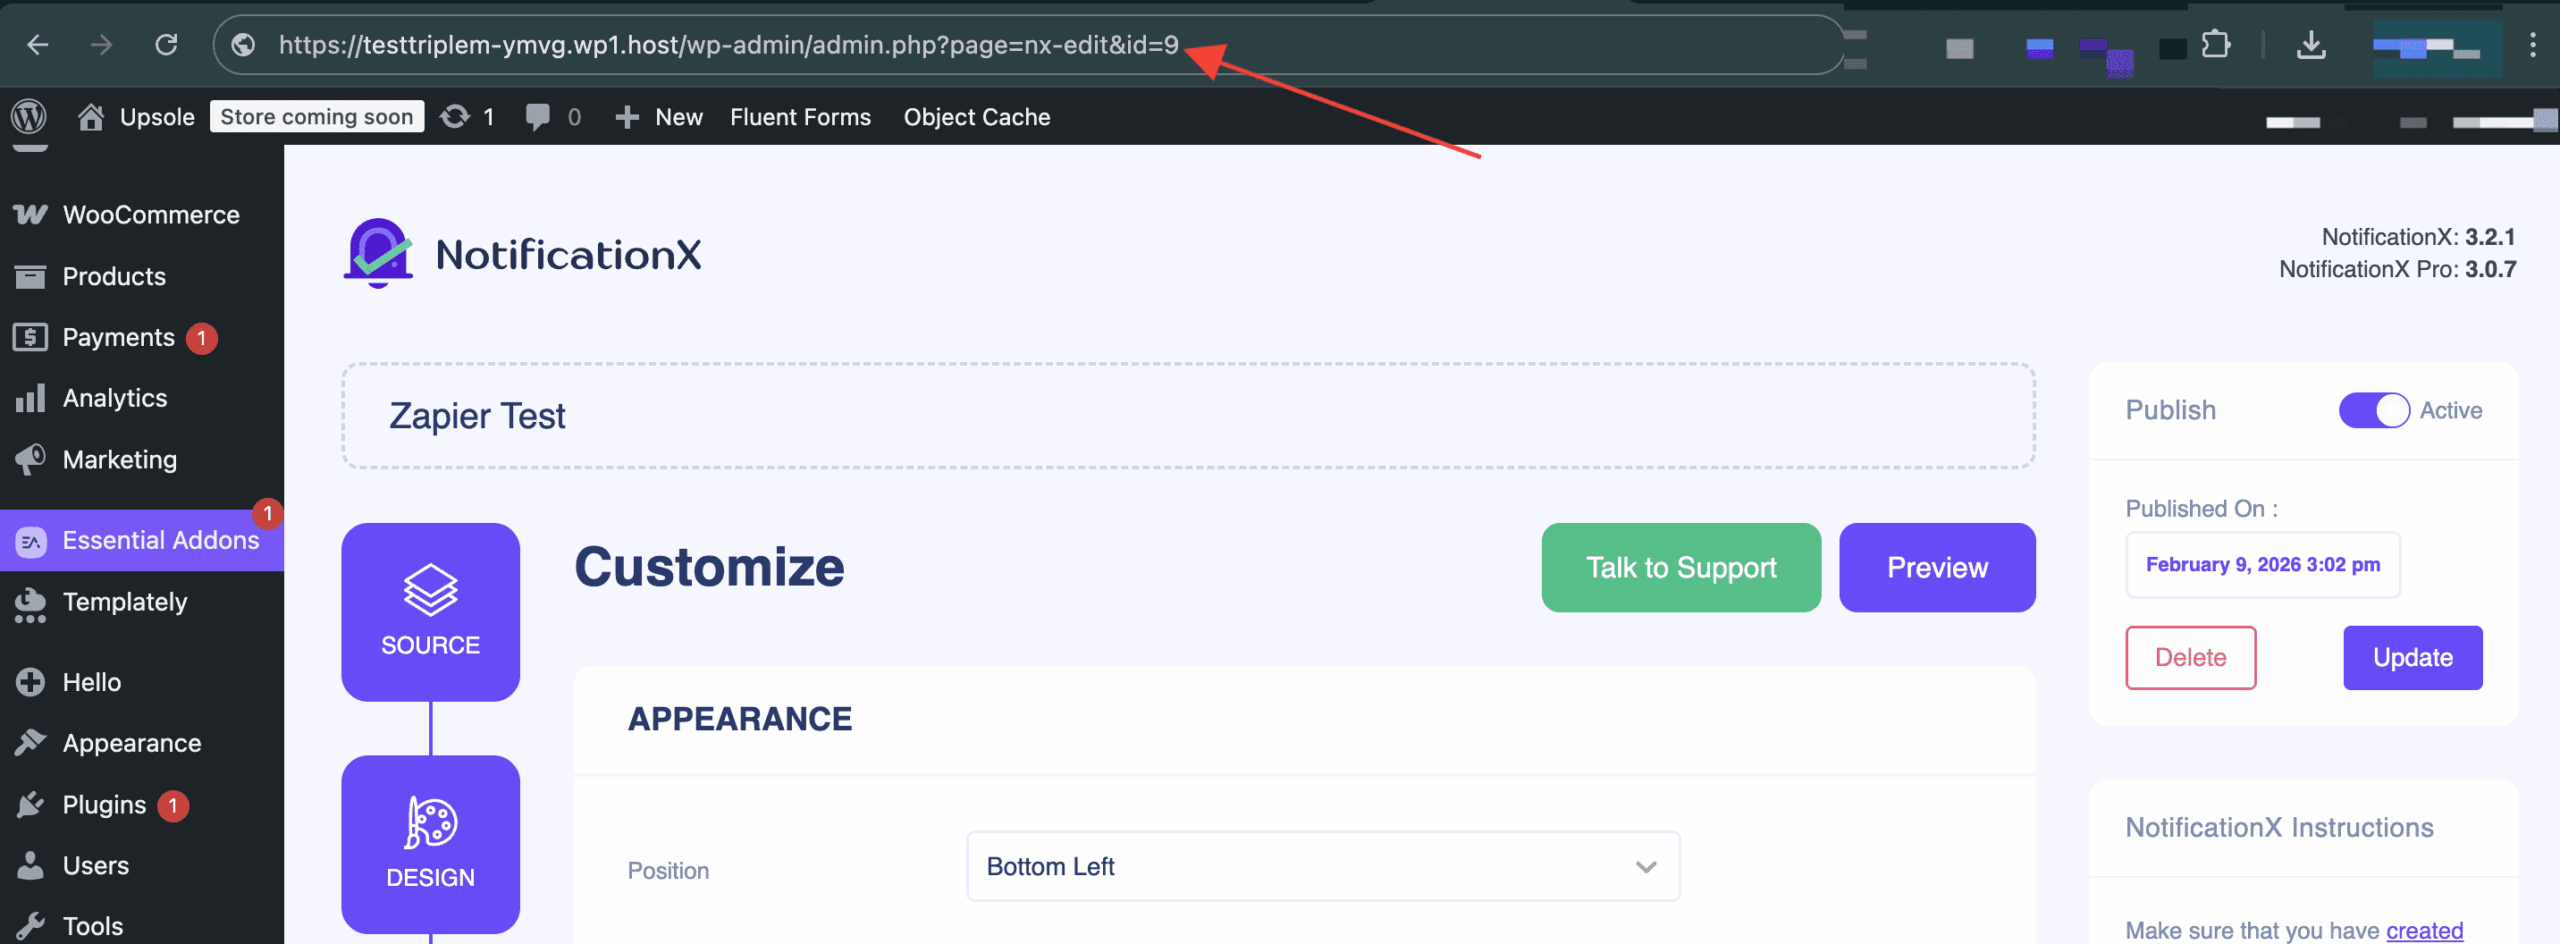
आप अपने पा सकते हैं NotificiationX आईडी जैपियर नोटिफिकेशन अलर्ट से आपने पहले बनाया है। इसे खोजने के लिए, यहां जाएं: wp-admin -> सभी NotificationX -> NotificationX. Open the Zapier Notification alert and just simply check the end of the URL as you can see in the screenshot. That’s your NotificationX आईडी.
After that, configure the notification type. Select the specific value you want to display. Select the value and then go to the next step. There, for different types of notification you will find different options. Fill in all the fields to complete the setup.
Then, from the ‘Test’ section, you can either set a test or skip this part. After skipping, click on the “Publish” button to make the notification LIVE on your website.
After you have completed all the steps mentioned above, go to your website and you will find the जैपियर नोटिफिकेशन अलर्ट इस तरह से पॉप अप:

By using NotificationX, this is how you can easily design and display an amazing जैपियर नोटिफिकेशन पॉपअप अपनी वर्डप्रेस वेबसाइट पर और अपना यूजरबेस बढ़ाएँ।
यदि आपको कोई समस्या है, तो आप हमारी सहायता टीम से संपर्क कर सकते हैं यहाँ.


