
Building notification campaigns by hand takes time. You log into wp-admin. You open a builder. You pick a theme, set the timing, choose a position, then repeat it all for the next campaign. It works, but it is slow.
Now there is a faster way. NotificationX supports MCP (Model Context Protocol). This lets you connect MCP to WordPress and manage your notification campaigns straight from a chat with an AI assistant like Claude.
The setup takes just a few clicks. But the real value is what you do after. This guide shows you the best ways to put it to work once you connect MCP to WordPress, so you know exactly where it saves you time.
A Quick Summary (TL;DR)
NotificationX now supports MCP (Model Context Protocol), so you can connect it to WordPress and manage your notification campaigns straight from a chat with an AI assistant like Claude.
Once connected, you can:
- Create, duplicate, and toggle campaigns
- Export campaigns and pull analytics
- Do it all without opening wp-admin
Claude acts under your admin account, so every action stays approved and in your control.
The result: faster AI notification management. Your social proof popups and FOMO alerts stay a chat away.
MCP in NotificationX: What Makes This Connection Possible
MCP (Model Context Protocol) is an open standard. It gives AI assistants a safe way to connect with outside tools and act on real data. Think of it as a bridge. On one side sits your AI assistant. On the other side sits your WordPress site.
Các MCP in NotificationX feature puts that bridge inside your plugin. Once you turn it on, your site runs its own MCP server with a secure connector URL. When you connect MCP to WordPress, you type a request in chat instead of clicking through wp-admin. The AI reads your setup, then makes the change for you.
Now let us look at where this actually helps.
7 Ways to Use MCP in NotificationX
The same connection fits many moments in your workflow. Here are seven practical ways to use it once you connect MCP to WordPress.
1. Launch a Campaign in Seconds During a Sale
Speed matters when a promo goes live. Instead of opening the builder, you describe the campaign in one message. The AI builds it and publishes it for you.
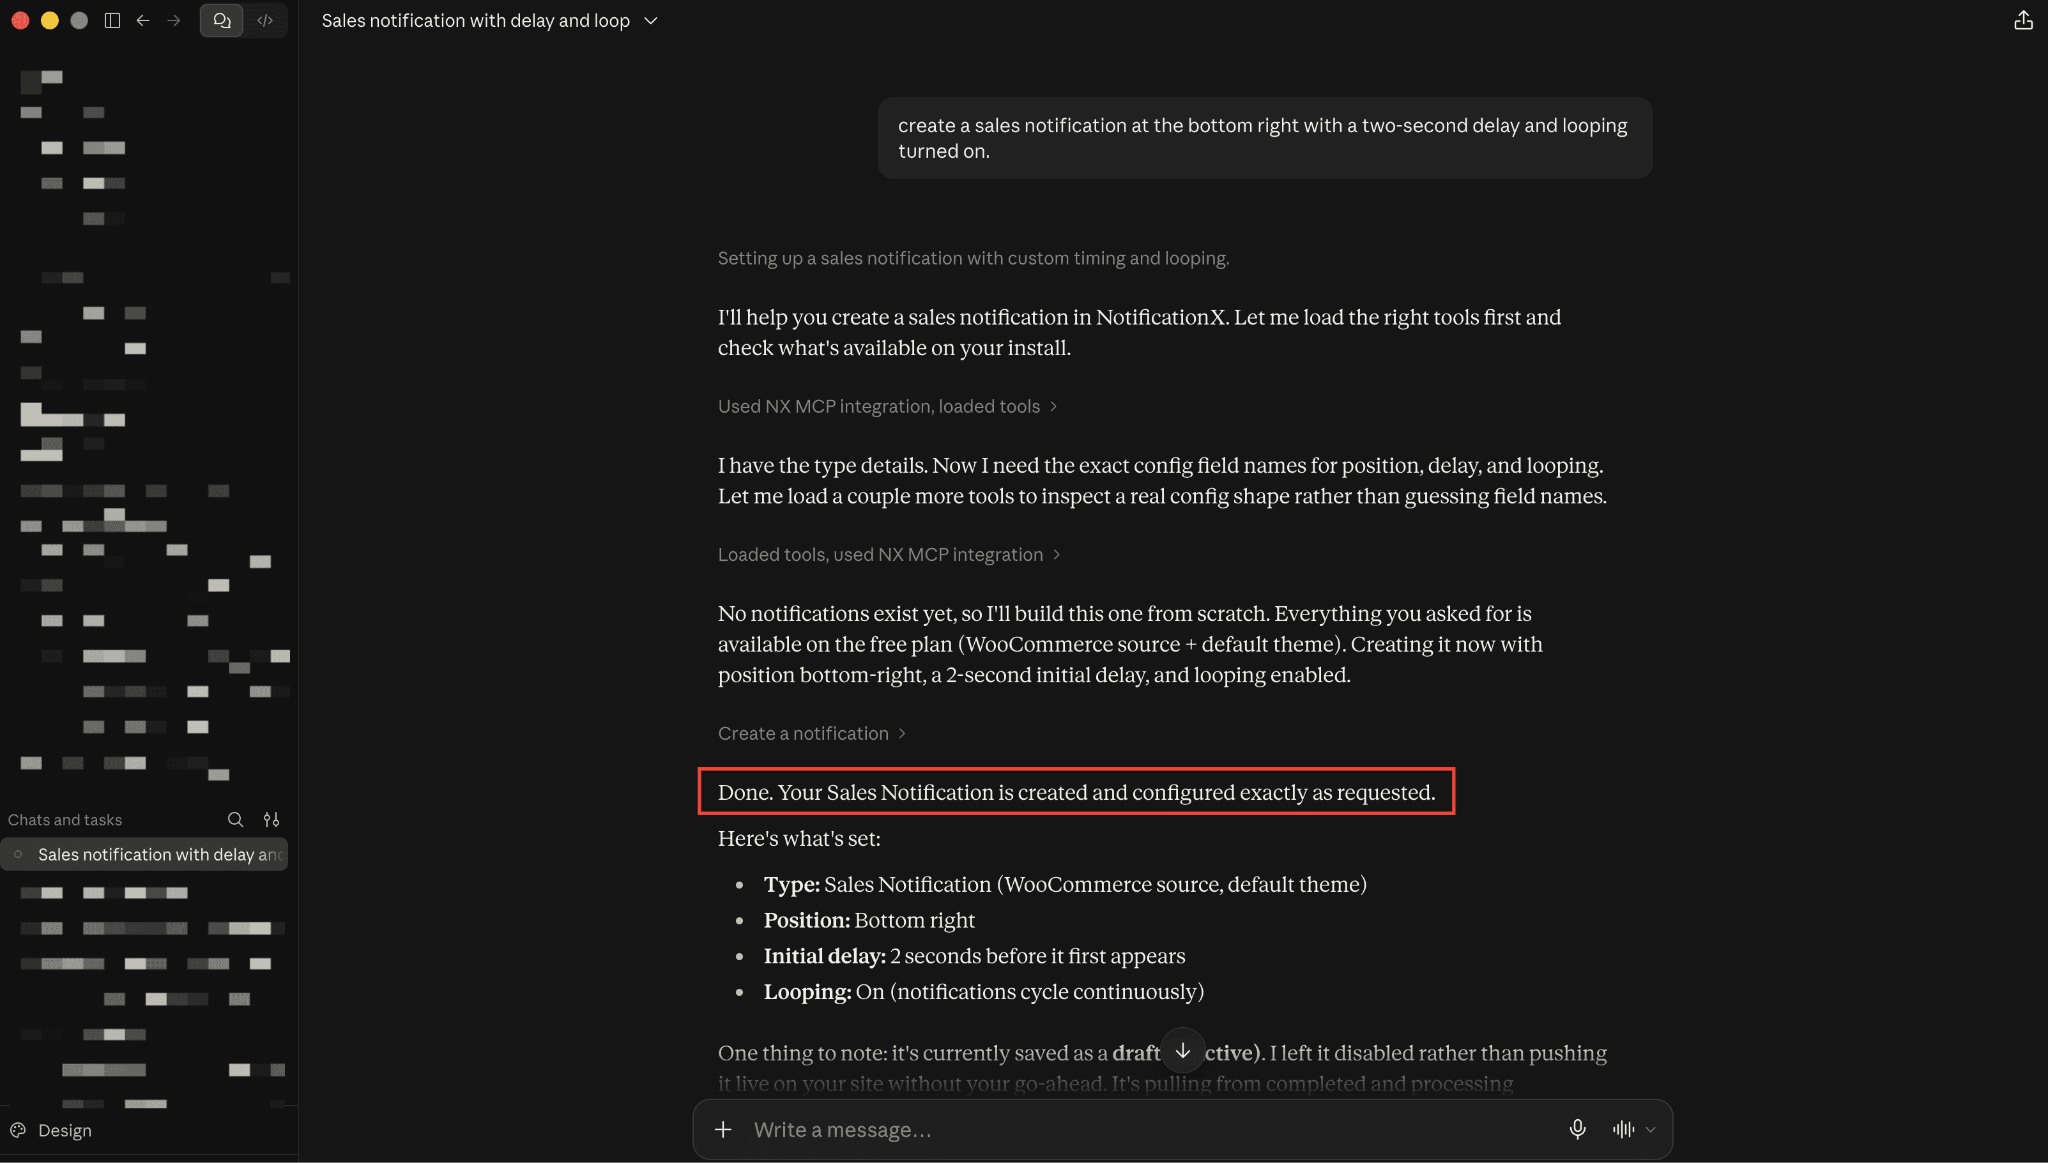
For example, ask Claude to create a sales notification at the bottom right with a two-second delay and looping turned on. It is done in seconds. When a flash sale starts, this lets you react fast instead of clicking through tabs. If you need ideas for what to launch, our roundup of real-time social proof examples is a good place to start.
2. Duplicate a Winning Campaign for the Next Promo
A campaign that already performs is a template you should reuse. When you connect MCP to WordPress, you can clone it in one line.
Ask the AI to duplicate your Thứ sáu đen tối alert and swap the text for a New Year sale. You keep the setup that worked and only change what needs changing. This saves you from rebuilding a winning campaign from scratch every season.
3. Pause Or Resume Campaigns the Moment a Sale Ends
Timing is everything with promos. A sale alert left running after the deal ends looks sloppy. A cart peek or discount alert that starts late misses the rush.
With MCP, you toggle campaigns on or off with a single message. You do not need to hunt through a list in wp-admin. Just name the campaign and tell the AI to switch it off. This keeps your bằng chứng xã hội accurate and on schedule.
4. Pull Analytics in Chat to Spot Your Best Performers
Good decisions need numbers. Instead of opening the analytics page, you ask for the data in chat.
Ask Claude to show the results for your last three thông báo bán hàng. You can check impressions, clicks, and conversions right in the conversation. This makes it easy to see which alert pulls the most weight, then double down on what works.
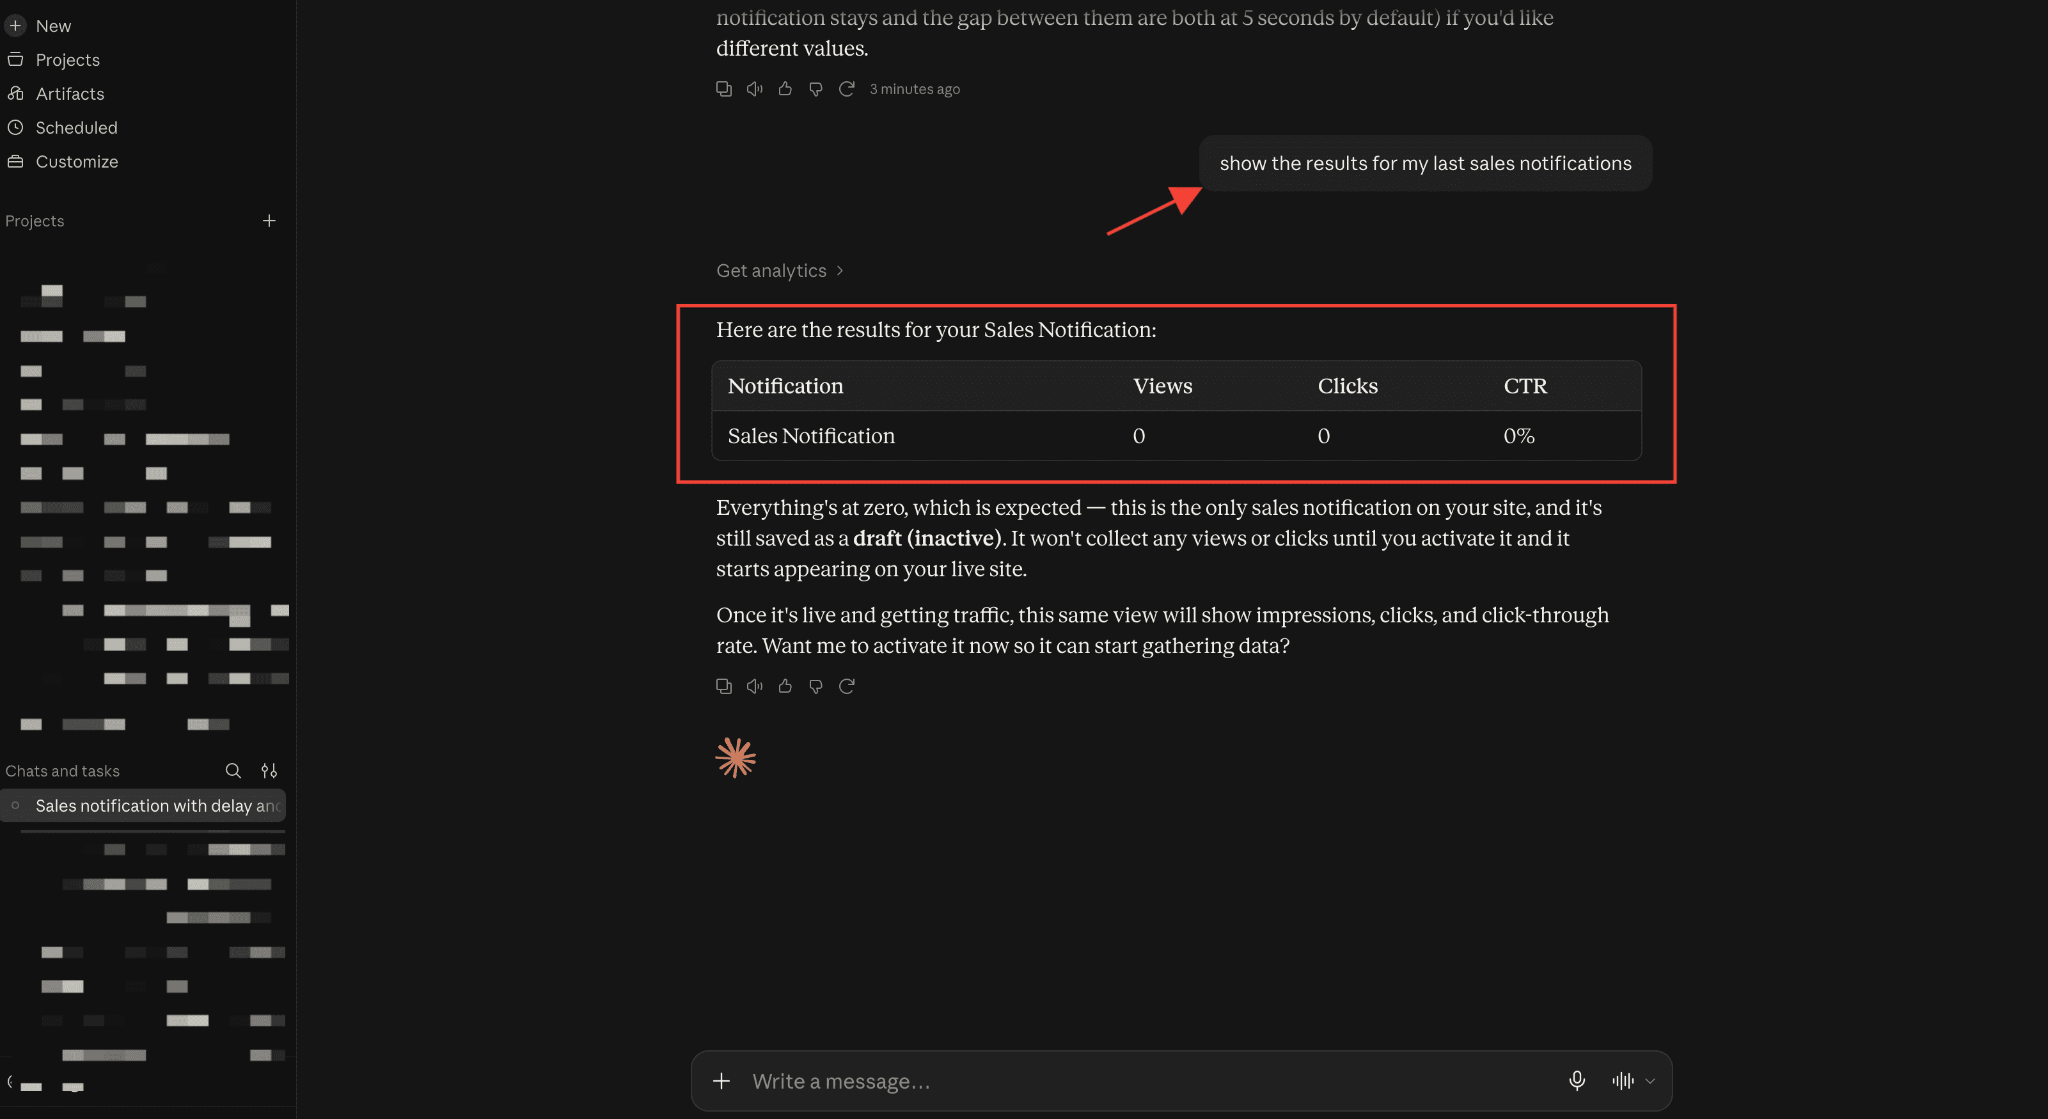
Note: As we’ve just made the sales notification, the analytics are showing empty numbers.
5. Let Non-Technical Teammates Manage Notifications
Not everyone wants to learn about a builder. A marketer or store manager can feel stuck when the tool has many tabs and settings.
Chat removes that barrier. Once you connect MCP to WordPress, a teammate just describes what they want in plain words. The AI handles the technical steps. This opens up AI notification management to your whole team, not only the people who know the plugin inside out.
6. Run Your Whole Notification Workflow without Tab-Switching
A busy store runs many campaigns at once. Jumping between the builder, the analytics page, and the campaign list eats up your day.
With MCP, one chat window becomes your control panel. You create, edit, check, and pause campaigns from a single conversation. You stop switching between tabs and start managing everything in one place. Over a week, those saved minutes add up to real hours.
7. Export And Audit Campaigns for Reporting
Sometimes you need the details of a campaign, not a change to it. Maybe for a report, a client handover, or a quick review.
Ask the AI to export a notification and it pulls the full setup for you. This is handy when you want to document what is live, share a setup with a teammate, or move a campaign to another project. It turns a tedious audit into a quick question.
Why Connect MCP to WordPress This Way?
The reason is speed and simplicity. Every use case above shares the same win. You skip the manual clicks and just say what you want.
Small teams and busy WooCommerce store owners gain the most here. You spend less time on setup and more time on strategy. The AI acts on your real campaigns inside NotificationX, so it is a true hands-on helper, not just an idea machine.
If you already use AI to shape your brand voice, this is the natural next step. You can pair it with the ideas in our guide on how to train Claude to sound like your brand.
How to Set It Up (Quick Version)
The build is fast. Here is the short path to connect MCP to WordPress with NotificationX. You will need an active NotificationX install and a Claude account that supports custom connectors.
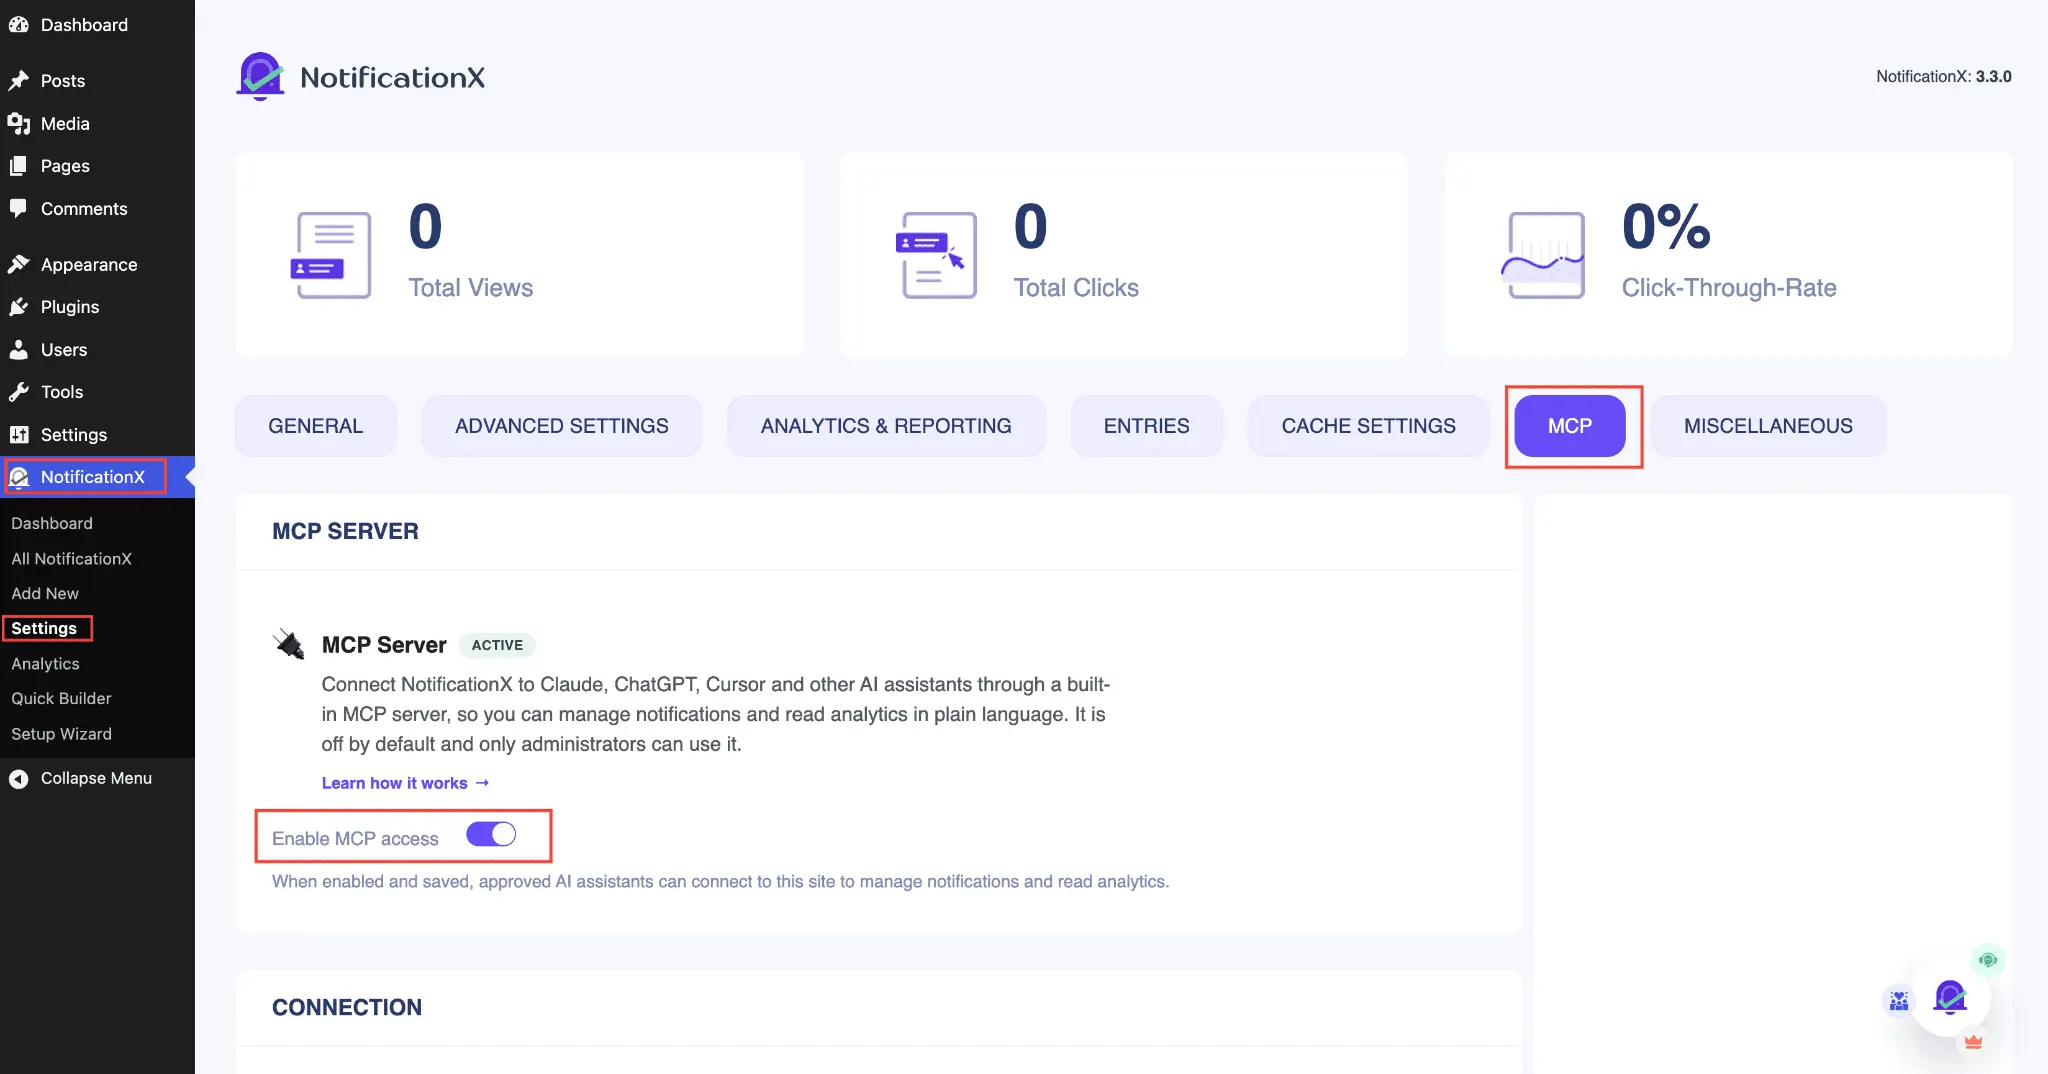
- Trong wp-admin, go to NotificationX, then Cài đặt, then MCP, and toggle on Enable MCP access.
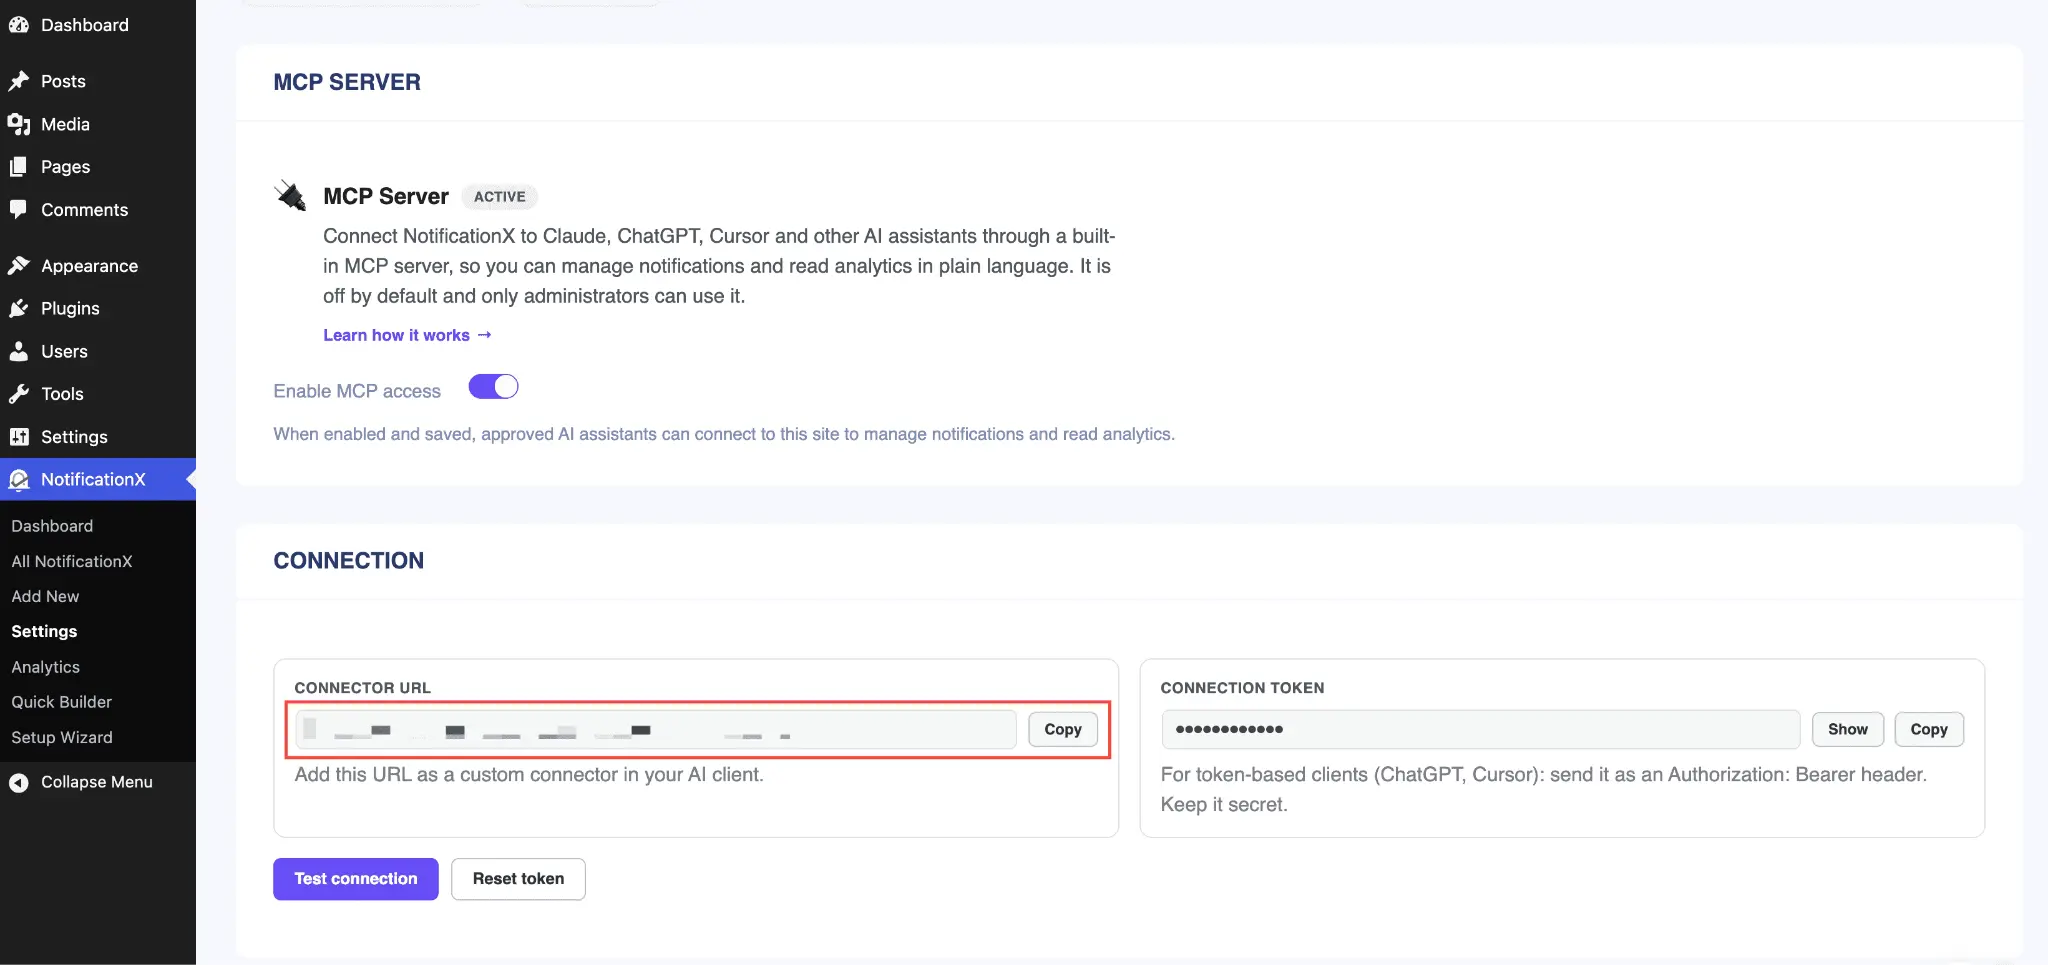
- Phía dưới cái CONNECTION section, copy the connector URL, then click Save Settings.
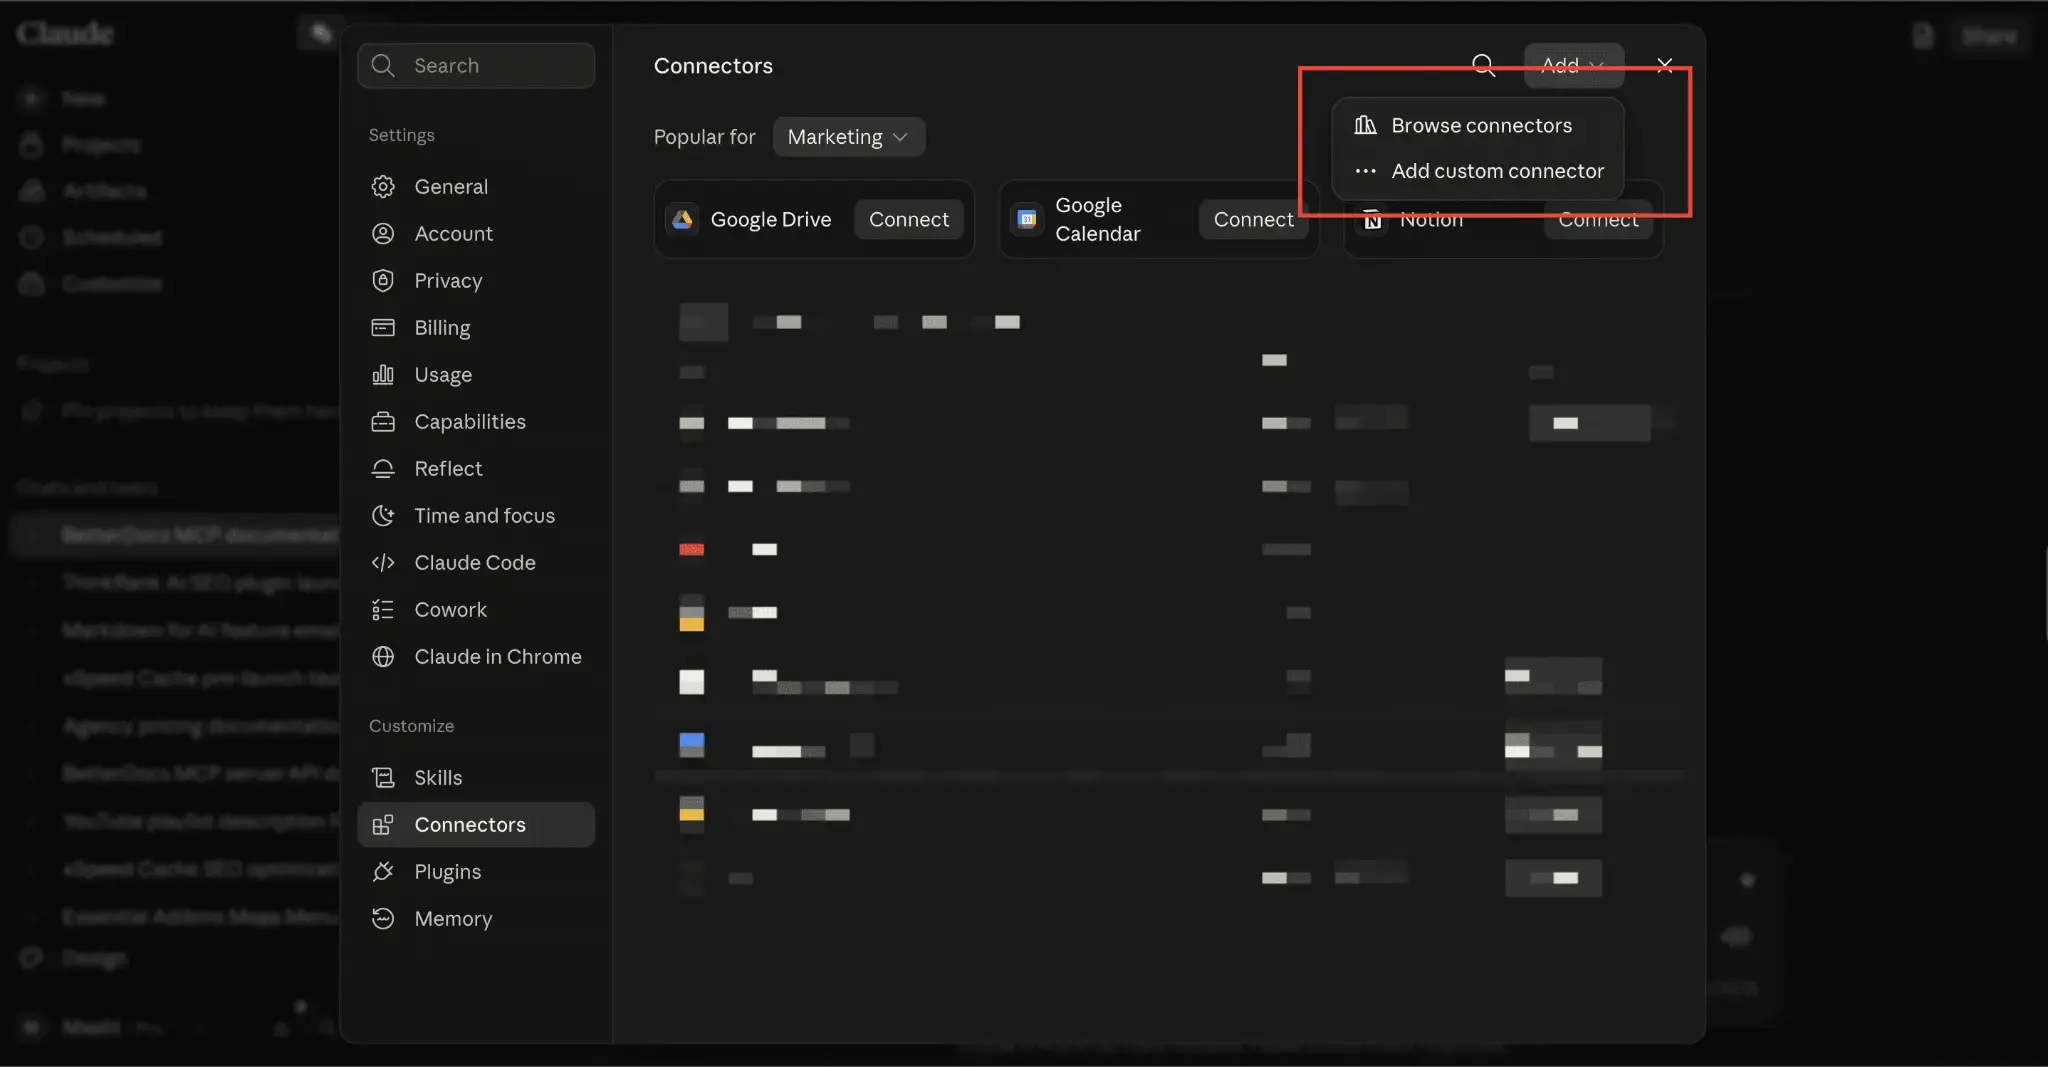
- In Claude, open Cài đặt, then Connectors, and click Add Custom Connector.
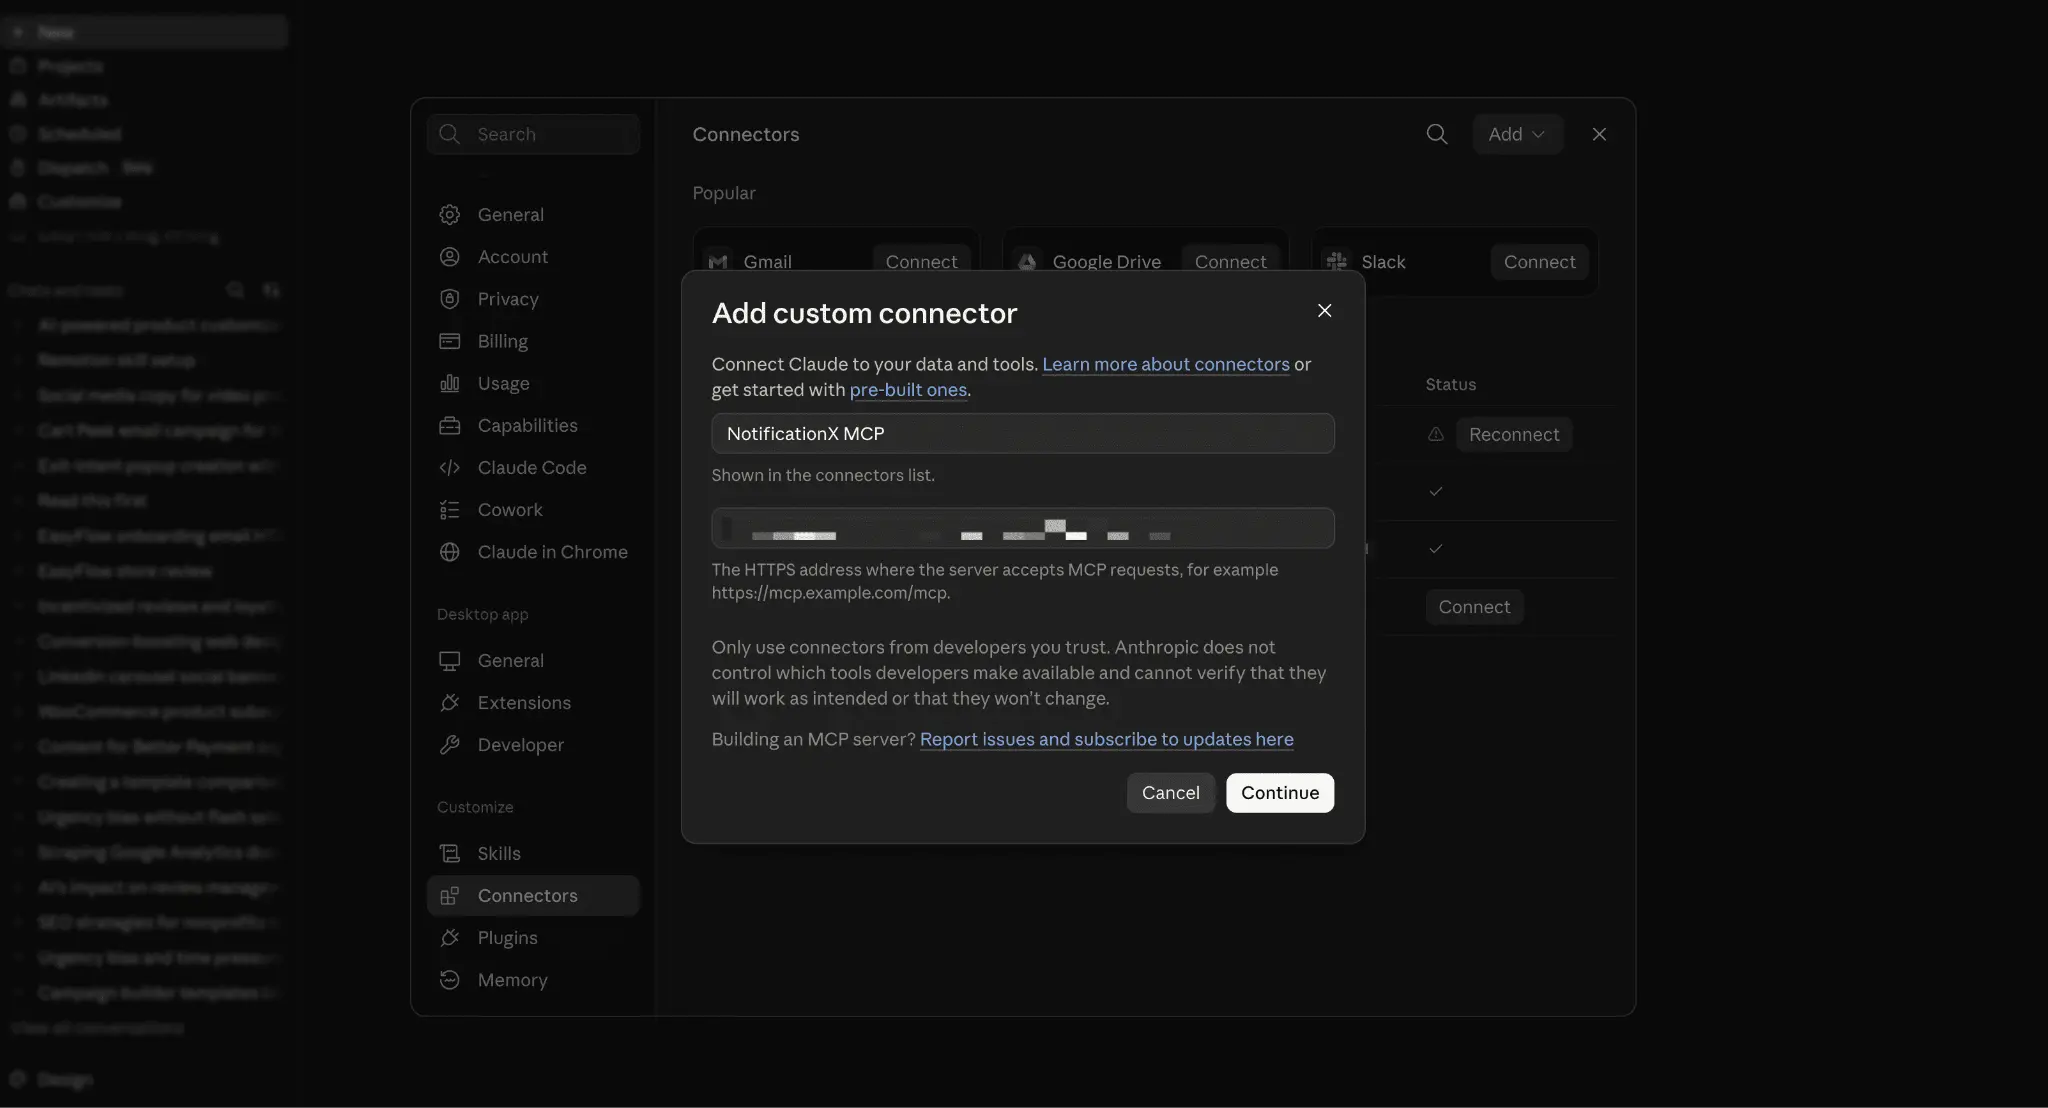
- Give it a name like NotificationX MCP, paste the connector URL, and click cộng.
- Approve the connection. Claude gets Read and write access under your admin user.
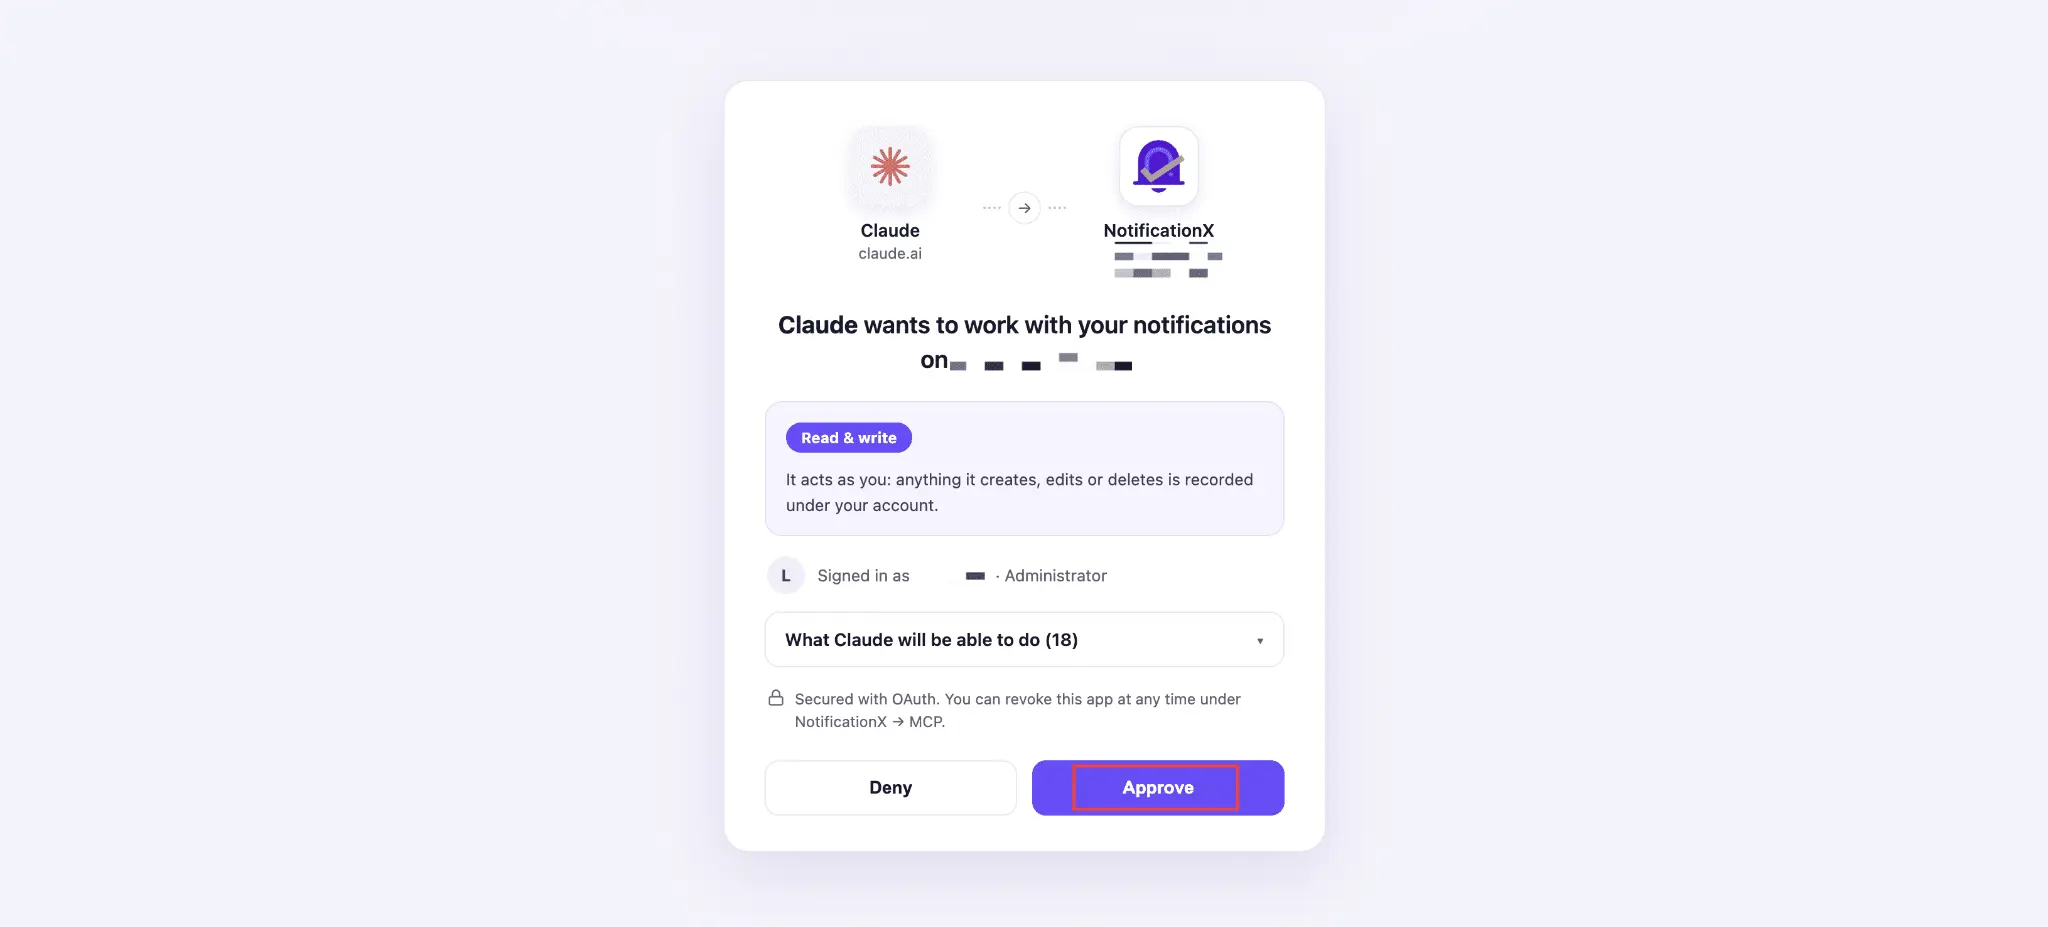
- Back in wp-admin, check the Connected apps table to confirm the link.
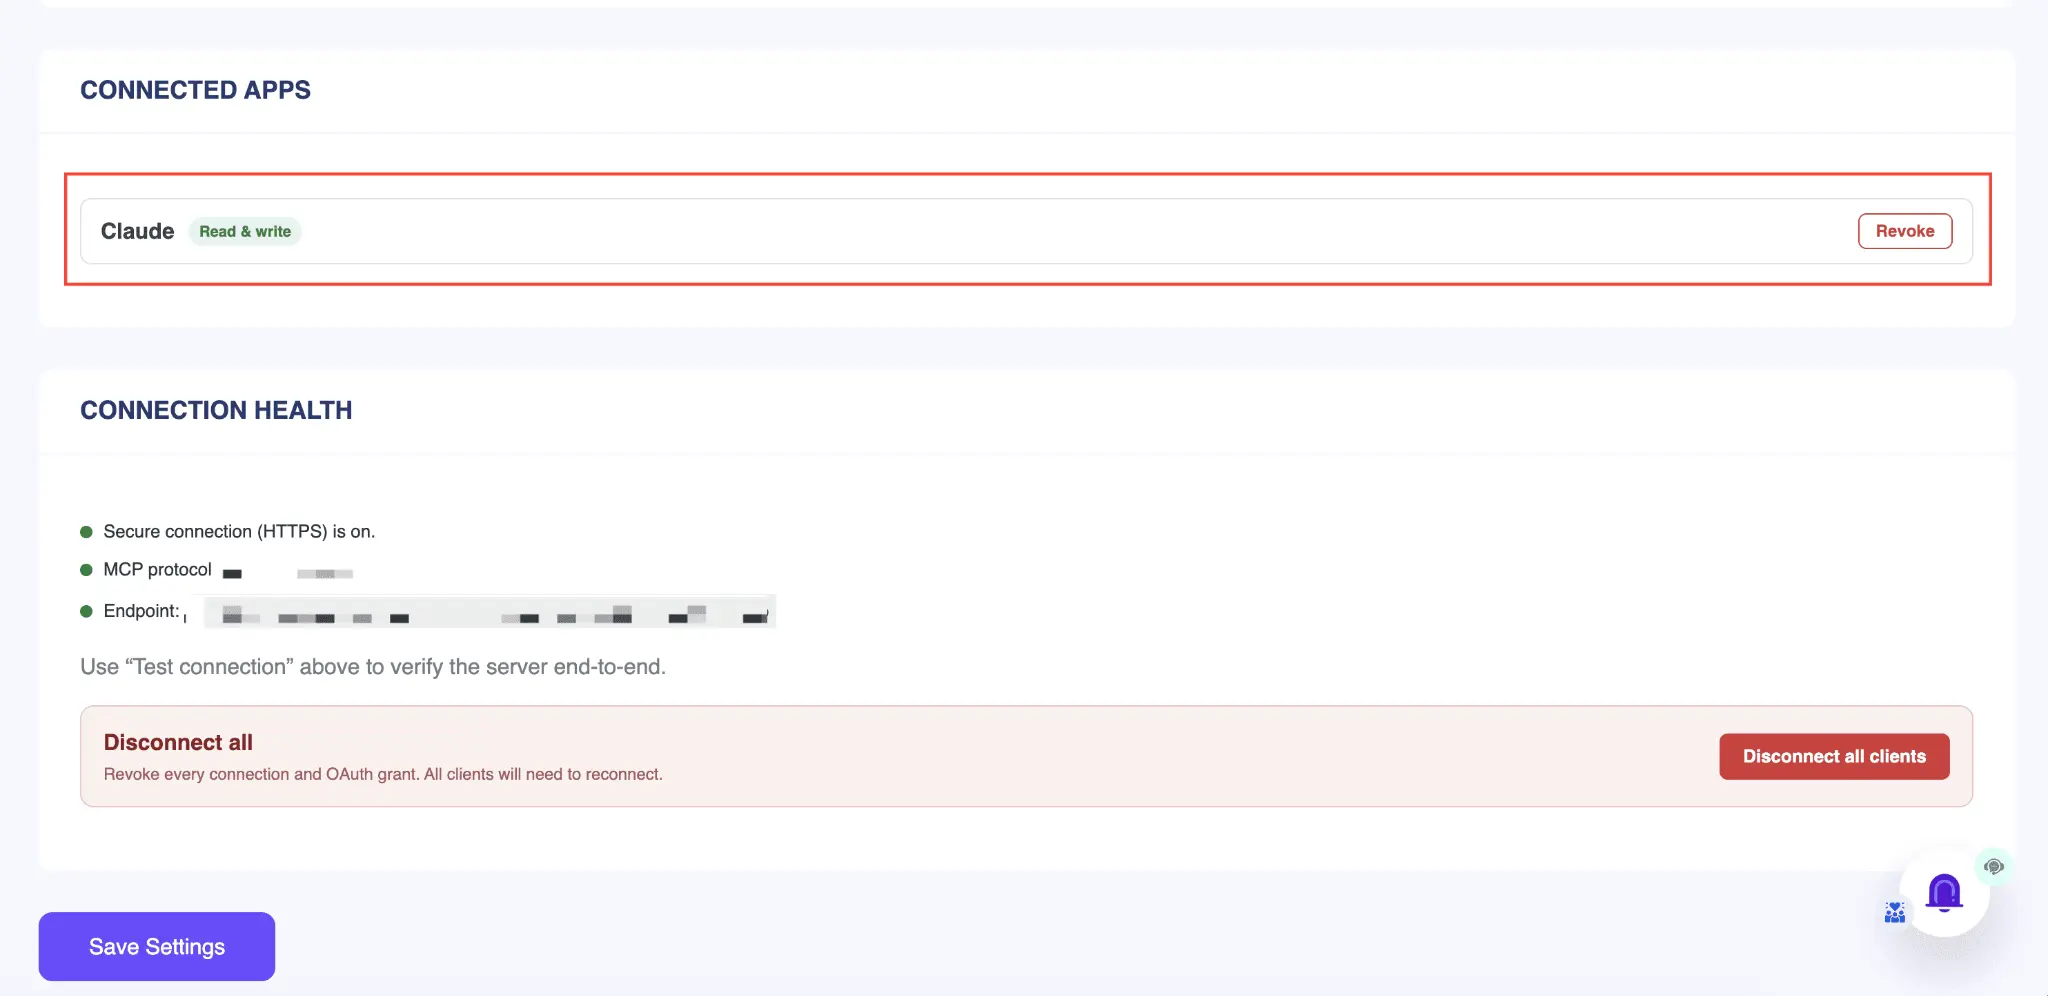
That is the whole flow. For a full walkthrough, see the MCP in NotificationX documentation.
Tips for Getting the Best Results
A few small habits make every use case run more smoothly.
- Be specific in your requests. Vague prompts give vague campaigns. Spell out the type, position, delay, and whether it should loop. The more the AI knows up front, the less you edit after.
- Review before you publish. The AI acts under your admin user, so check each campaign the way you would check your own work.
- Work in small steps. Ask for one change at a time when a campaign matters. This makes it easy to spot what changed.
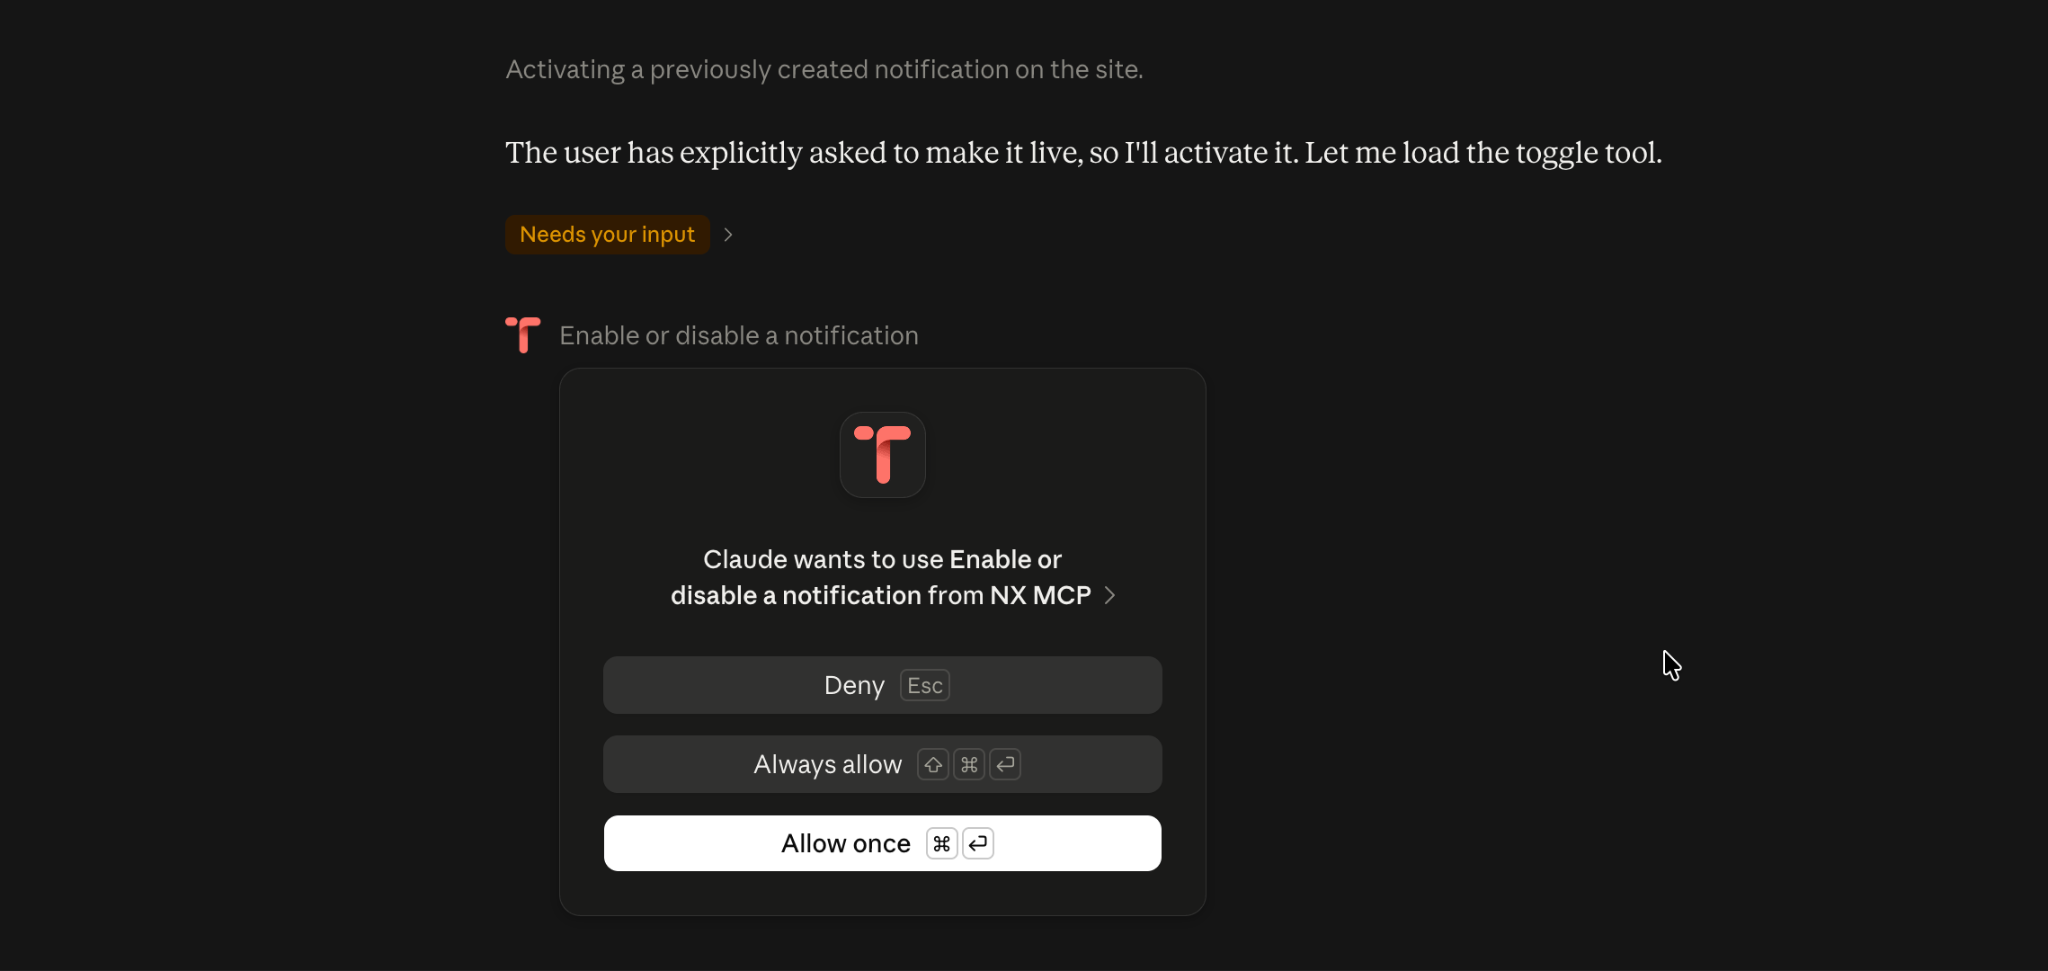
- Always use with care. It speeds up long sessions, but only turn it on when you trust the flow. For sensitive tasks, stick with Allow once.
- Revoke access when done. If a chat session is finished for good, revoke the connection from the Connected apps table. You can reconnect later with the same connector URL.
Connect MCP to WordPress And Let AI Run Your Notifications
Khi bạn connect MCP to WordPress with NotificationX, you change how you build social proof. Whether you launch a sale, clone a winning promo, pull analytics, or hand the work to a teammate, the pattern is the same. You describe what you want, and the AI handles the rest.
The setup is quick, and the payoff is daily. This is a smarter, faster way to run notifications, and it fits perfectly with an AI-driven workflow. Try it once, and the old manual method will feel slow by comparison.
If you run into any trouble, reach out to our Nhóm hỗ trợ.
Do not forget to đăng ký vào blog của chúng tôi for more guides on AI and conversion. You can also join our Cộng đồng Facebook to swap tips with other marketers.




 English
  Arabic
  Indonesian
  Spanish
  Portuguese
  German
  Dutch
Dutch  Russian
  Hindi
Hindi  French
  Japanese
  Chinese
  Vietnamese
  Malay
Malay