
Bagaimana Menunjukkan Makluman Pemberitahuan Zapier menggunakan NotificationX? #
NotificationX gives you the chance to integrate with your Zapier Account. As a result, you are able to display any sort of Zapier Notification Alerts, such as Email Subscription, Review, Sales Notifications and others.
Before you connect NotificationX with your Zapier Account, you need to create a Zapier Notification Alert on your website. Follow these steps to show the Zapier Notification popup with NotificationX:
Cara Membuat & Mengkonfigurasi Makluman Pemberitahuan Zapier #
Langkah 1 - Tambahkan Pemberitahuan Baru #
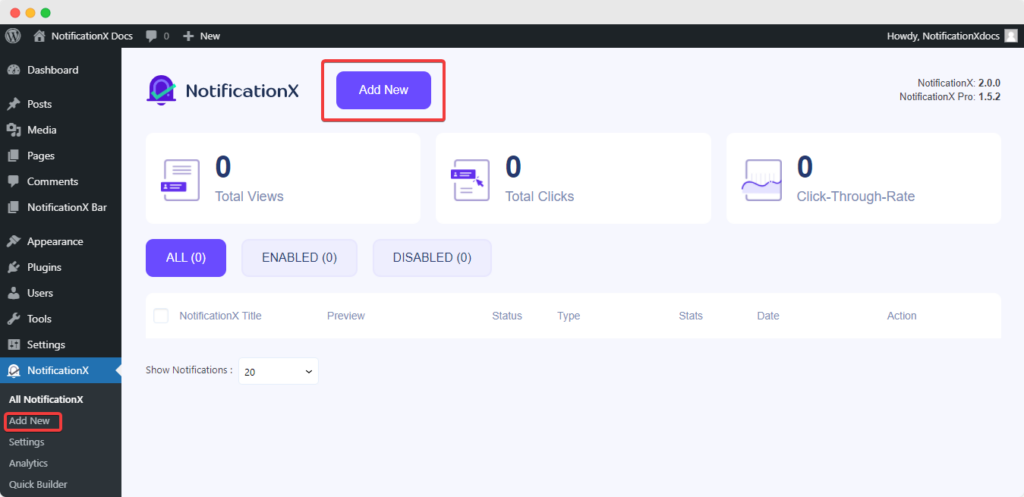
Untuk memulakan, pergi ke WordPress Dashboard anda dan arahkan ke wp-admin -> Semua NotificationX -> NotificationX. Then, right at the top, click on ‘Add New’.
Langkah 2 - Pilih Sumber #
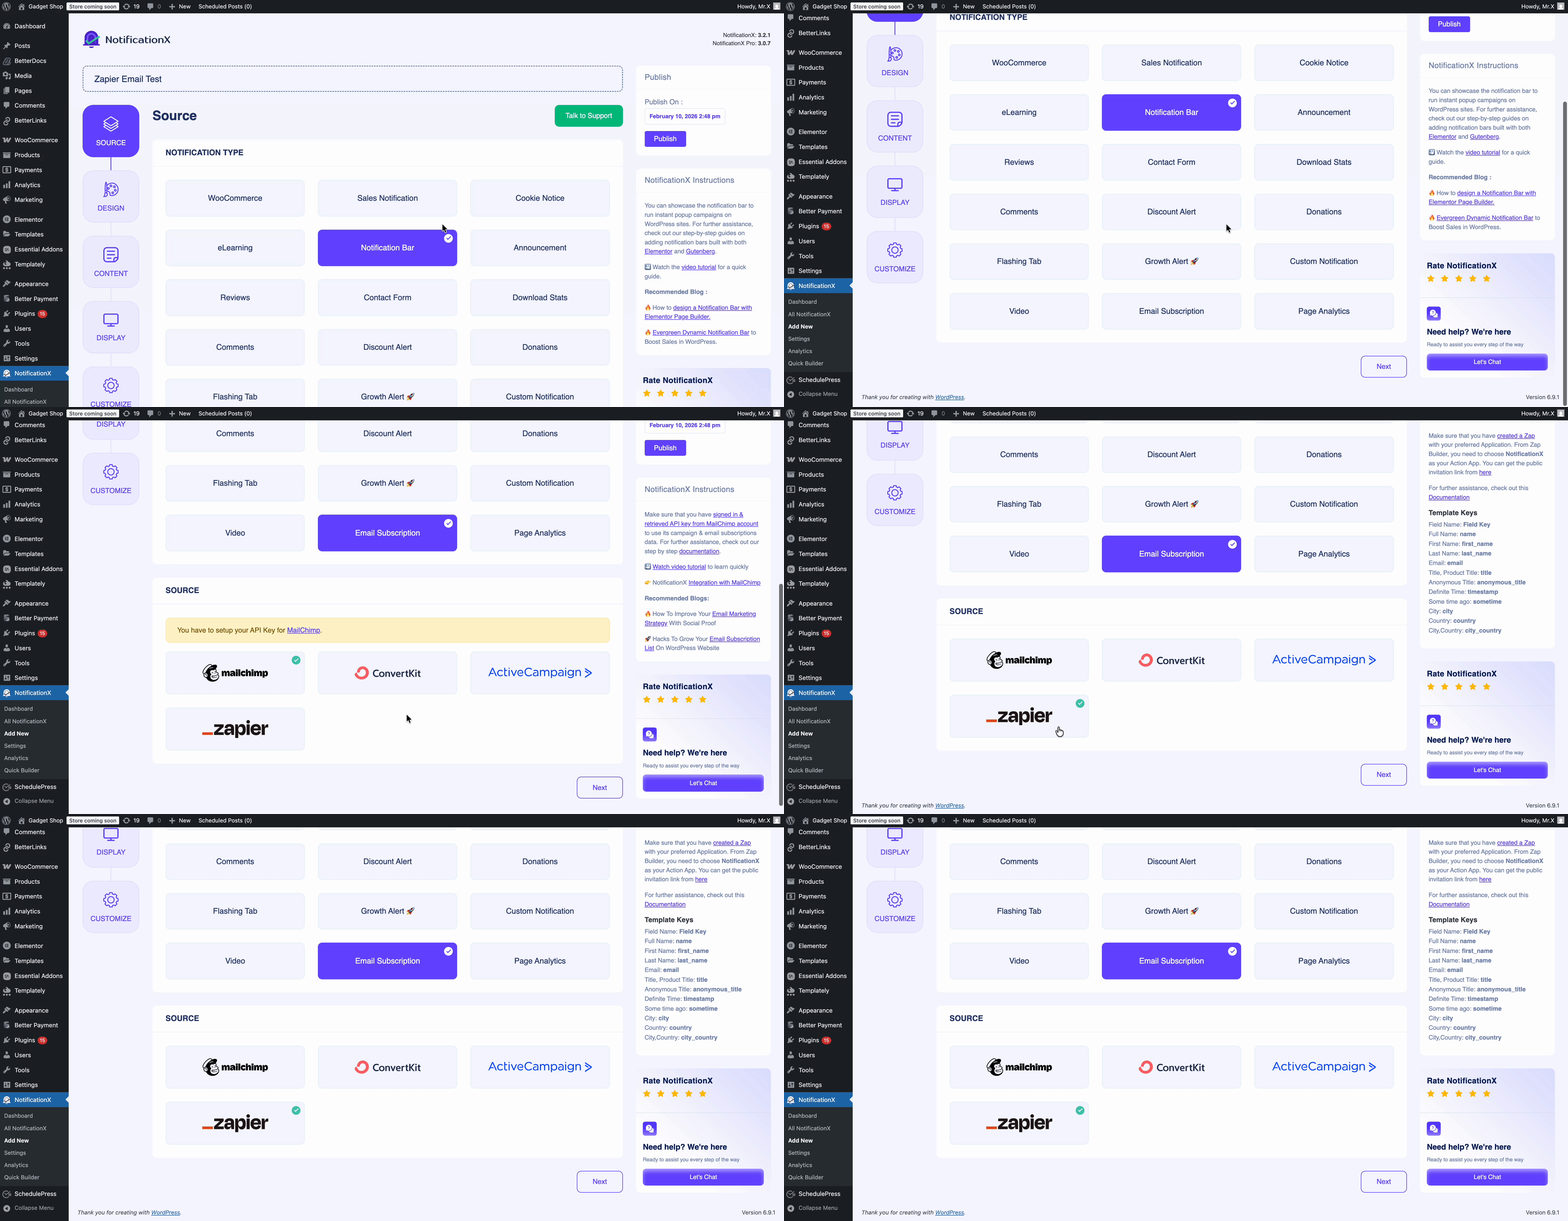
Anda akan mendapati ‘Zapier’ sumber dalam Jenis Pemberitahuan ini: Pemberitahuan Jualan, Ulasan dan Langganan E-mel. For instance, if you want to display new emails from your Gmail account, you can pick the ‘Email Subscription’ pilihan. Setelah memilih Jenis Pemberitahuan pilihan anda, pastikan untuk memilih ‘Zapier’ sebagai Sumber anda dan klik 'Seterusnya'.
Langkah 3 - Pilih Tema Reka Bentuk #
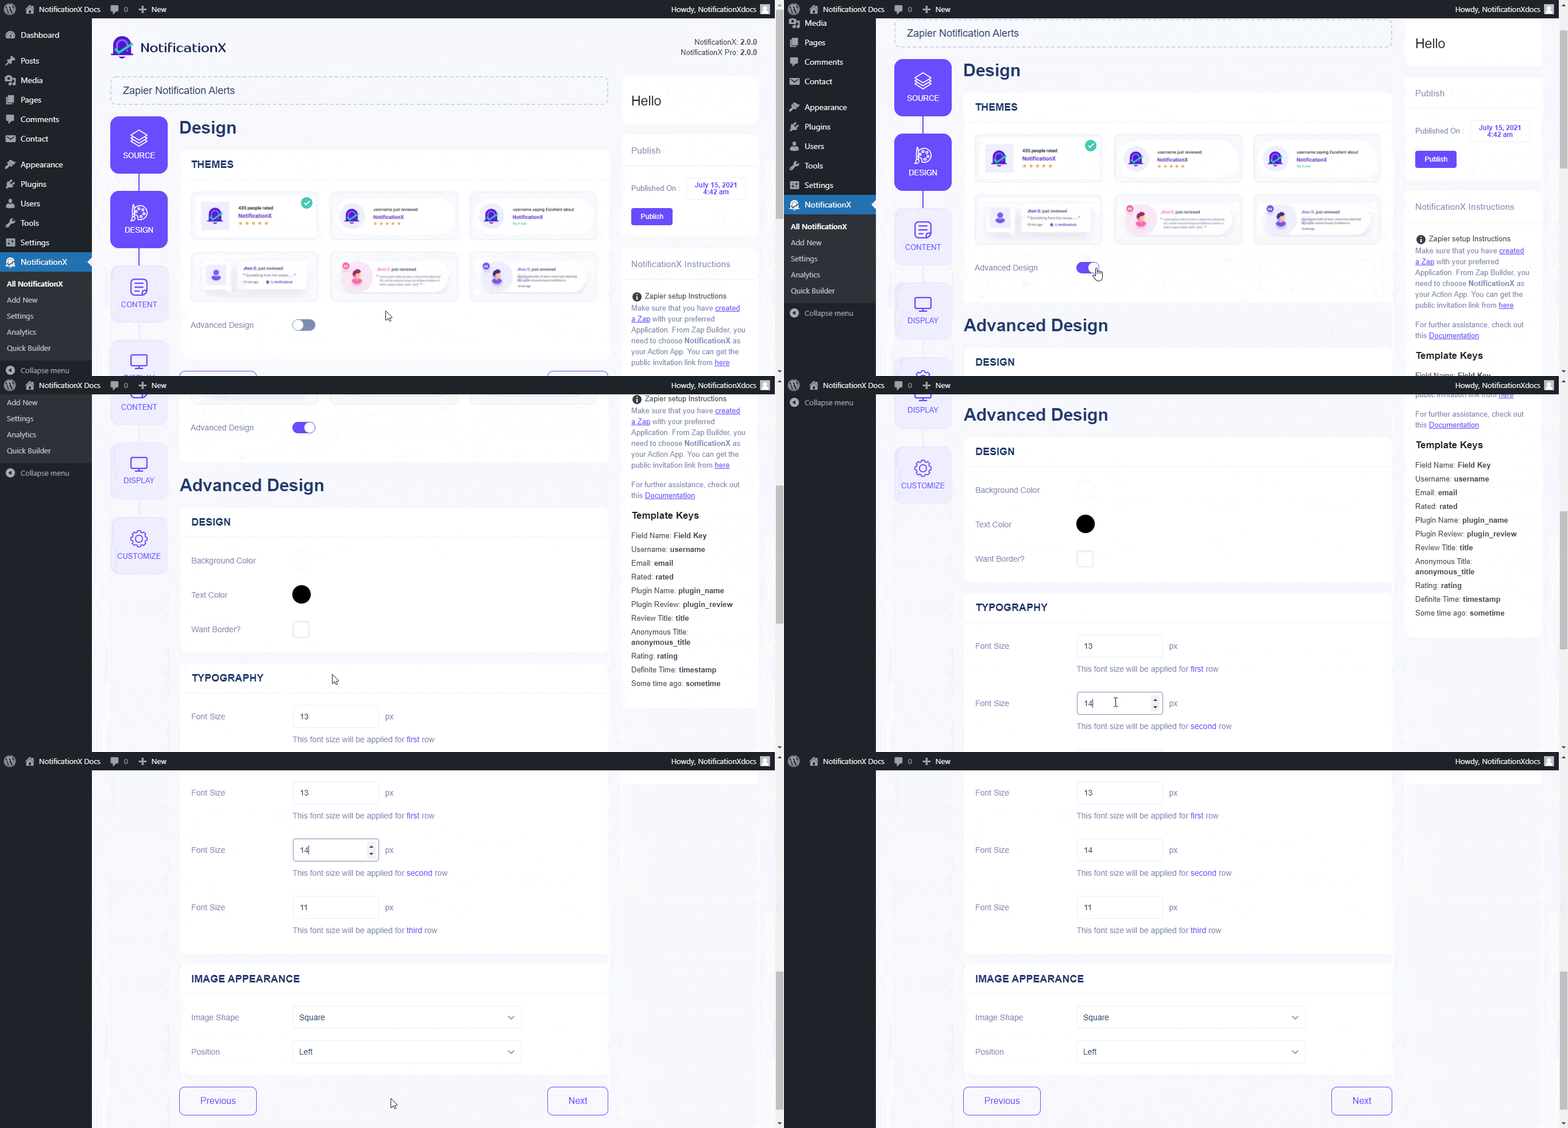
Daripada 'Reka Bentuk' tab, anda boleh memilih susun atur dan juga mempunyai fleksibiliti untuk menggunakan 'Reka Bentuk Lanjutan' pilihan untuk menyesuaikannya mengikut pilihan anda. Daripada 'Tema' bahagian, susun atur yang dipilih adalah bagaimana amaran pemberitahuan akan dipaparkan di laman web anda. Selain itu, anda boleh mengubah Tema pilihan anda dengan menyesuaikannya melalui 'Reka Bentuk Lanjutan ' pilihan. Dari bahagian ini, anda dapat menambahkan gaya pada reka bentuk, penampilan gambar dan tipografi anda dengan mudah.
Langkah 4 - Konfigurasikan Kandungan Templat #
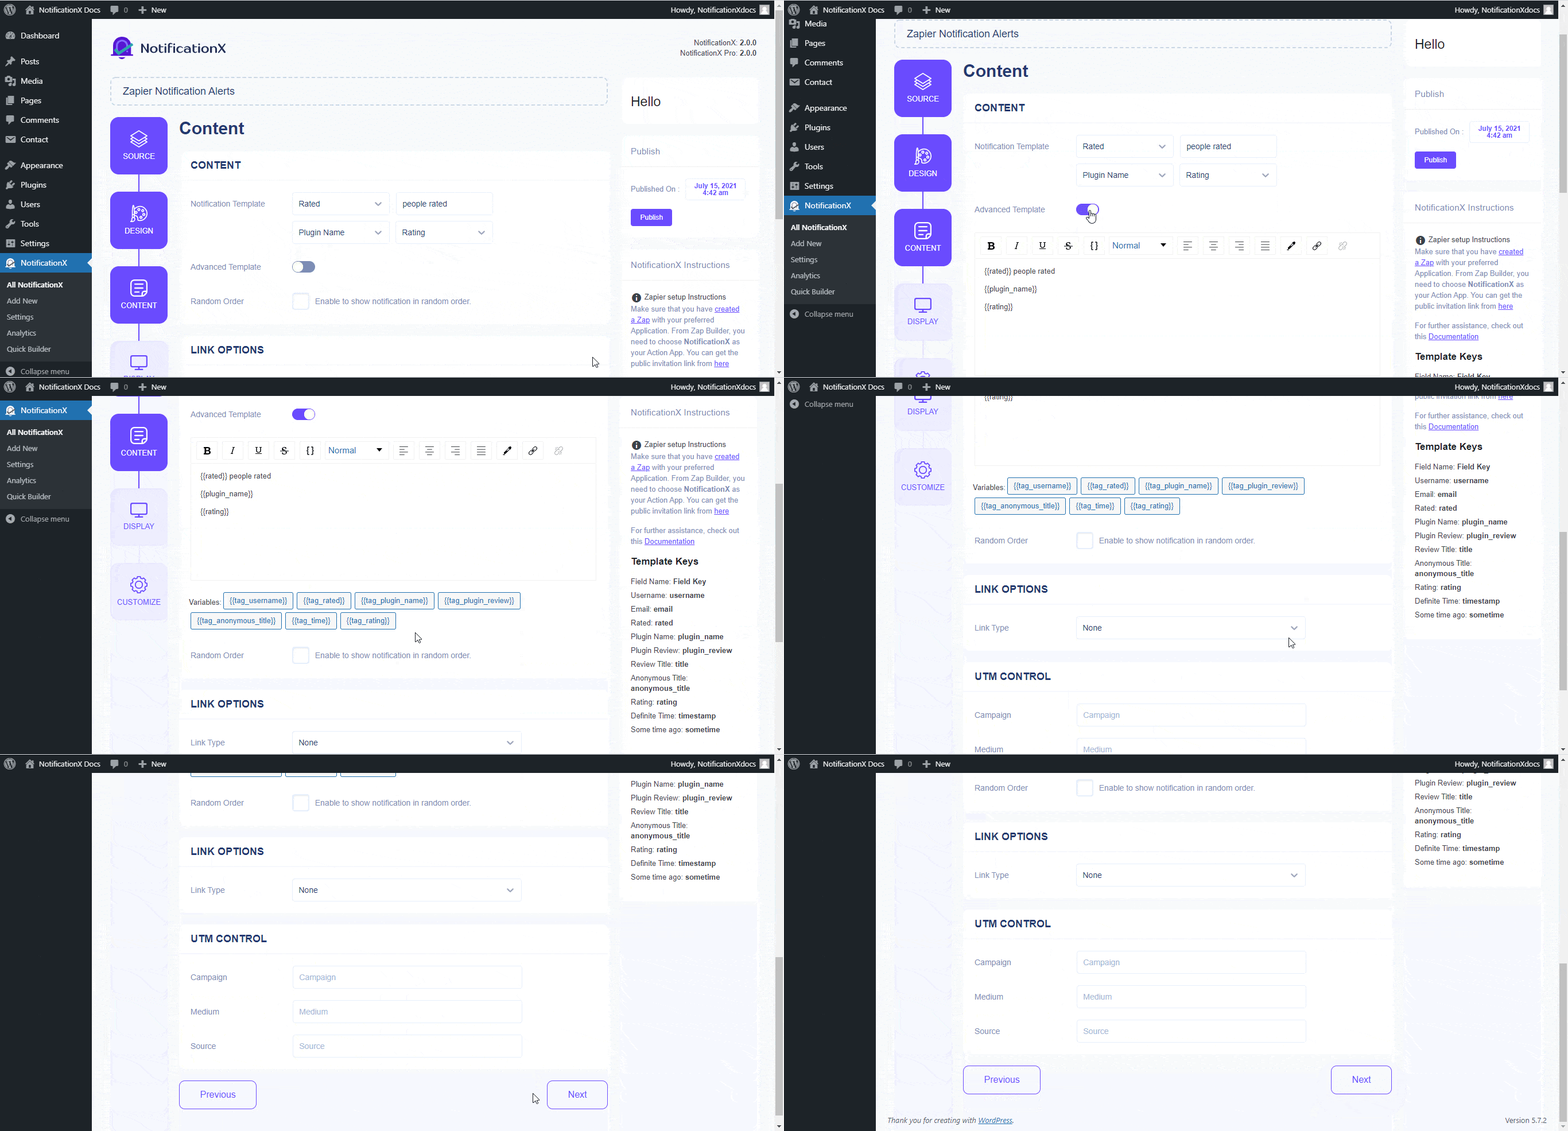
Anda kemudian akan diarahkan ke 'Kandungan' tab dari mana anda boleh mengubah suai 'Templat Pemberitahuan' dan menambahkan teks kandungan pilihan anda. Selain itu, tawaran NotificationX 'Templat Pemberitahuan' untuk Kandungan anda. Anda boleh terus maju dan memilih pemboleh ubah pilihan anda. Selain itu, 'Templat Lanjutan' memberi anda kawalan sepenuhnya untuk menyesuaikan keseluruhan Kandungan. Selain itu, anda juga boleh mengesan pelbagai jenis kempen melalui NotificationX hingga 'Kawalan UTM'.
Langkah 5 - Laraskan Pilihan Paparan #
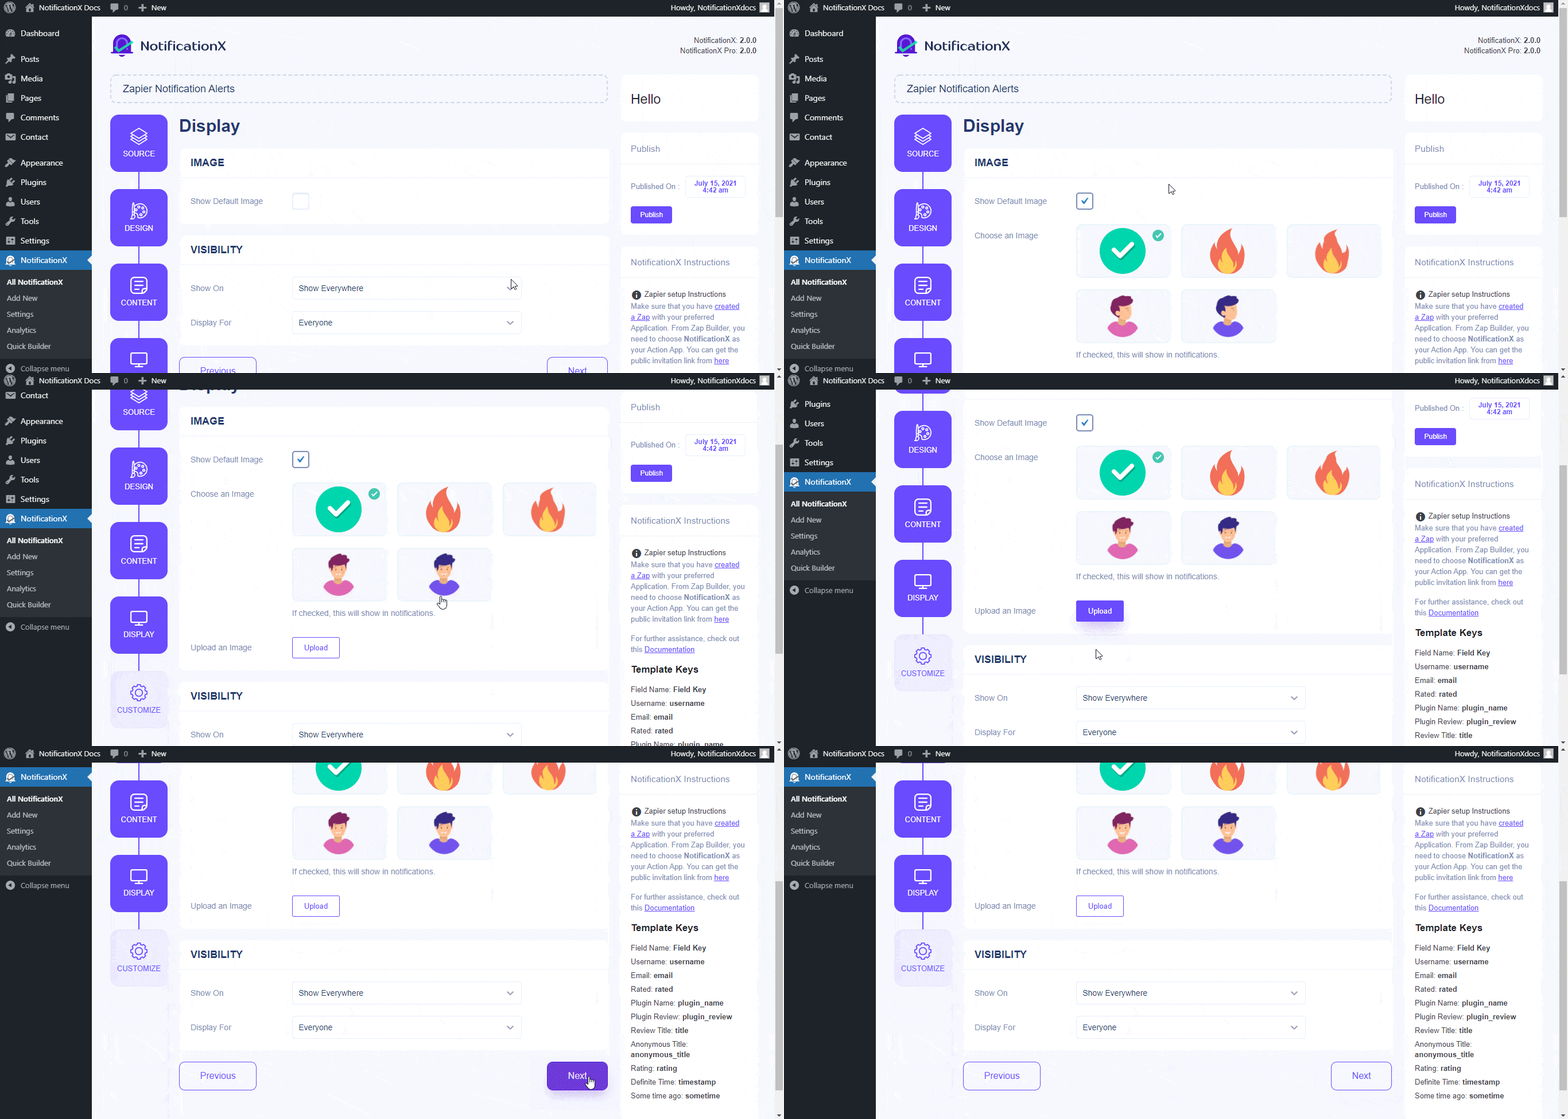
Daripada 'Imej' section, you can use the checkbox to display a default image or an avatar in the notification popup. Whereas the 'Penglihatan' bahagian membolehkan anda menetapkan halaman di mana anda ingin memaparkan amaran pemberitahuan Zapier.
Langkah 6 - Siapkan Penampilan #
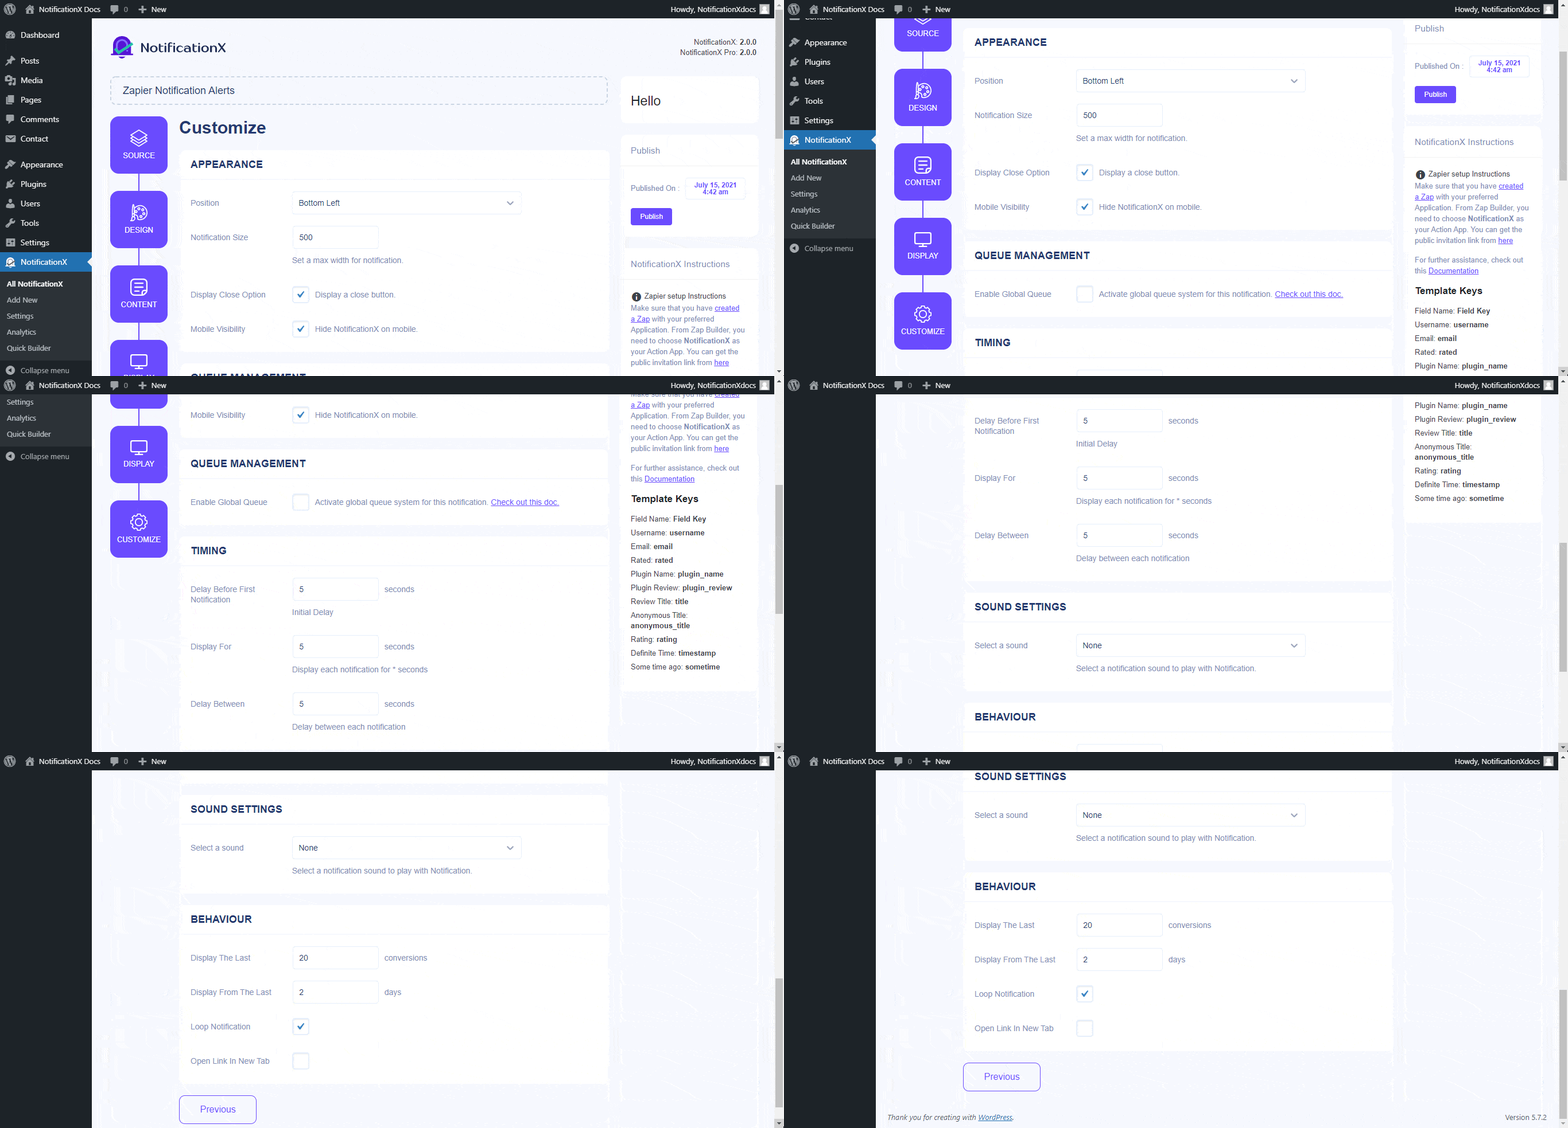
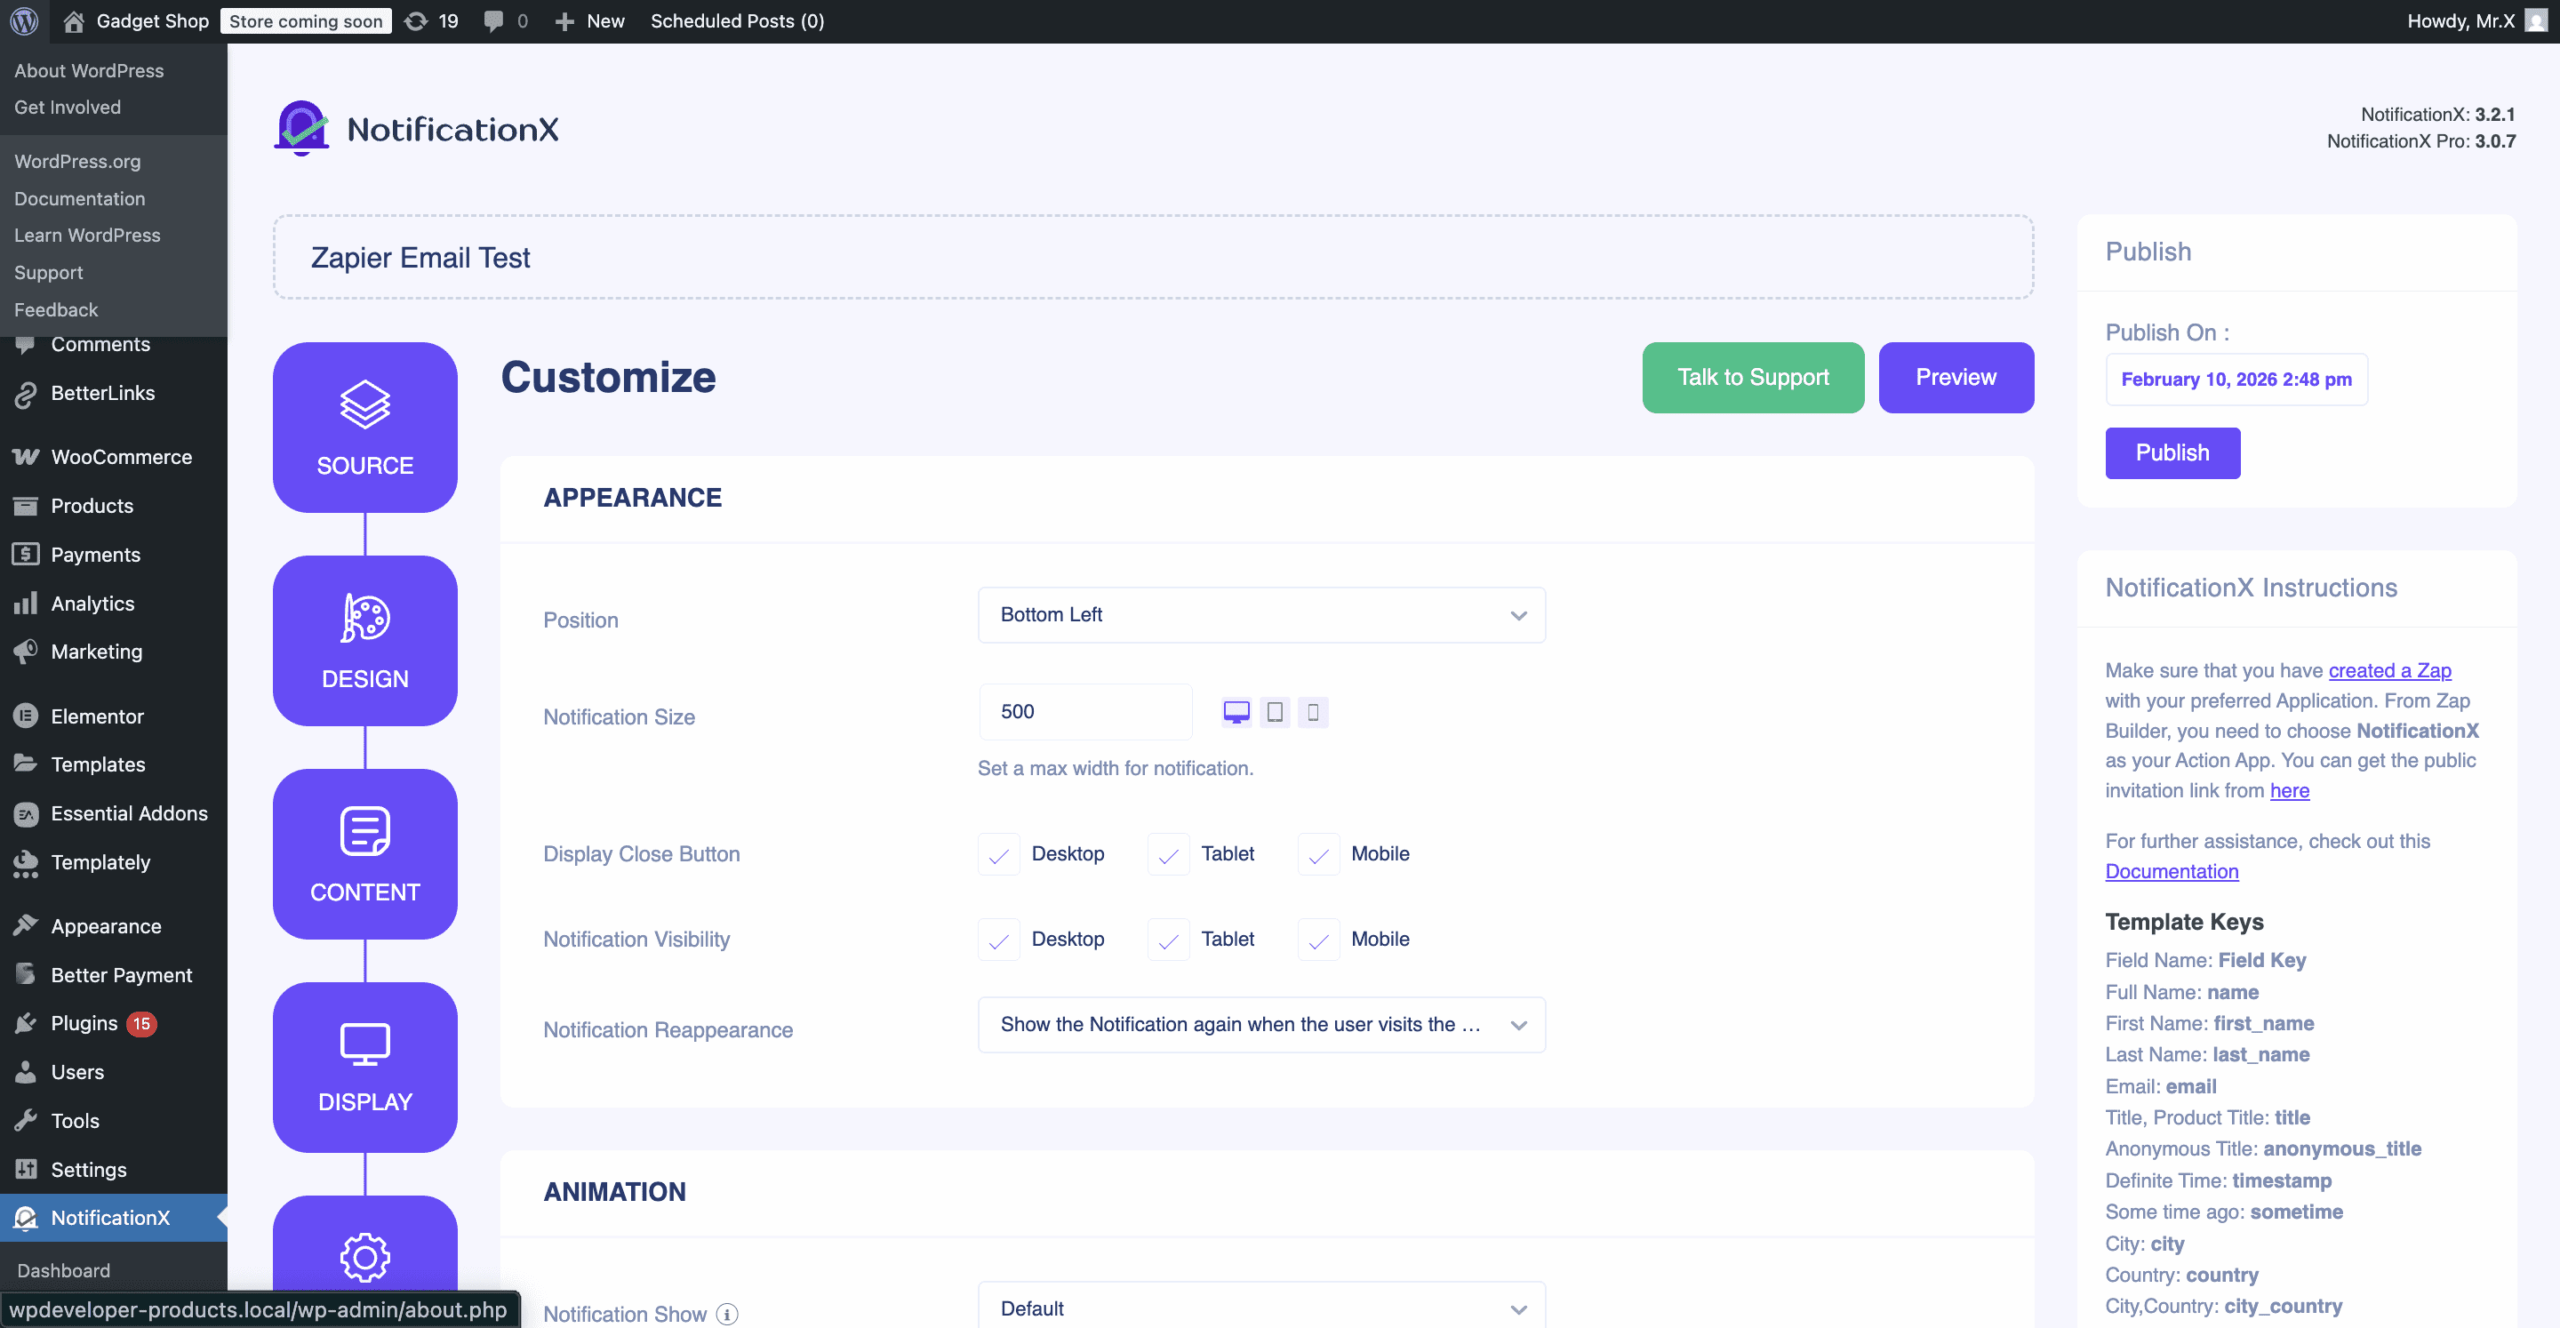
Daripada'Penampilan' section, you can set the position and width for notificiation alert. From the ‘Timing’ section, you can control the ‘Display’ time duration and set an initial time after which your ‘Zapier notification alert’ will pop up. The ‘Behaviour’ section allows you to pick a number of conversions and specify a certain number of days that will be considered for the notification popup. Besides, the ‘Sound Settings’ section lets you pick a Sound Alert for your notification popup.
Langkah 7: Terbitkan Pemberitahuan Anda #
Setelah anda melengkapkan langkah 6, klik pada 'Menerbitkan' butang. Hasilnya, 'Makluman Penghantaran Borang Hubungi' akan berjaya dibuat.
Cara Menghubungkan NotificationX dengan Zapier #
Setelah menerbitkan Makluman Pemberitahuan Zapier anda, anda perlu menyambungkan NotificationX dengan Zapier. Untuk melakukan itu, pertama sekali, anda perlu log masuk ke Papan Pemuka Zapier anda. Untuk menggunakan NotificationX di Zapier, pastikan untuk menerima pautan jemputan awam NotificationX. Kemudian, teruskan dan klik pada ‘Accept Invite & Build a Zap’ butang.
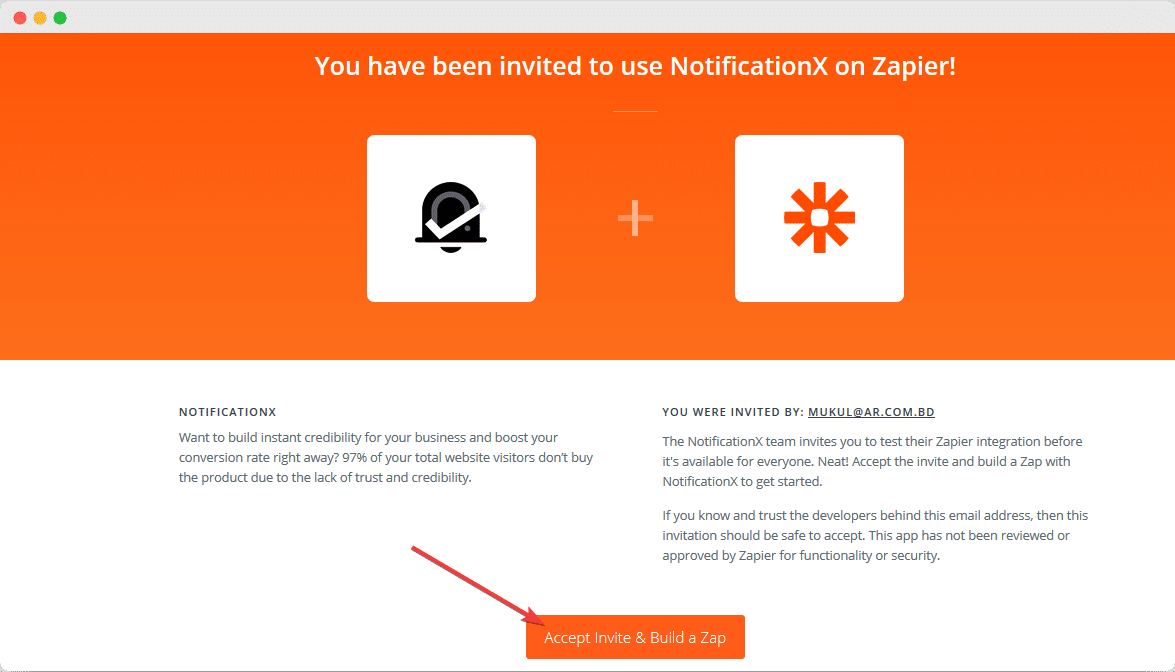
Nota: You will find the Zapier API key in the NotificationX settings option. There will be an API key, and you will get a public invitation link. You can add the link from the settings and get the invitation link here.
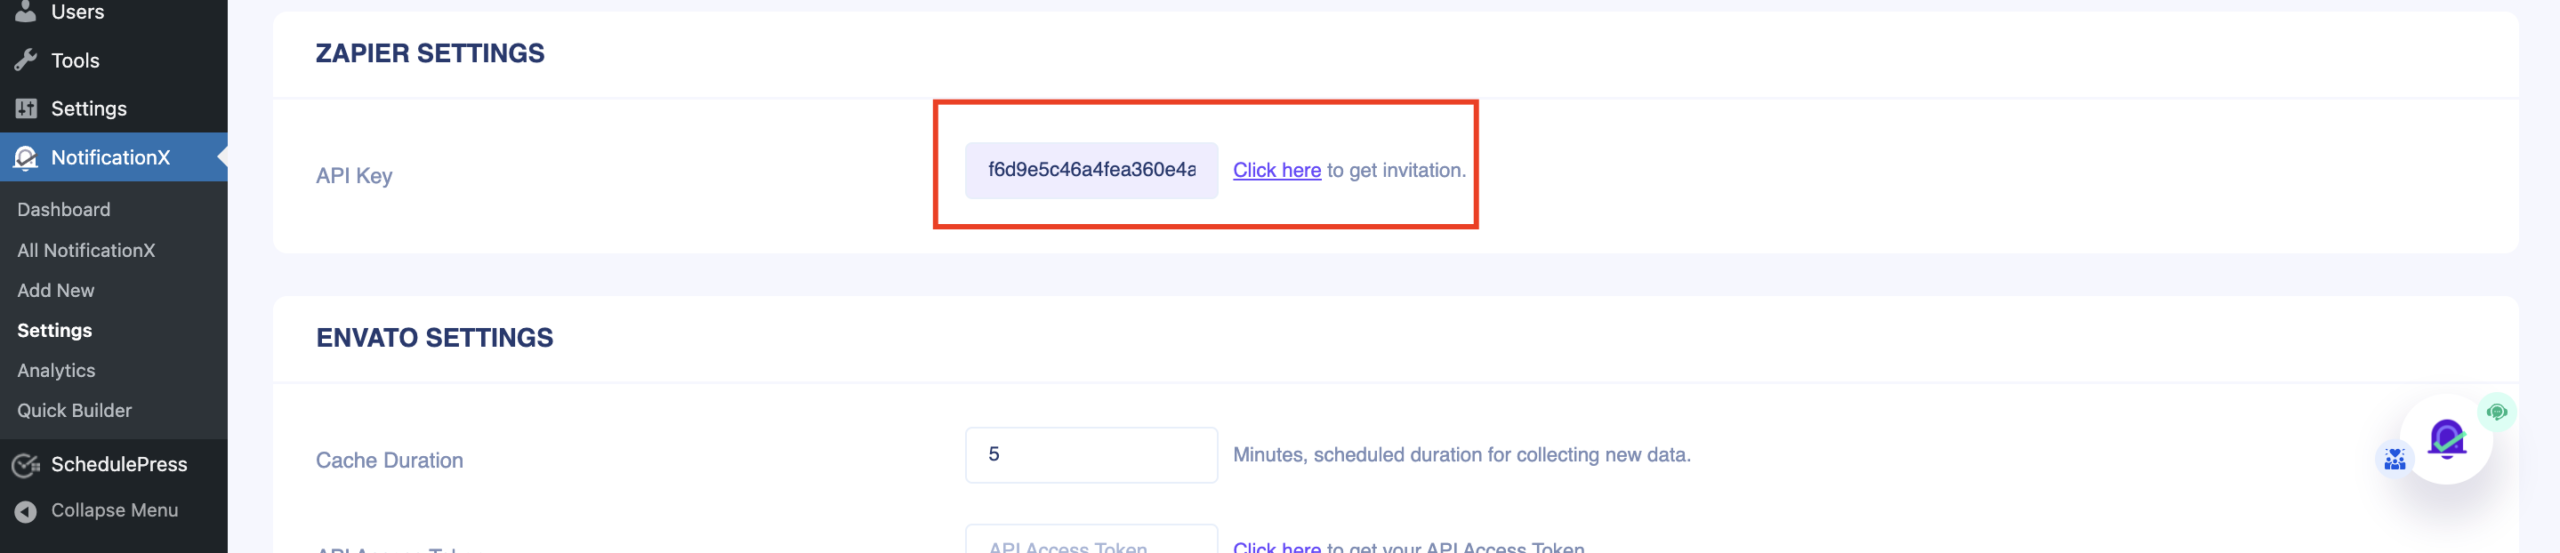
Langkah 1 - Buat Zap #
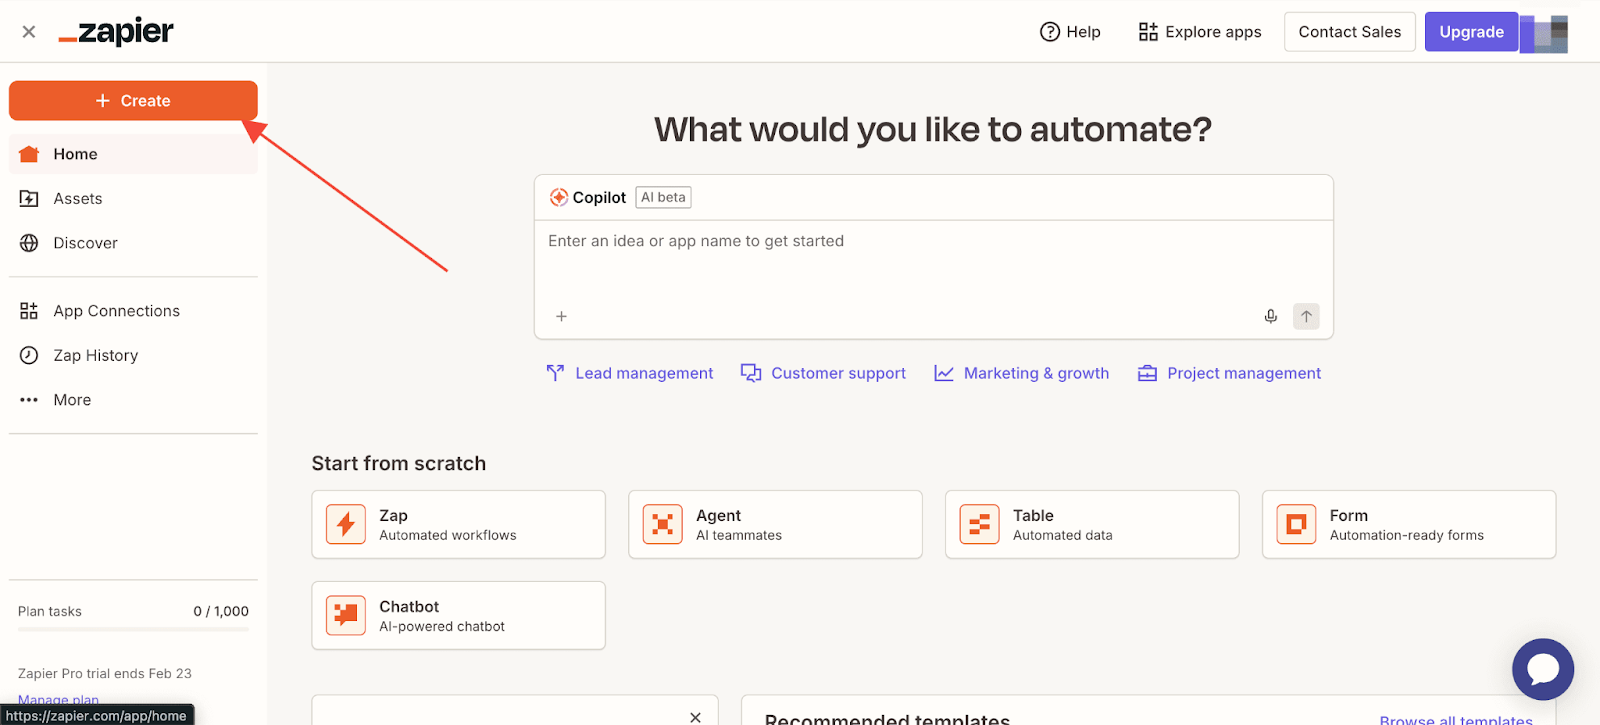
Untuk menyambungkan NotificationX dengan Zapier, anda perlu buat Zap dengan Aplikasi pilihan anda. Anda akan menjumpai ‘Create’ button on your Zapier Dashboard. Simply go ahead and click on it. After that, click on ‘Zaps’ to start automating your notification.
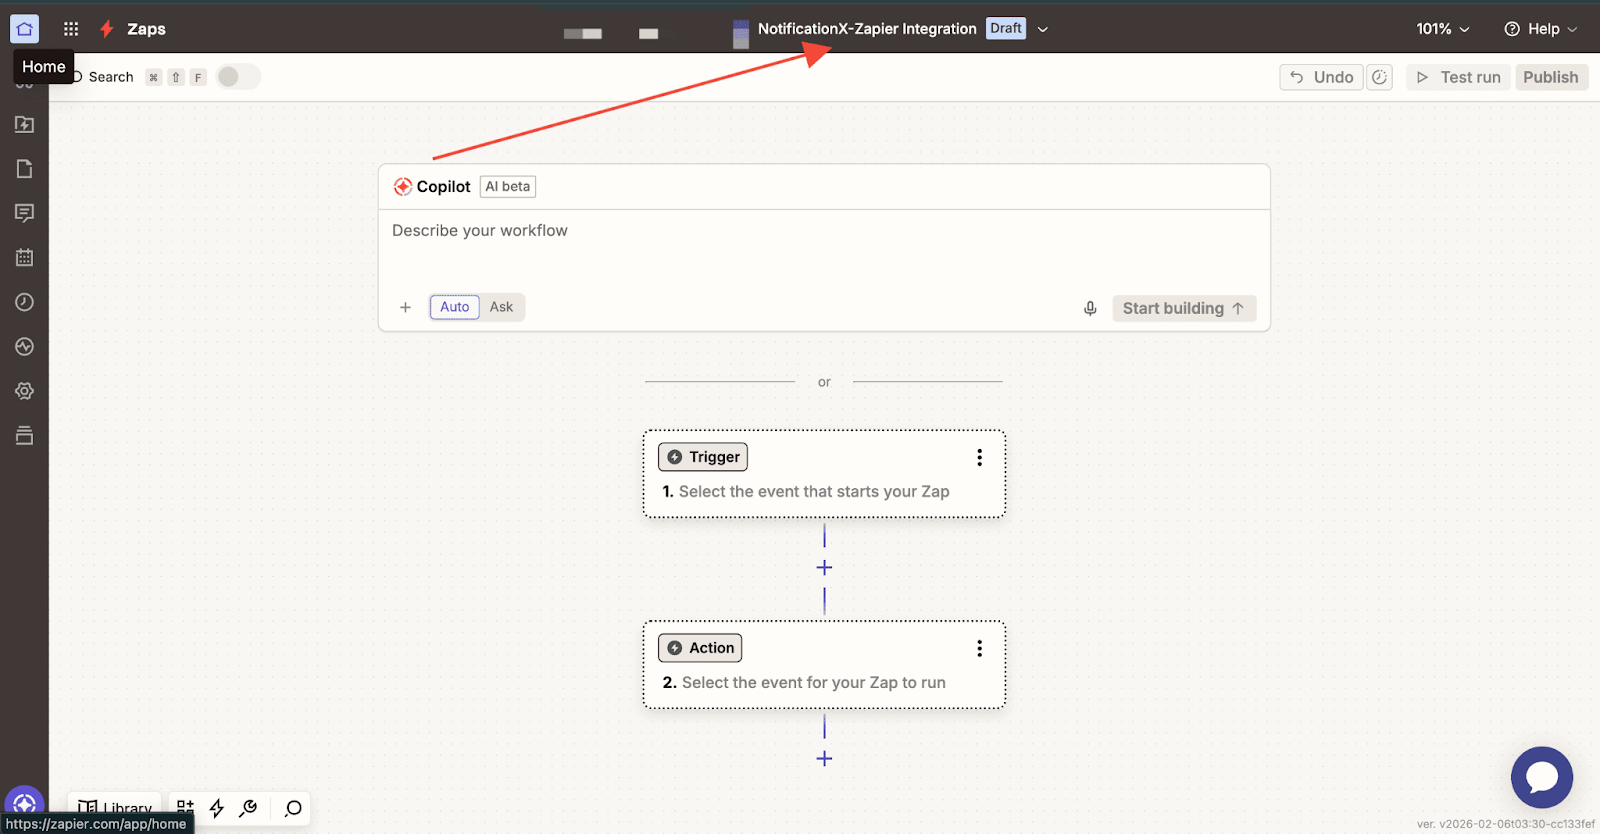
Step 2 – Choose App & Event #
Sebaik sahaja anda berada di halaman Editor Zapier, anda boleh tetapkan Nama for the Zap you are creating from the top bar of the Editor. Click on the dropdown and click on ‘Rename’. You can name it whatever you want.
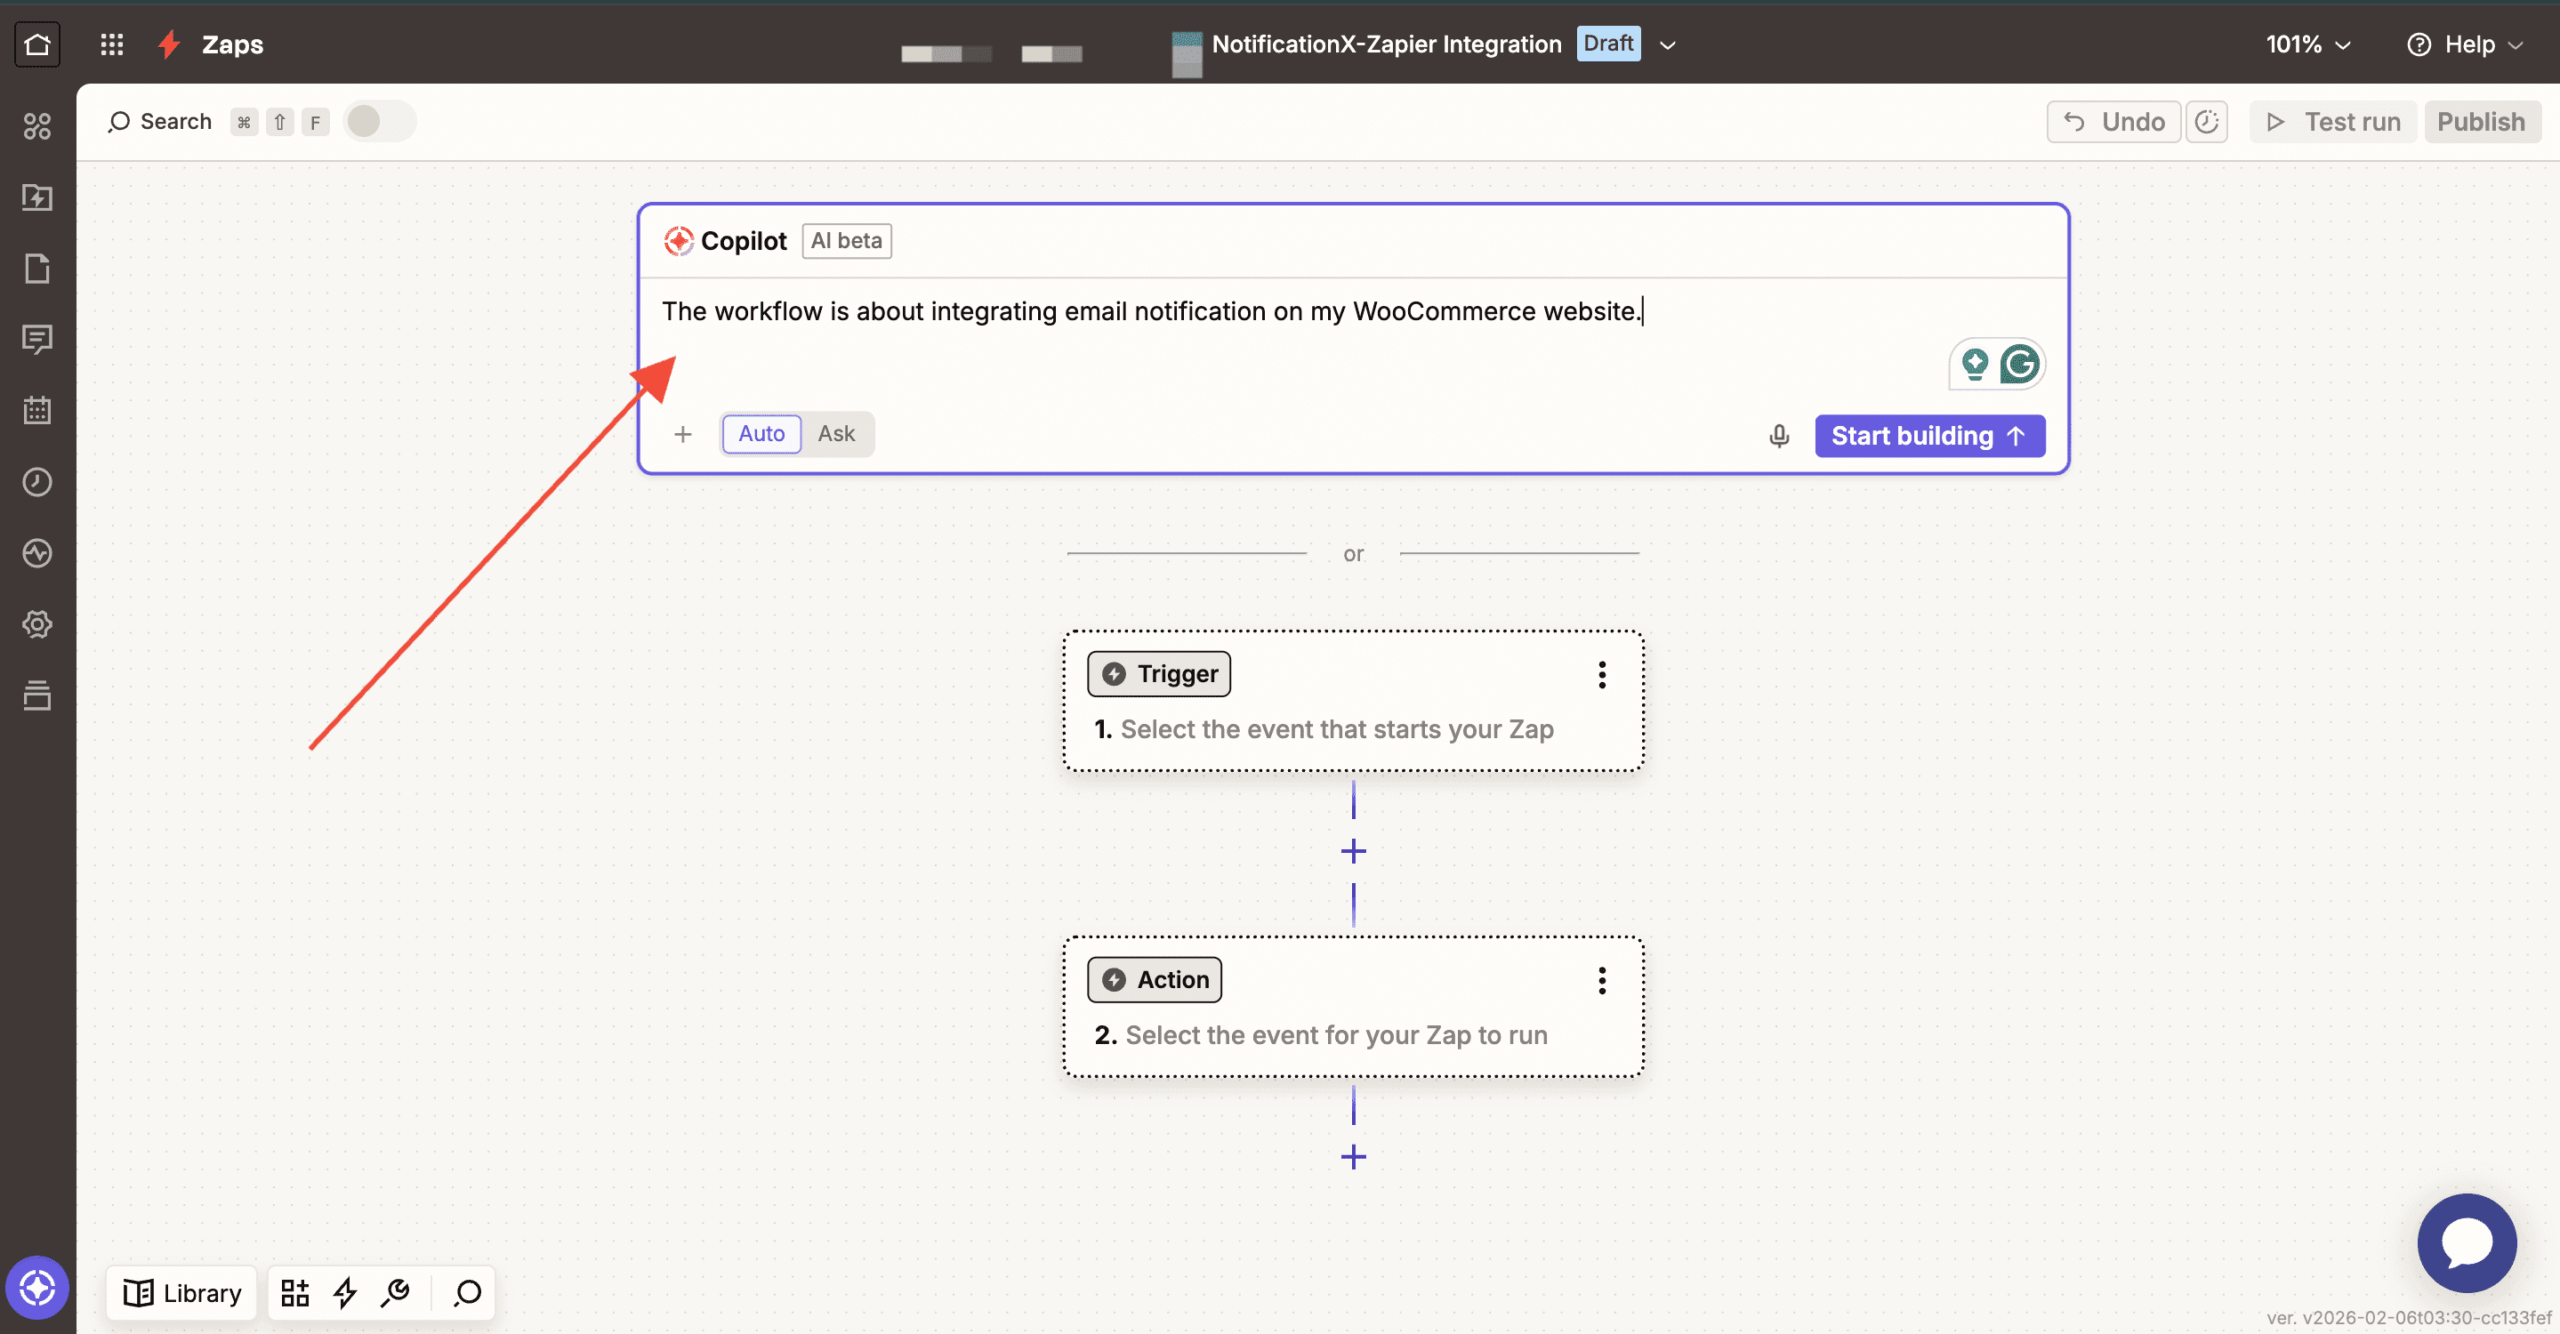
Afterward, you can describe the workflow. Here, you can write what this workflow is about and how it works on your website.
Alternatively, choose the app you want to integrate. Click on ‘Trigger,’ and then you will find a lot of options to choose the app. From there, select your preferred app.
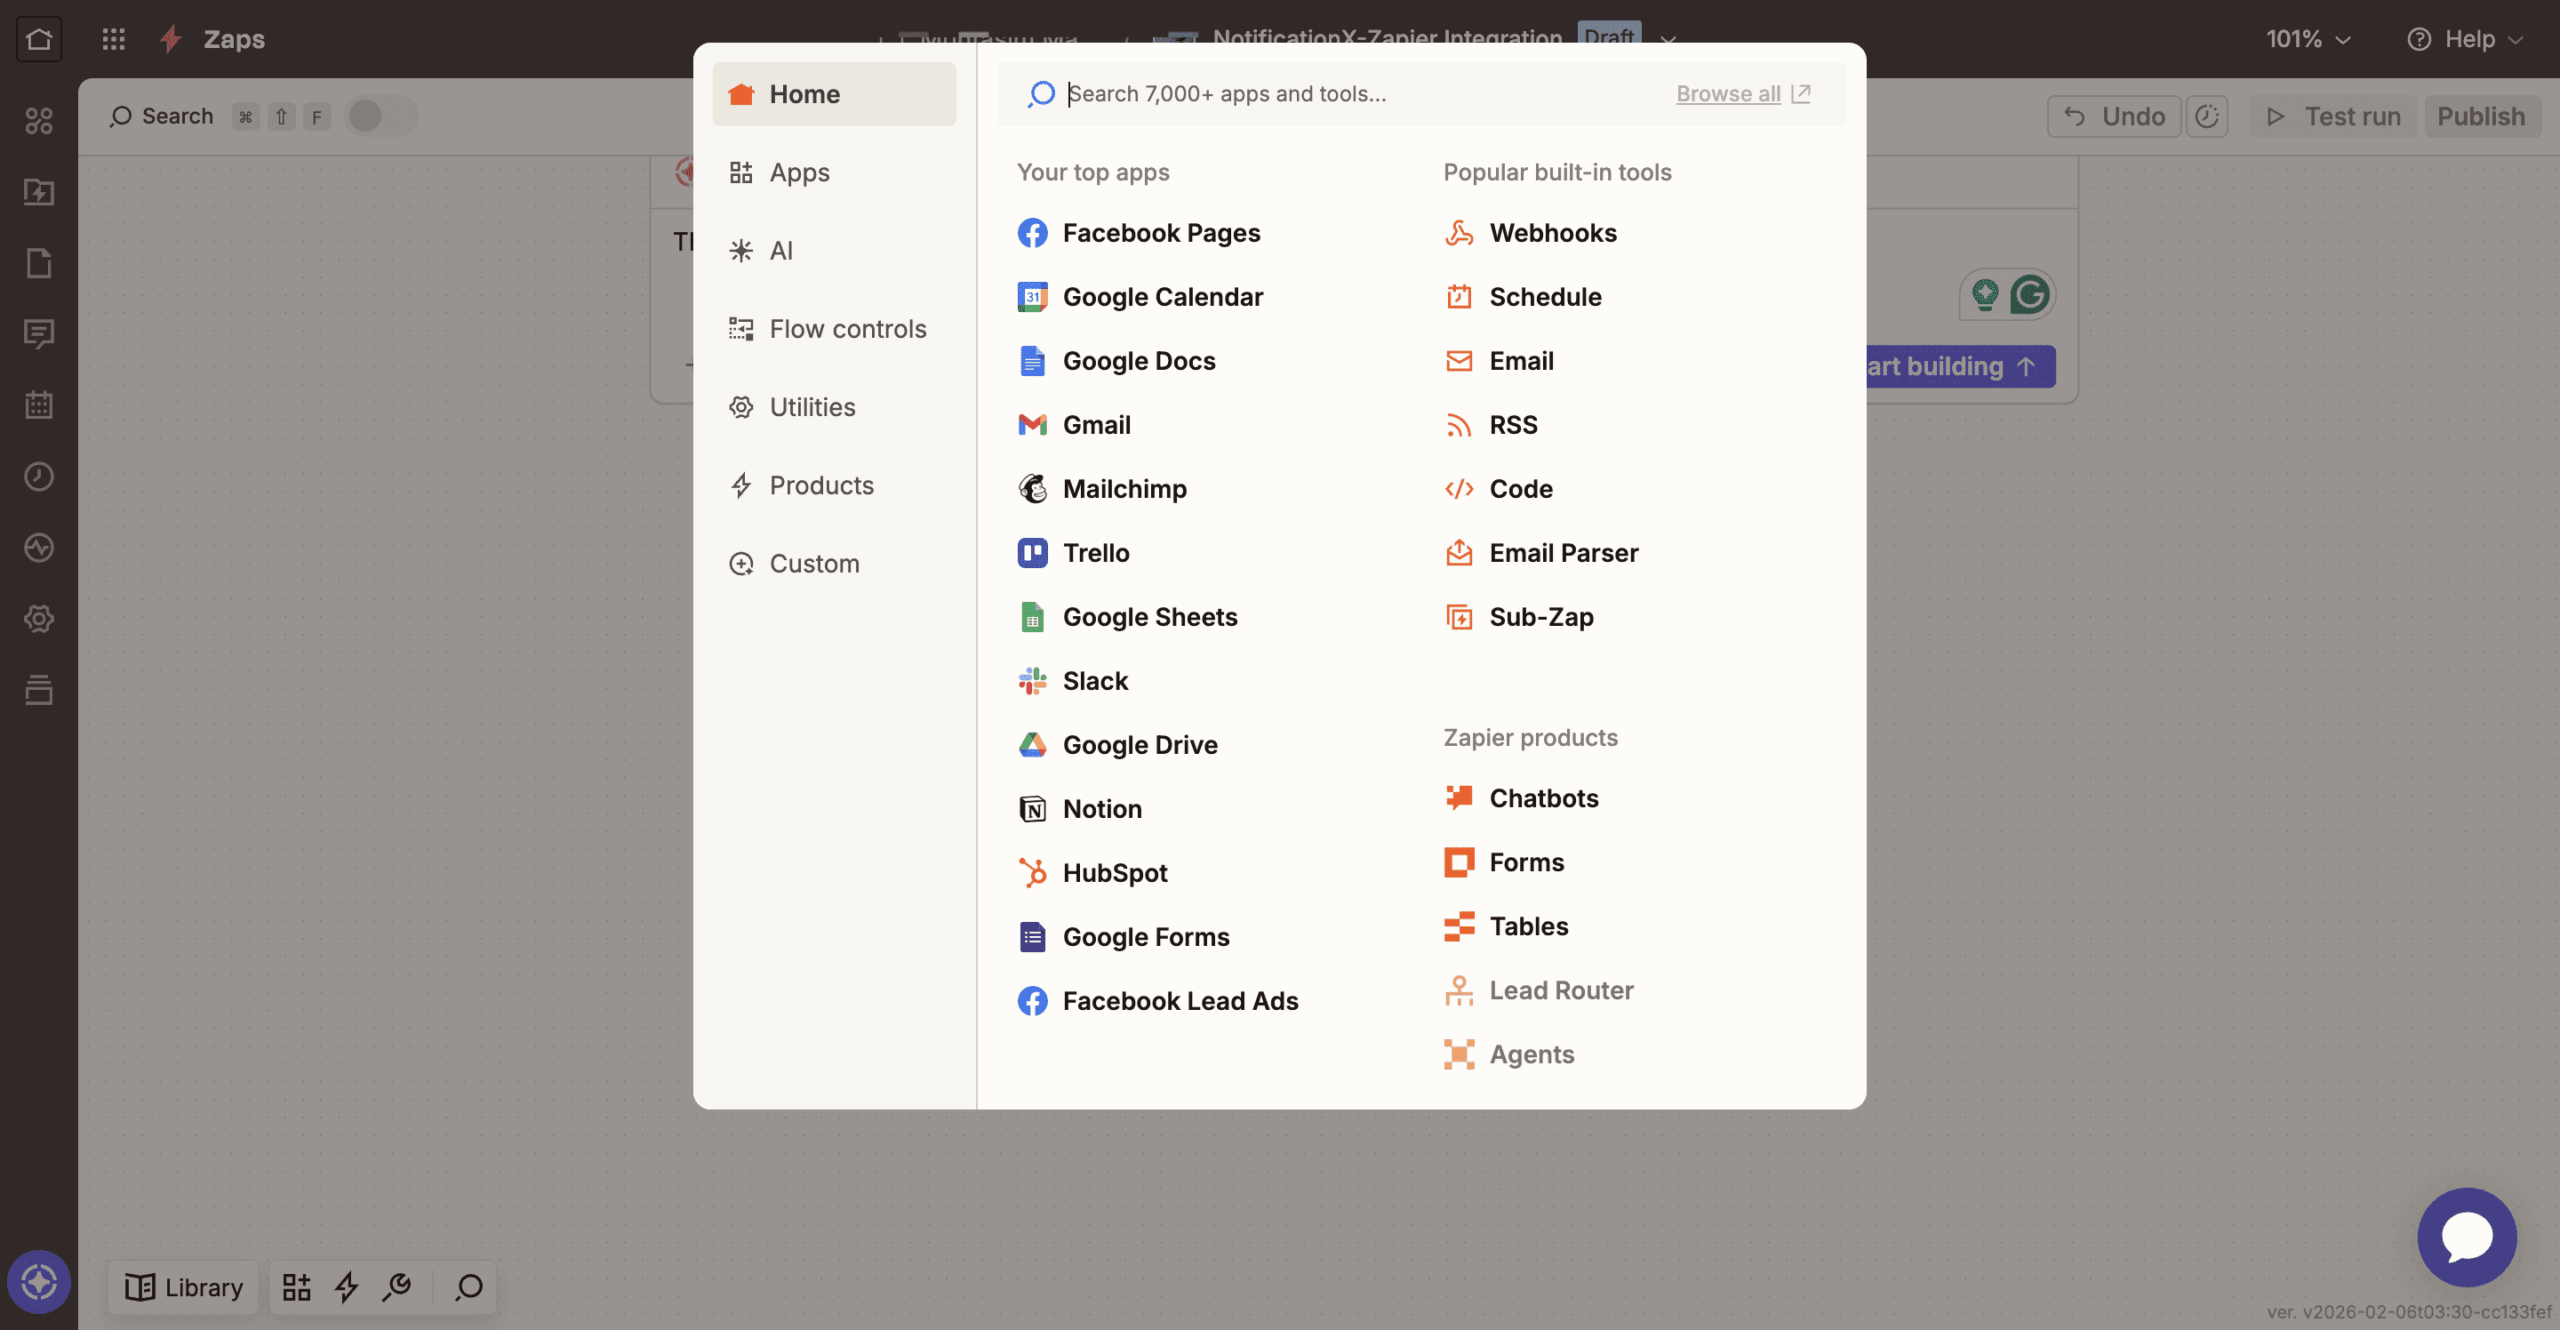
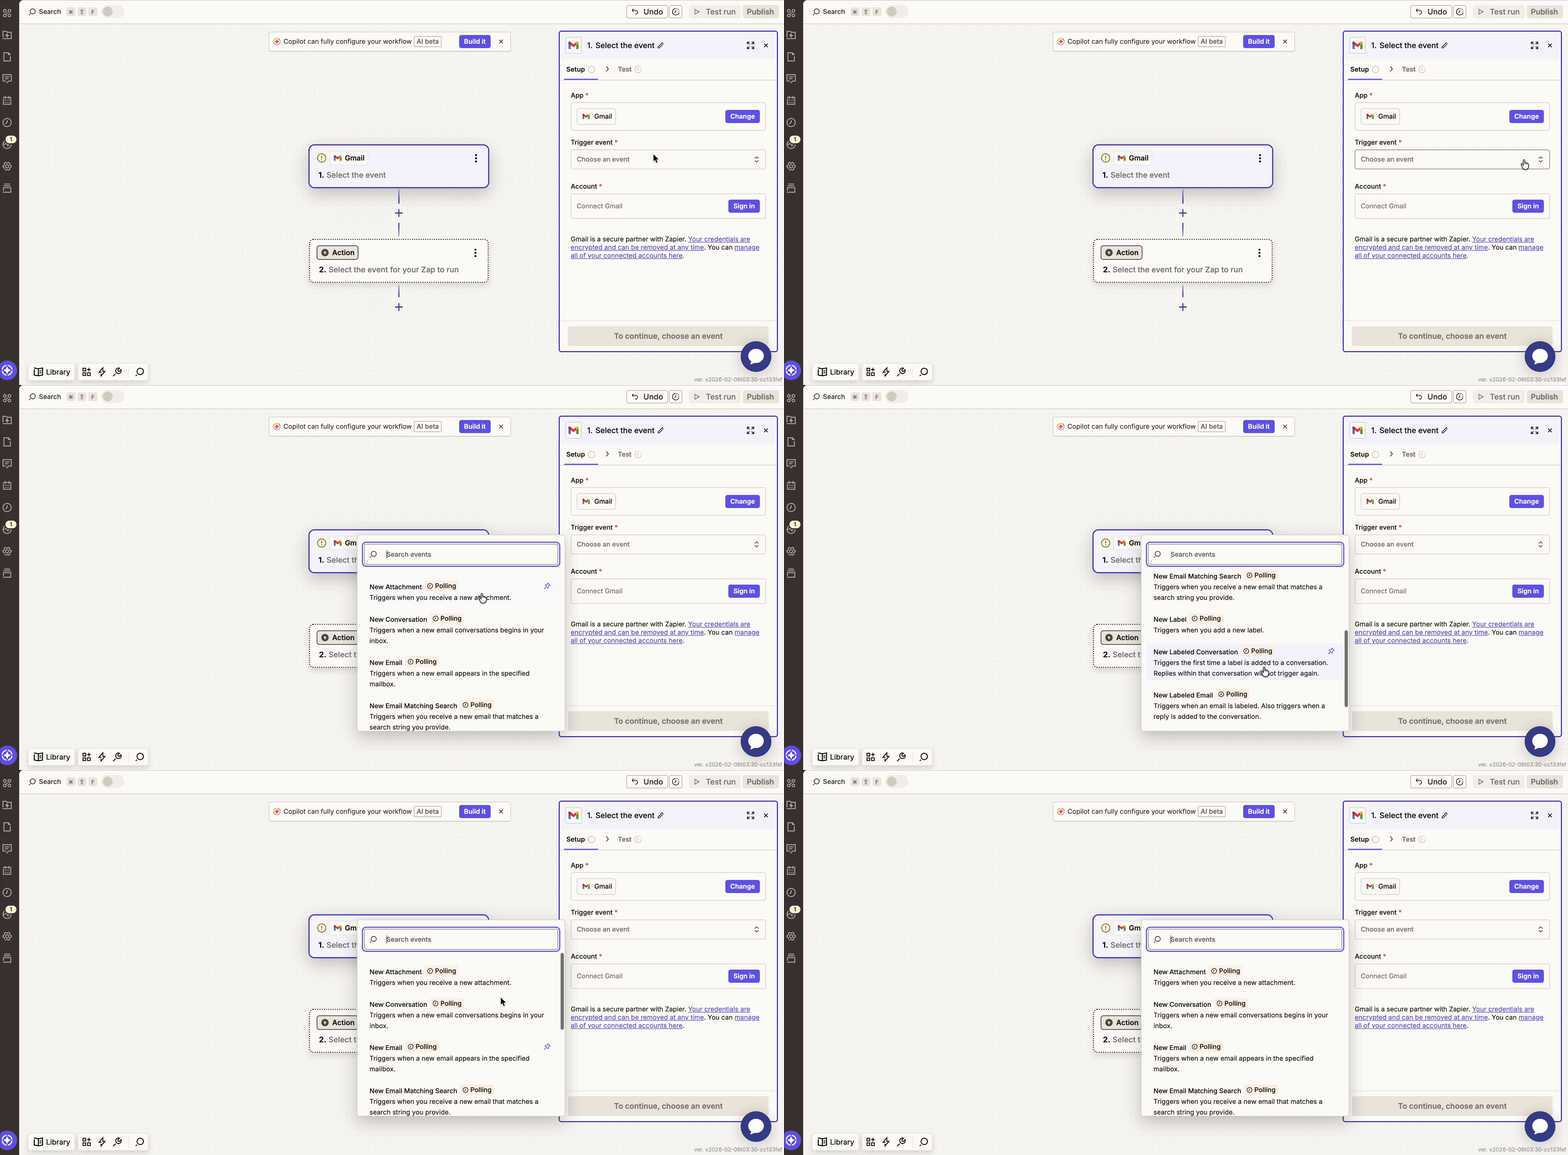
Setelah memilih Aplikasi anda, teruskan dan pilih a Peristiwa Pencetus untuk ia. (Contoh: if you want to show a new email notification from your Gmail, then pick ‘New Email’ as your Trigger Event).
Selepas itu, anda akan diminta untuk sambungkan akaun Aplikasi anda dengan Zapier. Setelah sambungan terjalin, teruskan dan teruskan.
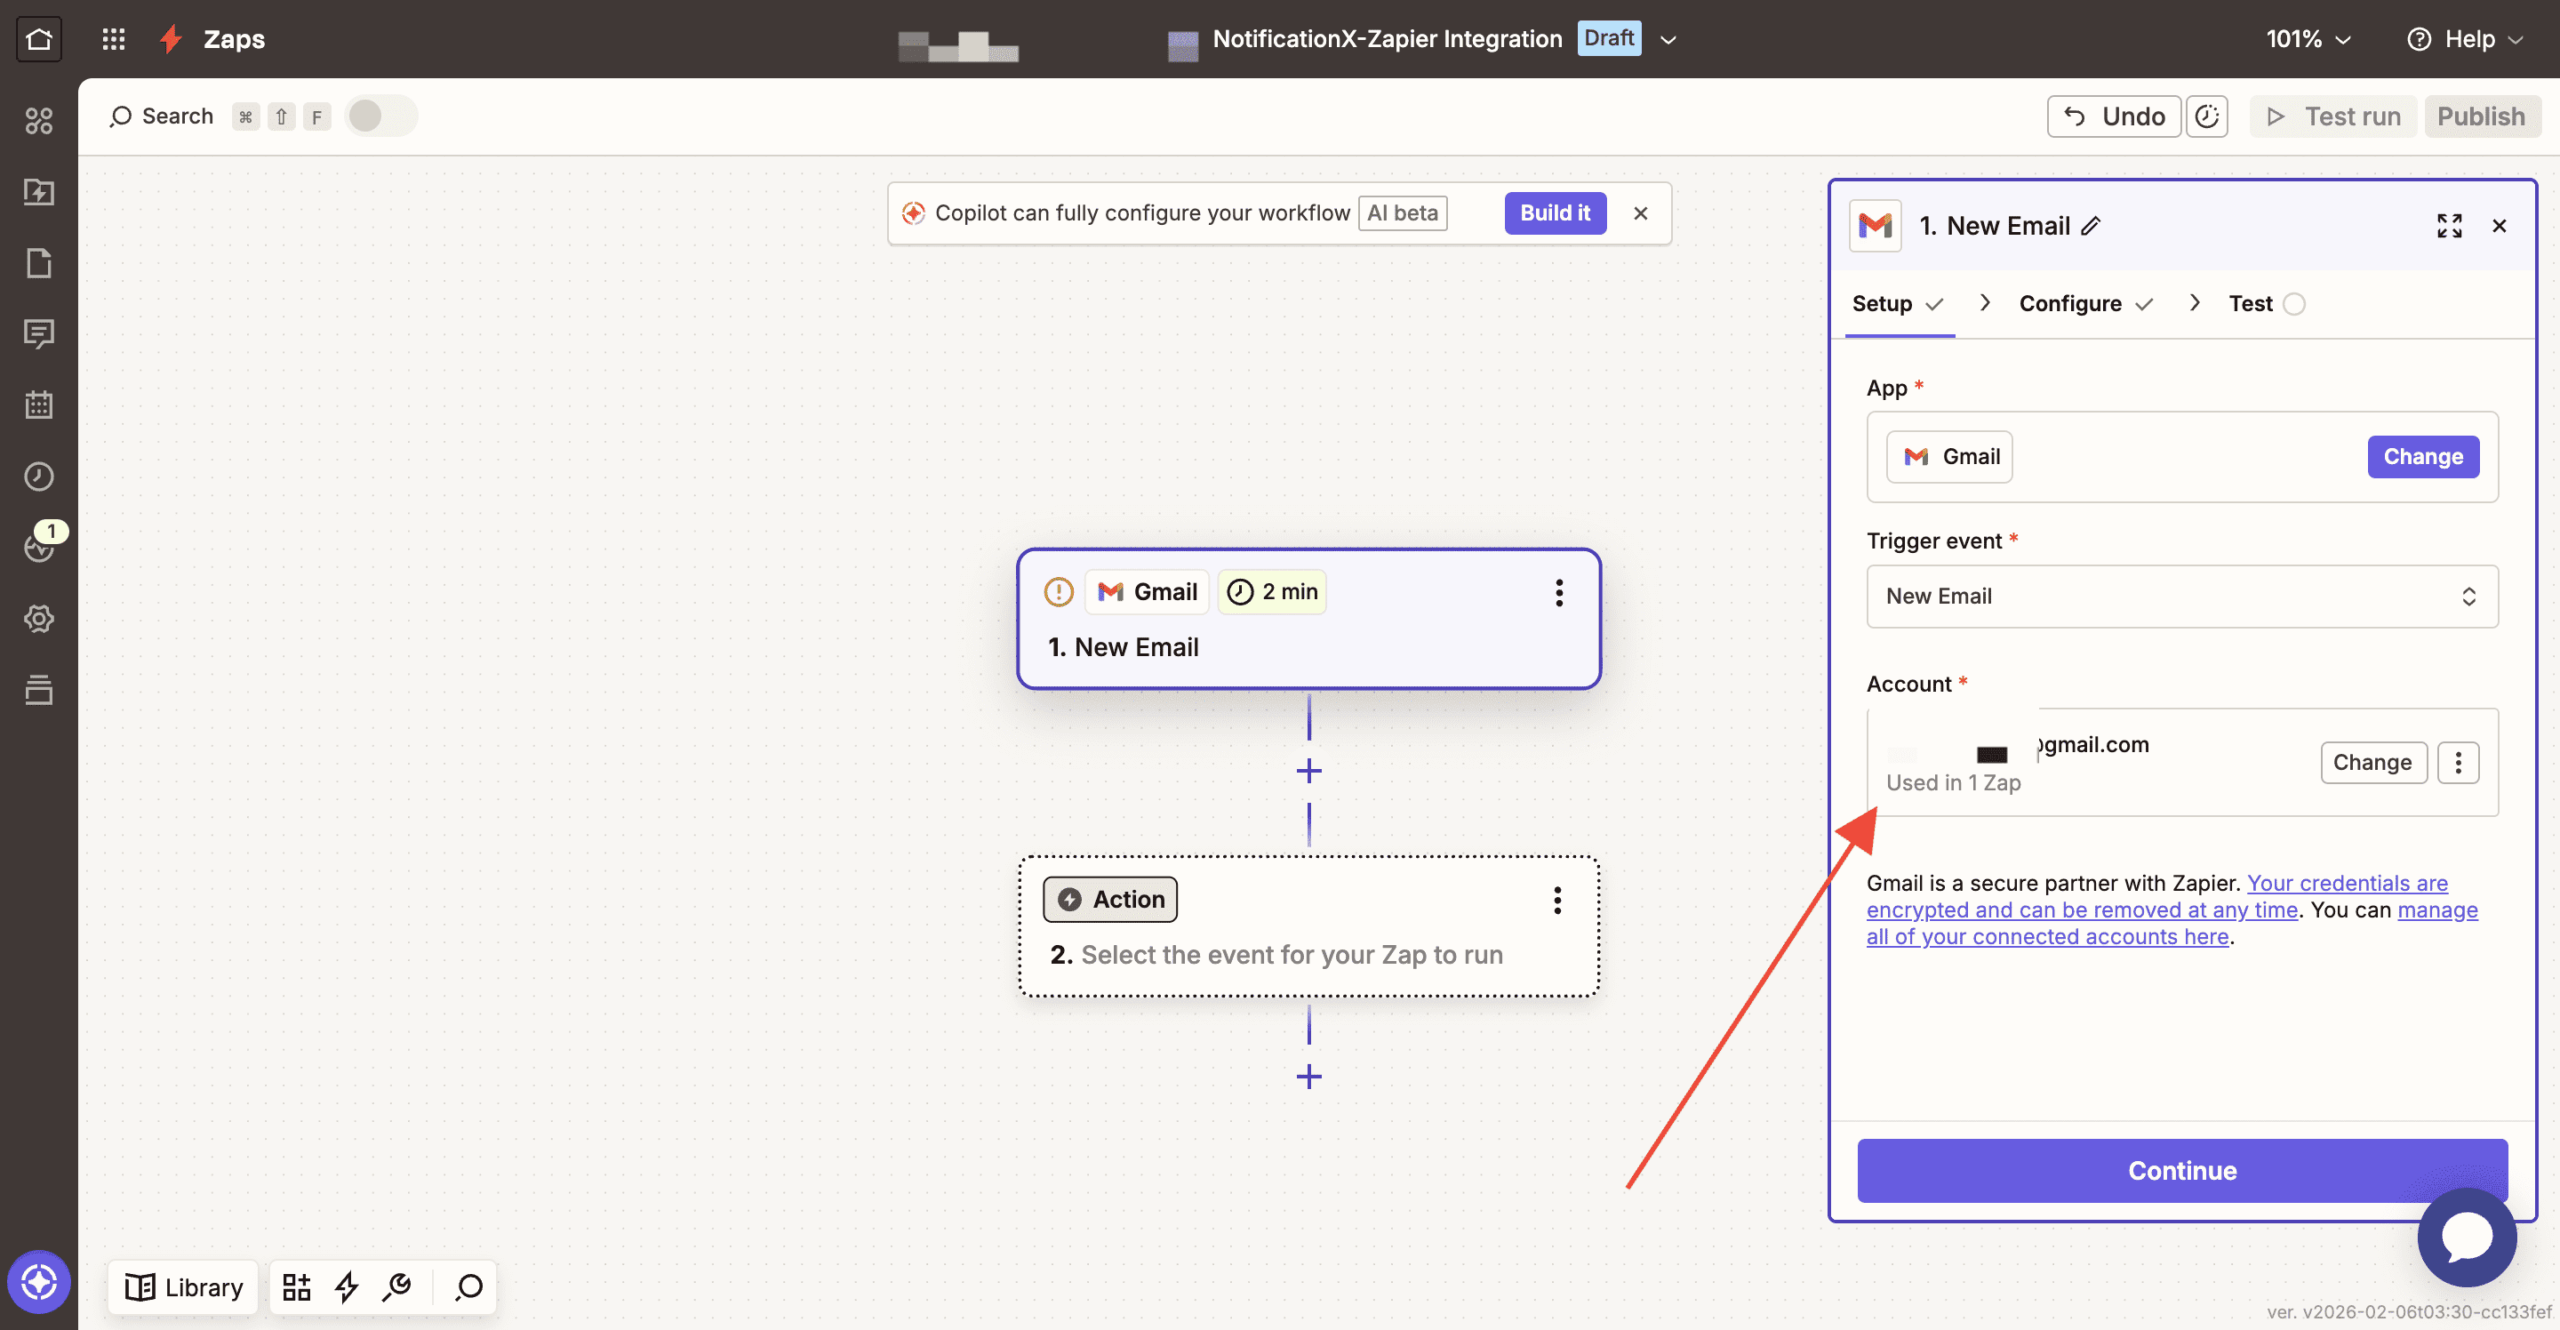
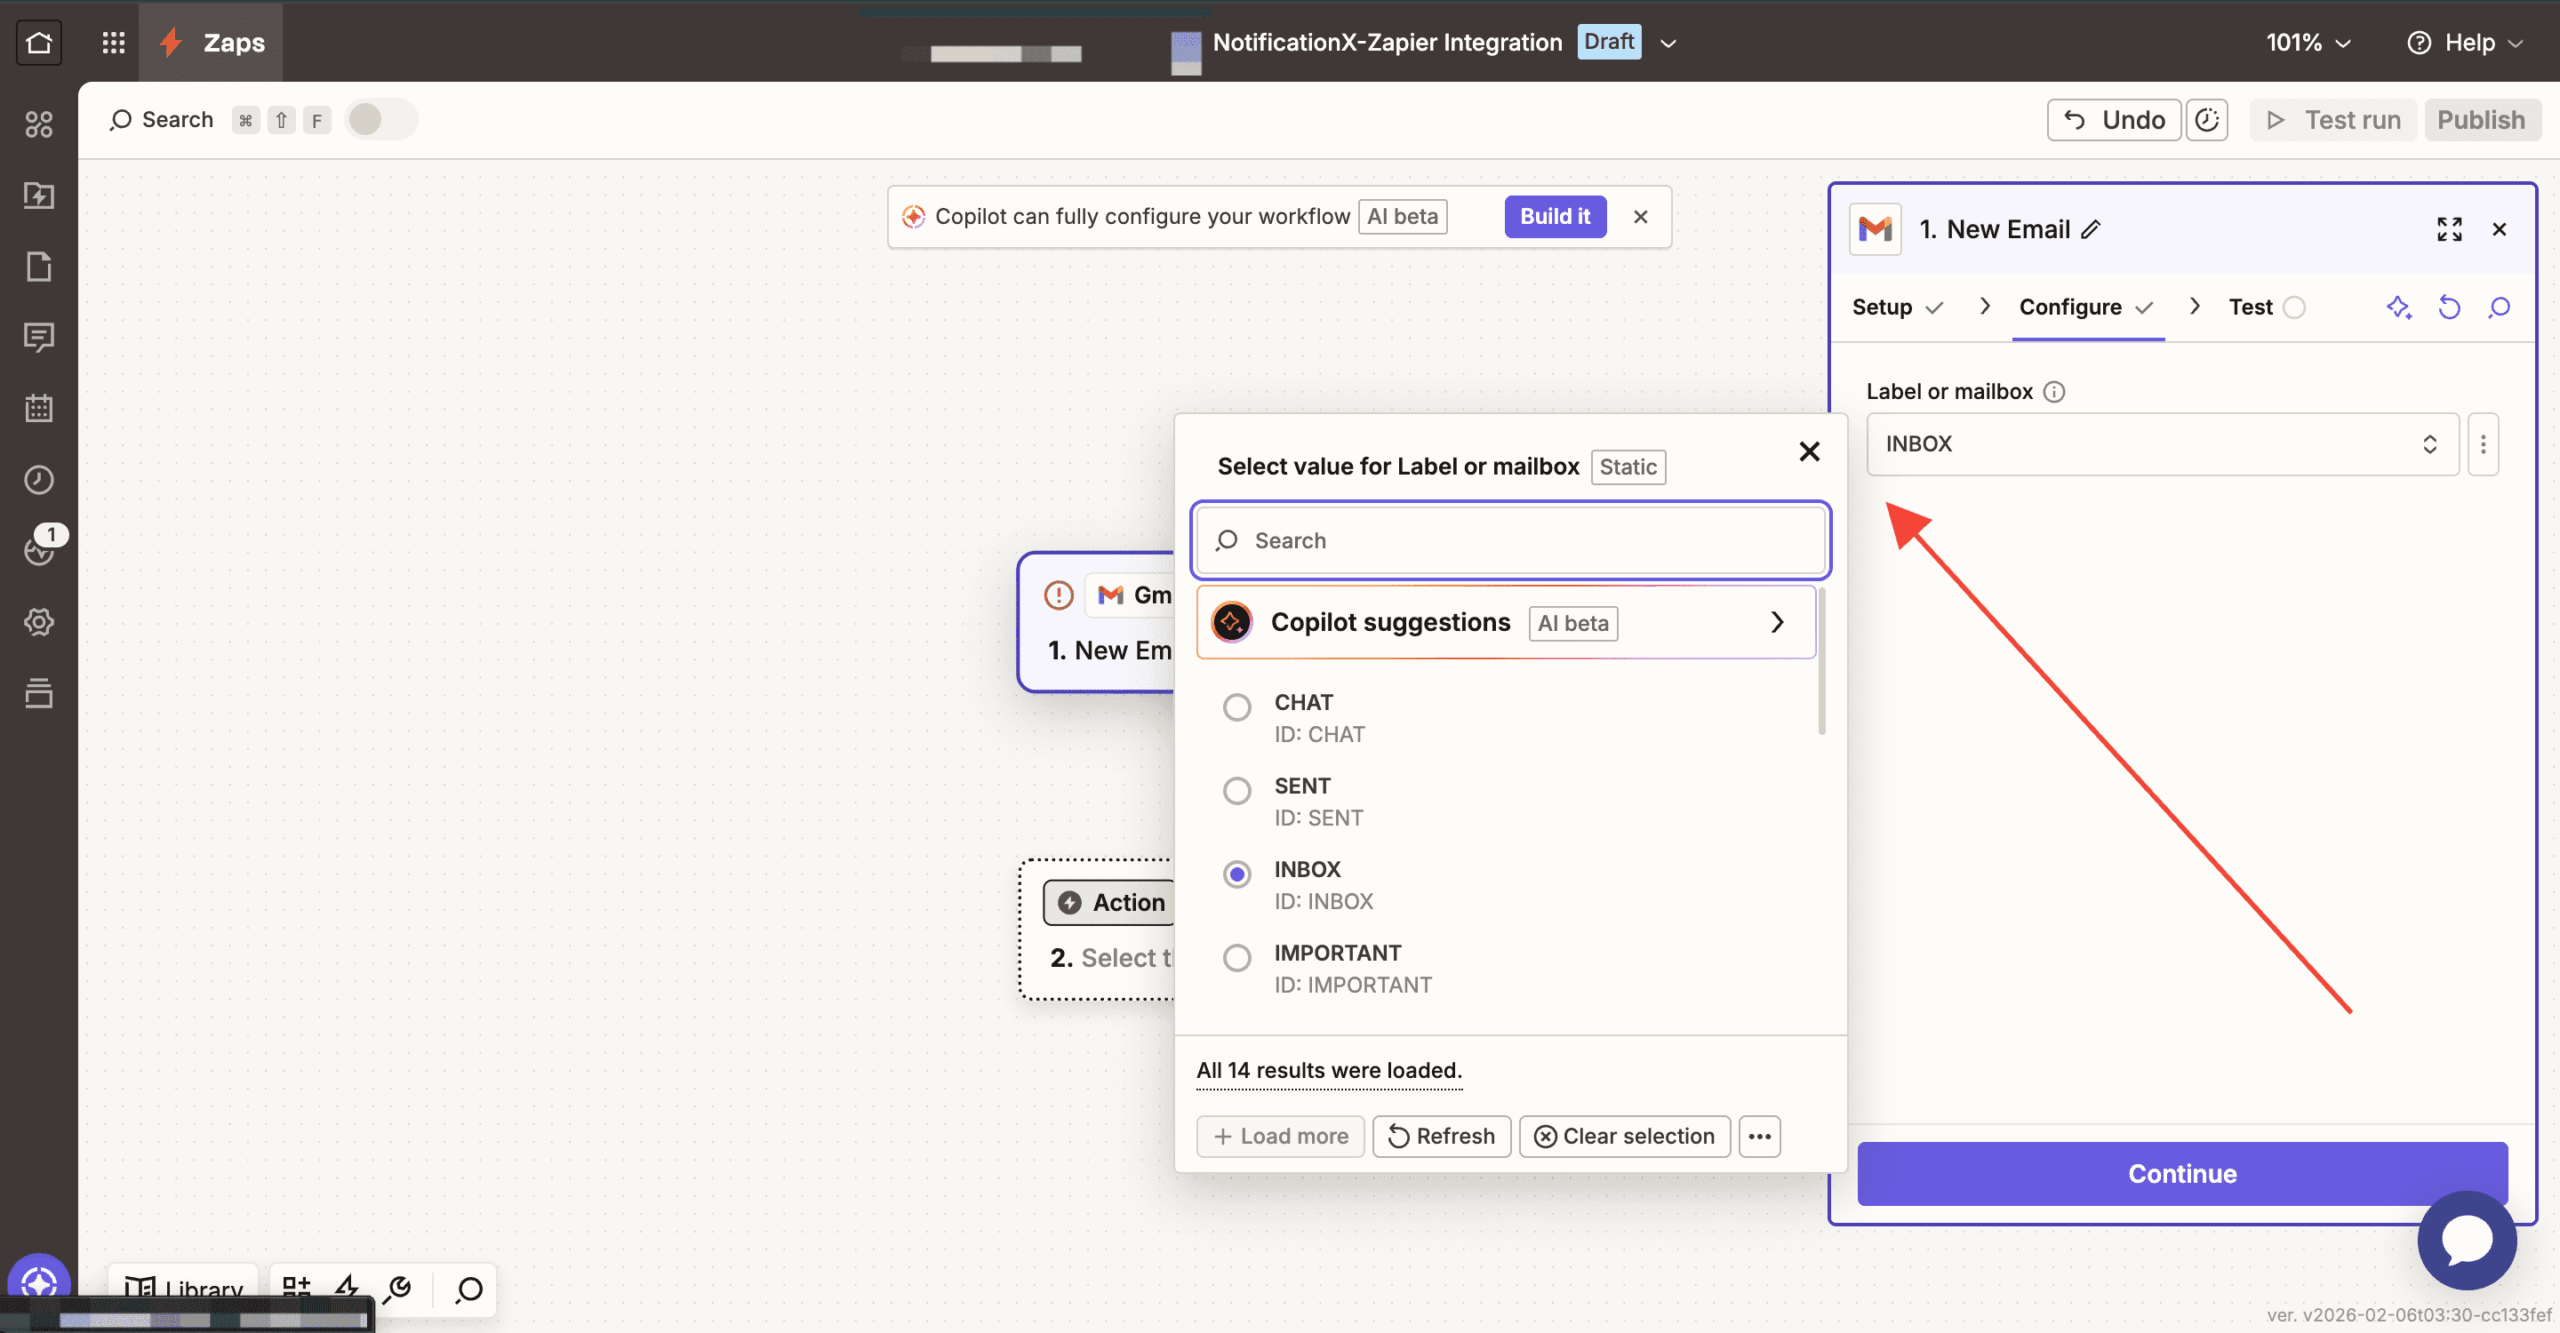
After that, click on the “Continue” button for the next stage. Then you have to add the ‘Configure’ section. In the ‘Configure’ section, choose the type of value label you want to choose.
For smooth flow in Zapier, next go to the ‘Test’ section. Here you can test if your email integration is working properly or not. Click on the ‘Test Trigger’ button to start the test.
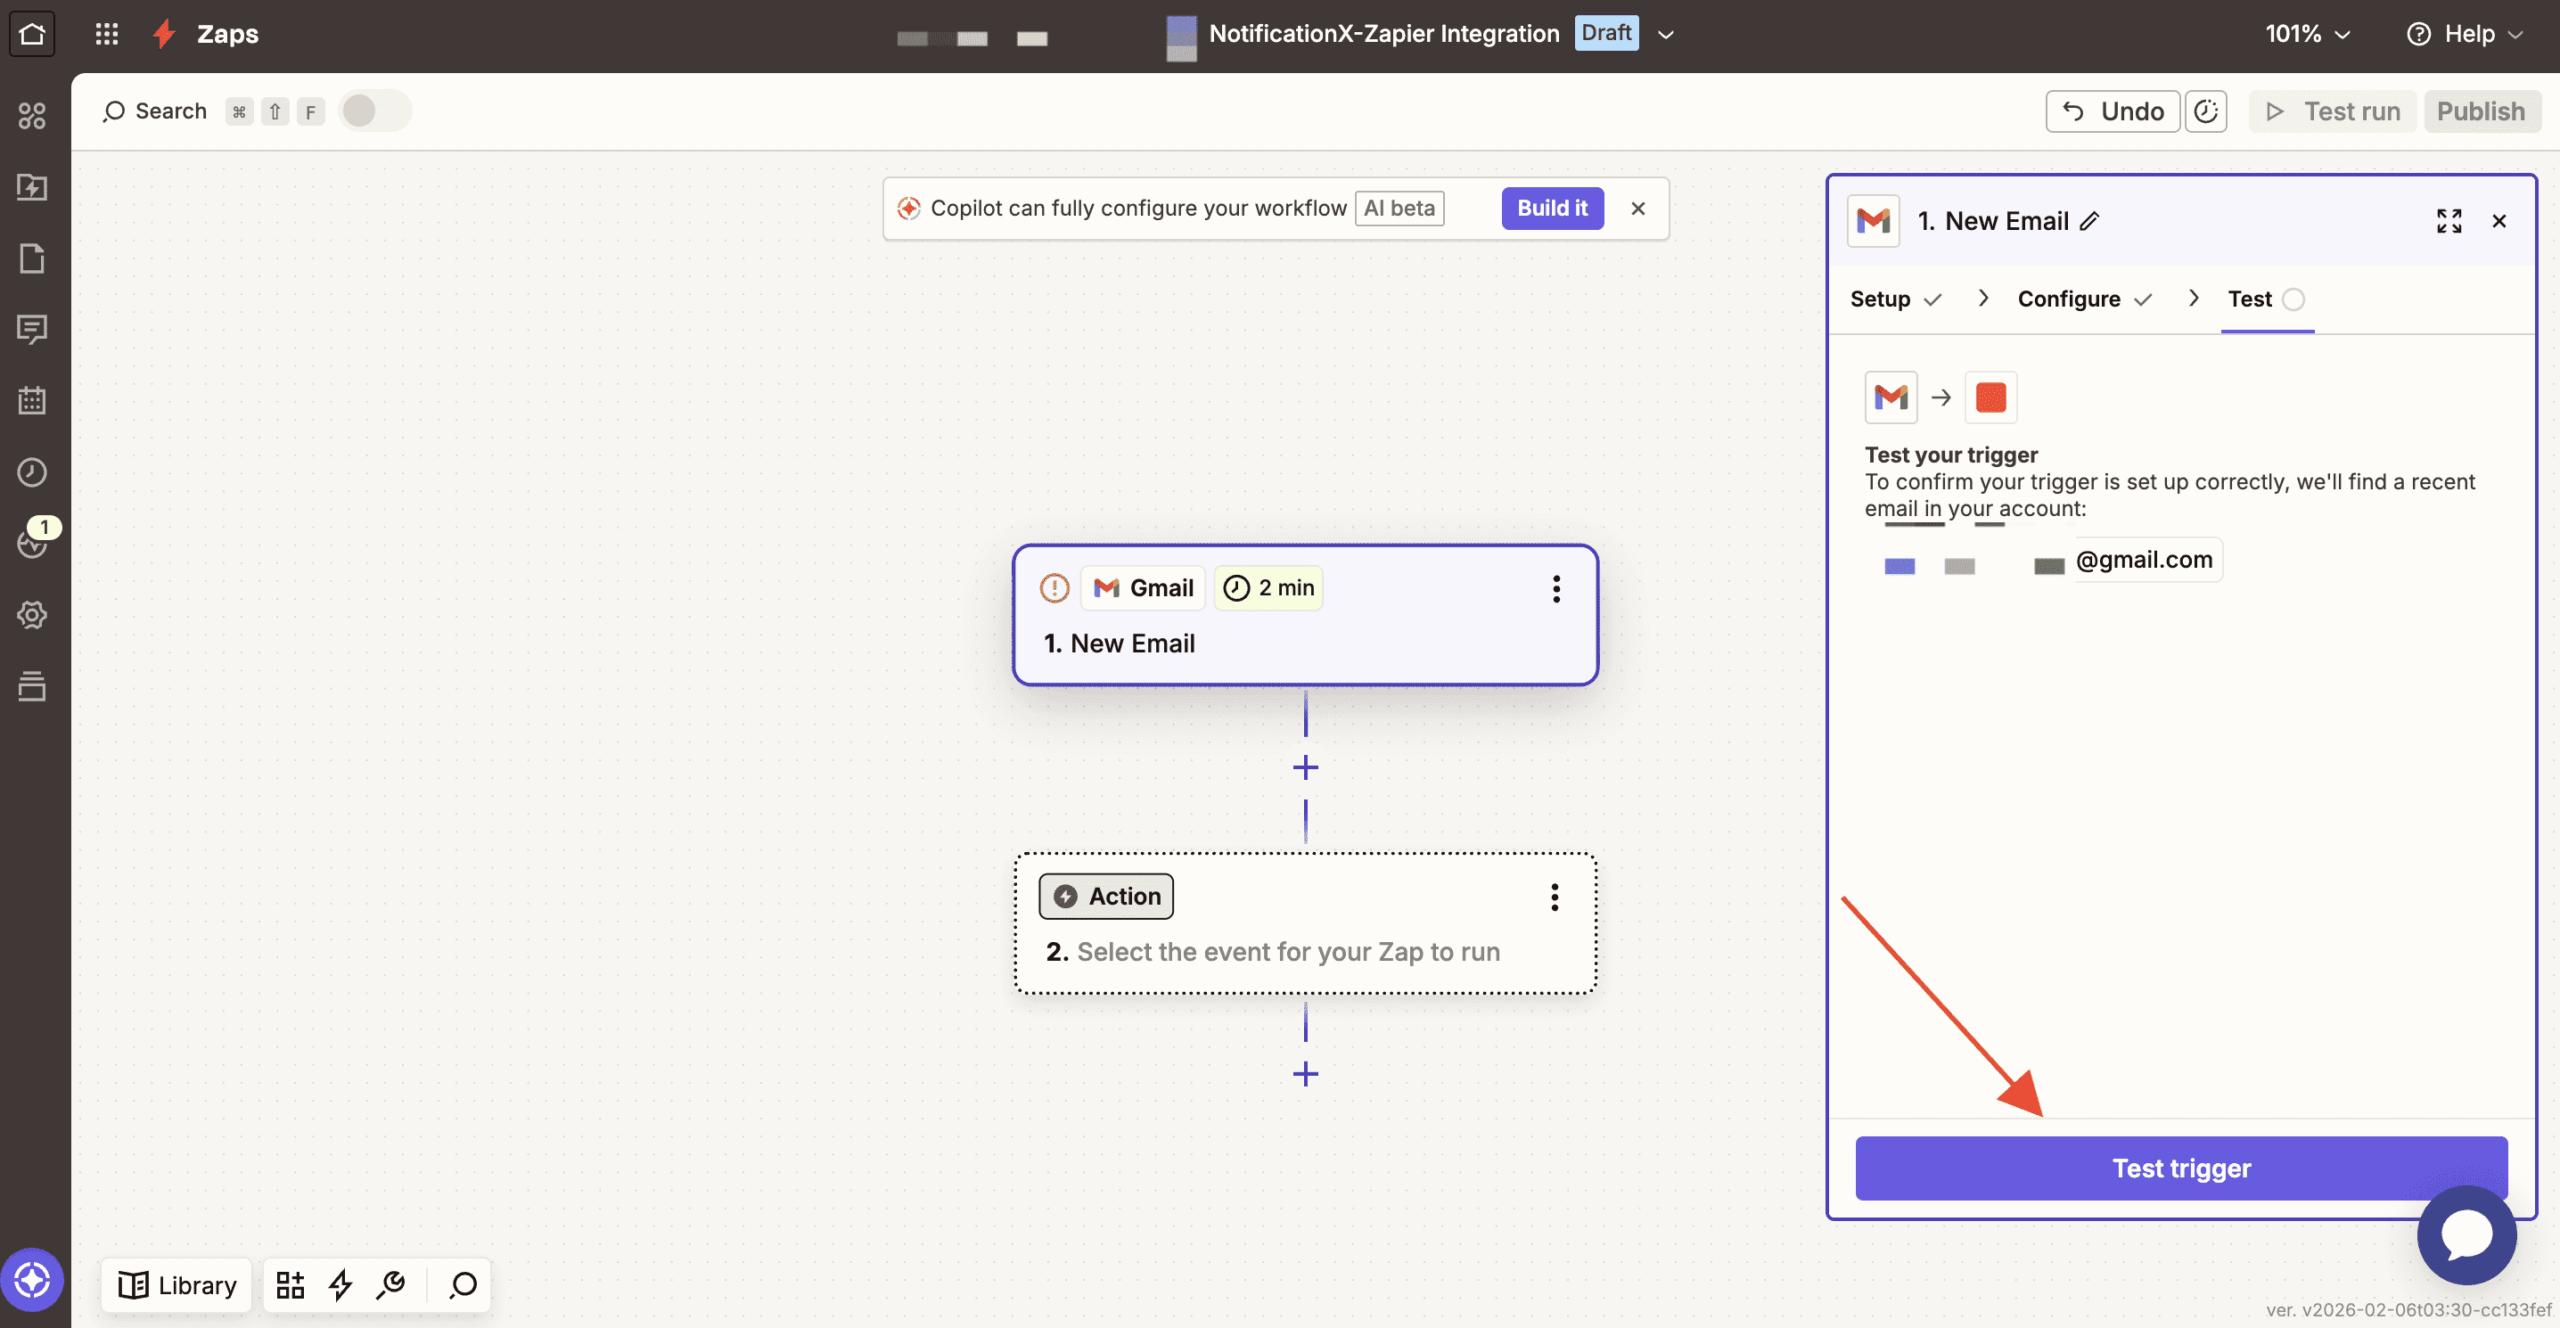
After that, from the fetched records by Zapier, you can start your testing. Click on “Continue with Selected Records” to get started.
Step 3 – Choose Action App & Action Event #
After you have successfully completed the previous step, from the action app, search for “NotificationX”. Afterward, choose‘Action Event’.
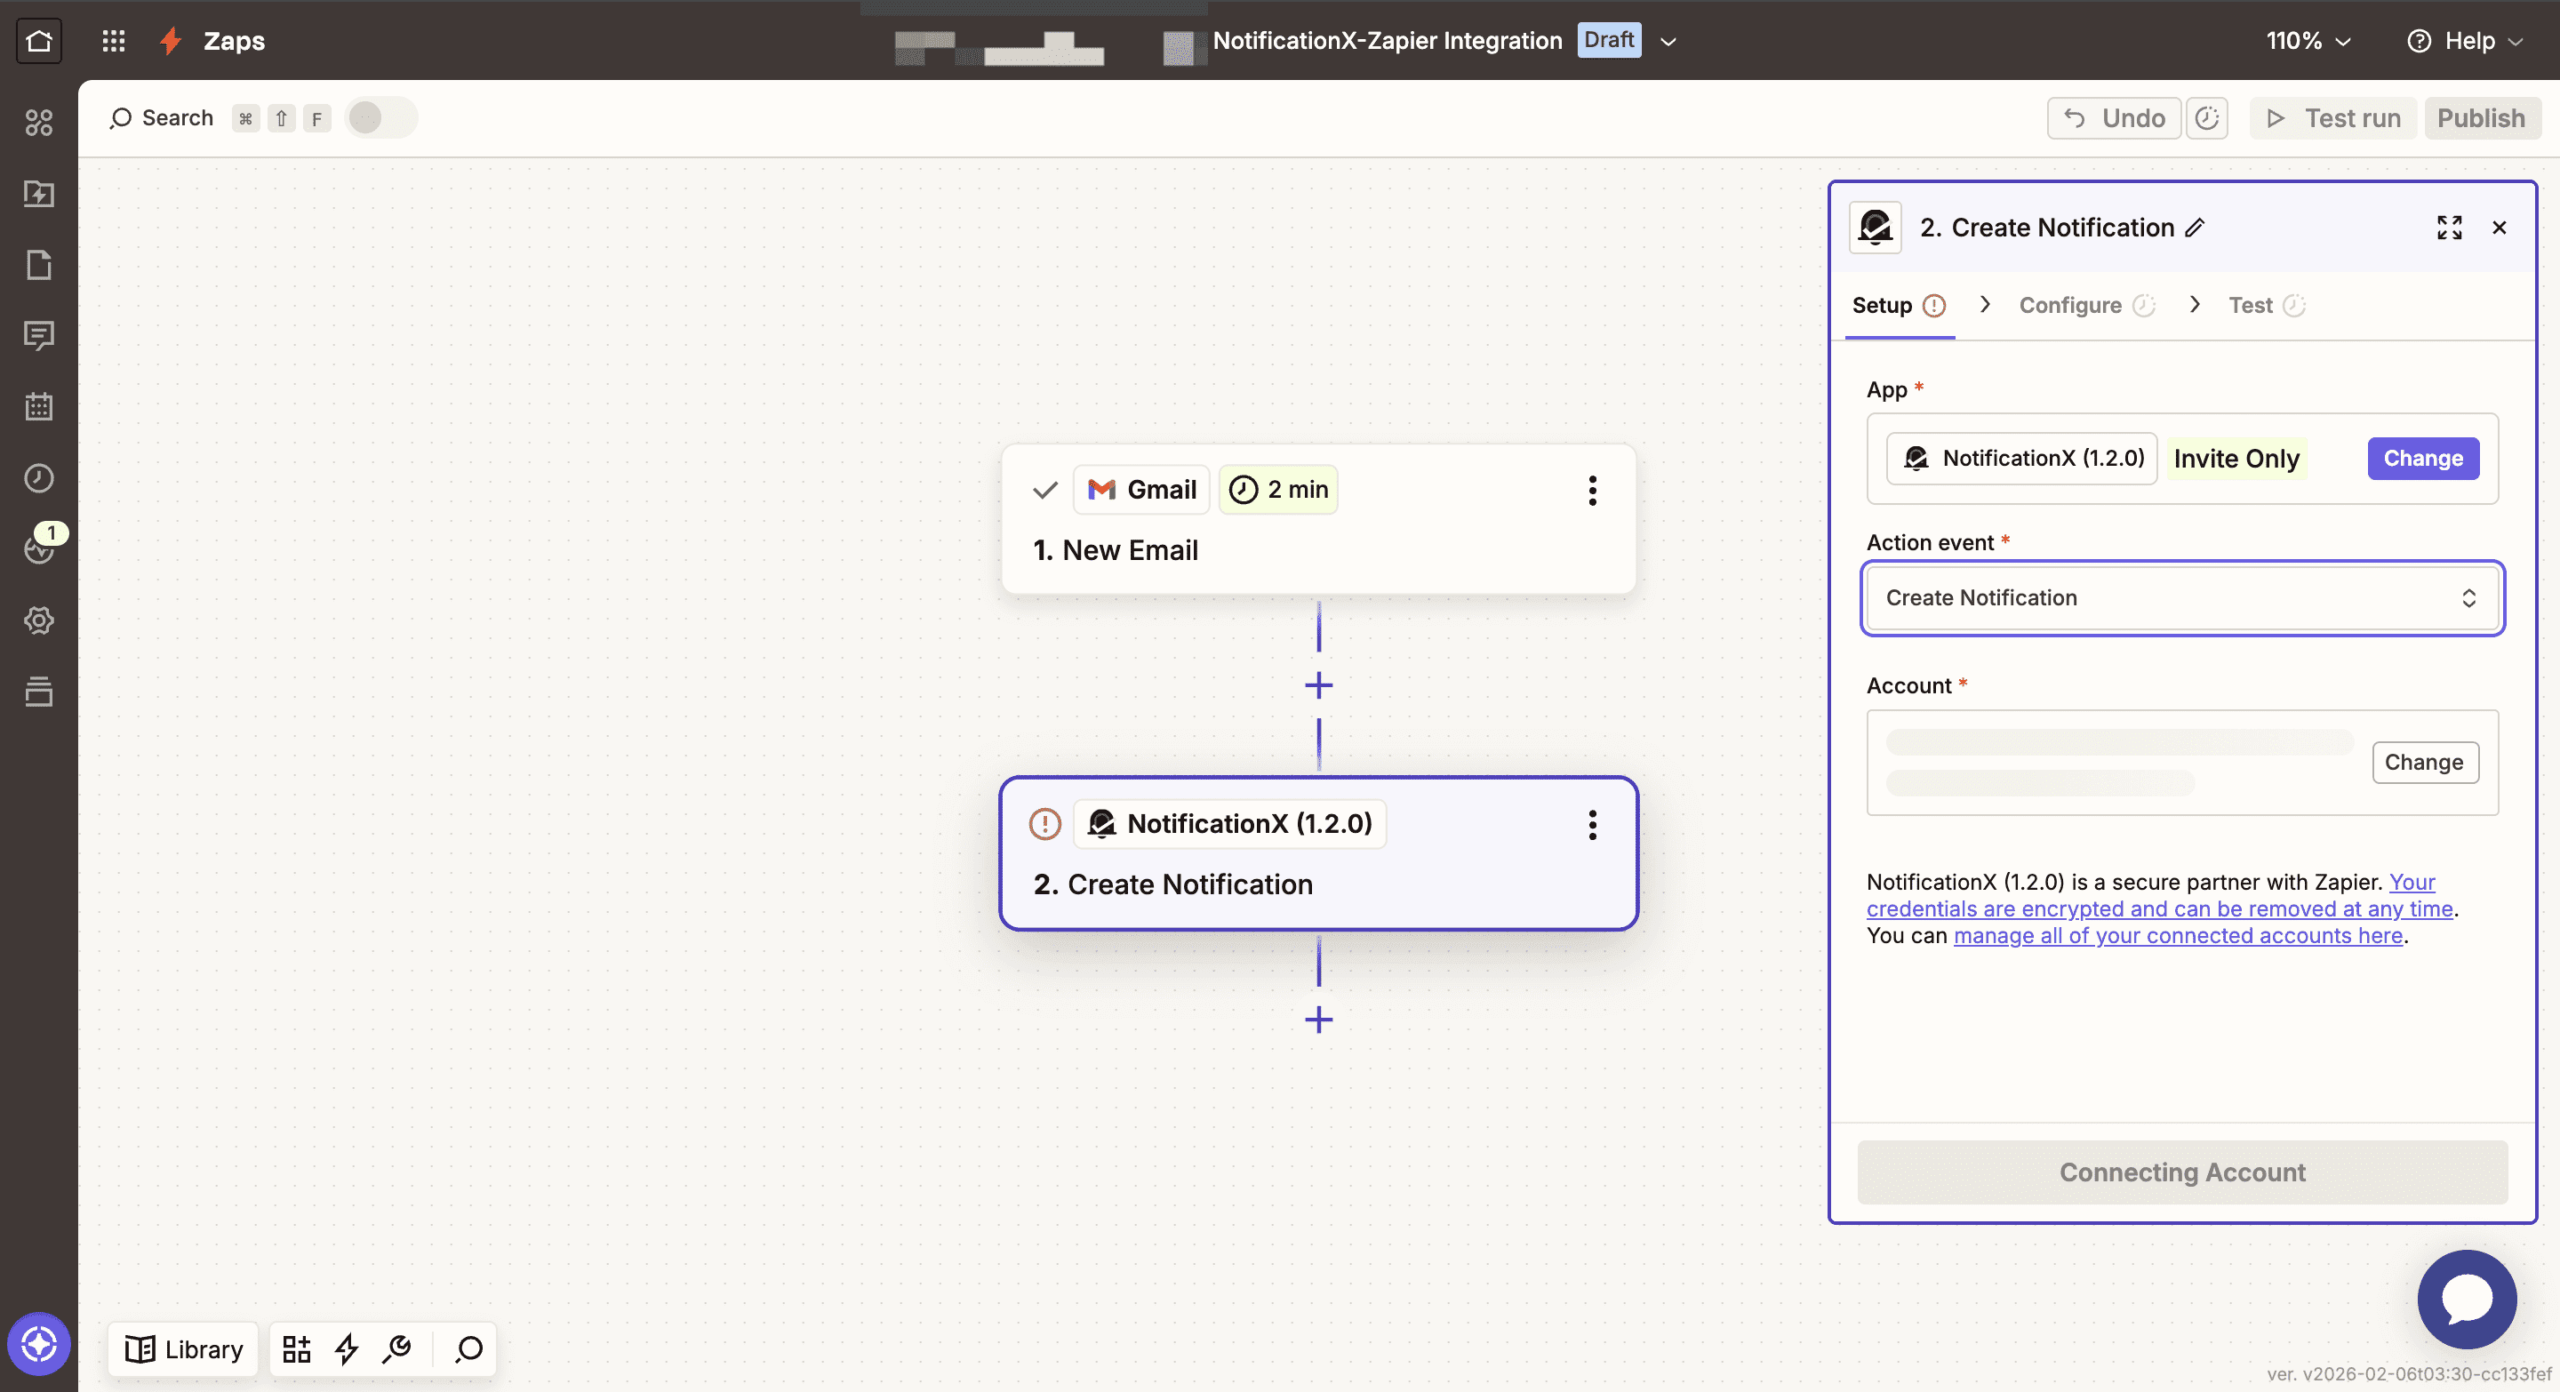
After that, connect your NotificationX account. After that, click on the “Yes, Continue to NotificationX” button. Then your account will be connected to the notification trigger. Then click on the “Continue” button.
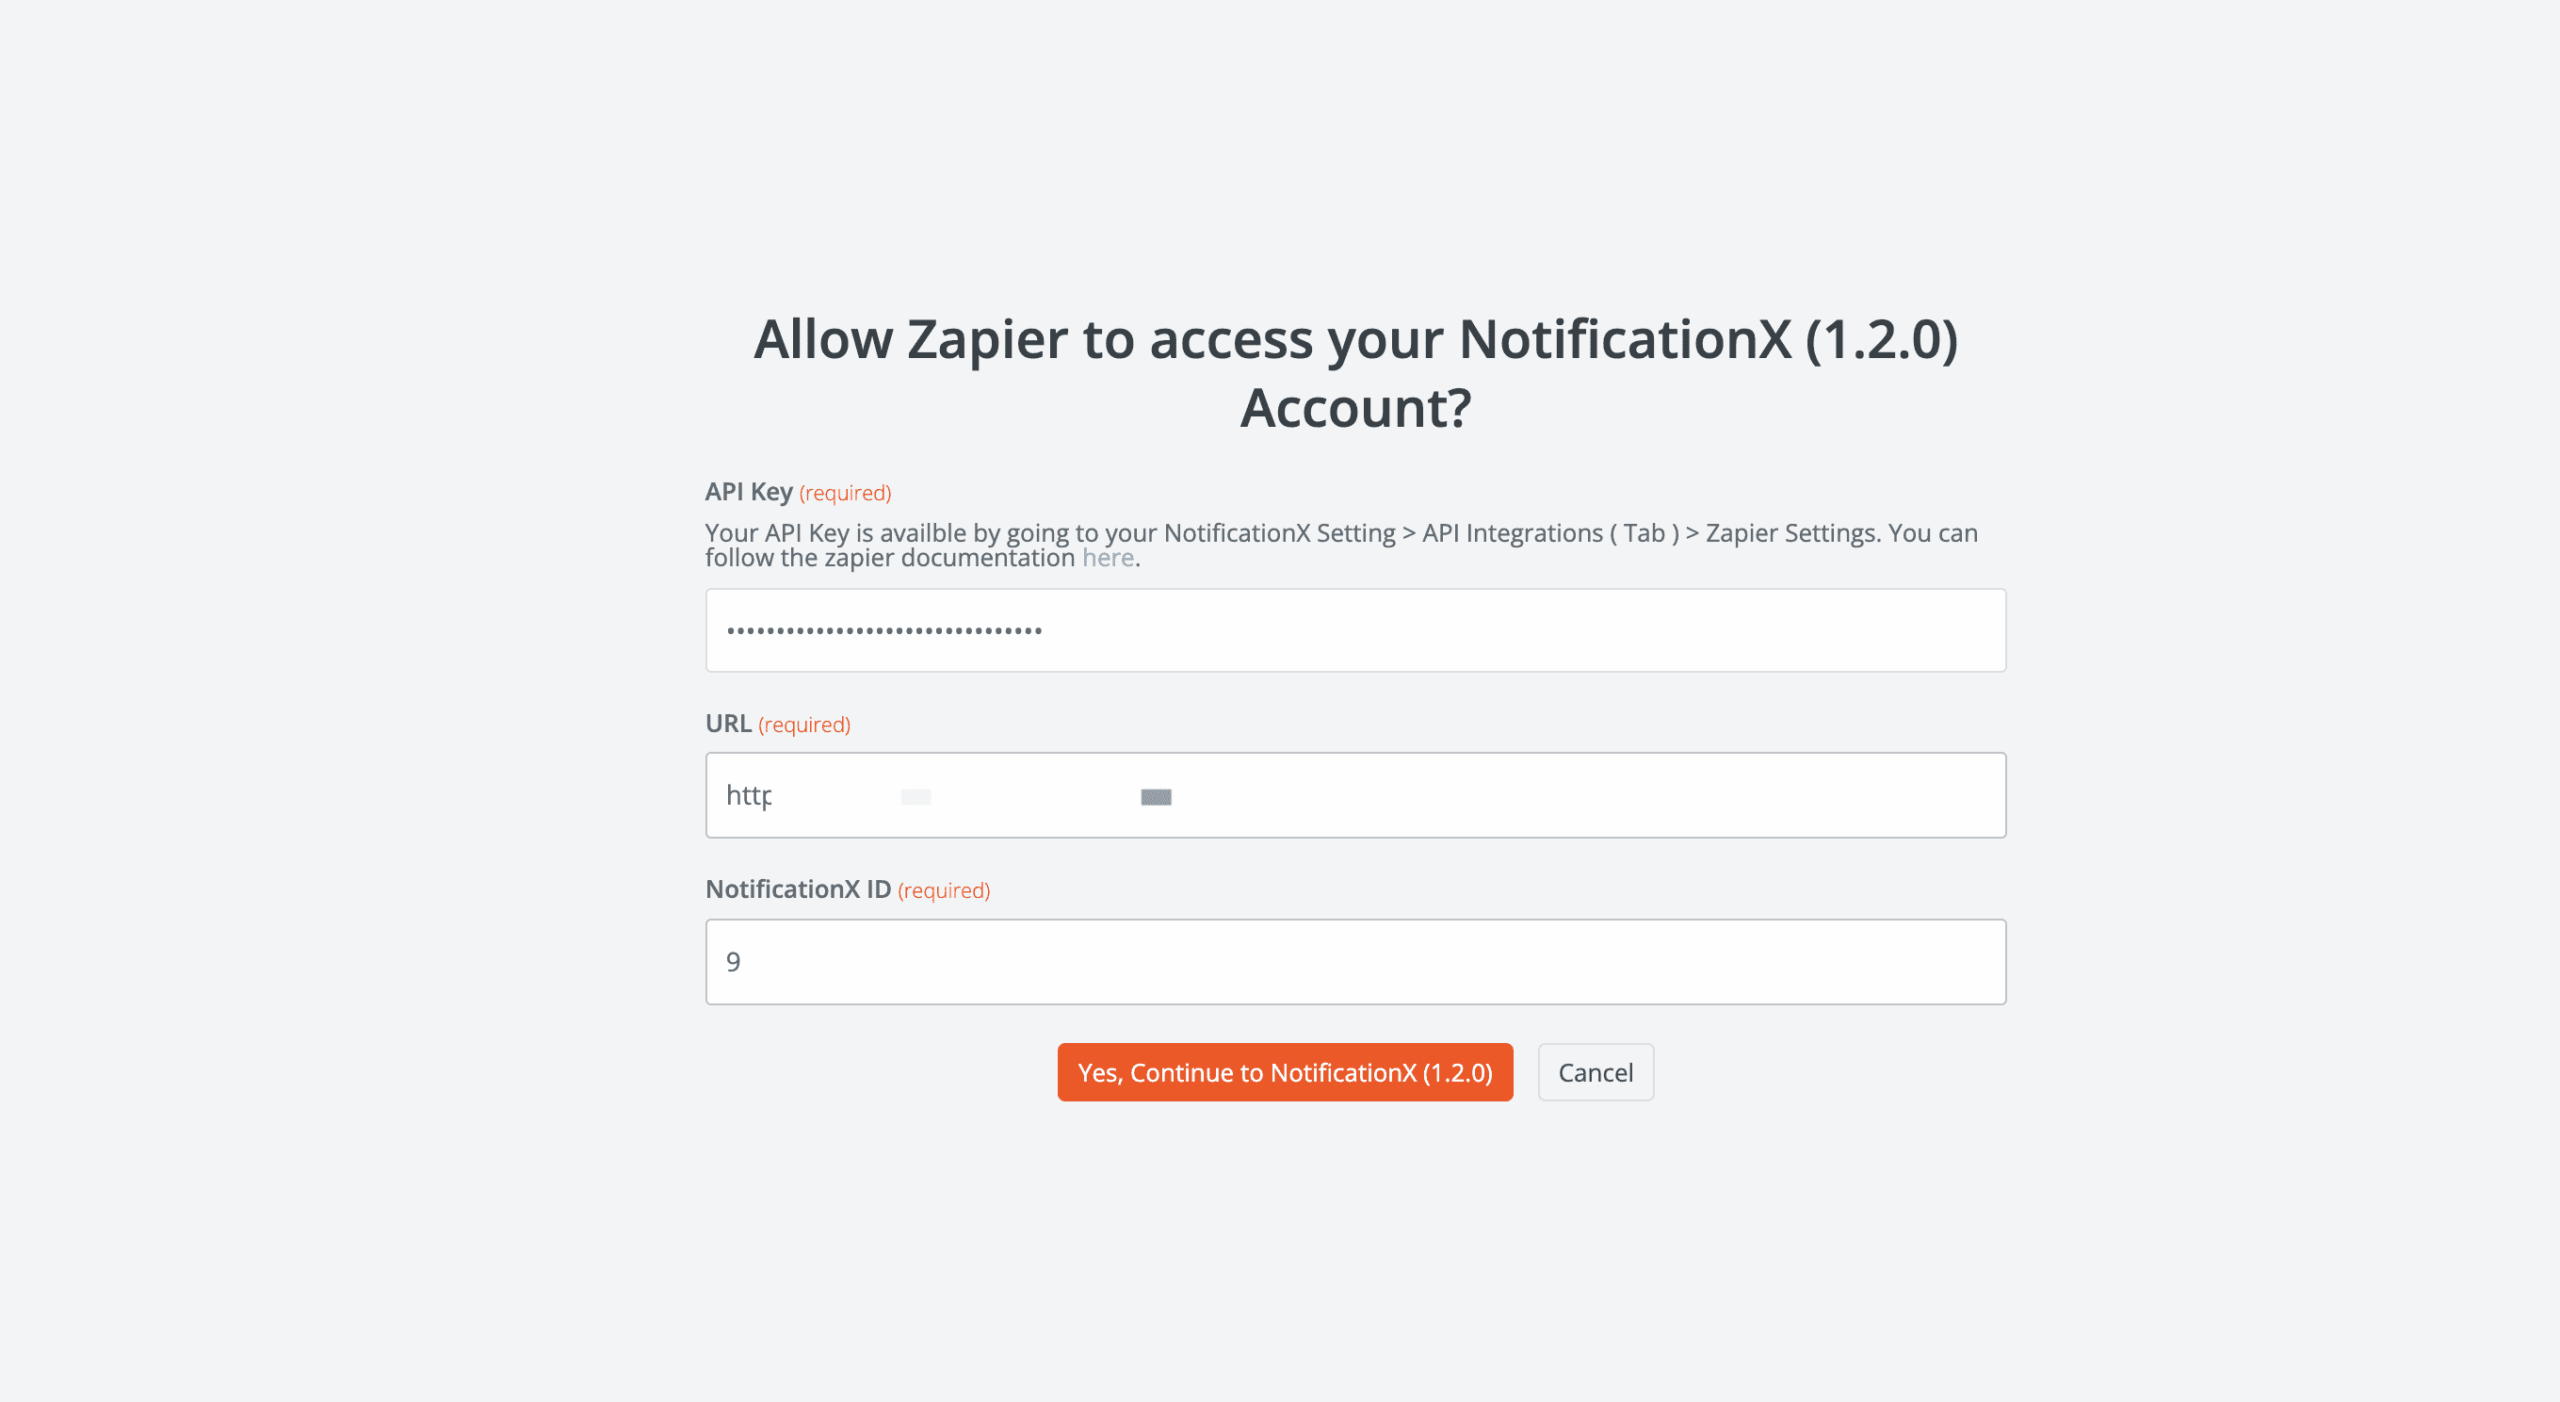
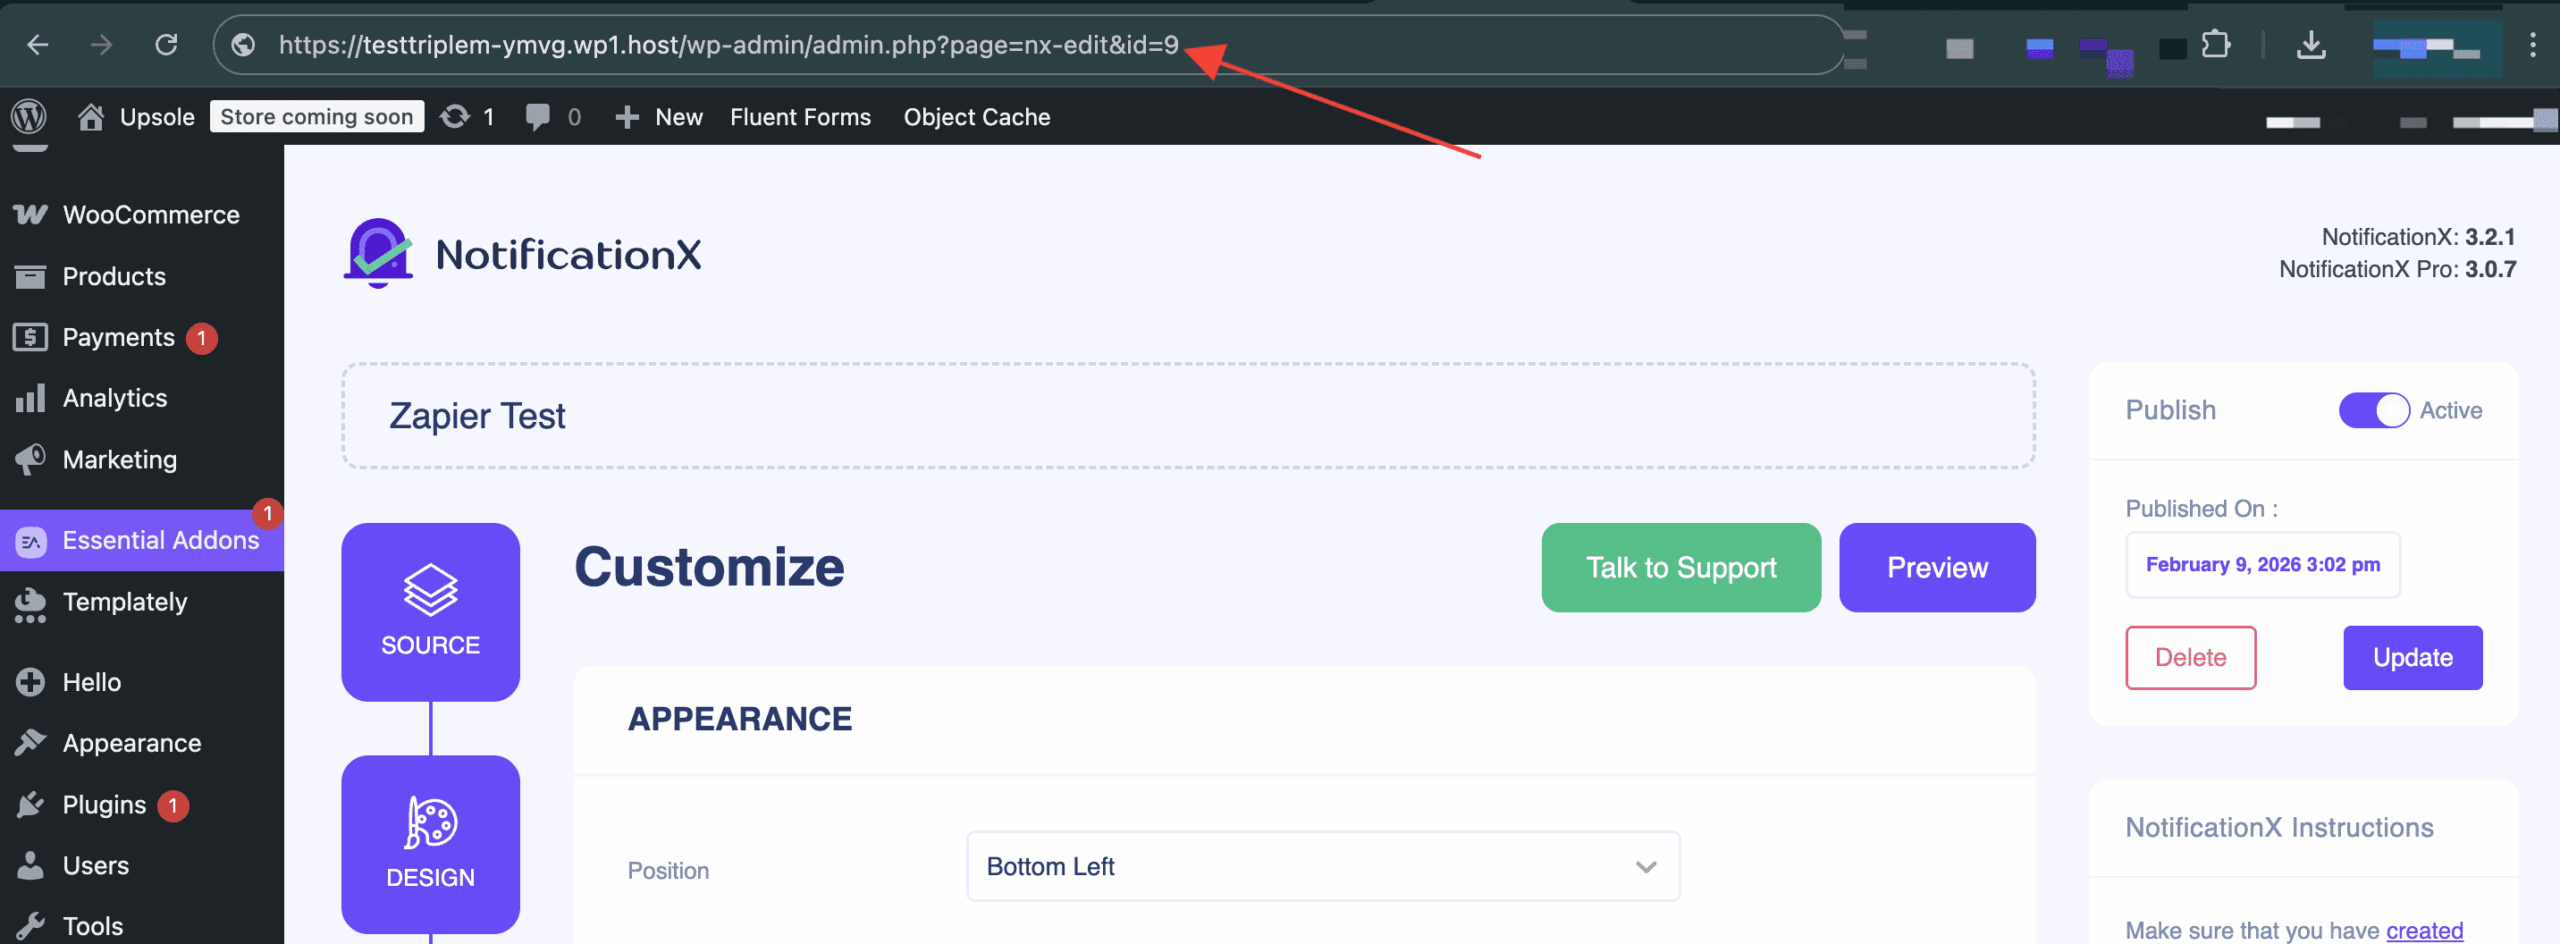
Anda boleh menemui PemberitahuanX ID dari Makluman Pemberitahuan Zapier yang anda buat sebelumnya. Untuk mendapatkannya, pergi ke: wp-admin -> Semua NotificationX -> NotificationX. Open the Zapier Notification alert and just simply check the end of the URL as you can see in the screenshot. That’s your ID NotificationX.
After that, configure the notification type. Select the specific value you want to display. Select the value and then go to the next step. There, for different types of notification you will find different options. Fill in all the fields to complete the setup.
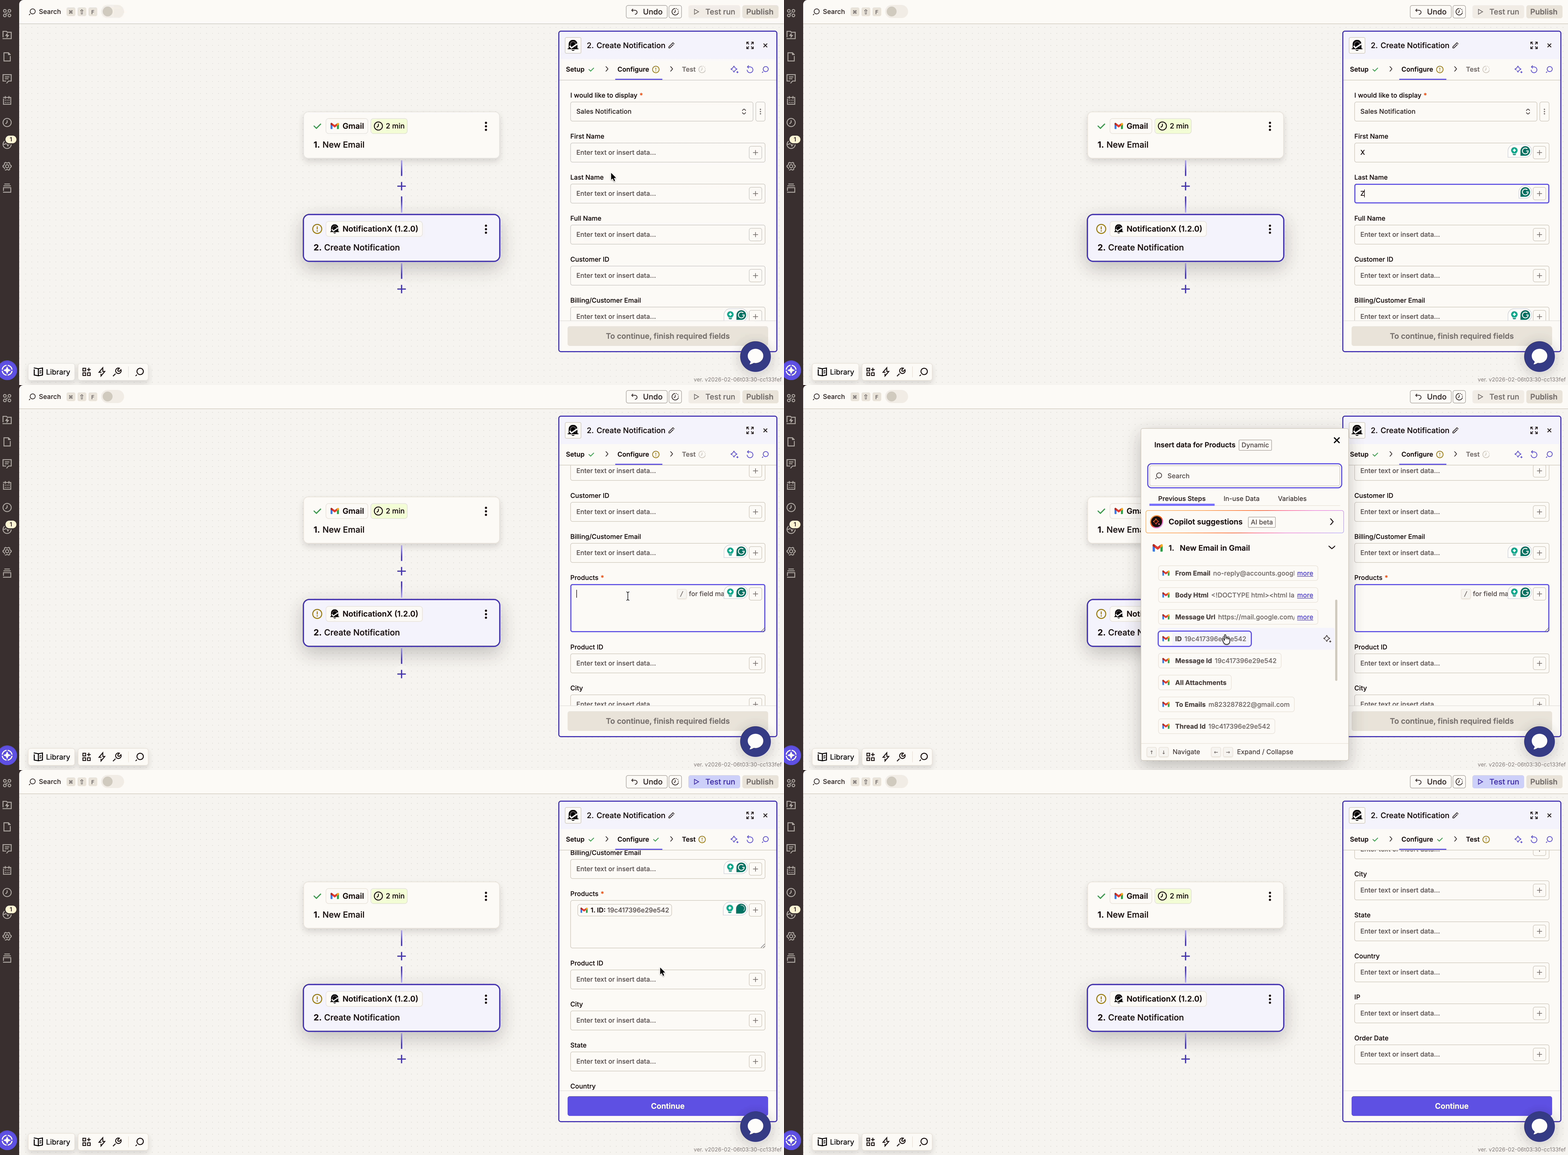
Then, from the ‘Test’ section, you can either set a test or skip this part. After skipping, click on the “Publish” button to make the notification LIVE on your website.
After you have completed all the steps mentioned above, go to your website and you will find the Makluman Pemberitahuan Zapier muncul seperti ini:
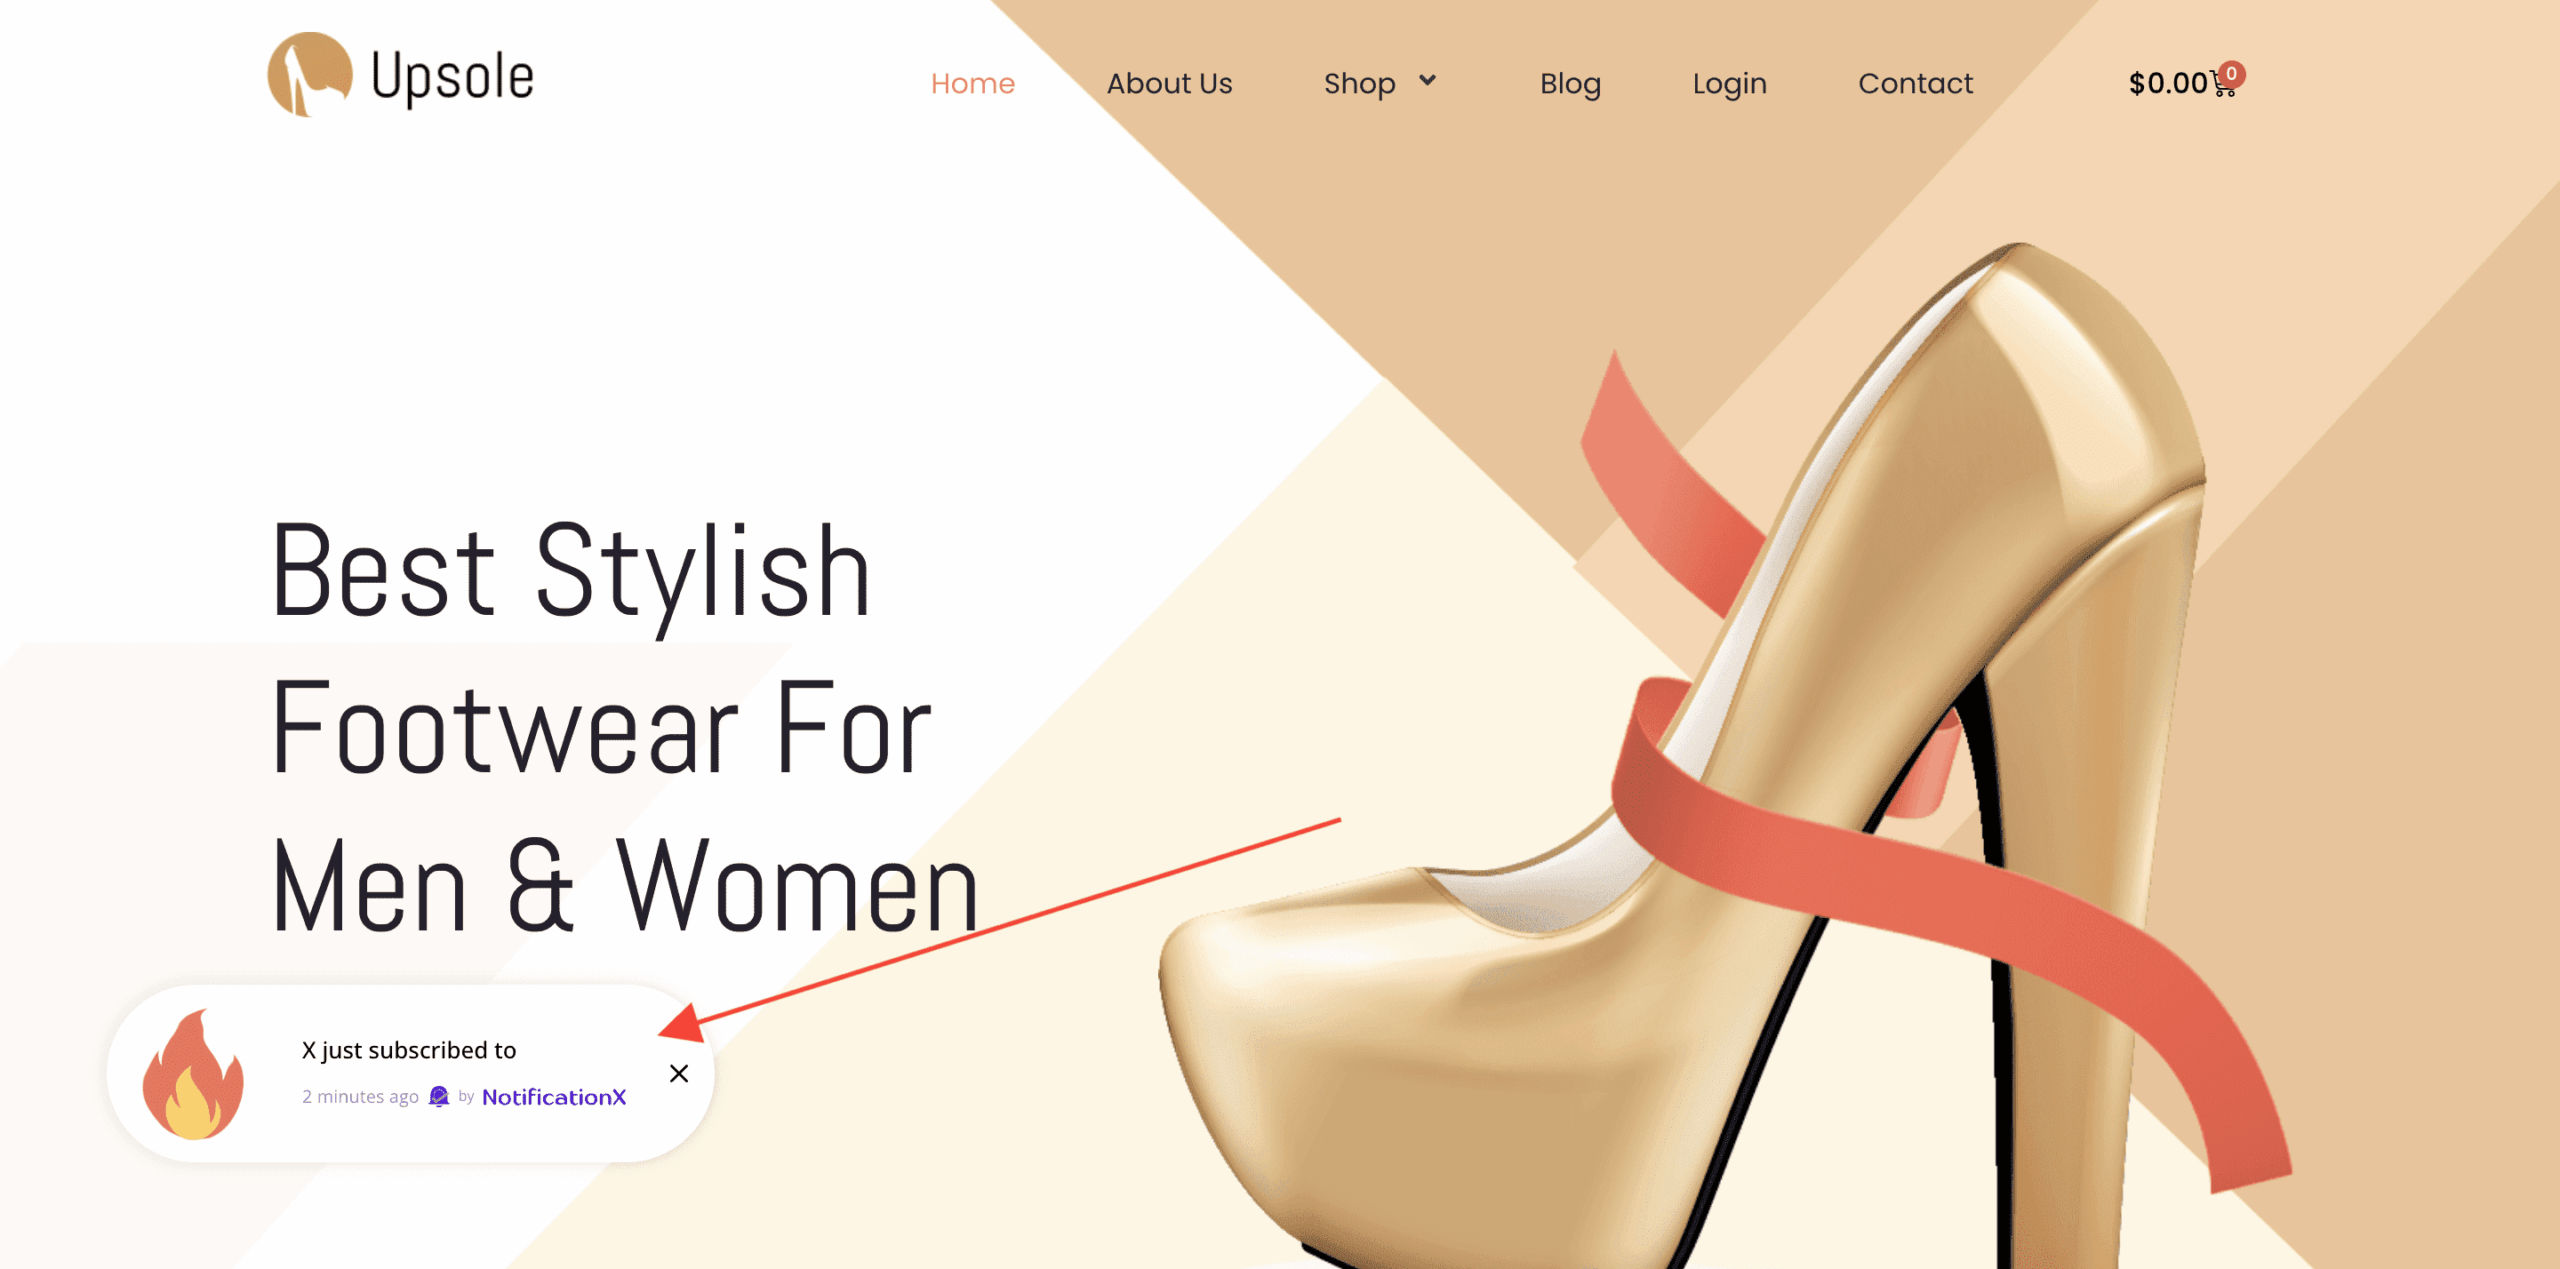
By using NotificationX, this is how you can easily design and display an amazing Pop timbul Pemberitahuan Zapier di laman web WordPress anda & kembangkan pangkalan pengguna anda.
Sekiranya anda menghadapi sebarang masalah, anda boleh menghubungi Pasukan Sokongan kami di sini.


 English
  Arabic
  Indonesian
  Spanish
  Bengali
  Portuguese
  German
  Dutch
Dutch  Russian
  Hindi
Hindi  French
  Japanese
  Chinese
  Vietnamese
  Malay
Malay