Are you facing difficulties increasing your form subscription rate on your website? Worry no more because from now on, you can easily boost your subscription conversion rates with the NotificationX form subscription alerts feature. And with this blog, we will tell you how you can integrate this amazing feature into WordPress and showcase attention-grabbing alerts on your site in just a few clicks. So, without further ado, let’s dive in and find out how.
🔍 Why Should You Use NotificationX Form Submission Alerts On Your Website?
Having qualified leads can help firms expand their market and grow their follower base or subscriber count. In addition, you can easily boost your revenue with targeted marketing campaigns once you have successfully converted your leads to converted customers. So, when website visitors subscribe to email lists or blog pages, they play a key role in driving leads and sales. Thus, form submission is an important aspect of generating more leads and boosting conversions for businesses.
However, for marketers, it is not that easy to generate leads in today’s competitive market. You will find a lot of different methods being used on different websites to increase the form submission rate. Even so, if you cannot connect with your visitors properly, these methods are not enough to generate and collect leads in the majority of these cases.
To fuel up your lead generation methods, the best FOMO marketing plugin, NotificationX comes with a powerful form subscription alert feature. This feature will help you effortlessly display real-time form submissions taking place on your site with stunning notification popup alerts. But not just that, it can be the perfect solution to influence your visitors to submit their contact forms by using the FOMO marketing technique to engage visitors instantly.

When visitors find all the other website visitors and customers subscribing to your website, it will trigger fear of missing out resulting in a boost in your submission rate. But not just that, it can also help to solidify the credibility of your business and add much-needed social proof. So, you can have more leads and maximize your profits from marketing campaigns using this exclusive feature from NotificationX.
💡 Guide: How To Create Elementor Form Submission Alerts In NotificationX
Once you have the Elementor Form Submissions feature activated on your website, you can easily showcase submission alerts to your visitors with help of the NotificationX plugin. This ultimate FOMO marketing plugin comes with all the amazing features that you need to create urgency among your visitors.
Along with many outstanding free features, NotificationX comes with some exclusive premium features that you can use to boost your marketing goals. As the Elementor form submission alert is a premium feature, you need to install & activate NotificationX PRO plugin on your website to follow this tutorial.
Get Started With NotificationX Pro
Step 1: Add New Notification Alert In NotificationX
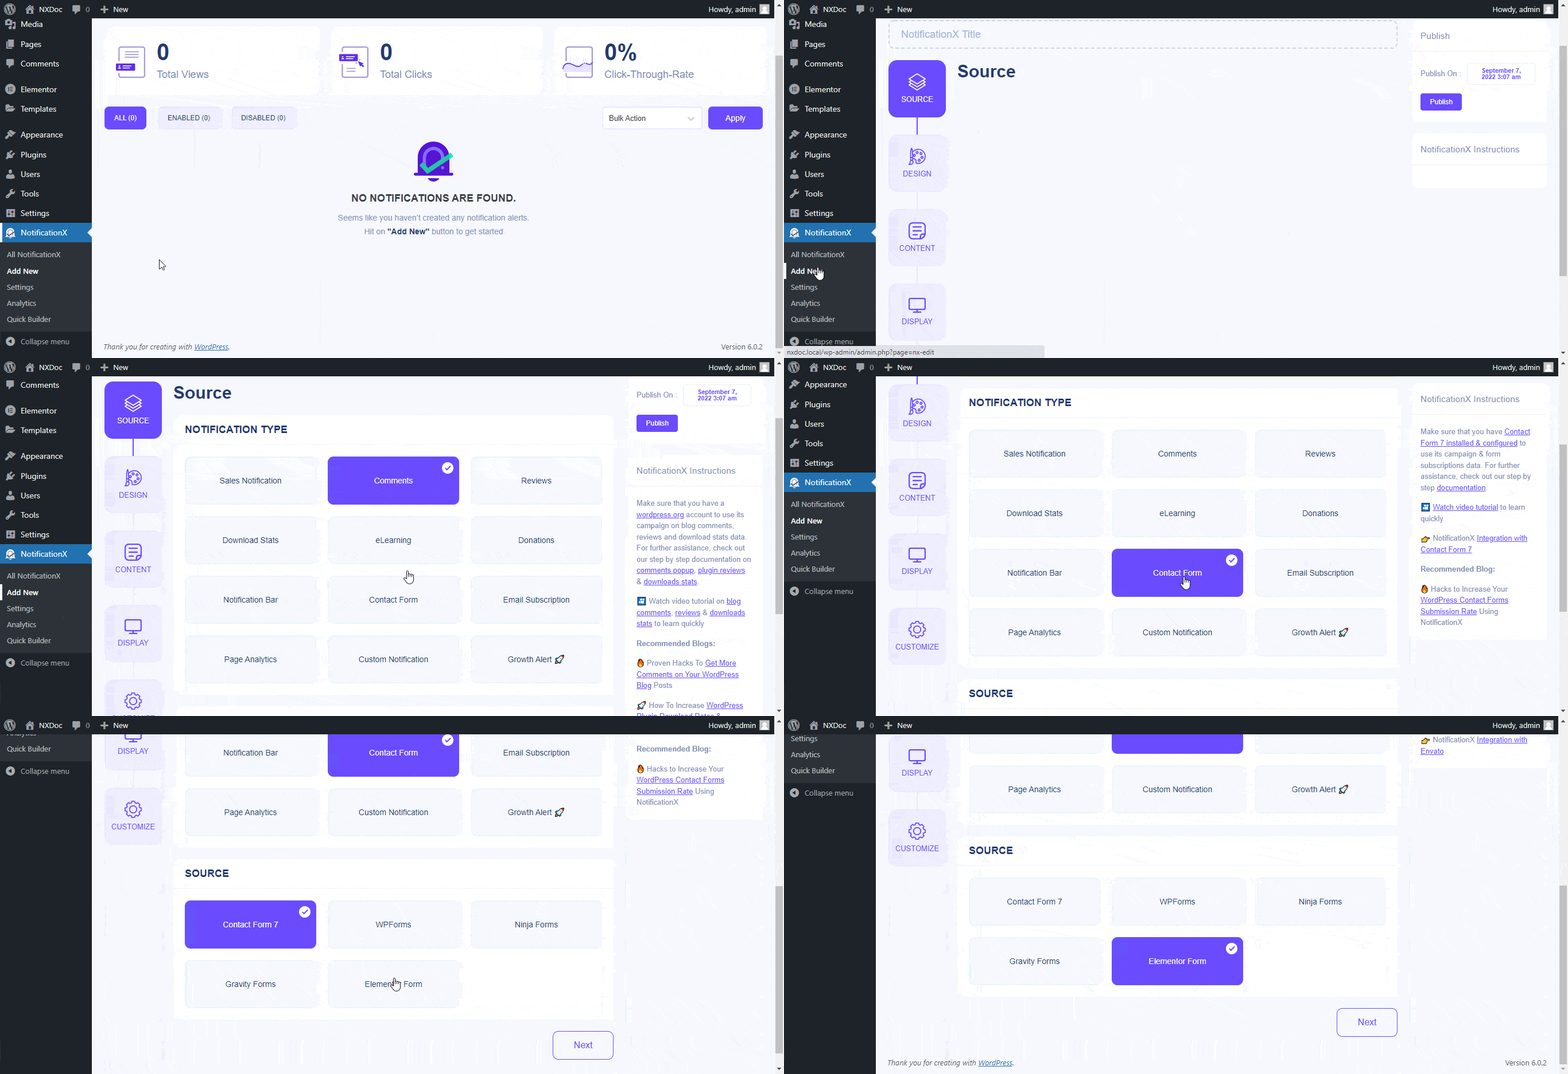
First of all, you need to create a new notifications alert in NotificaionX to showcase your Elementor form subscription alert on your website. Therefore, from your WordPress dashboard go to Notificationx and then navigate to the ‘Add New’ tab. Now, choose ‘Contact Form’ from the ‘Source Tab’ as your notification type and select the ‘Elementor Form’ as your source.
Step 2: Choose Notification Alert Theme & Design
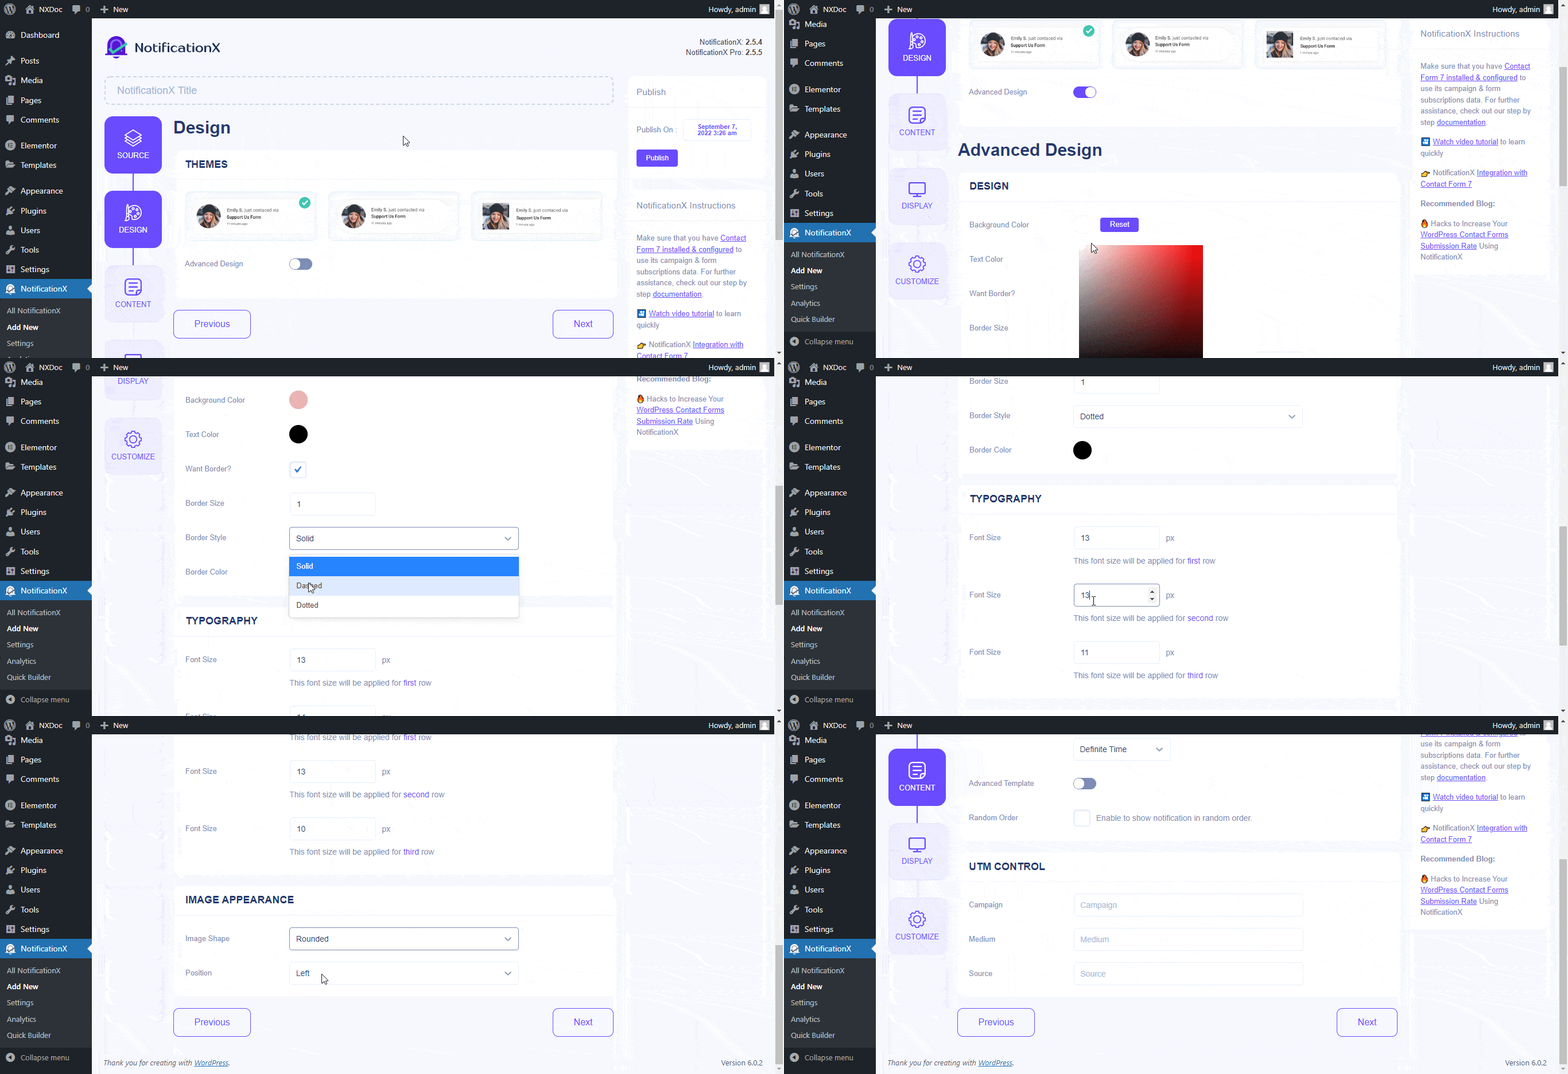
Now, go to the ‘Design’ tab and choose the theme for the Elementor form subscription alert as you like. Then, enable the ‘Advanced Design’ option to add more customization to your theme if needed. From there, you can personalize the Background and Text Color just the way you want.
You can also make endless border customization from there along with your typography of the notification alert. Choose your favorite font size and image appearance from there. Feel free to make the changes that suit your brand style and make the notification alerts truly stand out to your website visitors.
Step 3: Customize The Notification Alert Content
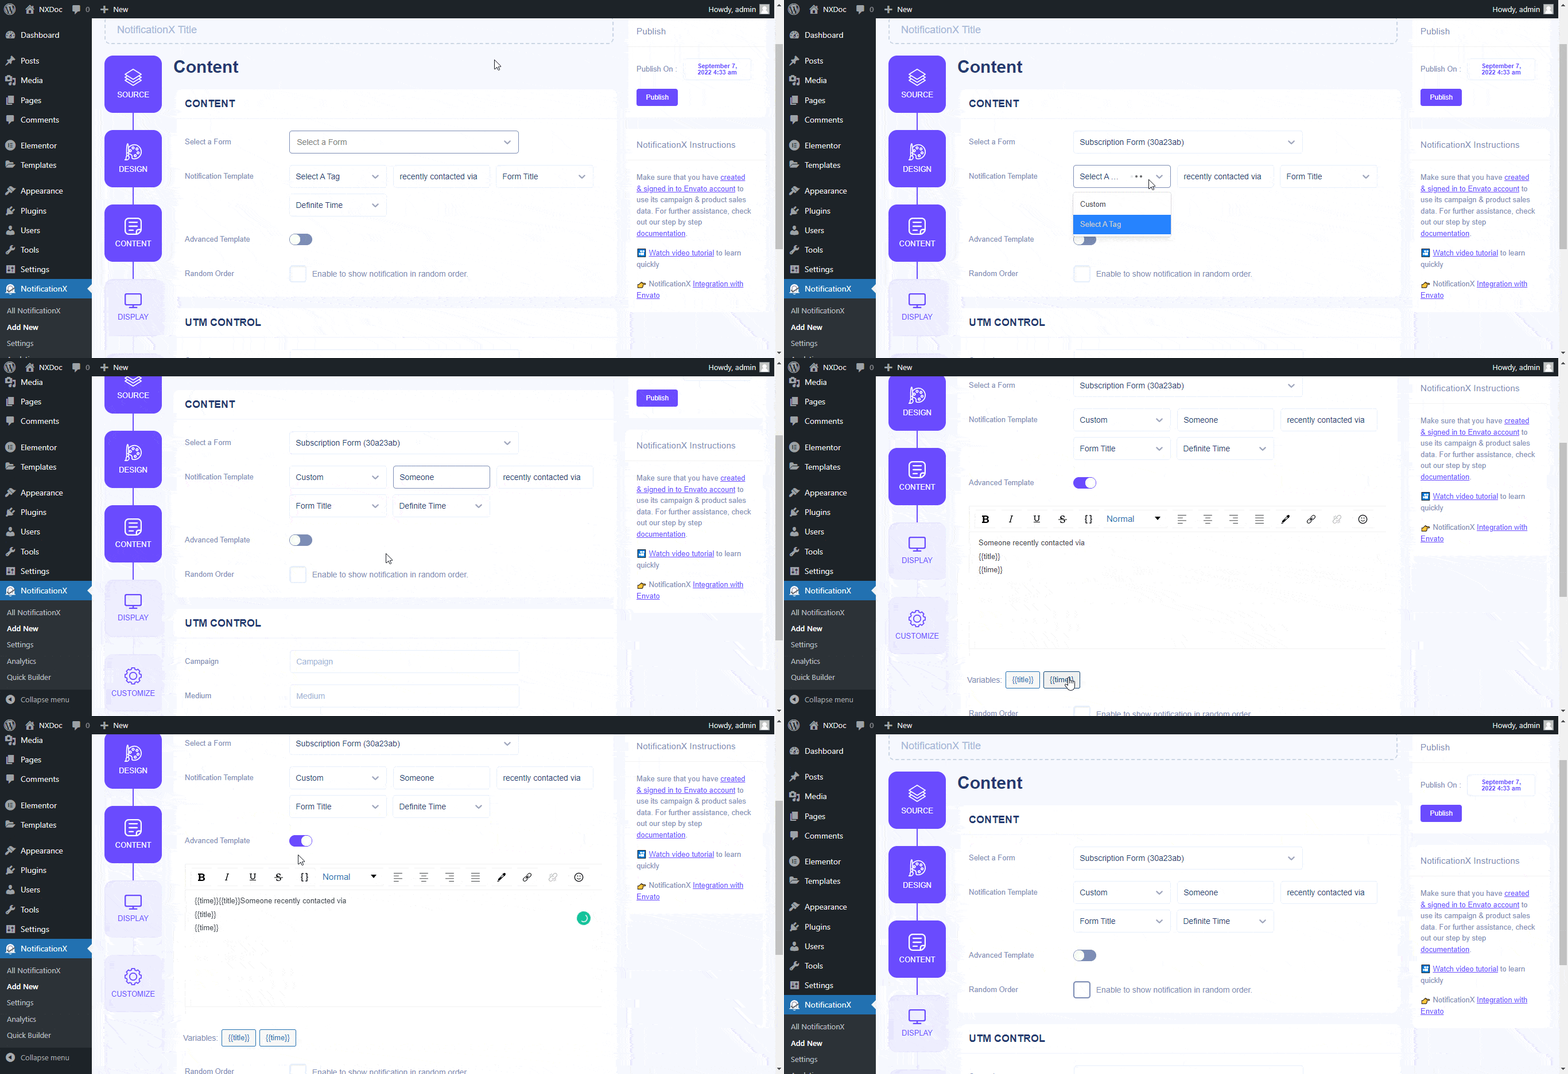
Afterward, navigate to the ‘Content’ tab to customize the template of your Elementor form subscription alert with content that can easily grab attention. Make changes as you wish to showcase the notification alert and enable the ‘Advanced Template’ option to manually add different attributes for the form notifications.
You can also activate the Random Order option which will display all submission alerts in random order, further helping to boost engagement. Your visitors will be able to see the different submission times which will increase your credibility and generate stronger social proof.
Step 4: Personalize The Notification Alert Appearance
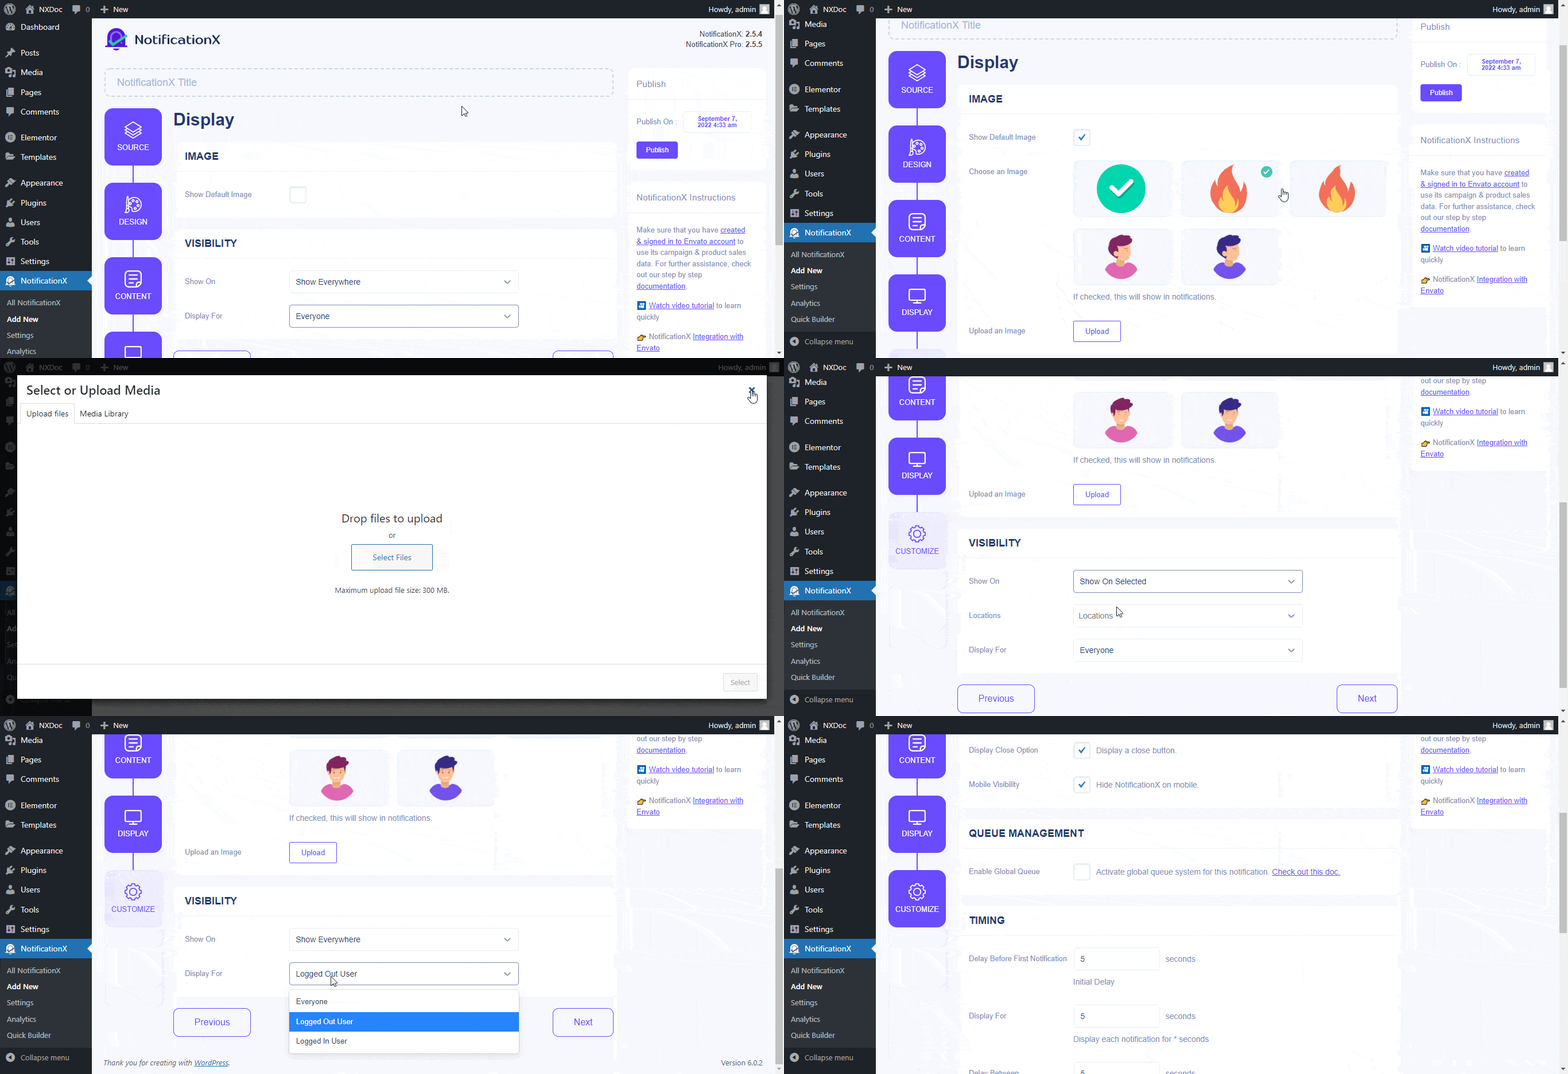
Once you have adjusted the content now is the time for customizing the appearance of the Elementor form subscription alert. Go to the ‘Display’ tab, and choose a default image for showcasing on the notification alert. If you want, you can also upload a custom-built image that you want to display on the form notifications alert instead of default, ready images from there to heighten trustworthiness.
In addition, from there, you can control the visibility of the Elementor form subscription alert and showcase it to your targeted users. This feature will help you to stop showing alerts for the people who already submitted their forms or already logged in to your website.
Step 5: Set The Notification Alert Settings
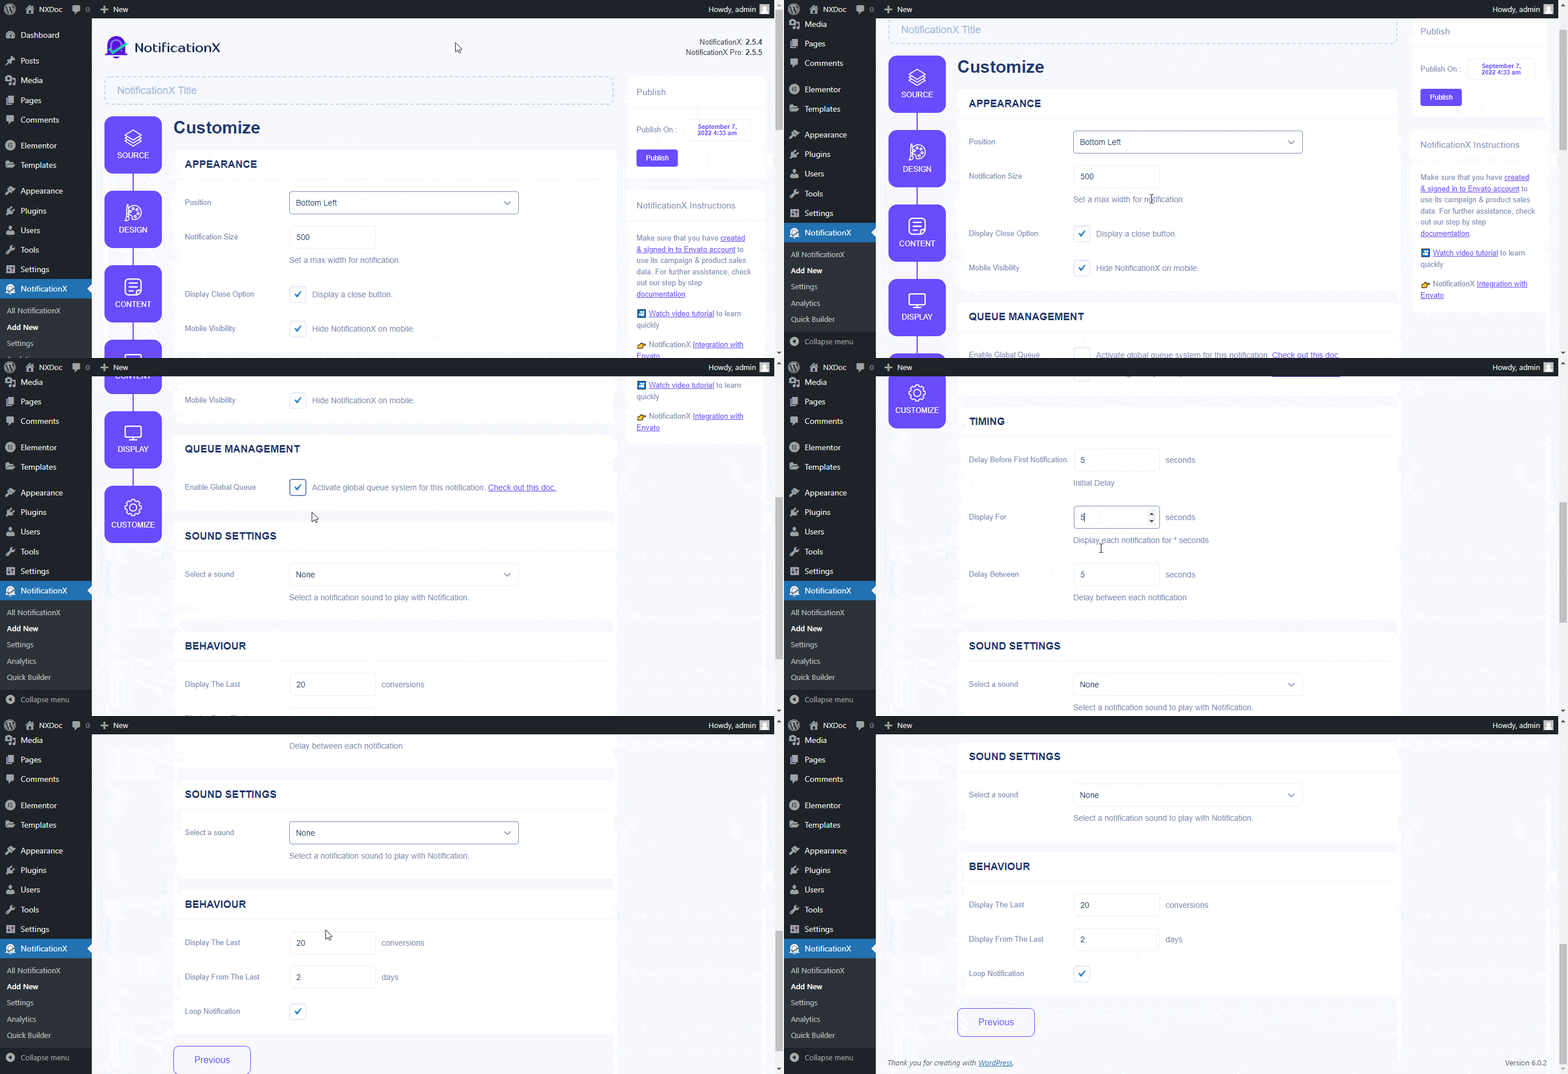
Now, we are at the final step of adding the Elementor form subscription alert. Go to the ‘Customize’ tab and set the notification alert settings. You can find endless controlling options there for your Elementor form subscription alert. From the ‘Appearance’ option you can choose the position, size, etc. of the notification alert with ease.
Besides, from the ‘Timing’, and ‘Sound Settings’ option you will find all the settings for adjusting the alerting time and sound for form submission notifications as you want. If you want to adjust notifications behavior, you can also do it from there. That’s it, if you have followed us correctly you have successfully created an Elementor form subscription alert on your website. Check out this documentation for more details.
Final Outcome: Display Engaging Notifications For All Form Submission Alerts
Now, all you need to do is click on the ‘Publish’ button to make it live on your website for showcasing the Elementor form subscription alerts to your visitors. Here is how the alert will pop up on your website:

Time To Boost Your Submission Rate With NotificationX
From the marketing perspective generating leads is extremely important for any business to achieve its marketing goals. Using the NotificationX plugin, you can easily increase your form submission rate with the new Elementor form subscription alert feature. Try out this feature now and let us know how much difference you have made with form submission notification on our Facebook Community.
Have you found this blog useful? If you do, then please subscribe to our blog for more useful tips, tutorials, updates, and more. Don’t hesitate to contact our dedicated support team if you face any issues while creating the Elementor form subscription alert.


