Halloween is approaching! Whether running a spooky sale, hosting a Halloween event, or simply getting into the festive spirit, a countdown timer adds a sense of urgency that can boost engagement and drive action. There is no better way to build excitement than with a countdown timer on your website. Are you looking for easy ways to set up a countdown timer on WordPress websites? In this blog, we will walk you through three easy ways to set up a Halloween countdown timer on your WordPress site. This guide will help you create a thrilling and timely experience for your visitors.

Benefits of Using Countdown Timer on WordPress Websites
Countdown timers are powerful elements for marketing campaigns, designed to boost engagement and drive revenue quickly. Creating a sense of urgency encourages visitors to take action, helping to turn prospects into paying customers. Here are four key reasons why adding countdown timers is important, along with their effectiveness:
Creates a Sense of Urgency
Countdown timers create a sense of urgency by visually showing that time is running out. It is most applicable in eCommerce and promotions since it forces prospective buyers to make decisions faster. Using ‘time-sensitive’ benefits is very effective since people have a natural tendency to want to grab the deal before the offer expires.
Boosts Engagement and Focus
Countdown timers are attention-grabbers and help encourage the visitors to look at the offer or event being promoted. The visual count-down attracts attention to the timer thus keeping users inclined to the message. Whether the message is about creating awareness or making a sale, countdown timers help complete the desired action.
Increases Conversion Rates
By showing a deadline, countdown times also eliminate doubts and motivate the visitors to take the particular action at the particular time mentioned in the countdown timers. With the use of the countdown, the sale’s sense of urgency makes it effective for flash sales, product launches, and discounts; the tendency for carts to be abandoned is eliminated.
Improves Time Management and Event Planning
Countdown timers on websites work best for events, sales, or product launches that need to be constantly reminded to the visitors. They also state time which makes it easier for people to get involved in the event and also avoid missing it. It results to increased attendance and or active participation during events such as webinars, sales events or product release events.
Countdown timers work as psychological triggers that effectively encourage prompt action, making them powerful tools for boosting engagement, sales, and participation in events.
Use Cases of Countdown Timers on Websites
Before diving into the tutorial on how to add a countdown timer on WordPress websites, let us explore some of the top use cases for an evergreen countdown timer and how it can enhance your marketing strategy.
#1 Countdown Timer on WordPress Event Pages

Event Pages showcase special occasions and provide essential details. By incorporating a countdown timer, you inform visitors of the event’s schedule and remaining time until it begins. This approach effectively communicates the date and time while encouraging sign-ups.
#2 Countdown Timer on WordPress Announcement Pages

Countdown timers are common on announcement pages for product launches, sports events, and other news. These timers build anticipation among visitors and can increase conversion rates. When combined with compelling copy, they can significantly boost sales and help achieve marketing goals. For product launches or event openings, a countdown timer can be an effective tool to drive conversions.
#3 Countdown Timer On WordPress Deal Page

Deal pages are crucial for boosting sales during special occasions. They should clearly explain your offers to customers. Adding a countdown timer to these pages creates a sense of urgency, potentially increasing conversion rates by encouraging visitors to act quickly on limited-time deals.
#4 Countdown Timer in Popup Window
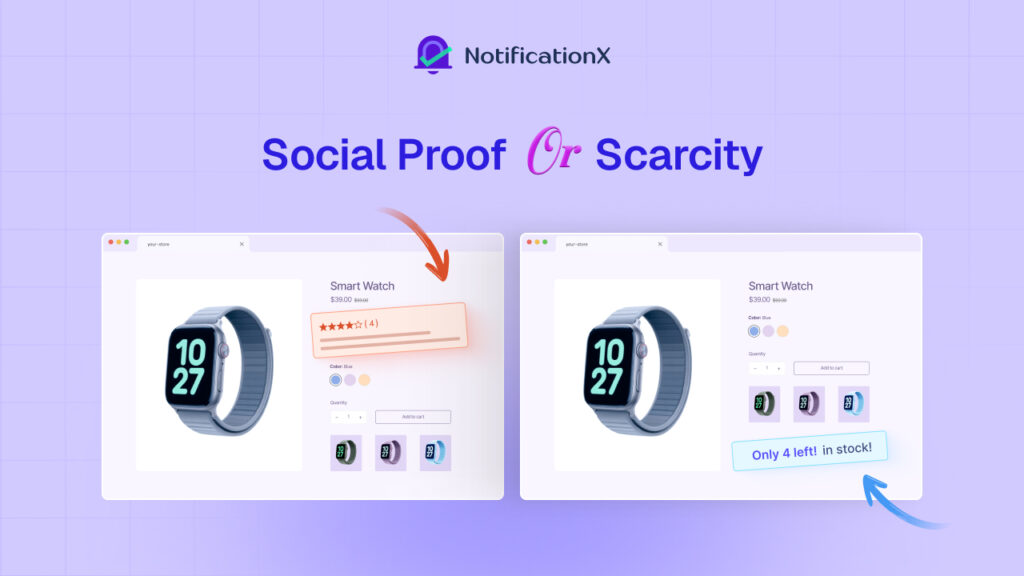
Placing a countdown timer next to limited-time offers can effectively boost conversion rates. For example, ConvertFlow uses this strategy by adding a timer beside its call-to-action button for limited spots. This approach encourages visitors to act quickly before the offer expires.
Method 1: Halloween Countdown Timer on WordPress with Essential Addons
You can build any web page in Элементор with its amazing widgets in just a few clicks. And Основные дополнения, the ultimate Elementor widgets library with 100+ advanced elements can make your Elementor web creation super smooth. It can help you to make your dream website live without any coding. You can easily add an evergreen countdown timer on Elementor using Essential Addons. You will find a fully customizable, 100% responsive EA Countdown widget to easily add an evergreen countdown timer in Elementor
To create an evergreen timer on this outstanding website builder you need to install & activate Elementor and Essential Addons on your website.
Step 1: Add The EA Countdown In Elementor
First, open the page where you want to add an evergreen timer on Elementor. Now, find the ‘EA Countdown’ widget from the search option. After that, drag and drop the widget where you want to insert your evergreen timer.

Once the widget is inserted, update the content on your Elementor countdown timer and style it as you want. You will find all the options that you need to personalize your evergreen countdown timer with absolute ease.

Step 2: Add the Countdown Timer Content
Перейти к «Содержание» tab. Here, you will find options like ‘Timer Settings’, ‘Content Settings’, и ‘Expiry Action’. Navigate to the ‘Timer Settings’ then choose the 'Вечнозеленый таймер' от ‘Type’ option. Once you select this option, you will find some new fields where you have to configure the evergreen timer for your website.

Set the time for the countdown timer and toggle on the ‘Recurring Countdown’ option to set the restart and stoppage time. Before you move to the next step, choose the preferable time for your countdown timer.
Then, go to the ‘Content Settings’ and choose the layout for the timer you want. You can enable or disable the minutes, hours, etc. from there. Also, configure the content for ‘Expire Action’ with your preferred settings.

Step 3: Style Your Evergreen Countdown Timer
Once you are done customizing the content, go to the style option and adjust the timer style as needed. From the ‘Countdown Styles’ option, you can personalize the background of your timers and change the outlook as you want.

От ‘Color & Typography’ option, choose the color that you want and adjust the typography of your timer. Afterward, add more customization to each box as you like and make the evergreen timer look as you want. If you want to learn more about customizing the Elementor countdown timer, you can ознакомьтесь с этой документацией.

Step 4: Publish Your Evergreen Countdown Timer
Once you are done with all the customization, now click on the ‘Update/Publish’ button to make the evergreen timer live on your website. Check out the outcome on the image here.

Method 2: Halloween Countdown Timer on WordPress with Essential Blocks
Adding a countdown timer to your WordPress site can be a breeze with Essential Blocks. This powerful plugin offers 50+ feature-packed blocks that make customizing your WordPress Gutenberg website easier than ever. With its user-friendly interface and wide range of options, you can quickly and easily add a countdown timer to any page or post. Here is a simple step-by-step guide to help you seamlessly add a countdown timer on WordPress using Essential Blocks.
Step 1: Open Gutenberg Editor and Add a New Block
Open the page in Gutenberg where you want to add the countdown timer. Now click on the ‘+’ icon to add a new block. You can also start typing ‘countdown’ in the editor, and it should suggest the countdown block.

Step 2: Configure the Countdown Block
After adding the countdown block, you will see options to configure the countdown timer. You can choose from the available templates for countdown timers or start blank.

Now, set the date, time, and other parameters based on your requirements. You can also create an evergreen countdown timer if needed.

Step 3: Customize the Styling Options
Depending on the block or theme options, you can customize the styling of the countdown block. Change the block width, space, etc as required.

You can change colors, fonts, or other visual aspects, etc. as well. Choose from various timer styles, customize the display, and enhance the visual appeal of your website while instilling a time-sensitive element for your audience.

Once you are done customizing the Halloween countdown timer, preview your page to see how the countdown block looks. If you are satisfied, save the changes.

If you are editing an existing page, click the “Update” button to save your changes and when you are creating a new page, click “Publish” to make the page live. Visit your published page to ensure that the countdown block is live.
Method 3: Halloween Countdown Timer on WordPress With NotificationX
You can easily add a Halloween Countdown Timer on WordPress websites using the ultimate social proof and FOMO marketing plugin NotificationX. This plugin is super useful for showcasing information or customer activities through notification popups. Before you start, make sure that you have NotificationX installed and activated. Below is a step-by-step guide to adding a Halloween Countdown Timer with NotificationX.
Step 1: Add a New Notification from NotificationX
Go to the WordPress dashboard and find ‘NotificationX’ in the left sidebar. Click on it to access the NotificationX. Then, select ‘Add New’ to create a new notification.

Step 2: Choose the Countdown Notification Template
Look for the notification type name 'Панель уведомлений'. Select from the countdown timer templates in this option to create a countdown notification.

Step 3: Configure Countdown Settings
Set the date, time, and other parameters for your countdown notification. Customize the necessary notification settings from the Design, Content, and Display tabs as needed.

Step 4: Preview and Publish the Halloween Countdown Timer
Once you are done setting up the Display, move to the ‘Customize‘ tab. In the ‘Appearance’ section, you can adjust the size of the notification using the Notification Size option. Preview your notification to see how the countdown looks. If satisfied, save the changes. Make sure the notification is active and your WordPress countdown timer is live! This is how you can create a Halloween countdown timer on WordPress.

Halloween countdown timers are perfect for grabbing your audience’s attention and adding urgency to your Halloween promotions and offers. It is super easy to integrate. By strategically placing these timers, you can ensure that your Halloween marketing campaigns stand out. NotificationX allows you to create a more dynamic and engaging experience that drives user interaction and boosts your overall marketing efforts.
Place Countdown Timer on WordPress Websites & Get Your Site Ready for Halloween
Now that you know how to add a Halloween countdown timer on WordPress websites, you can add them anytime on your website. Just make sure you use the countdown timer in the right place to make the most out of your marketing campaigns. So, do not wait anymore to add a Halloween countdown timer and boost your sales with ease.
Have you found our blog useful? If you do, then please подписывайтесь на наш блог и присоединяйтесь к нашему Сообщество Facebook for more useful guides, tips and tricks, updates, and more. Also, feel free to knock out our dedicated support team if you face any issues while adding this widget to your website.